往期回顾:
-
细读Spring源码(一)---refresh()方法概览
-
细读Spring源码(二)---关于Spring中用到的设计模式
-
细读Spring源码(三)---深度剖析动态代理底层原理
-
细读Spring源码(四)---什么是IOC?
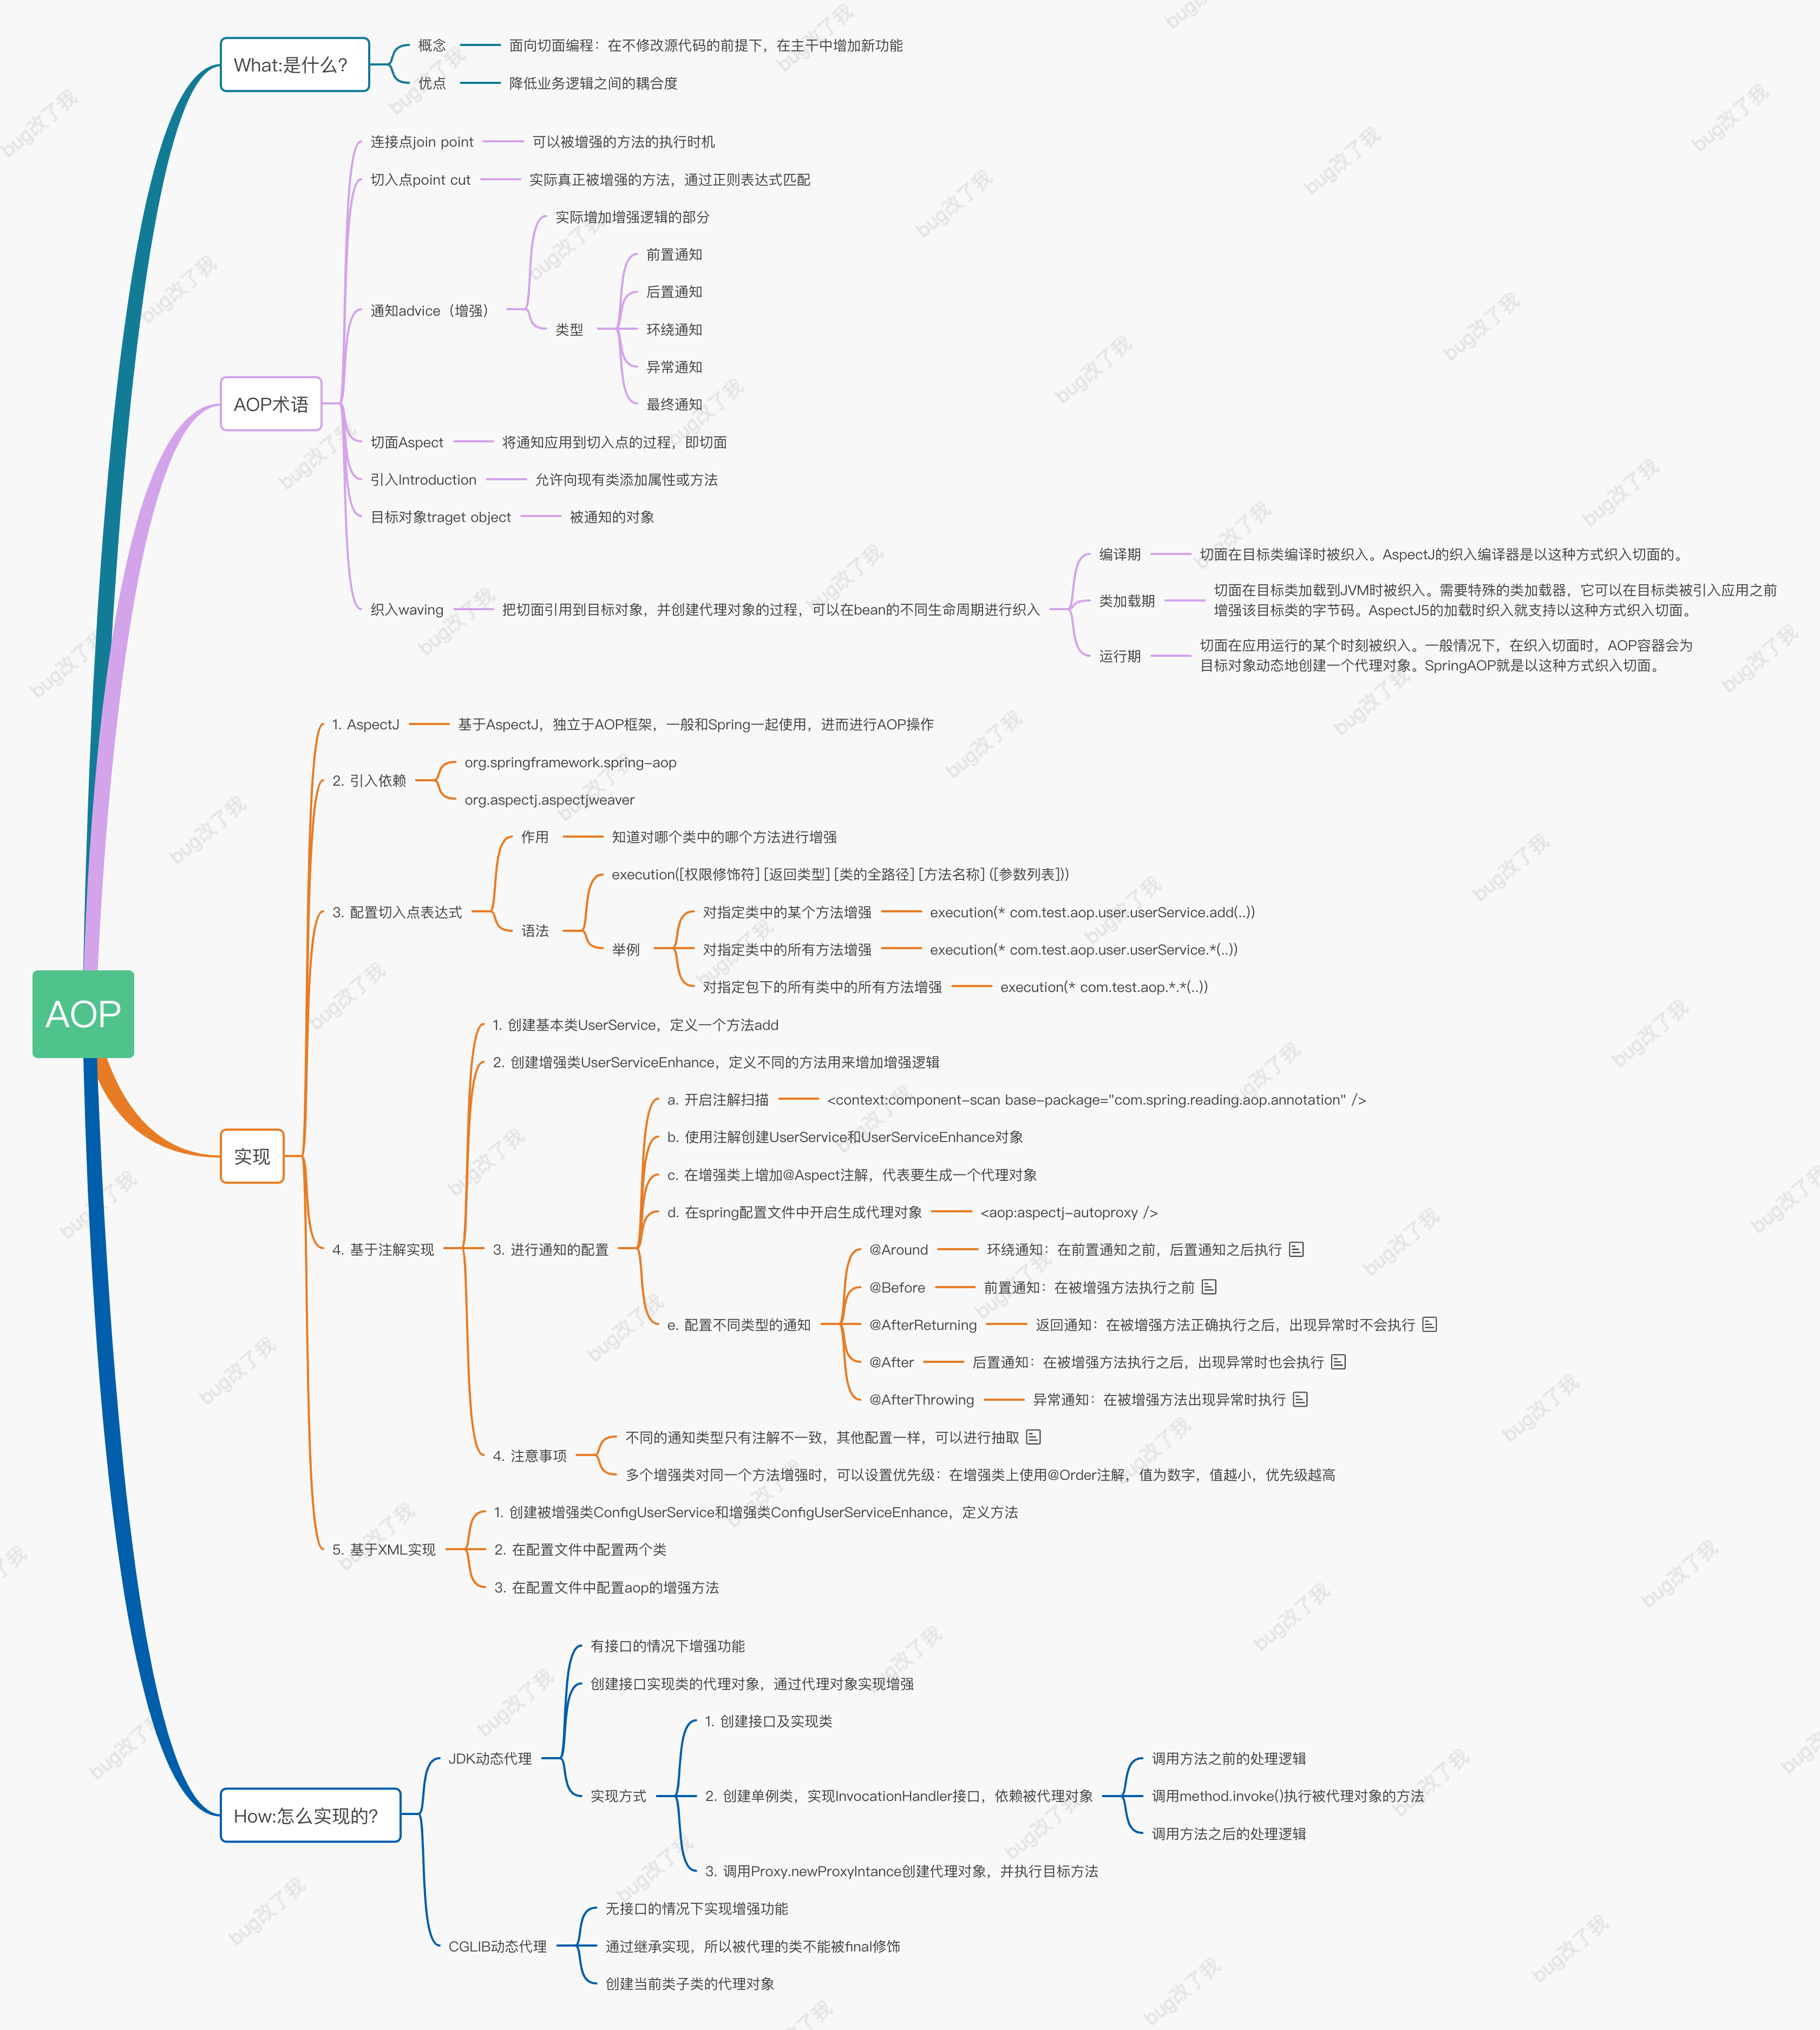
一、AOP是什么
AOP为Aspect Oriented Programming的缩写,意为:面向切面编程,通过预编译方式和运行期间动态代理实现程序功能的统一维护的一种技术。AOP是OOP的延续,是软件开发中的一个热点,也是Spring框架中的一个重要内容,是函数式编程的一种衍生范型。利用AOP可以对业务逻辑的各个部分进行隔离,从而使得业务逻辑各部分之间的耦合度降低,提高程序的可重用性,同时提高了开发的效率。
简单来讲,就是在不改变代码的情况下,能够增强功能,降低耦合,提高代码复用率。打个比方,实际开发中,我们会定义很多很多的方法,为了方便排查问题,会在方法中的入口和出口处添加日志,打印入参和出参,如果每个方法都这样实现,那岂不是成了一种体力活?为了解决相同逻辑多次出现的问题,AOP就诞生了,利用它我们可以将这些相同逻辑提取出来,作为一个切面,切入到需要它出现的地方,而不是每次需要都重复开发。
二、AOP术语
在实战之前先来明确一下AOP中几个比较重要的概念吧:
1、JoinPoint
连接点,就是被增强的方法执行的时机
2、PointCut
切入点,实际被增强的方法,一般通过正则表达式来决定哪个类中的哪个方法别增强。
切入点表达式格式为:
execution([权限修饰符] [返回类型] [类的全路径] [方法名称] ([参数列表]))
一般来说有下列四种情况:
- 对指定类中的某个方法增强:execution(* com.test.aop.userService.add(..))
- 对指定类中的所有方法增强:execution(* com.test.aop.userService.*(..))
- 对指定包下的所有类中的所有方法增强:execution(* com.test.*.*(..))
- 对使用某注解的方法增强:@annotation(注解全限定名)
3、Advice
通知,即增强的功能,实际增强的部分,总共有四种类型:
前置通知Before:在被增强方法开始执行之前执行的逻辑
后置通知After:在被增强方法直接之后执行的逻辑,不管被增强方法成功还是失败,都会执行
环绕通知Around:包裹Before和After,在Before之前和After之后执行的逻辑
返回通知AfterReturning:在被增强方法正常返回之后执行的逻辑,如果被增强方法执行异常,将不会执行
异常通知AfterThrowing:与AfterReturning相反,在被增强方法出现异常时才会执行
4、Aspect
切面,就是整个增强的部分,由切入点和通知组成,通俗点说,就是对重复代码实现复用的规则封装成一个对象(切面)
5、Waving
将是将上面封装好的封面织入到不同的逻辑当中,实现真正的一处开发,处处复用。
三、实战
下面通过两种方式来实现在方法执行前打印入参,执行后打印返回结果的一个功能。
3.1 基于XML的实现方式
1、创建类,实现被增强的方法
 1 package com.spring.reading.aop.xml;
 2
 3 /**
 4  * @author: cyhua
 5  * @createTime: 2021/11/26
 6  * @description:
 7  */
 8 public class XmlUserService {
 9
10     public int config(int num) {
11         System.out.println("执行被增强的方法");
12         return 100 / num;
13     }
14 }
2、创建切面类
 1 package com.spring.reading.aop.xml;
 2
 3 import org.aspectj.lang.ProceedingJoinPoint;
 4
 5 /**
 6  * @author: cyhua
 7  * @createTime: 2021/11/26
 8  * @description: 定义一个切面
 9  */
10 public class XmlUserServiceAspect {
11
12
13     /**
14      * 环绕通知:在前置通知之前,后置通知之后执行
15      */
16     public int around(ProceedingJoinPoint point) throws Throwable {
17         Object[] args = point.getArgs();
18         Object target = point.getTarget();
19         System.out.println("执行环绕通知around:方法入参=" + args[0] + ";类名=" + target.getClass().getName() + ";方法名=" + point.getSignature().getName());
20         int res = (int) point.proceed();
21         System.out.println("执行环绕通知around:方法返回结果=" + res);
22         return res;
23
24     }
25
26     /**
27      * 前置通知:在被增强方法执行之前
28      */
29     public void before() {
30         System.out.println("执行前置通知before...");
31     }
32
33     /**
34      * 返回后通知:在被增强方法正确执行之后,出现异常时不会执行
35      */
36     public void afterReturning() {
37         System.out.println("执行返回通知AfterReturning...");
38     }
39
40     /**
41      * 后置通知:在被增强方法执行之后,出现异常时也会执行
42      */
43     public void after() {
44         System.out.println("执行后置通知after...");
45     }
46
47
48     /**
49      * 异常通知:在被增强方法出现异常时执行
50      */
51     public void afterThrowing() {
52         System.out.println("执行异常通知AfterThrowing");
53     }
54 }
该类中包含了上面介绍的五种通知,并且在环绕通知中执行了被增强方法,并在执行前打印入参,执行之后打印返回值!
3、在xml中定义切面
 1 <?xml version="1.0" encoding="UTF-8"?>
 2 <beans xmlns="http://www.springframework.org/schema/beans"
 3        xmlns:xsi="http://www.w3.org/2001/XMLSchema-instance" xmlns:aop="http://www.springframework.org/schema/aop"
 4        xmlns:context="http://www.springframework.org/schema/context"
 5        xsi:schemaLocation="http://www.springframework.org/schema/context http://www.springframework.org/schema/context/spring-context-3.0.xsd
 6      http://www.springframework.org/schema/beans http://www.springframework.org/schema/beans/spring-beans-3.0.xsd
 7
 8
 9      http://www.springframework.org/schema/aop http://www.springframework.org/schema/aop/spring-aop-3.0.xsd">
10
11
12     <!--开启注解扫描-->
13     <context:component-scan base-package="com.spring.reading.aop.xml"/>
14
15     <!---->
16     <aop:aspectj-autoproxy/>
17
18     <!--创建对象-->
19     <bean id="xmlUserService" class="com.spring.reading.aop.xml.XmlUserService"/>
20     <bean id="xmlUserServiceAspect" class="com.spring.reading.aop.xml.XmlUserServiceAspect"/>
21
22     <!--aop配置-->
23     <aop:config>
24         <!--配置切入点-->
25         <aop:pointcut id="pointcut" expression="execution(* com.spring.reading.aop.xml.XmlUserService.config(..))" />
26         <!--配置切面-->
27         <aop:aspect ref="xmlUserServiceAspect">
28             <!--配置通知-->
29             <aop:around method="around" pointcut-ref="pointcut"/>
30             <aop:before method="before" pointcut-ref="pointcut"/>
31             <aop:after-retunrning method="afterReturning" pointcut-ref="pointcut"/>
32             <aop:after-throwing method="afterThrowing" pointcut-ref="pointcut"/>
33             <aop:after method="after" pointcut-ref="pointcut"/>
34         </aop:aspect>
35     </aop:config>
36
37 </beans>
在XML中需要做以下四点:
- 开启包扫描
- 定义bean
- 开启AOP
- 配置AOP
4、创建测试类
 1 package com.spring.reading.aop.xml;
 2
 3 import org.springframework.context.ApplicationContext;
 4 import org.springframework.context.support.ClassPathXmlApplicationContext;
 5
 6 /**
 7  * @author: cyhua
 8  * @createTime: 2021/11/26
 9  * @description:
10  */
11 public class XmlAopCaller {
12     public static void main(String[] args) {
13         ApplicationContext context = new ClassPathXmlApplicationContext("classpath:spring-aop-xml.xml");
14         XmlUserService xmlUserService = context.getBean("xmlUserService", XmlUserService.class);
15         int result = xmlUserService.config(5);
16         System.out.println("XmlAopCaller result=" + result);
17     }
18 }
5、查看执行结果
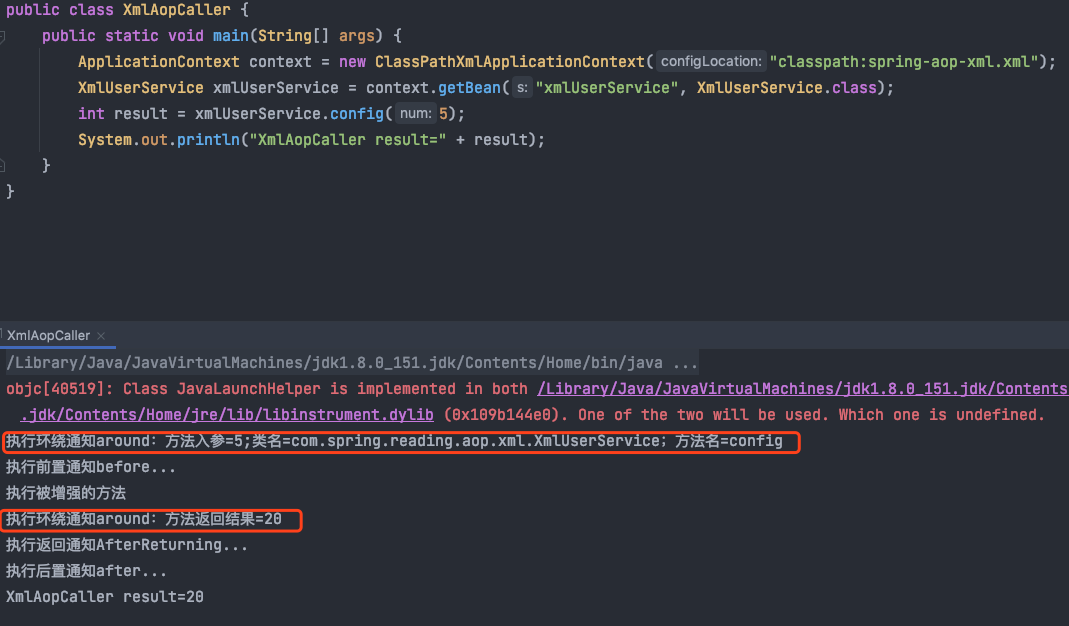
其实环绕通知和前置通知都是在方法被调用之前执行,但它们之间的执行顺序会按照在XML中定义的顺序执行。
上面的config方法中执行的是除法操作,除数是通过参数传进去的,当我将该参数传为0时,来看下效果: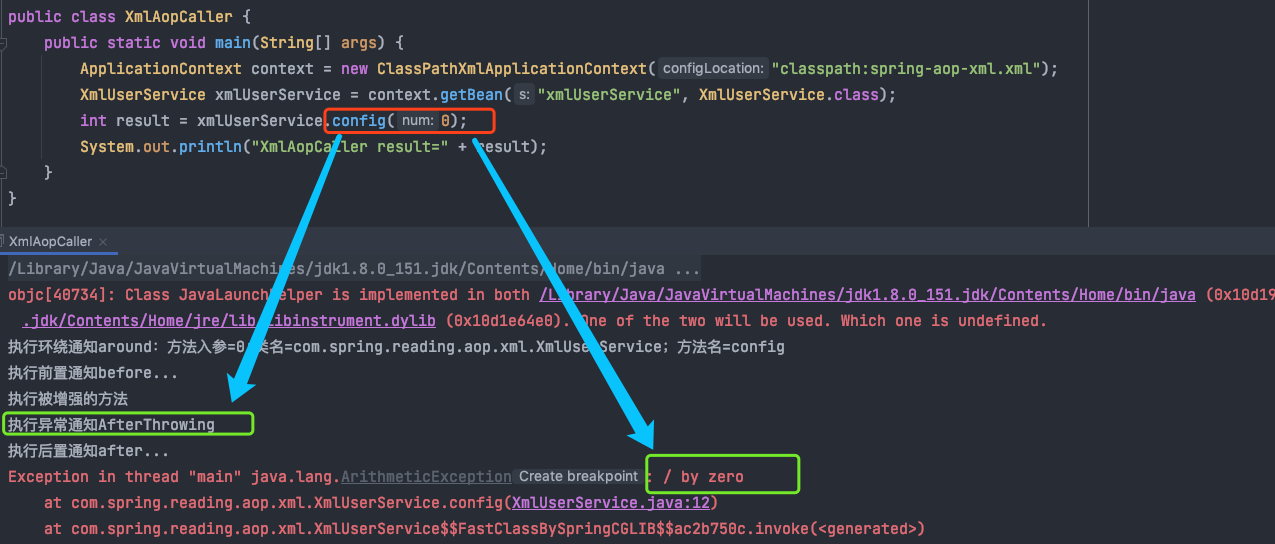
从上图可以看到,afterReturning没有执行,而是执行了afterThrowing方法,并抛出了异常。
3.2 基于注解的实现方式
注解的方式中,将pointCut设置为使用了@LogAspect注解的方法
1、定义一个注解类@LogAspect
 1 package com.spring.reading.aop.annotation;
 2
 3 import java.lang.annotation.ElementType;
 4 import java.lang.annotation.Retention;
 5 import java.lang.annotation.RetentionPolicy;
 6 import java.lang.annotation.Target;
 7
 8 /**
 9  * @author: cyhua
10  * @createTime: 2021/12/2
11  * @description: 定义一个注解,在方法执行前后打印日志
12  */
13 @Target(ElementType.METHOD)
14 @Retention(RetentionPolicy.RUNTIME)
15 public @interface LogAspect {
16 }
2、定义一个切面
 1 package com.spring.reading.aop.annotation;
 2
 3 import org.aspectj.lang.ProceedingJoinPoint;
 4 import org.aspectj.lang.annotation.*;
 5 import org.springframework.core.annotation.Order;
 6 import org.springframework.stereotype.Component;
 7
 8 /**
 9  * @author: cyhua
10  * @createTime: 2021/11/26
11  * @description:
12  */
13 @Component
14 @Aspect
15 @Order(value = 3)
16 public class AnnotationUserServiceAspect {
17
18     /**
19      * 定义切点,对使用了@LogAspect注解的方法进行增强
20      */
21     @Pointcut(value = "@annotation(com.spring.reading.aop.annotation.LogAspect)")
22     public void pointCut() {
23     }
24
25
26     /**
27      * 环绕通知:在前置通知之前,后置通知之后执行
28      */
29     //@Around(value = "execution(* com.spring.reading.aop.annotation.UserService.add(..))")
30     //使用@Pointcut注解抽取公共部分进行优化
31     @Around(value = "pointCut()")
32     public int around(ProceedingJoinPoint point) throws Throwable {
33         Object[] args = point.getArgs();
34         Object target = point.getTarget();
35         System.out.println("执行环绕通知around:方法入参=" + args[0] + ";类名=" + target.getClass().getName() + ";方法名=" + point.getSignature().getName());
36         int res = (int) point.proceed();
37         System.out.println("执行环绕通知around:返回结果=" + res);
38         return res;
39
40     }
41
42     /**
43      * 前置通知:在被增强方法执行之前
44      */
45     @Before(value = "pointCut()")
46     public void before() {
47         System.out.println("执行前置通知before...");
48     }
49
50     /**
51      * 返回后通知:在被增强方法正确执行之后,出现异常时不会执行
52      */
53     @AfterReturning(value = "pointCut()")
54     public void afterReturning() {
55         System.out.println("执行返回通知AfterReturning");
56     }
57
58     /**
59      * 后置通知:在被增强方法执行之后,出现异常时也会执行
60      */
61     @After(value = "pointCut()")
62     public void after() {
63         System.out.println("执行后置通知after...");
64     }
65
66
67     /**
68      * 异常通知:在被增强方法出现异常时执行
69      */
70     @AfterThrowing(value = "pointCut()")
71     public void afterThrowing() {
72         System.out.println("执行异常通知AfterThrowing");
73     }
74
75 }
上面代码中第14行,使用@Aspect注解定义当前类是一个切面;第21行定义了切点是注解@LogAspect。
3、目标类及要被增强的方法
 1 package com.spring.reading.aop.annotation;
 2
 3 import org.springframework.stereotype.Component;
 4
 5 /**
 6  * @author: cyhua
 7  * @createTime: 2021/11/26
 8  * @description:
 9  */
10 @Component
11 public class AnnotationUserService {
12
13     /**
14      * 在该方法上使用@LogAspect,执行该方法时会触发AOP进行增强
15      *
16      * @param a
17      * @param b
18      * @return
19      */
20     @LogAspect
21     public int add(int a, int b) {
22         System.out.println("开始执行被增加方法");
23         return (a + b);
24     }
25
26 }
上面代码中第20行,在add方法上增加了注解@LogAspect,当执行该方法时会触发AOP增强流程。
4、定义配置类
 1 package com.spring.reading.aop.annotation;
 2
 3 import org.springframework.context.annotation.ComponentScan;
 4 import org.springframework.context.annotation.Configuration;
 5 import org.springframework.context.annotation.EnableAspectJAutoProxy;
 6
 7 /**
 8  * @author: cyhua
 9  * @createTime: 2021/11/26
10  * @description:
11  */
12 @Configuration
13 @ComponentScan(basePackages = {"com.spring.reading.aop.annotation"})
14 @EnableAspectJAutoProxy(proxyTargetClass = true)
15 public class AopConfig {
16 }
上面代码中第13行开启包扫描,第14行开启AOP
4、测试
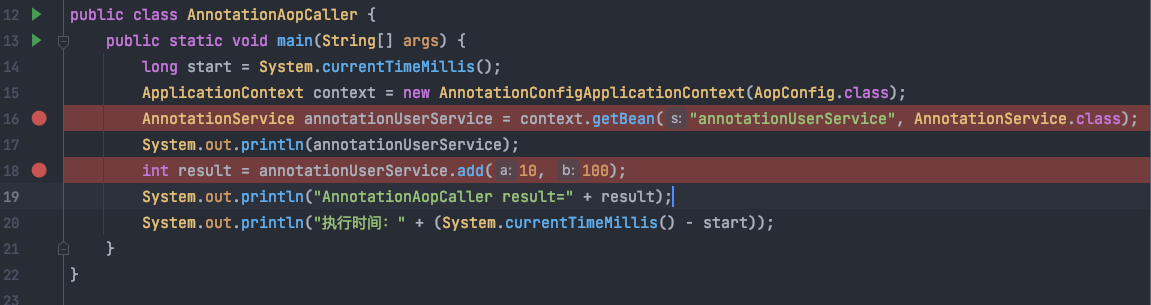
 1 package com.spring.reading.aop.annotation;
 2
 3 import org.springframework.context.ApplicationContext;
 4 import org.springframework.context.annotation.AnnotationConfigApplicationContext;
 5 import org.springframework.context.support.ClassPathXmlApplicationContext;
 6
 7 /**
 8  * @author: cyhua
 9  * @createTime: 2021/11/26
10  * @description:
11  */
12 public class AnnotationAopCaller {
13     public static void main(String[] args) {
14         ApplicationContext context = new AnnotationConfigApplicationContext(AopConfig.class);
15         AnnotationUserService annotationUserService = context.getBean("annotationUserService", AnnotationUserService.class);
16         int result = annotationUserService.add(10, 100);
17         System.out.println("AnnotationAopCaller result=" + result);
18     }
19 }
5、查看效果

可以看到,在执行add方法前,打印了参数,执行add方法后,打印了返回结果,符合预期效果。值得说的一点是,如果多个切面作用在相同的方式上时,可以设置优先级,其实这点就很像我们开发中使用的拦截器了。实战部分演示完毕,接下来看看源代码中是怎么实现的。
四、源码分析
先来看一下@EnableAspectJAutoProxy(proxyTargetClass = true)这个注解:
1 @Target({ElementType.TYPE})
2 @Retention(RetentionPolicy.RUNTIME)
3 @Documented
4 @Import({AspectJAutoProxyRegistrar.class})
5 public @interface EnableAspectJAutoProxy {
6     boolean proxyTargetClass() default false;
7
8     boolean exposeProxy() default false;
9 }
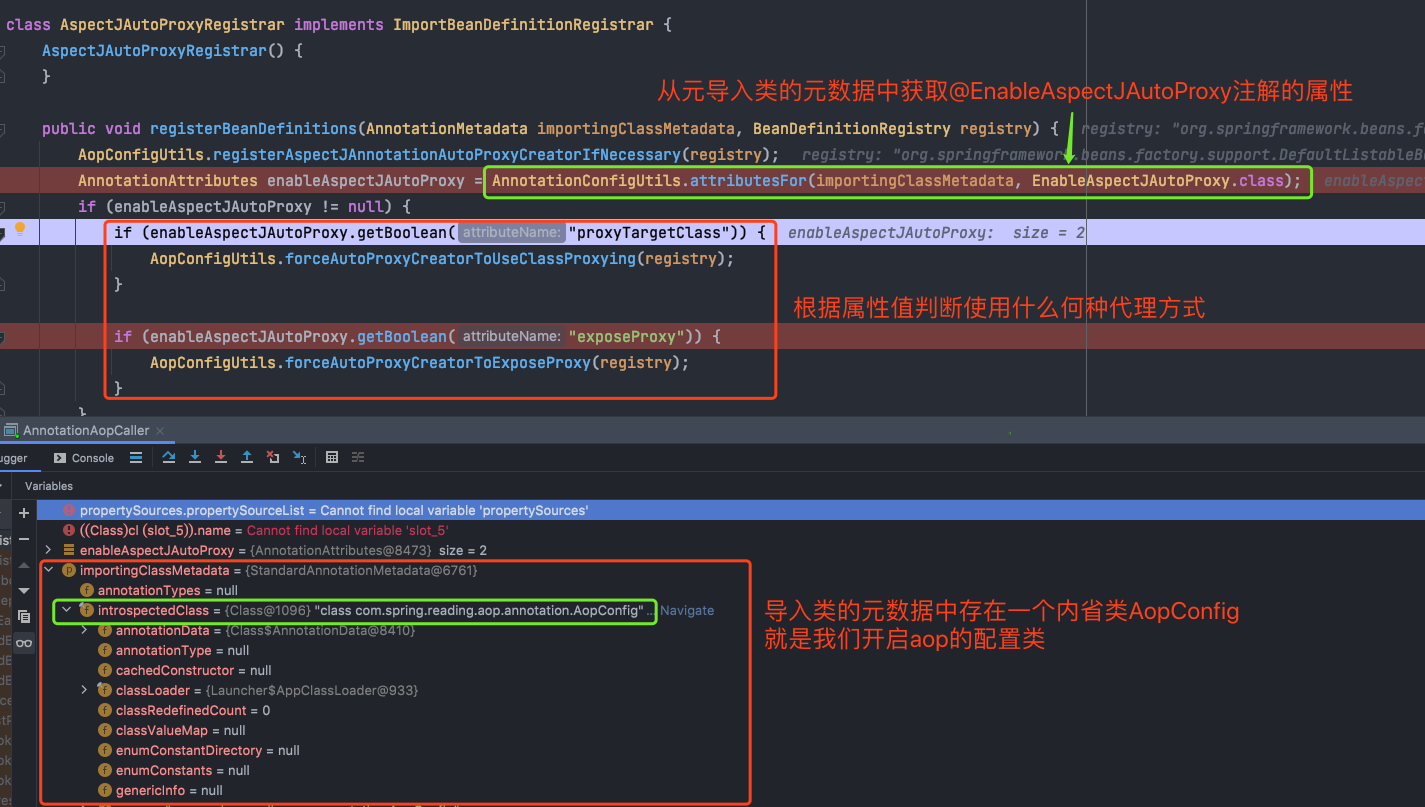
该注解有两个属性:proxyTargetClass和exposeProxy,默认都是false,第4行还有一个Import注解,这个注解有一个Class数组类型的属性,可以传入多个class,表示将该class交给spring容器去管理,可以看到上面导入的是一个名叫AspectJAutoProxyRegistrar的类。我满现在进入这个类看一眼:
 1 /*
 2  * Copyright 2002-2017 the original author or authors.
 3  *
 4  * Licensed under the Apache License, Version 2.0 (the "License");
 5  * you may not use this file except in compliance with the License.
 6  * You may obtain a copy of the License at
 7  *
 8  *      https://www.apache.org/licenses/LICENSE-2.0
 9  *
10  * Unless required by applicable law or agreed to in writing, software
11  * distributed under the License is distributed on an "AS IS" BASIS,
12  * WITHOUT WARRANTIES OR CONDITIONS OF ANY KIND, either express or implied.
13  * See the License for the specific language governing permissions and
14  * limitations under the License.
15  */
16
17 package org.springframework.context.annotation;
18
19 import org.springframework.aop.config.AopConfigUtils;
20 import org.springframework.beans.factory.support.BeanDefinitionRegistry;
21 import org.springframework.core.annotation.AnnotationAttributes;
22 import org.springframework.core.type.AnnotationMetadata;
23
24 /**
25  * Registers an {@link org.springframework.aop.aspectj.annotation.AnnotationAwareAspectJAutoProxyCreator
26  * AnnotationAwareAspectJAutoProxyCreator} against the current {@link BeanDefinitionRegistry}
27  * as appropriate based on a given @{@link EnableAspectJAutoProxy} annotation.
28  * 基于EnableAspectJAutoProxy注解,注册一个AnnotationAwareAspectJAutoProxyCreator,而不是BeanDefinitionRegistry
29  *
30  * @author Chris Beams
31  * @author Juergen Hoeller
32  * @see EnableAspectJAutoProxy
33  * @since 3.1
34  */
35 class AspectJAutoProxyRegistrar implements ImportBeanDefinitionRegistrar {
36
37     /**
38      * Register, escalate, and configure the AspectJ auto proxy creator based on the value
39      * of the @{@link EnableAspectJAutoProxy#proxyTargetClass()} attribute on the importing
40      * {@code @Configuration} class.
41      * 根据注解EnableAspectJAutoProxy的proxyTargetClass属性值,注册、升级并配置一个面向切面的自动代理创建者
42      */
43     @Override
44     public void registerBeanDefinitions(
45             AnnotationMetadata importingClassMetadata, BeanDefinitionRegistry registry) {
46
47         //1、通过AOP配置工具注册一个AnnotationAwareAspectJAutoProxyCreator
48         AopConfigUtils.registerAspectJAnnotationAutoProxyCreatorIfNecessary(registry);
49
50         //2、通过注解配置工具获取注解EnableAspectJAutoProxy的元数据
51         AnnotationAttributes enableAspectJAutoProxy =
52                 AnnotationConfigUtils.attributesFor(importingClassMetadata, EnableAspectJAutoProxy.class);
53         //3、如果元数据不为空,则获取属性proxyTargetClass的值,以确定使用何种代理方式
54         if (enableAspectJAutoProxy != null) {
55             if (enableAspectJAutoProxy.getBoolean("proxyTargetClass")) {
56                 AopConfigUtils.forceAutoProxyCreatorToUseClassProxying(registry);
57             }
58             if (enableAspectJAutoProxy.getBoolean("exposeProxy")) {
59                 AopConfigUtils.forceAutoProxyCreatorToExposeProxy(registry);
60             }
61         }
62     }
63
64 }
这个类它实现了接口ImportBeanDefinitionRegistrar,实现该接口的类可以,可以在处理配置类(使用@Configuration)时,注册额外的Bean Defination,而额外的Bean定义可以通过Import注解引入。它的registerBeanDefinition方法,会先创建一个AnnotationAwareAspectJAutoProxyCreator,再获取注解EnableAspectJAutoProxy,通过其属性判断这类Bean定义是用什么方式进行自动创建代理。追踪日志如下:
再来看看AopConfigUtils中的forceAutoProxyCreatorToUseClassProxying方法
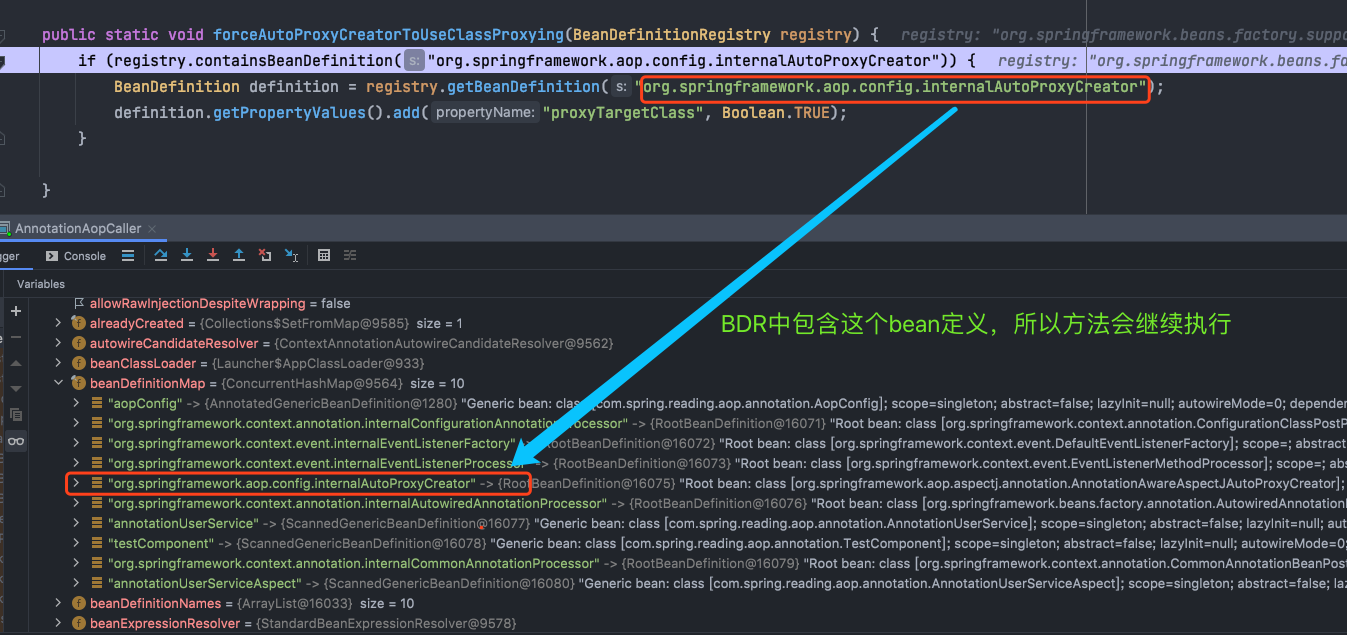
最后的效果就是给内置的自动代理创建器这个BeanDefinition添加了属性:proxyTargetClass,应该是为了在创建bean的时候,判断是否需要进行代理以及使用何种代理方式。
以上这些就是@EnableAspectJAutoProxy(proxyTargetClass = true)这个注解所代表的含义,那具体是怎样执行的呢?下面开启debug模式一追到底:
1、添加断点
在16行添加断点,传入一个使用了@Configuration注解的配置类,进入该方法,就会执行经典的refresh()方法,在执行到AbstractApplicationContext#invokeBeanFactoryPostProcessors这个方法进行BeanFactory后置处理器调用时,会执行BeanDefinitition后置处理器的注册,然后遍历BeanDefinititionPostProcessor后会进入一个ConfigurationClassPostProcessor的类中执行processConfigBeanDefinitions方法,顾名思义就是处理配置的BD,从配置类中解析定义的bean,经过一些参数校验后接着会执行processConfigBeanDefinitions方法,如下图所示:
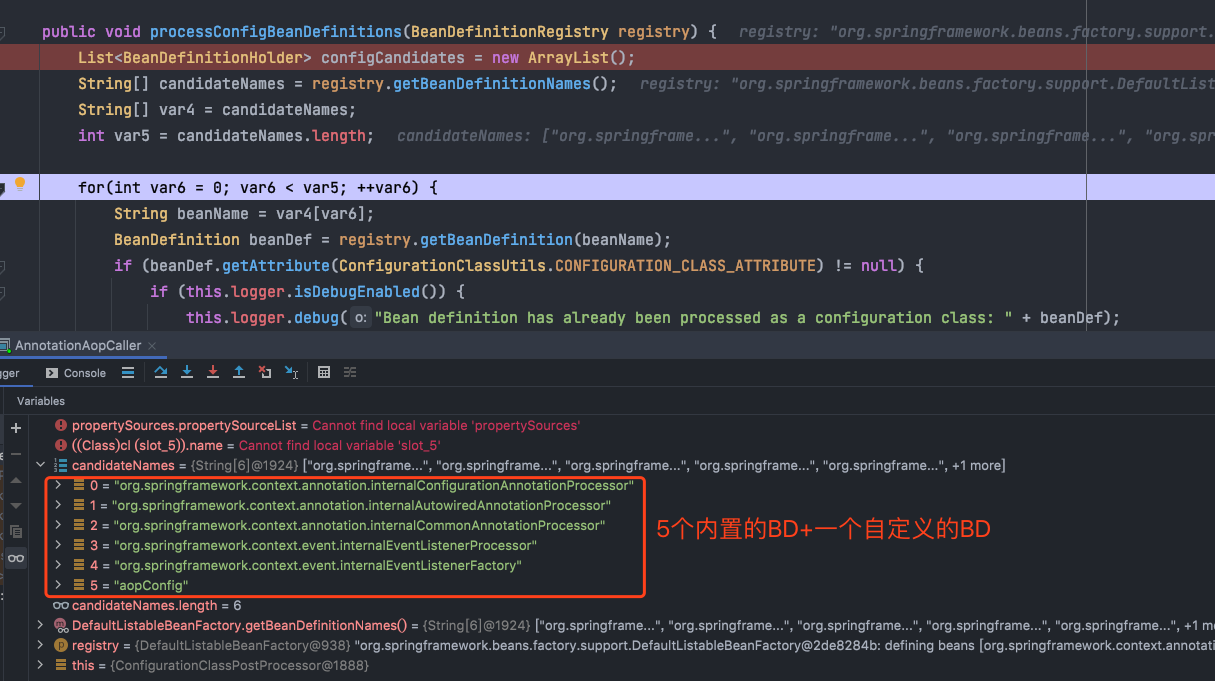
可以看到从BD注册器中获取到了6个BD,其中5个时内置的,都带了Internal的标识,最后一个AopConfig就是我传入的配置类。会从这些BD中筛选出配置类型的BD,即使用了@Configuration注解的BD类,加入到候选beanName列表中,后面通过它解析出自定义的bean,如下图所示:

上面绿色箭头指向的红色框框内的bean就是自定义的bean,接着会将这四个bean做为参数传到白色正在debug的那行代码,执行loadBeanDefinitions方法,该方法内容如下:
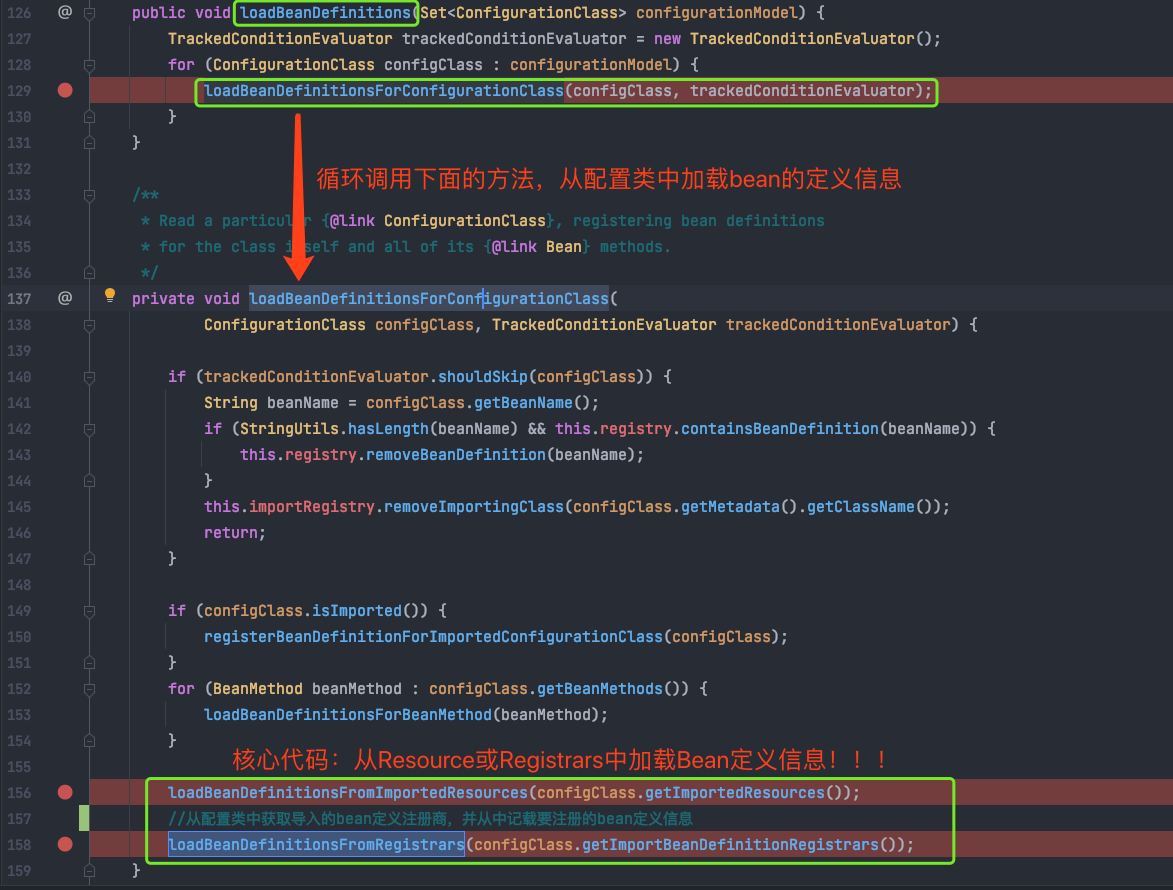
第126行中循环调用了129行的方法,129行的方法从配置类中加载BD信息,再看打了端点的156和158行代码,就是自定义类中获取import的自定义BD,debug到第156行后发现了下面情况:
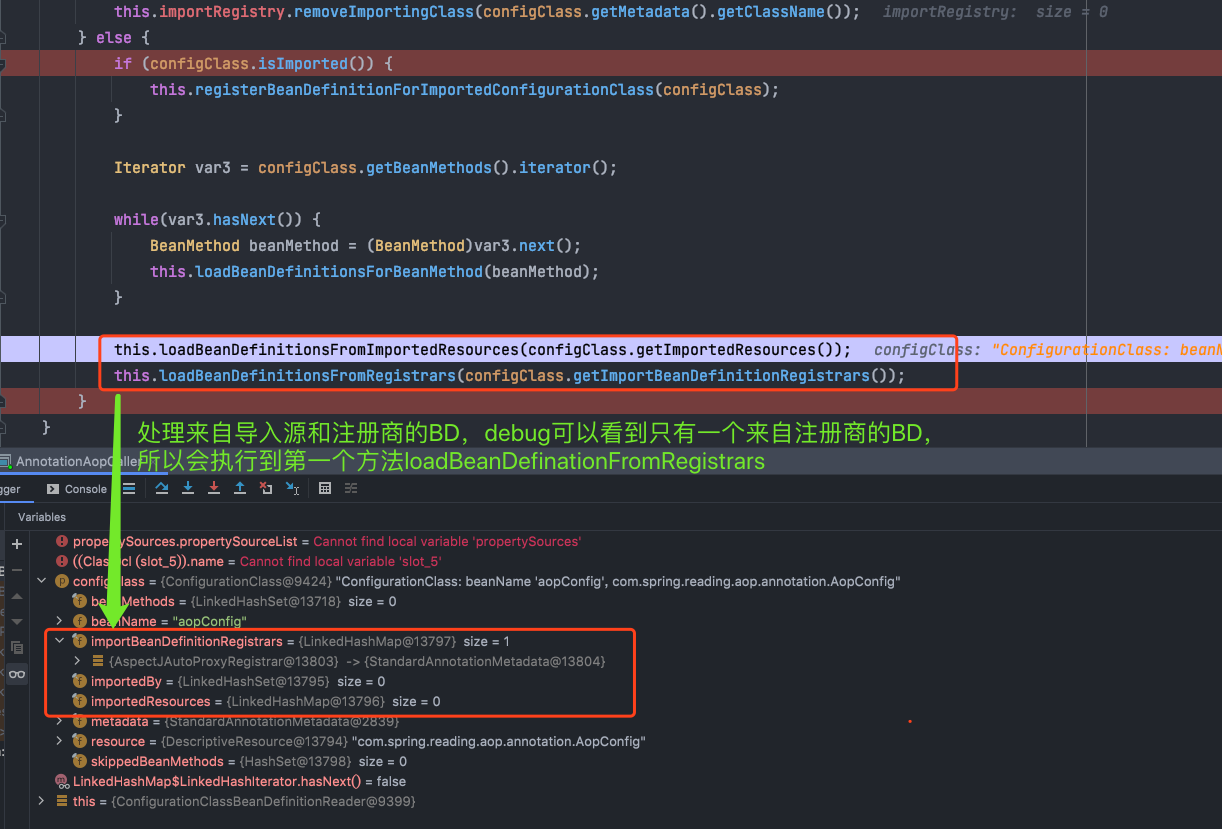
即AopConfig这个BD中有一个importBeanDefinititionRegistrars属性,且不为null,猜想一下,下一步应该就会执行第158行的代码了,没错,我们点进去看看发生了神马?
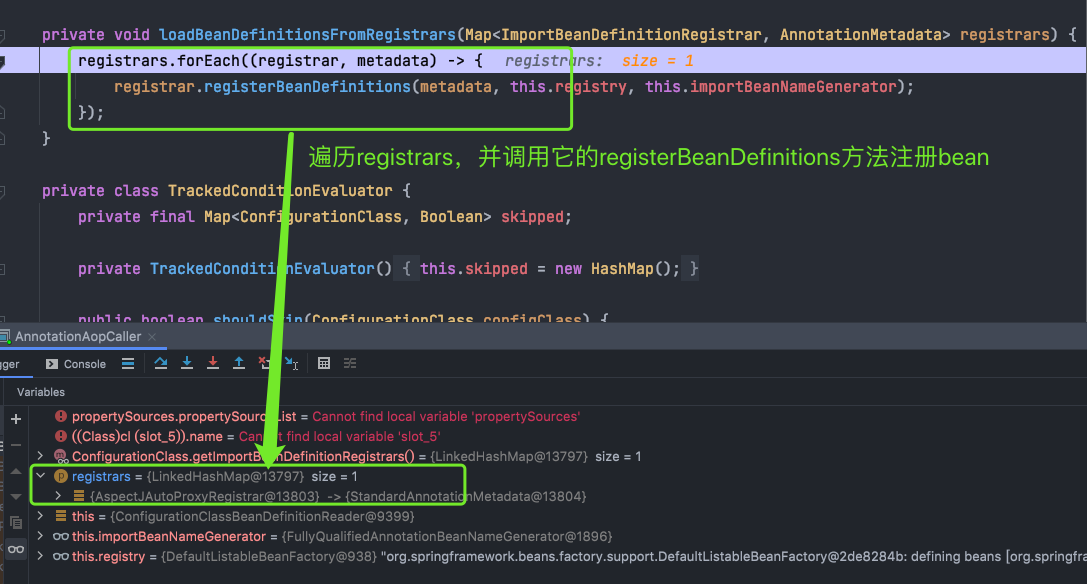
上图中参数registrars不为空,程序会进入循环体执行registrar的registBeanDefinitions方法,这个方法有木有很熟悉呢? 没错,它就是在刚开始分析源码时提到的注解@EnableAspectJAutoProxy告诉我们要做的事情,我们带着参数继续debug

先来看看该方法中第一行做了什么事情?

第143~148中,最终会注册一个内置的自动代理创建者,然后在下面根据注解的proxyTargetClass属性值判断使用什么方式的代理,默认为JDK动态代理,到这一步,就完成了BD的注册流程,同时也就把自定义的bean交给了容器去处理,接下来就是容器对bean进行创建(实例化->初始化)的过程了,这里创建的细节先不做详细阐述,仅看一下交给容器的自定义bean最后的实例化结果。
在容器对这些bean的创建过程中,创建的实例如下:

如上图红色框框中圈起来的(那个箭头好像指错了呢,其中一应该指向第三个框框,哈哈哈~~~),我发现我定义的四个bean中,除了切面类annotationUserServiceAspect之外,其他三个通过CGLIB动态代理被增强了,这是为什么呢?于是我做出了如下猜想:
首先,被增强的三个类有个特点:
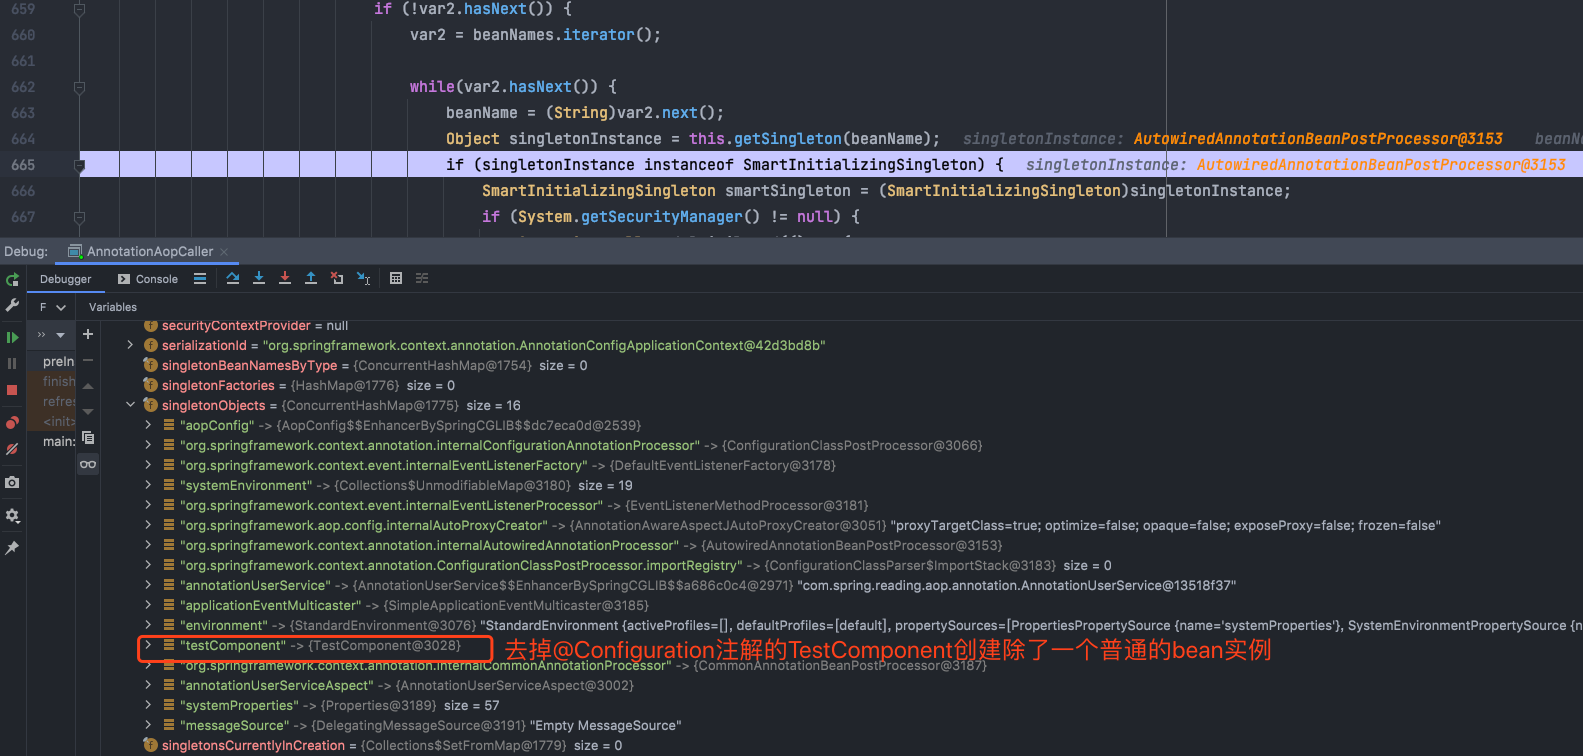
AopConfig和testComponent都被@Configuration注解所修饰,AnnotationUserService这个类中有个方法作为AOP中的切点,需要进行一些增强处理,唯独AnnotatuonUserServiceAspect这个类只用@Aspect标记为一个注解,用@Component标记为一个普通bean,那是不是被Configuration注解修饰的类都会创建代理对象呢,于是我将TestCommponent上的configuraton注解去掉测试了一遍,得到如下结果:
那到底是不是因为@Configuration注解呢,我现在将AopConfig类上的注解@EnableAspectJAutoProxy(proxyTargetClass = true)去掉再看结果:
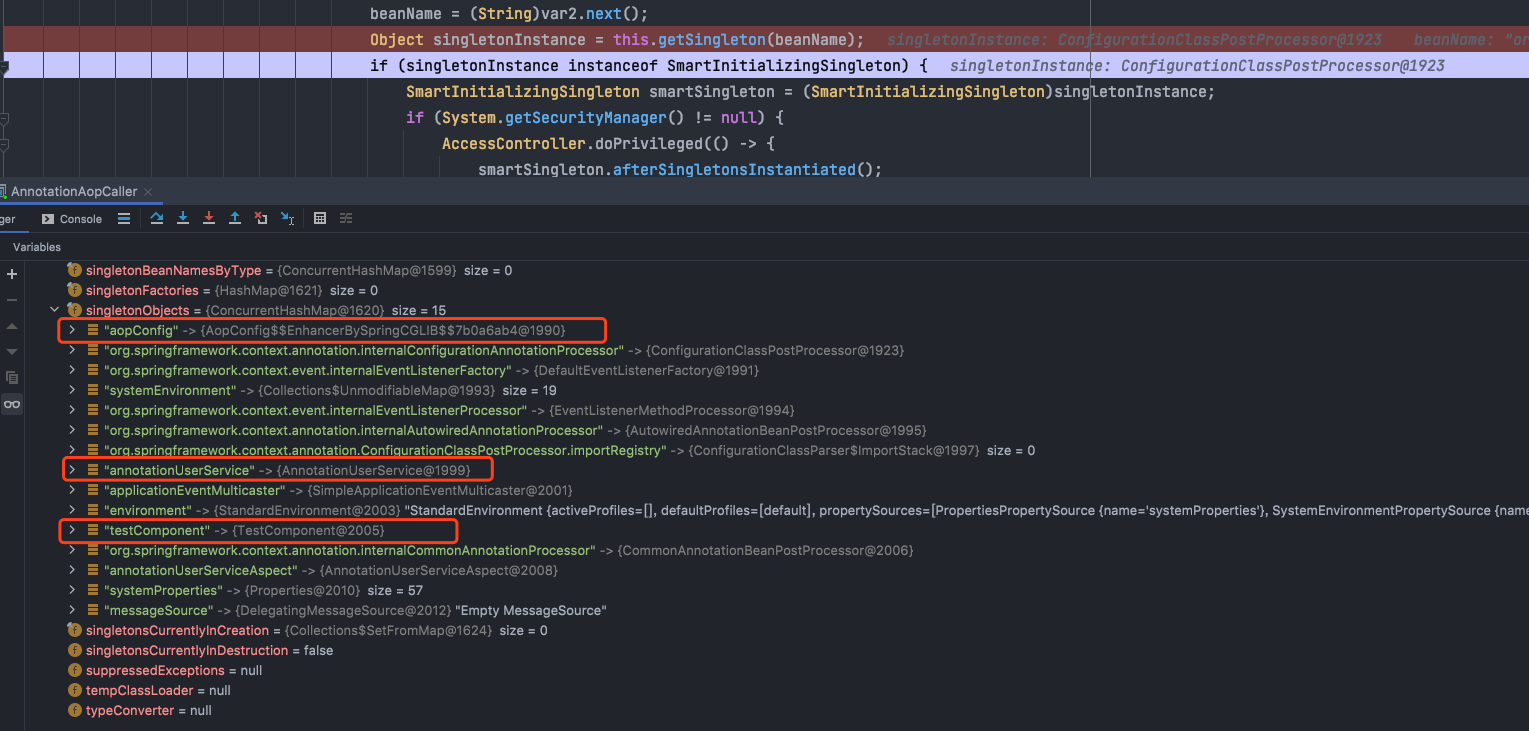
去掉@EnableAspectJAutoProxy(proxyTargetClass = true)注解会发现,除了AopConfig类,其他的都成了普通实例,通过上面的两个测试可以得出下面两个结论:
- 通过@Configuration注解修饰的类,其实例模式使用CGLIB动态代理创建
- AOP中被增强的类,通过开启AOP的注解@EnableAspectJAutoProxy(proxyTargetClass = true)会创建一个代理对象,具体代理方式由其属性proxyTargetClass来确定,默认情况下为JDK,通过设置为true来实现CGLIB动态代理方式
下面再来测试,将porxyTargetClass属性设置为false(默认)得到的结果: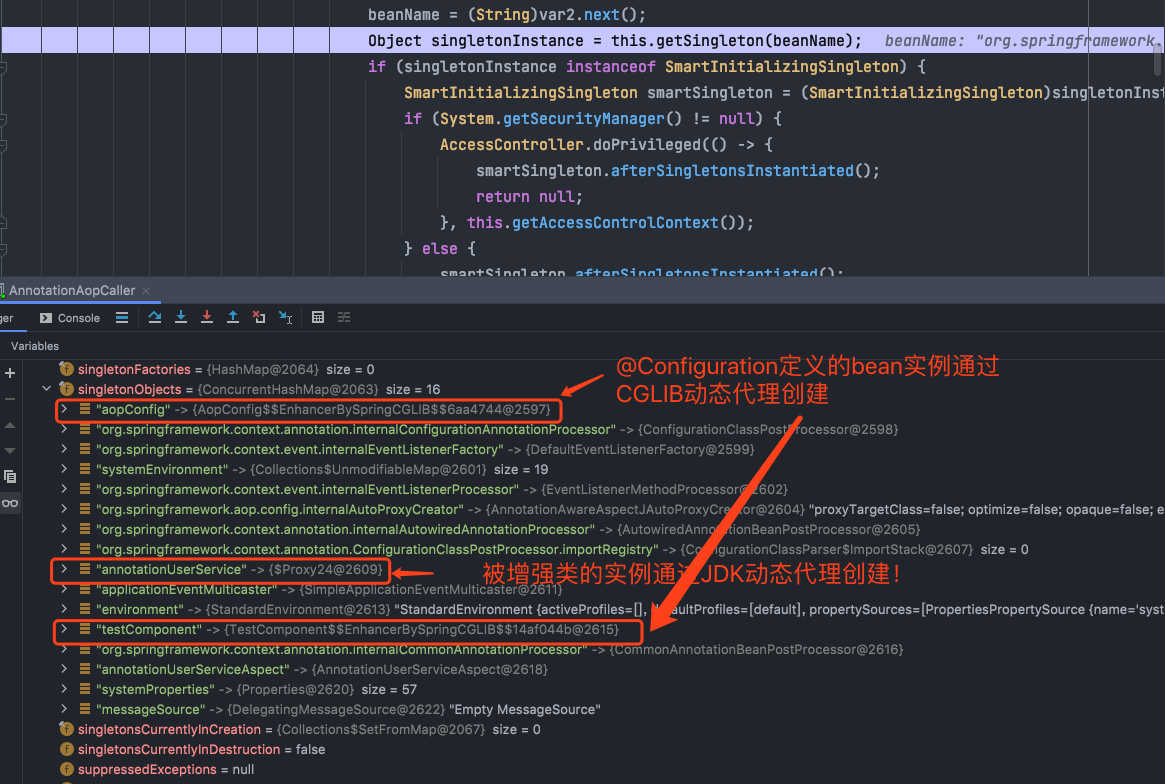
再一次发现无论何时,使用了@Configuration注解的类的实例总是通过CGLIB动态代理实现,而AOP中使用的动态代理模式可以自定义!
以上即是对Spring中AOP的研究,从如何实现AOP到剖析AOP实现的源码,可以看到整个过程还是离不开容器的启动过程,就是refresh()方法,本文只是简单地看了一下源码,后面争取增加更加详细的研究过程,最后还是来总结一下吧:
1、使用AOP首先要开启AOP功能(注解和XML两种开启方式)
2、容器启动过程中,会在处理BeanFactory的后置处理器时,注册BeanDefinition
3、处理处理容器内置的BeanDefinition之外,还会根据配置文件(config配置类或xml配置文件)检查是否有自定义的BeanDefinition注册商,如果有,则解析相关的Class信息并注册到Registry中
4、在进行实例创建过程中,通过BeanDifinition来确定实例的创建方式,常规bean使用反射创建,@Configuration的bean通过CGLIB动态代理创建,使用AOP增强的bean通过定义的动态代理方式创建
5、最后通过getBean获取到的目标对象,其实是一个代理对象,在其原有功能上,进行了增强(通知)
现在觉得,不管是AOP还是IOC,最后都会下沉到创建实例的问题上,因为spring中把实例创建的控制权交给了容器,它通过开发者对类的定义动态地帮助开发者创建实例,最后使用的还是反射,所以万变不离其宗,反射才是王者啊!!!