1-> 集群的准备工作
1)关闭防火墙(进行远程连接)
systemctl stop firewalld
systemctl -disable firewalld
2)永久修改设置主机名
vi /etc/hostname
注意:需要重启生效->reboot
3)配置映射文件
vi /etc/hosts
#127.0.0.1 localhost localhost.localdomain localhost4 localhost4.localdomain4
#::1 localhost localhost.localdomain localhost6 localhost6.localdomain6
192.168.40.11 bigdata11
192.168.40.12 bigdata12
192.168.40.13 bigdata13
2-> 安装jdk
1)上传tar包
用winscp那个软件吧
2)解压tar包
tar -zxvf jdk
3)配置环境变量
vi /etc/profile
export JAVA_HOME=/root/training/jdk1.8.0_144
export PATH=$PATH:$JAVA_HOME/bin
注意:加载环境变量 source /etc/profile
4)发送到其它机器(偷个懒,不用一个一个的配,哈哈哈)
scp -r /root/.bash_profile root@bigdata12:/root/.bash_profile
scp -r /root/.bash_profile root@bigdata13:/root/.bash_profile
注意:加载环境变量 source /etc/profile
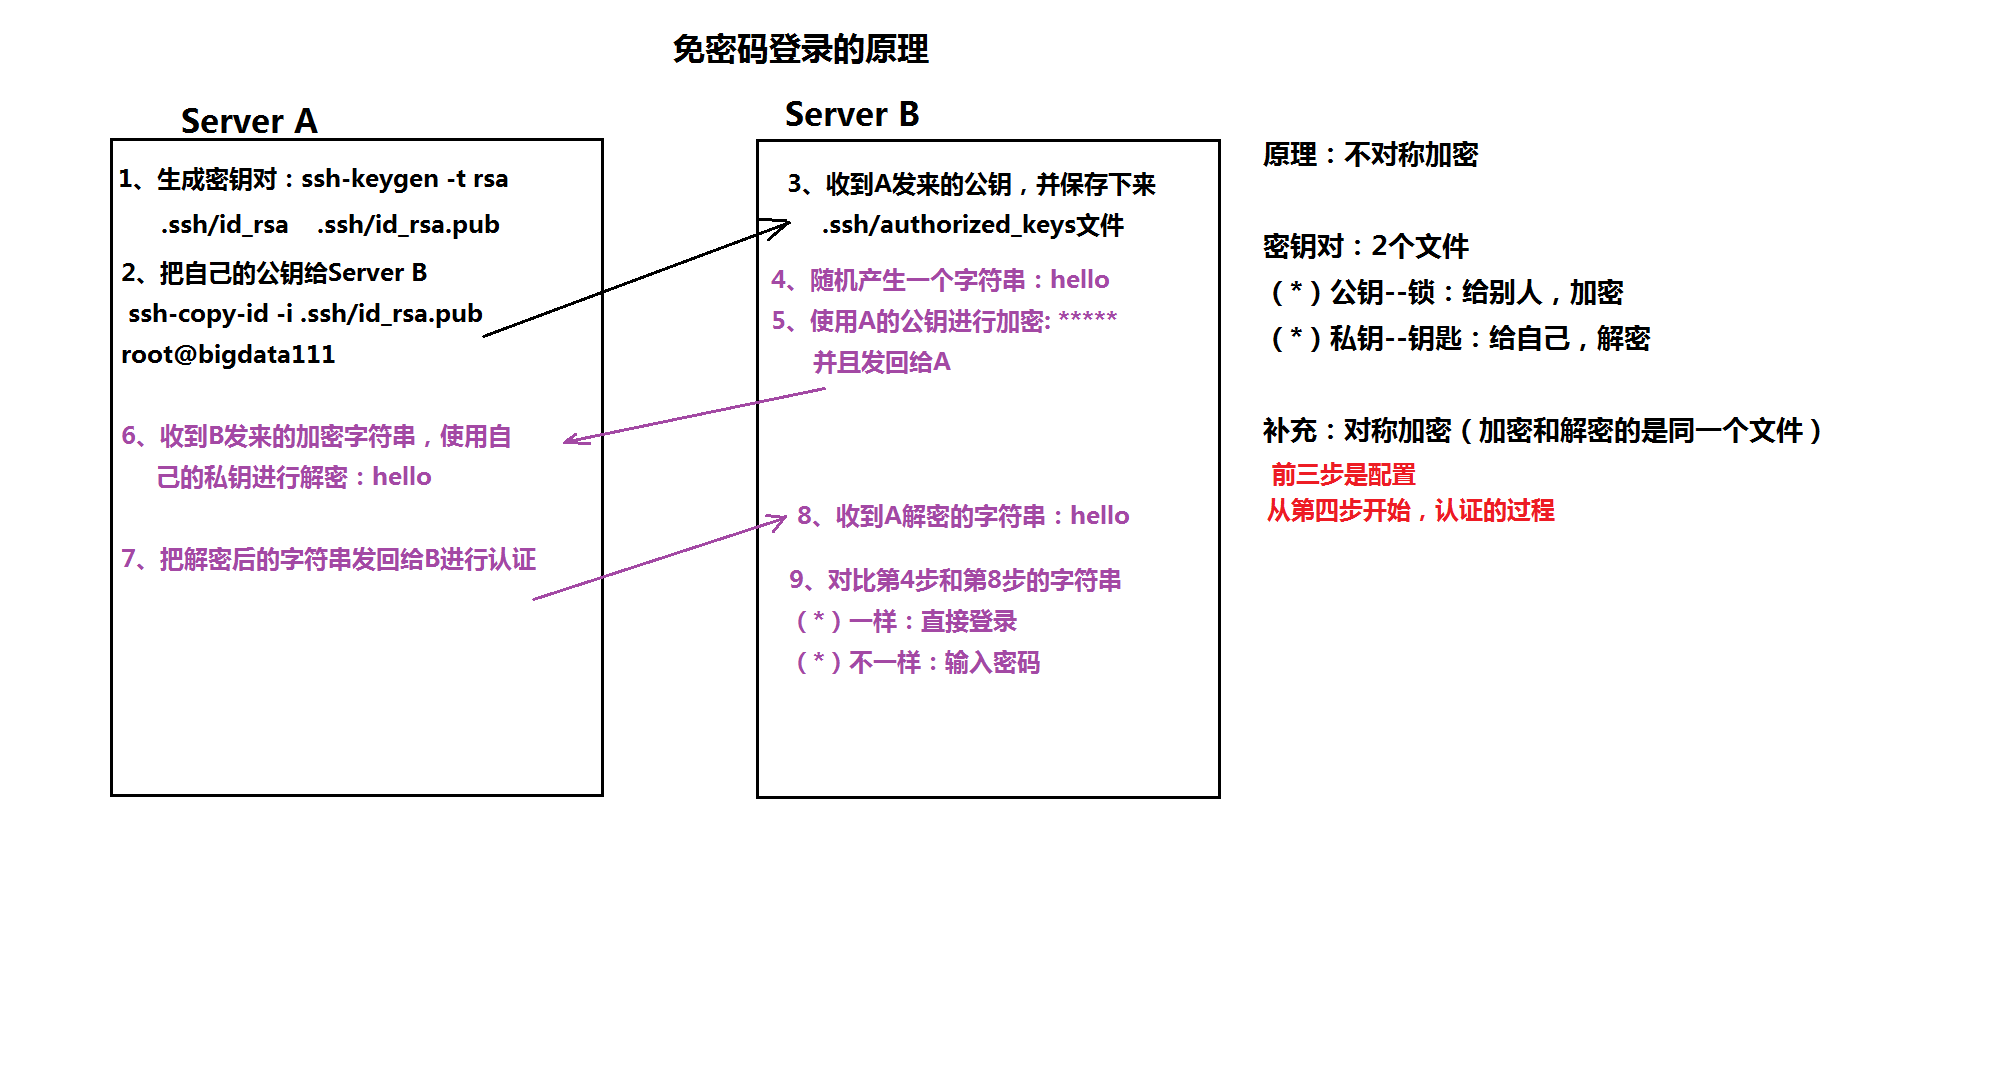
5)配置ssh免密登录
-》ssh-keygen 生成密钥对
-》 ssh-copy-id 自己
ssh-copy-id 其它
ssh-copy-id 其它
每台机器都这样操作。
1:生产公钥对:ssh-keygen -t rsa(直接回车到底)
2:把公钥发送给serverB: ssh-copy-id -i .ssh/id_rsa.pub root@bigdata11
ssh-copy-id -i .ssh/id_rsa.pub root@bigdata12
ssh-copy-id -i .ssh/id_rsa.pub root@bigdata13
3-> 安装HDFS集群(注意,只是安装的hdfs,并非完全的hadoop,我们用到什么就装什么。有助于学习理解)
1) 修改hadoop-env.sh
export JAVA_HOME=/root/training/jdk1.8.0_144
2) 修改core-site.xml
<!--配置hdfs-->
<configuration>
<property>
<name>fs.defaultFS</name>
<value>hdfs://bigdata11:9000</value>
</property>
</configuration>
3) 修改hdfs-site.xml
<configuration>
<!--配置元数据存储位置-->
<property>
<name>dfs.namenode.name.dir</name>
<value>/root/training/hadoop-2.8.4/dfs/name</value>
</property>
//配置数据存储位置
<property>
<name>dfs.datanode.data.dir</name>
<value>/root/training/hadoop-2.8.4/dfs/data</value>
</property>
</configuration>
4)格式化namenode
hadoop namemode -format
5)分发hadoop到其它机器
scp -r /root/training/hadoop-2.8.4/ bigdata12:/root/training/
scp -r /root/training/hadoop-2.8.4/ bigdata13:/root/training/
6)配置hadoop环境变量
export HADOOP_HOME=/root/training/hadoop-2.8.4
export PATH=$PATH:$HADOOP_HOME/bin:$HADOOP_HOME/sbin
6)分发hadoop环境变量
scp -r /root/.bash_profile root@bigdata12:/root/.bash_profile
scp -r /root/.bash_profile root@bigdata13:/root/.bash_profile
注意:加载环境变量 source /root/.bash_profile(每个虚拟机都要配置)
7)启动namenode
hadoop-daemon.sh start namenode
8)启动datanode
hadoop-daemon.sh start datanode
9)访问namenode提供的web端口:50070
4-> 自动批量的启动脚本
1)修改配置文件vi /etc/hadoop/slaves(记得每台虚拟机都要配置哦)
bigdata12
bigdata13
2)执行启动命令
start-dfs.sh
start-dfs.sh
如果在安装过程中出现了问题。可以私聊我的qq。在线帮忙解决。或者将问题发在我qq邮箱1850748316@qq.com,我会第一时间回复你!!
附加一个免密登录的原理图吧!!
===========================================================》》
小bug1:secondNameNode(备份)在bigdata11那个机器上,这样第二名称节点也没有起什么作用!
完全成了摆设
解决方案:先在bigdata11上修改hdfs-site.xlm
添加如下代码
<property>
<!--注意不是https。-->
<name>dfs.namenode.secondary.http-address</name>
<value>bigdata12:50090</value>
</property>
这里只是在bigdata11上修改了。由于是集群模式。所有机子都要修改!!!
直接分发到其他机器就行了
scp hdfs-site.xml bigdata12:$PWD
scp hdfs-site.xml bigdata13:$PWD
重启集群就会发现只有bigdata12上才有secondnamenode