1.双系统失败记录
多系统启动问题
先安装完deepin,发现再安装windows怎么都起不起来,哪怕他们已经安装在不同的盘
(体现再Windows7通过ghost位于另外一个盘,但就是没有启动项)
为了装双系统,损失惨重,sda2盘不幸被格式化,千万不要幻想pe工具可以把系统写到磁盘的中间区域,
它一定是从磁盘的起始区域开始写,所以通过压缩卷弄出来的空间装系统一定不靠谱,会导致数据覆盖的!!!
window7 sda2
deepin sdb
不得不佩服deepin,无论bios如何设置,deepin系统总是能启动起来,哪怕开机启动项里已经完全排除了sdb盘。
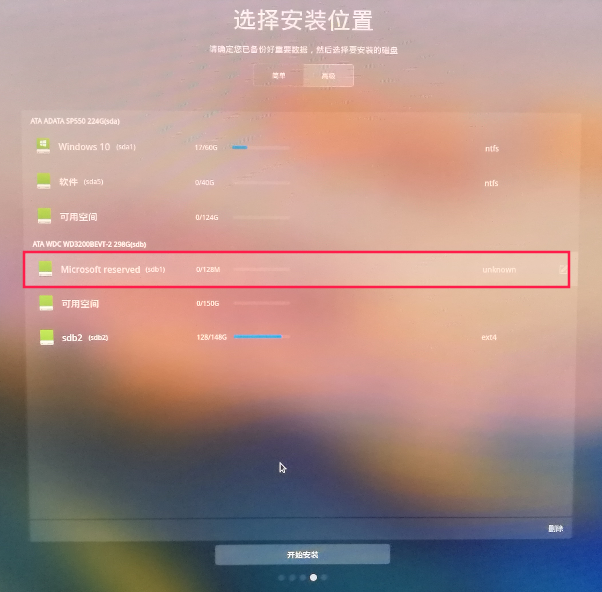
deepin这样做真的好吗,安装的时候求着我要一个EFI格式分区(sdb1),可装完就翻脸不认人了,直接把我的bios
启动顺序给无视了(被欺骗的感觉),使用efibootmgr可以发现,它完全自己搞了一套启动顺序
sain@Linux:~/Desktop$ efibootmgr
BootCurrent: 0000
Timeout: 1 seconds
BootOrder: 0000,0001,0002,0005,0006
Boot0000* deepin
Boot0001* Hard Drive
Boot0002  UEFI OS
Boot0005  UEFI OS
Boot0006  USB
/etc/grub.d/40_custom (用于生成/boot/grub/grub.cfg中的自定义引导项)
sain@Linux:/etc/grub.d$ ls
00_header  05_debian_theme  10_linux  20_linux_xen  30_os-prober  30_uefi-firmware  40_custom  41_custom  README

READEM
All executable files in this directory are processed in shell expansion order.
00_*: Reserved for 00_header.
10_*: Native boot entries.
20_*: Third party apps (e.g. memtest86+).
The number namespace in-between is configurable by system installer and/or
administrator. For example, you can add an entry to boot another OS as
01_otheros, 11_otheros, etc, depending on the position you want it to occupy in
the menu; and then adjust the default setting via /etc/default/grub.
文件/etc/default/grub也并无想要的东西
# Written by com.deepin.daemon.Grub2
GRUB_BACKGROUND="/boot/grub/themes/deepin/background.png"
GRUB_CMDLINE_LINUX=""
GRUB_CMDLINE_LINUX_DEFAULT="splash quiet"
GRUB_DEFAULT="0"
GRUB_DISTRIBUTOR="`/usr/bin/lsb_release -d -s 2>/dev/null || echo Deepin`"
GRUB_GFXMODE="1920x1080"
GRUB_THEME="/boot/grub/themes/deepin/theme.txt"
GRUB_TIMEOUT="5"
修改
/etc/grub.d/40_custom
#!/bin/sh
exec tail -n +3 $0
# This file provides an easy way to add custom menu entries.  Simply type the
# menu entries you want to add after this comment.  Be careful not to change
# the 'exec tail' line above.

menuentry 'Windows 7 (loader) (on /dev/sda2)' --class windows {
    insmod part_msdos
    insmod ntfs
    set root='hd0,msdos2'
    chainloader +1
}
重新生成 /boot/grub/grub.cfg
sudo grub-mkconfig -o /boot/grub/grub.cfg
打开设置那里,可以发现菜单多了选项
其实这样也只不过是菜单上多了个win7选项,肯定还是无法启动的

反复修改,都无法启动,提示找不到磁盘或者invalid EFI file path
UUID的获取sudo blkid
menuentry 'Windows 7 (loader) (on /dev/sda2)' --class windows {
    insmod part_msdos
    insmod ntfs
    set root='(hd0,msdos1)'
    search --no-floppy --fs-uuid --set=root 000598F0000980AD
    chainloader +1
}

error: invalid EFI file path
安装过win7系统所在磁盘EFI目录文件如下:
sain@Linux:/media/sain/000598F0000980AD/EFI/Microsoft/Boot$ ls
BCD  BCD.LOG  BCD.LOG1    BCD.LOG2  bootmgfw.efi    bootmgr.efi  BOOTSTAT.DAT  en-US  Fonts  memtest.efi  zh-CN
正确的配置
exec tail -n +3 $0
# This file provides an easy way to add custom menu entries.  Simply type the
# menu entries you want to add after this comment.  Be careful not to change
# the 'exec tail' line above.

menuentry 'Windows 7 (loader) (on /dev/sda2)' --class windows {
    insmod part_msdos
    insmod ntfs
    set root='(hd0,msdos1)'
    search --no-floppy --fs-uuid --set=root 000598F0000980AD
    chainloader /EFI/Microsoft/Boot/bootmgfw.efi
}
安装原版windows 系统

BIOS-->MBR-->DPT-->PBR--> Bootmgr-->bcd-->Winload.exe-->内核加载 -->整个windows7系统
https://baike.baidu.com/item/bootmgr/7141238?fr=aladdin
2.失败原因分析
感觉原理没问题了,可最终还是失败了,尽量不要尝试先装deepin,再装windows,纠结了好几天,也没搞出来原因
后来再重装时才突然为什么重启就不行
    set root='(hd0,msdos1)'
    search --no-floppy --fs-uuid --set=root 000598F0000980AD
    chainloader /EFI/Microsoft/Boot/bootmgfw.efi
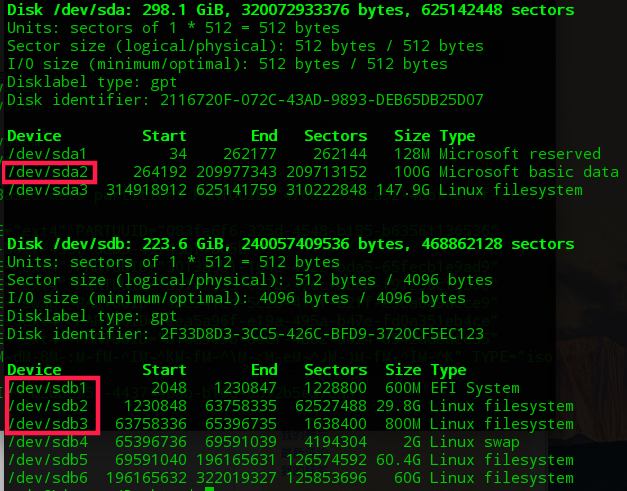
因为我当时磁盘的划分不是mbr而是gpt引导, 整个硬盘多出来一个100多兆的分区存放索引信息,gpt支持2T以上的银盘,mbr不支持的,这就导致gpt实际上多出了一个磁盘分区,如下图
这对用deepin引导是致命的

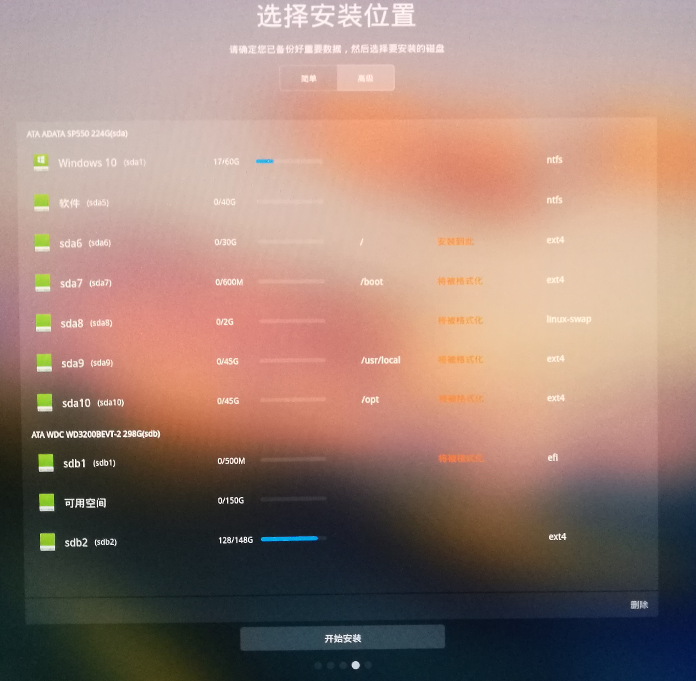
3.双系统正确的装法
先装win10,再装deepin,很简单就好了
ssd 分出一部分 装win10,为了方便deepin引导,分区坚决使用mbr
ssd 分出一部分 装deepin , 其中home分区挂载hdd上
为保证系统的独立性,deepin必须的EFi分区放在hdd上,这样两个系统的引导信息就在不同的盘上,而且系统主体都在ssd上,保证了系统的启动速度
附张图:
SSD 240G
HHD 320G
menuentry 'Windows 10 (loader) (on /dev/sda1)' --class windows {
    insmod part_msdos
    insmod ntfs
    set root='(hd0,msdos1)'
    search --no-floppy --fs-uuid --set=root 000BA64600056356
    chainloader +1
}
装完双系统默认已经生成了一个,不过会卡屏一下才启动,自己写的更好一些
### BEGIN /etc/grub.d/30_os-prober ###
menuentry 'Windows 10 (on /dev/sda1)' --class windows --class os $menuentry_id_option 'osprober-chain-000BA64600056356' {
    insmod part_msdos
    insmod ntfs
    set root='hd0,msdos1'
    if [ x$feature_platform_search_hint = xy ]; then
      search --no-floppy --fs-uuid --set=root --hint-bios=hd0,msdos1 --hint-efi=hd0,msdos1 --hint-baremetal=ahci0,msdos1  000BA64600056356
    else
      search --no-floppy --fs-uuid --set=root 000BA64600056356
    fi
    parttool ${root} hidden-
    drivemap -s (hd0) ${root}
    chainloader +1
}
### END /etc/grub.d/30_os-prober ###

### BEGIN /etc/grub.d/30_uefi-firmware ###
### END /etc/grub.d/30_uefi-firmware ###

### BEGIN /etc/grub.d/40_custom ###
# This file provides an easy way to add custom menu entries.  Simply type the
# menu entries you want to add after this comment.  Be careful not to change
# the 'exec tail' line above.

menuentry 'Windows 10 (loader) (on /dev/sda1)' --class windows {
    insmod part_msdos
    insmod ntfs
    set root='(hd0,msdos1)'
    search --no-floppy --fs-uuid --set=root 000BA64600056356
    chainloader +1
}
### END /etc/grub.d/40_custom ###