目前常用的持续集成工具主要是jenkins与gitlab-ci ,我已在另一博文中详细记录了jenkins部署过程(其中包括gitlab的搭建),此篇介绍gitlab-ci的使用。
背景介绍
GitLab-Runner是配合GitLab-CI进行使用的。一般地,GitLab里面的每一个工程都会定义一个属于这个工程的软件集成脚本,用来自动化地完成一些软件集成工作。当这个工程的仓库代码发生变动时,比如有人push了代码,GitLab就会将这个变动通知GitLab-CI。这时GitLab-CI会找出与这个工程相关联的Runner,并通知这些Runner把代码更新到本地并执行预定义好的执行脚本。
已在线下机房安装好gitlab,之前jenkins项目博文有介绍详细安装方法,gitlab-runner端安装在阿里云ECS上,且还需安装maven在 runner所在服务器上,maven安装博客有教程,注册时通过gitlab的公网或域名方式的url注册。
我司防火墙的80端口被封了,需要将gitlab的默认80端口修改为8088:
vim /etc/gitlab/gitlab.rb
external_url 'http://gitlab.home.com:8088'  #添加上端口
nginx['listen_port'] = 8088   #添加

vim /var/opt/gitlab/nginx/conf/gitlab-http.conf 、
server {
listen *:8088;     #改其内置nginx监听端口

gitlab-ctl reconfigure  #重置配置文件
gitlab-ctl restart      #重启服务
本地gitlab 版本查看 cat /opt/gitlab/embedded/service/gitlab-rails/VERSION
版本选择
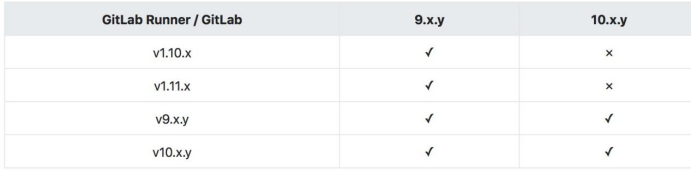
本文gitlab为10.5.2,runner为gitlab-ci-multi-runner-9.5.1-1.x86_64.rpm
添加gitlab的官方库
[root@localhost ~]# curl -L https://packages.gitlab.com/install/repositories/runner/gitlab-ci-multi-runner/script.rpm.sh | sudo bash
安装runner
[root@localhost ~]# yum -y install gitlab-ci-multi-runner
注:安装版本大于等于10的方法
需要用新的官方库
curl -L https://packages.gitlab.com/install/repositories/runner/gitlab-runner/script.rpm.sh | sudo bash
安装最新版
yum install gitlab-runner
安装指定版
yum list gitlab-runner --showduplicates | sort -r #查看版本
yum install gitlab-runner-12.2.0-1
注册 runner ,其中 url与 token可以在gitlab的web界面工具的runner中找到
[root@localhost ~]# gitlab-ci-multi-runner register
Running in system-mode.

Please enter the gitlab-ci coordinator URL (e.g. https://gitlab.com/):
http://172.19.0.101:8088/
Please enter the gitlab-ci token for this runner:
hy-zVkJBwTyG3WyvS3Sr
Please enter the gitlab-ci description for this runner:
[localhost.localdomain]: test_nothing
Please enter the gitlab-ci tags for this runner (comma separated):
nothing_runner
Whether to run untagged builds [true/false]:
[false]: false
Whether to lock Runner to current project [true/false]:
[false]: false
Registering runner... succeeded                     runner=hy-zVkJB
Please enter the executor: docker+machine, docker-ssh+machine, docker-ssh, shell, ssh, virtualbox, kubernetes, docker, parallels:
    shell
Runner registered successfully. Feel free to start it, but if it's running already the config should be automatically reloaded!
启动 gitlab runner
[root@localhost ~]# gitlab-ci-multi-runner run
[root@localhost ~]# ps -ef|grep runner
root      9294     1  0 04:13 ?        00:00:00 /usr/bin/gitlab-ci-multi-runner run --working-directory /home/gitlab-runner --config /etc/gitlab-runner/config.toml --service gitlab-runner --syslog --user gitlab-runner

此时在gitlab的web界面可以看到本runner

在项目根目录添加 .gitlab-ci.yaml
runner会执行添加的命令,要注意pom.xml的路径,默认在项目根目录中,若不在,需要以项目根目录为相对路径加上该文件所在路径,如:mvn clean package -f libra/ ,以下脚本可以去掉before_script,打包命令改为 mvn clean package。在注册runner时,要根据提示,是否要执行不带tag的项目。

before_script:
  - mvn clean
stages:
  - deploy
deploy_job:
  stage: deploy
  only:
      - master
  script:
    - mvn package
    - sh /test_project/test-backend/runner_tomcat.sh
  tags:
    - test-tag
以上runner_tomcat.sh脚本定义了打包后的与应用相关的镜像处理与到阿里云的镜像推送。
vim /test_project/test-backend/runner_tomcat.sh
#!/bin/bash
namespace=testimage
project_name=aaa-a
war_name=aaa.war
image_name=registry-vpc.cn-shanghai.aliyuncs.com/$namespace/$project_name
old_version=`sudo docker images|grep $image_name|awk '{print $2}'|sort -r|awk 'NR==1{print}'`
new_version=$(expr $old_version + 1)
newimage=$image_name:$new_version
Dockerfile_path=/test_project/$project_name/
war_path=`find / -cmin -20 -name $war_name 2>/dev/null | grep -v "/var/lib/docker" | grep -v "/test_project/$project_name/"`
source /etc/profile
rm -rf /test_project/$project_name/$war_name &&
mv $war_path /test_project/$project_name/ &&
sudo docker login --username=ur_name --password=test1245& registry-vpc.cn-shanghai.aliyuncs.com
sudo docker build -t $newimage  $Dockerfile_path &&
sudo docker push $newimage
测试runner是否生效
随意修改有 .gitlab-ci.yaml文件的项目的代码,提交。查看流水线,也可以看镜像仓库是否推送了该版本镜像
初次运行应该会报错,以下是我多次报错总结
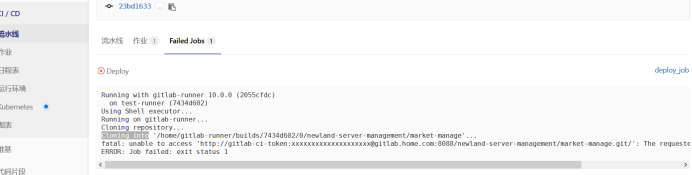
gitlab上测试项目的流水线发现触发runner执行命令,有时候以root身份执行,项目放在/etc/gitlab-runner/builds/下,有时候以gitlab-runner身份执行,项目放在/home/gitlab-runner/build下。
原因:可以 ps -ef|grep runner 查看,有多个runner进程,分别属于gitlab-runner与root
解决方法:kill掉所有runner进程,以root身份执行 gitlab-ci-multi-runner start ,查看进程数,只有一个

当gitlab-runner用户执行runner时,对于一些操作没有权限,需要设置sudo权限,root用户不存在此问题,也要注意runner上脚本的执行权限。
解决方法:
vim /etc/sudoers
gitlab-runner ALL=(root)  /bin/docker,NOPASSWD: ALL  #加上NOPASSWD: ALL,执行命令时不用再输入passwd for gitlab-runner
gitlab-ci打包某个群组里的项目报错
解决方法:对该群组没操作权限,将你登陆gitlab的此用户加到该群组成员中,访客身份无效。
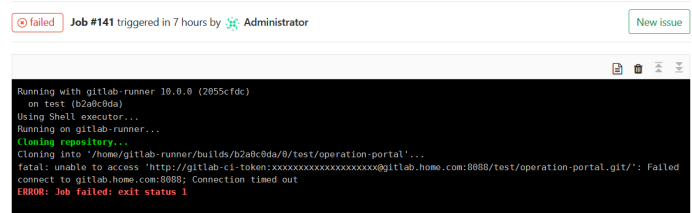
Runner跑流水线pull项目报连接超时,可能是不能解析gitlab.home.com。在gitlab-runner的/etc/hosts文件中加上域名解析,注意内网/公网ip,是否能ping通