开始整理RabbitMQ咯 因为之前完全不了解 基础知识方面参考了很多 推荐一个印象很深刻的 基础知识讲的很全面:https://www.cnblogs.com/dwlsxj/p/RabbitMQ.html
至于安装部分可以自行百度 网上很多很全
我就直接开始贴代码了:
先进行简单的一次消息发送接收(因为LZ刚开始做的时候因为导错包 搞了半天也跑不起来 特此沾上包地址)
配置类(初始化队列)
import javafx.application.Application;
import org.springframework.amqp.core.*;
import org.springframework.boot.SpringApplication;
import org.springframework.boot.autoconfigure.SpringBootApplication;
import org.springframework.context.annotation.Bean;

public class RabbitMQConfig {
    //以下方法的方法名无任何特别作用 队列名为括号中的值   例如:new Queue("oneToOne")的队列名为oneToOne
    @Bean
    public Queue TestQueue(){
        return new Queue("testQueue");
    }
    public static void main(String[] args) throws Exception {
        SpringApplication.run(Application.class, args);
    }
}
测试类
import org.springframework.beans.factory.annotation.Autowired;
import org.springframework.web.bind.annotation.RequestMapping;
import org.springframework.web.bind.annotation.RestController;

import java.util.List;

@RestController//@ResponseBody+@Controller的结合体 直接返回JSON数据
@RequestMapping("/rabbit")
public class RabbitTestController {

    @Autowired
    private SendController helloSender1;

    /**
     * 单生产者-消费者
     */
    @RequestMapping("/oneToOne")
    public void oneToOne() {
        helloSender1.send("oneToOne");
    }
}
生产者
import org.springframework.amqp.core.AmqpTemplate;
import org.springframework.beans.factory.annotation.Autowired;
import org.springframework.stereotype.Component;

import java.time.LocalDateTime;

/**
 * 生产者一号
 * <p>
 * @Date 2019/5/23 15:56
 **/
@Component
public class SendController {

    @Autowired
    private AmqpTemplate template;

    //字符串传输使用
    public void send(String msg) {
        String context = msg+ LocalDateTime.now();
        System.out.println("生产者一号 : " + context);
        //参数1为队列名称 2为消息内容
        this.template.convertAndSend("testQueue", context);
    }
}
消费者
import org.springframework.amqp.rabbit.annotation.RabbitHandler;
import org.springframework.amqp.rabbit.annotation.RabbitListener;
import org.springframework.stereotype.Component;

/**
 * 消费者一号
 * <p>
 * @Date 2019/5/23 15:58
 **/
@Component
@RabbitListener(queues = {"testQueue"})
public class ReceiverController {

    @RabbitHandler
    public void process(String msg) {
        System.out.println("消费者一号 : " + msg);
    }
}
执行完毕后访问http://127.0.0.1:8888/rabbit/oneToOne就会看到两条记录,一条发送,一条接收,如下图

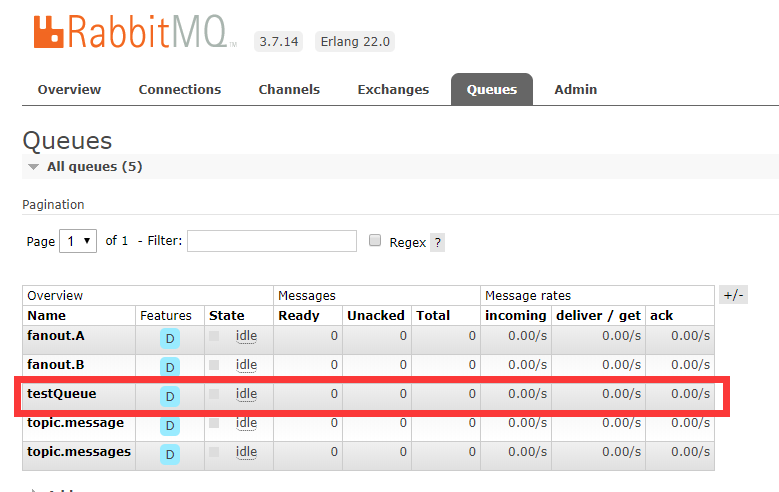
此时在RabbitMQ Management(http://localhost:15672)中可以看到这个队列的的具体数据
至此,一个简单的RabbitMQ就搭建完成了
源代码会在后续的进阶版中贴出