今天做实验的时候,想起我那台yum安装的nginx+php-fpm+mysql服务器上的nginx版本有点低了,并且还要加两个第3方模块,就去nginx官网下载了最新稳定版nginx-1.0.6,好了,废话不多说看教程吧.
系统版本: centos 5.6
ip: 192.168.1.200
需要的软件包:nginx-1.0.6.tar.gz Nginx-accesskey-2.0.3.tar.gz ngx_cache_purge-1.3.tar.gz(这3个包可以自己去下载,我就不提供了)
1.解压并修改nginx内核
tar zxf nginx-1.0.6.tar.gz && tar zxf Nginx-accesskey-2.0.3.tar.gz && tar zxf Nginx-accesskey-2.0.3.tar.gz
cd nginx-1.0.6
vi src/http/ngx_http_header_filter_module.c
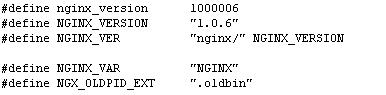
修改ngx_http_header_filter_module.c里的
static char ngx_http_server_string[] = "Server: nginx" CRLF;
static char ngx_http_server_full_string[] = "Server: " NGINX_VER CRLF;
改成:
static char ngx_http_server_string[] = "Server: tws" CRLF;
static char ngx_http_server_full_string[] = "Server: " NGINX_VER CRLF; (这行不要去改,不然后面编译会报错,我不知道网上其他人是怎么处理的,也不知道他们到底有没有亲手试过)
再来
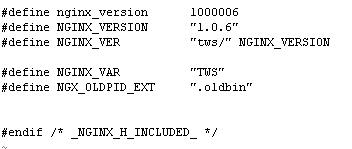
vi src/core/nginx.h
改为
2.开始编译安装nginx和第3方模块
./configure --user=nginx --group=nginx --add-module=../ngx_cache_purge-1.3 --add-module=../nginx-accesskey-2.0.3 --prefix=/usr/share/nginx --sbin-path=/usr/sbin/nginx --conf-path=/etc/nginx/nginx.conf --error-log-path=/var/log/nginx/error.log --http-log-path=/var/log/nginx/access.log --http-client-body-temp-path=/var/lib/nginx/tmp/client_body --http-proxy-temp-path=/var/lib/nginx/tmp/proxy --http-fastcgi-temp-path=/var/lib/nginx/tmp/fastcgi --pid-path=/var/run/nginx.pid --lock-path=/var/lock/subsys/nginx --with-http_secure_link_module --with-http_random_index_module --with-http_ssl_module --with-http_realip_module --with-http_addition_module --with-http_sub_module --with-http_dav_module --with-http_flv_module --with-http_gzip_static_module --with-http_stub_status_module --with-http_perl_module --with-http_geoip_module --with-mail --with-mail_ssl_module
这是我的编译参数,当然你可以根据自己的需要来修改.
如果编译安装出现错误提示,那就你要执行下面的语句
yum -y install pcre-devel GeoIP* openssl-devel
configure完后如果没有报错,就执行
make && meke install
安装完后查看nginx的版本号和编译参数![]()
我这里没有把下面编译参数截图,这个你懂的
3.让nginx随系统启动
cd /etc/rc.d/init.d
vi nginx
nginx的内容:
#!/bin/sh
#
# nginx - this script starts and stops the nginx daemon
#
# chkconfig: - 85 15
# description: Nginx is an HTTP(S) server, HTTP(S) reverse
# proxy and IMAP/POP3 proxy server
# processname: nginx
# config: /etc/nginx/nginx.conf
# config: /etc/sysconfig/nginx
# pidfile: /var/run/nginx.pid
# Source function library.
. /etc/rc.d/init.d/functions
# Source networking configuration.
. /etc/sysconfig/network
# Check that networking is up.
[ "$NETWORKING" = "no" ] && exit 0
nginx="/usr/sbin/nginx"
prog=$(basename $nginx)
NGINX_CONF_FILE="/etc/nginx/nginx.conf"
[ -f /etc/sysconfig/nginx ] && . /etc/sysconfig/nginx
lockfile=/var/lock/subsys/nginx
start() {
[ -x $nginx ] || exit 5
[ -f $NGINX_CONF_FILE ] || exit 6
echo -n $"Starting $prog: "
daemon $nginx -c $NGINX_CONF_FILE
retval=$?
echo
[ $retval -eq 0 ] && touch $lockfile
return $retval
}
stop() {
echo -n $"Stopping $prog: "
killproc $prog -TERM
retval=$?
if [ $retval -eq 0 ]; then
if [ "$CONSOLETYPE" != "serial" ]; then
echo -en "\033[16G"
fi
while rh_status_q
do
sleep 1
echo -n $"."
done
rm -f $lockfile
fi
echo
return $retval
}
restart() {
configtest || return $?
stop
start
}
reload() {
configtest || return $?
echo -n $"Reloading $prog: "
killproc $nginx -HUP
sleep 1
RETVAL=$?
echo
}
configtest() {
$nginx -t -c $NGINX_CONF_FILE
}
rh_status() {
status $prog
}
rh_status_q() {
rh_status >/dev/null 2>&1
}
# Upgrade the binary with no downtime.
upgrade() {
local pidfile="/var/run/${prog}.pid"
local oldbin_pidfile="${pidfile}.oldbin"
configtest || return $?
echo -n $"Staring new master $prog: "
killproc $nginx -USR2
sleep 1
retval=$?
echo
if [[ -f ${oldbin_pidfile} && -f ${pidfile} ]]; then
echo -n $"Graceful shutdown of old $prog: "
killproc -p ${oldbin_pidfile} -TERM
sleep 1
retval=$?
echo
return 0
else
echo $"Something bad happened, manual intervention required, maybe restart?"
return 1
fi
}
case "$1" in
start)
rh_status_q && exit 0
$1
;;
stop)
rh_status_q || exit 0
$1
;;
restart|configtest)
$1
;;
force-reload|upgrade)
rh_status_q || exit 7
upgrade
;;
reload)
rh_status_q || exit 7
$1
;;
status|status_q)
rh_$1
;;
condrestart|try-restart)
rh_status_q || exit 7
restart
;;
*)
echo $"Usage: $0 {start|stop|reload|configtest|status|force-reload|upgrade|restart}"
exit 2
esac
然后执行
chmod a+x nginx
chkconfig --add nginx
chkconfig nginx on
service nginx start
最后执行
curl -I http://localhost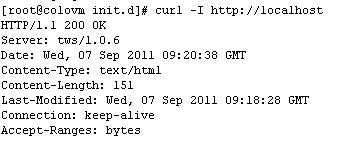
可以看到nginx正常运行中,好了,后面就是修改nginx.conf的事了,我就不说了.