View Controller用于管理app的各种资源,有时虽然View Controller被实例化,但仍不会在屏幕中显示。比如Navigation中的view controller,只有栈顶的元素才能显示。正因为如此,所以View Controller实现了复杂行为来管理view的load和unload操作。
1 VC初始化
当View Controller被初始化时,它首先创建和加载在其生命周期内都要使用的对象。同时View Controller一般不会创建View对象,且不会创建一些可视化的内容。对于那些创建或维护比较耗资源的对象,一般都采用赖加载。
当app在Launch阶段时,IOS只实例化main storyboard文件中的起始view controller(Initial View Controller),若后续需要更多的view controller,那么可以调用UIStoryboard类的instantiateViewControllerWithIdentifier方法来实例化storyboard文件中定义的view controller;若在storyboard文件中没有定义相应的view controller,则可按Objective-C传统的allocate 和 initialize方法进行实例化。
1.1 view展示
1) 获取view对象
若使用Storyboard方式定义View Controller和View时,那么当View Controller对象需要view对象时,UIKit会自动从Storyboard文件中加载相关的view对象,UIKit执行具体过程为:
a) 获取storyboard文件中的信息,进而实例化view;
b) 连接所有outlets 和 actions;
c) 设置view controller的view属性为root view(每个view controller都有一个主视图);
d) 调用view controller对象的awakeFromNib方法(若被实现),从而用户可以在这些方法中执行一些配置内容;
e) 调用view controller的viewDidLoad方法:通过该方法进行view的添加、删除、修改布局约束和加载数据。
2) 屏幕显示
在将view controller的view展示在屏幕之前,UIKit提供一些方法进行操作,UIKit将view展示在屏幕过程中执行如下操作:
a) 在view显示在屏幕之前,会调用view controller的viewWillAppear方法;
b) 更新view的布局;
c) 将view展示在屏幕中;
d) 在view显示在屏幕之后,会调用view controller的viewDidAppear方法。
1.2布局管理
当view的尺寸或位置发生改变时,UIKit会自动更新层次结构中的view布局。若使用Auto Layout来配置view,那么UIKit会根据当前的布局约束来更新布局。在UIKit更新view的布局过程中,会发送一些消息给用户,使得还有机会修改view的布局。其中UIKit更新的过程操作为:
a) 更新view或view controller的特征;
b) 调用view controller的viewWillLayoutSubviews方法;
c) 调用当前UIPresentationController对象的containerViewWillLayoutSubviews方法;
d) 调用view controller中的root view的layoutSubviews方法:该方法的默认实现是根据布局约束来计算新布局信息,并且它会递归调用层次结构中所有子view的layoutSubviews方法;
e) 将布局信息应用于所有view中;
f) 调用view controller的viewDidLayoutSubviews方法;
g) 调用当前UIPresentationController对象的containerViewDidLayoutSubviews方法;
正如上述的b)和f)中,可以在view controller的viewWillLayoutSubviews 和 viewDidLayoutSubviews方法中另外配置一些信息,从而可影响布局设置。即可在布局之前,添加或移除view,也可更新view的尺寸或位置,以及能更新布局约束或修改层次结构中相关属性;在布局之后,需要重新加载布局,从而做最后的更改。
2 view管理
在view controller中需要对对象进行引用管理,一般在表 21所示的UIViewController方法中创建内存或释放内存。
表 21 Places to allocate and deallocate memory
|
方法 |
功能 |
描述 |
|
Initialization |
构造方法 |
创建新对象,初始化一些数据结构或属性的信息。 |
|
viewDidLoad |
加载数据方法 |
通过这个方法来加载需要在view中显示的数据,并且在调用此方法时,要保证view对象存在和有好的状态。 |
|
didReceiveMemoryWarning |
响应低内存消息方法 |
通过此方法来释放viewController的一些非重要对象。 |
|
dealloc |
虚构方法 |
重载该方法来释放view controller对象的内存。 |
在一个View Controller对象的生命周期中,对View对象有两个重要的管理周期:load和unload。
2.1 加载
任何时候若其View对象不在内存中,而又被访问,那么View Controller对象将创建和初始化需要的View对象。并将加载的View对象赋值给自身(View Controller对象)的view属性。
如下是加载(load)view的过程:
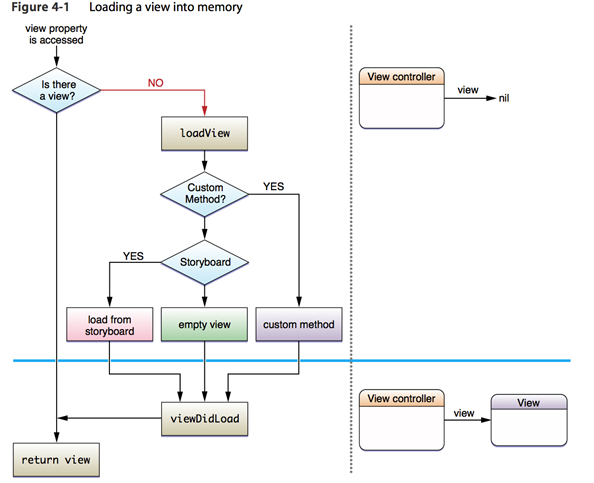
1) 若View Controller对象中不存在view对象,而又被访问了view对象,那么将触发加载的过程。
2) View Controller对象将调用loadView方法,默认在该方法中实现如下两件事之一:
-
若View Controller有一个关联的storyboard,则从storyboard文件中加载view;
-
若View Controller没有关联的storyboard,则创建一个空的UIView对象,并将其赋值给View Controller的view属性。
3) View Controller对象将调用viewDidLoad方法,从而可在该方法中执行一些附件的操作,如初始化子类。
如图 21所示,是load一个view对象的过程,用户可以重载图中的loadView和viewDidLoad方法,从而执行一些附件的操作。比如可以另外添加一个视图的层次结构。

图 21 Loading a view into memory
2.2 卸载
只要app接收到低内存警告,那么View Controller对象将立即卸载(unload)view对象。在unload过程中,View Controller对象将释放view对象,并将该View Controller对象还原到最初状态,即无view对象状态。若成功释放了view对象,那么View Controller对象将一直保持无view状态,直到重新需要访问view对象,那么再重新加载view对象。
如下是view的卸载(unload)过程:
a) app接收到系统发送的低内存警告信息;
b) app中的每个View Controller对象都会调用didReceiveMemoryWarning方法,该方法的默认实现是释放view对象;
c) 如果不能安全释放view对象(如该view正处于屏幕中),那么其默认实现是直接返回;
d) View Controller对象将调用viewWillUnload方法,从而向那些将被移除view对象的所有子类发送消息。一般子类都重载viewWillUnload方法,从而来保存一些属性信息。
e) 将View Controller对象的view属性设置为nil。
f) View Controller对象将调用viewDidUnload方法向被移除view的子类发送消息。一般子类在该方法中释放强引用的指针。
如图 22所示是view被unload的过程:

图 22 Unloading a view from memory
3 实现Container VC
Container View Controller将多个Content View Controller结合为单一的层次结构窗口,即建立Container VC与Content VC之间的一种父子关系。Container VC管理Content VC的尺寸和位置,而Content VC自己管理其内部的view和控件。
3.1 Interface Builder方式
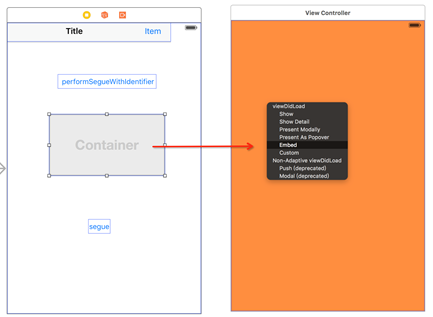
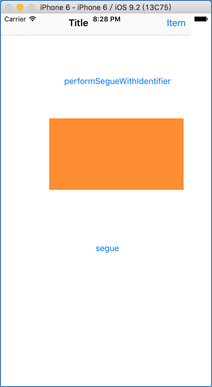
通过Interface Builder创建和配置Container View Controller比较简单。只需在Container View Controller的view中添加一个Container view控件,这个控件只是一个占位符,不具有可视化功能;然后从Container view控件中以Embed方式推出Content View Controller即可。如图 23和图 24所示的操作图和效果图。

图 23 操作图

图 24 运行效果图
3.2 Program方式
程序的方式比较复杂,但是控制的功能也比较多。
3.2.1 添加子VC
通过程序的方式,建立view controller之间的一种父子关系,可以按如下步骤完成:
a) 调用container view controller的addChildViewController方法;从而告诉UIKit由该 container VC来管理相应子view controller(content view controller)。
b) 将content VC的view添加到container view的层次结构中。
c) 在container view中为子content view添加一些布局约束(若需要)。
d) 调用子view controller的didMoveToParentViewController方法。
如下所示是简单在container view controller添加一个子view controller的例子:
2 {
3 [self addChildViewController:content];
4 content.view.frame = [self frameForContentController];
5 [self.view addSubview:self.currentClientView];
6 [content didMoveToParentViewController:self];
7 }
3.2.2 移除子VC
为了移除container view controller中的子view controller,需按如下步骤完成:
a) 调用子view controller的willMoveToParentViewController方法,并传递一个nil参数。
b) 移除子content view在container view中配置的布局约束。
c) 通过调用子content view的removeFromSuperview方法,将子content view从container view的层次结构中移除。
d) 调用子view controller的removeFromParentViewController方法来终止container与content之间的父子关系。
如下所示:
2 {
3 [content willMoveToParentViewController:nil];
4 [content.view removeFromSuperview];
5 [content removeFromParentViewController];
6 }
3.2.3 转换子VC
可以在container view controller中切换view controller,同时还可在切换的过程中添加一些动画,但在切换之前必须保证切换的view controller需为container view controller的子view controller。
如下所示,是切换两个view controller:
2 {
3 // Prepare the two view controllers for the change.
4 [oldVC willMoveToParentViewController:nil];
5 [self addChildViewController:newVC];
6
7 // Get the start frame of the new view controller and the end frame
8 // for the old view controller. Both rectangles are offscreen.
9 newVC.view.frame = [self newViewStartFrame];
10 CGRect endFrame = [self oldViewEndFrame];
11
12 // Queue up the transition animation.
13 [self transitionFromViewController: oldVC toViewController: newVC
14 duration: 0.25 options:0
15 animations:^{
16 // Animate the views to their final positions.
17 newVC.view.frame = oldVC.view.frame;
18 oldVC.view.frame = endFrame;
19 }
20 completion:^(BOOL finished) {
21 // Remove the old view controller and send the final
22 // notification to the new view controller.
23 [oldVC removeFromParentViewController];
24 [newVC didMoveToParentViewController:self];
25 }];
26 }