@app.route('/detail/<question_id>')
def detail(question_id):
quest =
return render_template('detail.html', ques = quest)@app.route('/detail/<question_id>') def detail(question_id): quest= Question.query.filter(Question.id == question_id).first() return render_template('detail.html',ques=quest)首页标题的标签做带参数的链接。
{{ url_for('detail',question_id = foo.id) }}<a href="{{ url_for('detail',question_id=foo.id) }}">{{foo.author.username}}</a> <br> <a href="#">{{ foo.title }}</a><br> <span class="badge">{{ foo.creat_time }}</span><br> <p style="color:black">{{ foo.detail}}</p><br>
- 在详情页将数据的显示在恰当的位置。
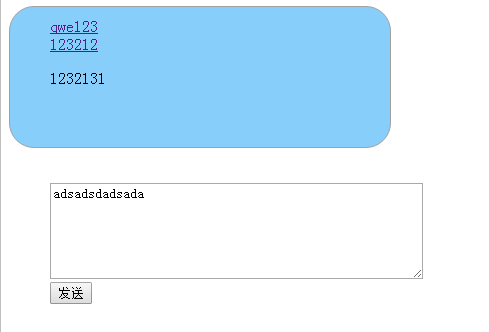
{{ ques.title}}
{{ ques.id }}{{ ques.creat_time }}{{ ques.author.username }}
{{ ques.detail }}建立评论的对象关系映射:
class Comment(db.Model):
__tablename__='comment'尝试实现发布评论。
class Comment(db.Model):
    __tablename__ = 'comment'
    id = db.Column(db.Integer, primary_key=True, autoincrement=True)
    author_id = db.Column(db.Integer, db.ForeignKey('user.id'))
    question_id = db.Column(db.Integer, db.ForeignKey('question.id'))
    create_time = db.Column(db.DateTime, default=datetime.now)
    detail = db.Column(db.Text, nullable=False)
    question = db.relationship('Question', backref=db.backref('comment'))
    author = db.relationship('User', backref=db.backref('comment'))
{% extends'fumoban.html' %} {% block title %}评论详情{% endblock %} <meta charset="UTF-8"> {% block head %} <link href="../static/css/detail.css" rel="stylesheet" type="text/css"> {% endblock %} {% block main %} <body id="body"> <div class="essayAera"> <ul class="list-group"> <a class="author" href="">{{ ques.author.username }}</a> <br> <a class="title" href="">{{ ques.title }}</a> <br> <span >{{ ques.create_time }}</span> <p class="abstract">{{ ques.detail }}</p> <form action=""> <div class="form-group"> <textarea class="inputFramework"style="margin-top:80px " rows="6" cols="50" id="details" name="detail"></textarea> </div> <button type="submit" class="btn btn-default">发送</button> </form> </ul> </div> </body> {% endblock %}