目录
Android 开发第七讲 RadioButton (单选按钮)
一丶重构代码
之前我们响应按钮事件都是直接通过匿名内部类的方式. new一个对象来实现OnClick方法.
现在因为按钮较多.所以新建内部类,实现接口为 View.OnClickListener 并且实现里面的OnClick方法
代码如下:
package com.ibinary.myapplication;

import androidx.annotation.NonNull;
import androidx.appcompat.app.AppCompatActivity;

import android.content.Intent;
import android.os.Bundle;
import android.sax.StartElementListener;
import android.view.View;
import android.widget.Button;
// Alt + Shift + Entery 引入此包
public class MainActivity extends AppCompatActivity {

//    声明Button 一会使用 如果找不到则引入这个包 Alt+Shift+Enter
    private Button m_BtnText;
    private Button m_BtnEditView;
    private Button m_ButtonView;
    private Button m_RadioButtonView;
    protected void onCreate(Bundle savedInstanceState) {
        super.onCreate(savedInstanceState);
        setContentView(R.layout.activity_main);
        m_BtnText = (Button) findViewById(R.id.Btn_Text);
        m_BtnEditView = (Button) findViewById(R.id.EdtView1);
        m_ButtonView = (Button) findViewById(R.id.m_BtnView);
        m_RadioButtonView = (Button) findViewById(R.id.RadioButton_Id);
        SetListener();
    }
    private void SetListener()
    {
        MyOnClick myOnClick = new MyOnClick();
        m_BtnText.setOnClickListener(myOnClick);
        m_BtnEditView.setOnClickListener(myOnClick);
        m_ButtonView.setOnClickListener(myOnClick);
        m_RadioButtonView.setOnClickListener(myOnClick);
    }
//    实现接口,在街口里面判断
    private class MyOnClick  implements View.OnClickListener{

    @Override
    public void onClick(View view) {

        Intent intent = null;
        switch (view.getId()){
            case R.id.Btn_Text:
                //跳转到TextView中
                intent = new Intent(MainActivity.this,TextViewActive.class);
                break;
            //跳转到Button页面
            case R.id.m_BtnView:
                intent =  new Intent(MainActivity.this,MyButton.class);
                break;
            //跳转到ExtView页面
            case R.id.EdtView1:
                intent = new Intent(MainActivity.this,EdtActive.class);
                break;
            //跳转到RadioButton页面
            case R.id.RadioButton_Id:
                intent = new Intent(MainActivity.this,RadioActivity.class);
                break;
        }
        if (intent == null) {
            return;
        }

        startActivity(intent);
    }
}
}
二丶RadioButton属性与xml编写
2.1 RadioButton属性
RadioButton是继承自TextView 所以一些属性是可以用的.
单独定义一个RadioButton不会有效果的.原因是.两个RadioButton以上. 都属于一个分组.
当这个分组中定义了两个 RadioButton的时候.那么你点击RadioButton1 那么RadioButton2就是未选中状态.看下如下xml描述
常用属性
android:checked = "true"  默认选中,使用这个属性那么 其他的RadioButton必须设置ID
android:button="@null"   去掉按钮属性,不使用小园框,自定义一个
<?xml version="1.0" encoding="utf-8"?>
<RelativeLayout xmlns:android="http://schemas.android.com/apk/res/android"
    xmlns:app="http://schemas.android.com/apk/res-auto"
    xmlns:tools="http://schemas.android.com/tools"
    android:layout_width="match_parent"
    android:layout_height="match_parent"
    android:padding="15dp">

<!--    使用RadioButton必须放到一个分组里面-->
    <RadioGroup
        android:id="@+id/rg_1"
        android:layout_width="match_parent"
        android:layout_height="wrap_content"
        android:orientation="horizontal">
<!--        RadioButton放到里面-->
        <RadioButton
            android:id="@+id/rd_1"
            android:layout_width="100dp"
            android:layout_height="40dp"
            android:text="男"
            android:textSize="20sp">

        </RadioButton>


        <RadioButton
            android:id="@+id/rd_2"
            android:layout_width="100dp"
            android:layout_height="40dp"
            android:text="女"
            android:textSize="20sp">

        </RadioButton>

    </RadioGroup>
</RelativeLayout>
界面则为下,选择男,则女就是未选中,否则就是相反
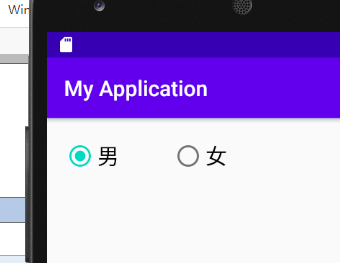
因为他们在一个组里面.所以只能单选
2.2 RadioButton实现自定义
实现自定义还是使用 android:background属性,来制定一个选择状态的xml. 来实现自定义的选中和未选中
但是前提要 设置 android:button="@null"才可以.
状态选择器XML如下
<?xml version="1.0" encoding="utf-8"?>
<selector xmlns:tools="http://schemas.android.com/tools"
    xmlns:android="http://schemas.android.com/apk/res/android"
    tools:ignore="MissingDefaultResource">
    <!--    状态选择器 android:state_checked = true代表选中-->
    <item android:state_checked="true">
        <!--        如果是选中,那么我们使用shape画一个-->
        <shape>
            <!--            设置实心颜色,并且设置圆角-->
            <solid android:color="#ff0000"></solid>
            <corners android:radius="10dp"></corners>
        </shape>
    </item>

    <!--    否则设置为绿色-->
    <item android:state_checked="false">
        <!--        如果是未选中,那么我们使用shape画一个-->
        <shape>
            <!--            设置描边形式,并且设置圆角-->
            <stroke android:width="1dp" android:color="#0ca30c"></stroke>
            <corners android:radius="10dp"></corners>
        </shape>
    </item>
</selector>
xml如下布局如下
   <!--    自定义-->
    <RadioGroup
        android:id="@+id/rg_2"
        android:layout_width="match_parent"
        android:layout_height="100dp"
        android:orientation="horizontal"
        android:layout_below="@id/rg_1"
        android:layout_marginTop="1dp"
        >
        <!--        RadioButton放到里面-->
        <RadioButton
            android:id="@+id/rd_3"
            android:layout_width="100dp"
            android:layout_height="40dp"
            android:button="@null"
            android:background="@drawable/selector_radiobutton"
            android:text="男1"
            android:textSize="20sp">

        </RadioButton>


        <RadioButton
            android:id="@+id/rd_4"
            android:layout_width="100dp"
            android:layout_height="40dp"
            android:button="@null"
            android:background="@drawable/selector_radiobutton"
            android:text="女1"
            android:textSize="20sp">

        </RadioButton>

    </RadioGroup>
请注意selector_radiobutton 文件名一定小写.
实现效果如下

自定义了一个实现效果
三丶RadioButton的监听事件
既然是单选那么单选之后肯定会有监听事件
package com.ibinary.myapplication;

import androidx.appcompat.app.AppCompatActivity;

import android.os.Bundle;
import android.widget.RadioButton;
import android.widget.RadioGroup;
import android.widget.Toast;

public class RadioActivity extends AppCompatActivity {

    private RadioGroup m_rg1;
    @Override
    protected void onCreate(Bundle savedInstanceState) {
        super.onCreate(savedInstanceState);
        setContentView(R.layout.activity_radio);

        m_rg1 = (RadioGroup)findViewById(R.id.rg_1);
        //响应Checked Listener
        m_rg1.setOnCheckedChangeListener(new RadioGroup.OnCheckedChangeListener() {
            @Override
            //两个参数,一个是组,一个是选中的ID. 可以通过组里面的finviewById找到当前是哪个Id
            public void onCheckedChanged(RadioGroup radioGroup, int i) {
                RadioButton RaButton = radioGroup.findViewById(i);
                Toast.makeText(RadioActivity.this, RaButton.getText(), Toast.LENGTH_SHORT).show();
            }
        });
    }
}
只需要设置事件,实现 RadioGroup.OnCheckedChangeListener() 即可.