经过上一次的马尔可夫图像做代码分类后。该思想存在两个问题,第一:概率矩阵的方法虽然可以有效的表示转移概率,但是按行归一化的方法忽略了不同行之间的频次差异,导致了一部分信息丢失。第二,因为用概率矩阵的位置表示不同字节间的转换,所以最多只能表示两个字节间的转换,也就是相当于2-gram。因此针对这两个问题,第一,采用z-score的归一化方法。第二,借鉴n步转移矩阵的思想,取(n,n+1),(n,n+2),(n,n+3)三个矩阵,最后将这三个矩阵合为一个三通道图像,作为分类数据。
下面是归一化图片代码
import PIL.Image as Image, os, sys, array, math
import numpy as np
from scipy import stats

base_sorce_dir = "D:\dataset\GCI\code_500\code"
def file2arr(file_path,file_save_path):
    fileobj = open(file_path, mode = 'rb')
    buffer = array.array('B', fileobj.read())
    array1 = np.zeros((256,256), dtype=np.int)

    for i in range(len(buffer)-2):
        j = i+1
        array1[buffer[i]][buffer[j]] += 1

    array2 = np.reshape(array1,(65536))				#对整个矩阵做z-score
    array3 = stats.zscore(array2)
    array4 = np.reshape(array3,(256,256))
    np.save(file_save_path,array4)

sorce_list = [os.path.join(base_sorce_dir,str(i)) for i in range(500)]

to_base_dir = "D:\dataset\GCI\code_500\image_2"
to_list = [os.path.join(to_base_dir,str(i)) for i in range(500)]

for i in range(500):
    count = 1
    for file in os.listdir(sorce_list[i]):
        print ("counting the {0} file...".format(str(count)))
        count+=1
        apk_dir = os.path.join(sorce_list[i],file)
        #创建图像存放文件夹
        if not os.path.exists(to_list[i]):
            os.mkdir(to_list[i])
        apk_save_dir = os.path.join(to_list[i],file)

        file2arr(apk_dir, apk_save_dir)
下面是三通道转换代码,这里还是采用概率矩阵的方法
import PIL.Image as Image, os, sys, array, math
import numpy as np
from scipy import stats
import numpy as np
import matplotlib.pyplot as plt
import sys
import cv2
import sys

base_sorce_dir = "D:\dataset\GCI\code_30\code"
def guiyi(array):
    trun_array = np.zeros(256,dtype=np.int)
    for i in range(256):
        for j in range(256):
            trun_array[i] += array[i][j]

    array2 = np.zeros((256,256),dtype=np.float)
    for i in range(256):
        for j in range(256):
            if(trun_array[i]!=0):
                array2[i][j] = array[i][j]/trun_array[i]

    return array2
def file2arr(file_path,file_save_path):
    fileobj = open(file_path, mode = 'rb')
    buffer = array.array('B', fileobj.read())

    array1 = np.zeros((256,256), dtype=np.int)
    for i in range(len(buffer)-2):
        j = i+1
        array1[buffer[i]][buffer[j]] += 1

    array2 = np.zeros((256,256), dtype=np.int)
    for i in range(len(buffer)-3):
        j = i+2
        array2[buffer[i]][buffer[j]] += 1

    array3 = np.zeros((256,256), dtype=np.int)
    for i in range(len(buffer)-3):
        j = i+3
        array3[buffer[i]][buffer[j]] += 1

    array1 = guiyi(array1)
    array2 = guiyi(array2)
    array3 = guiyi(array3)

    array1 = keras.preprocessing.image.img_to_array(array1)
    array2 = keras.preprocessing.image.img_to_array(array2)
    array3 = keras.preprocessing.image.img_to_array(array3)
    array4 = np.concatenate((array1, array2, array3), axis=-1)

    np.save(file_save_path,array)
sorce_list = [os.path.join(base_sorce_dir,str(i)) for i in range(29)]
to_base_dir = "D:\dataset\GCI\code_30\image_3"
to_list = [os.path.join(to_base_dir,str(i)) for i in range(29)]
for i in range(30):
    count = 1
    for file in os.listdir(sorce_list[i]):
        print ("counting the {0} file...".format(str(count)))
        count+=1
        apk_dir = os.path.join(sorce_list[i],file)
        #创建图像存放文件夹
        if not os.path.exists(to_list[i]):
            os.mkdir(to_list[i])
        apk_save_dir = os.path.join(to_list[i],file)

        file2arr(apk_dir, apk_save_dir)
这里比较了z-score方法和原归一化方法的精度,如下面两表,在最后附有图。
z-score做29分类
[0.6043557, 0.7513612, 0.80217785, 0.8330309, 0.9026013, 0.87598306, 0.9044162, 0.9304295, 0.9286146, 0.9461585, 0.9425287, 0.9419238, 0.9516032, 0.9443436, 0.95583785, 0.9721718, 0.9643073, 0.95886266, 0.9643073, 0.9649123, 0.9552329, 0.97096187, 0.9673321, 0.97338176, 0.97338176, 0.97096187, 0.97035694, 0.97338176, 0.97096187, 0.9552329, 0.97096187, 0.96249247, 0.97096187, 0.9739867, 0.9739867, 0.9770115, 0.9727768, 0.9751966, 0.98064125, 0.9745917, 0.97338176, 0.9727768, 0.9721718, 0.9751966, 0.9727768, 0.9764065, 0.97943133, 0.96854204, 0.9751966, 0.9721718]
马尔可夫图像29分类结果
[0.73260736, 0.82637626, 0.85904413, 0.9032063, 0.91167575, 0.9280097, 0.93466425, 0.94373864, 0.9516032, 0.9503932, 0.9516032, 0.9503932, 0.9600726, 0.9552329, 0.95886266, 0.9630974, 0.9600726, 0.96249247, 0.9655172, 0.9655172, 0.9509982, 0.9649123, 0.95462793, 0.9643073, 0.9618875, 0.96067756, 0.96672714, 0.9661222, 0.9643073, 0.9649123, 0.96249247, 0.9679371, 0.9630974, 0.9679371, 0.969147, 0.9673321, 0.9643073, 0.97035694, 0.96672714, 0.97156686, 0.9673321, 0.96975195, 0.969147, 0.97035694, 0.9643073, 0.97035694, 0.9727768, 0.97156686, 0.96854204, 0.97096187]
对于三通道图像,除了采用原有模型,还采用了VGG16模型分类,vgg分类代码以及两次的精度如下
import PIL.Image as Image, os, sys, array, math
import numpy as np
from scipy import stats

from tensorflow.keras.utils import to_categorical
import numpy as np
import matplotlib.pyplot as plt
import sys
import cv2
from tensorflow.keras import regularizers
from tensorflow.keras.models import Sequential
from tensorflow.keras.layers import Dense,Dropout,Activation,Flatten
from tensorflow.keras.layers import Conv2D,MaxPooling2D,BatchNormalization
from tensorflow.keras.optimizers import SGD,Adam,RMSprop
from tensorflow.keras.callbacks import TensorBoard
from sklearn.datasets import load_digits  # 加载手写数字识别数据
import pylab as pl
from sklearn.model_selection import train_test_split
from sklearn.preprocessing import StandardScaler  # 标准化工具
from sklearn.svm import LinearSVC
from sklearn.metrics import classification_report  # 预测结果分析工具

from tensorflow import keras
%matplotlib inline
import os

os.environ["CUDA_DEVICE_ORDER"] = "PCI_BUS_ID"

os.environ["CUDA_VISIBLE_DEVICES"] = "0"
from tensorflow.keras import layers
from tensorflow.keras import models
from tensorflow.keras import optimizers

def guiyi(array):
    trun_array = np.zeros(256,dtype=np.int)
    for i in range(256):
        for j in range(256):
            trun_array[i] += array[i][j]

    array2 = np.zeros((256,256),dtype=np.float)
    for i in range(256):
        for j in range(256):
            if(trun_array[i]!=0):
                array2[i][j] = array[i][j]/trun_array[i]

    return array2
def file2arr(file_path):
    fileobj = open(file_path, mode = 'rb')
    buffer = array.array('B', fileobj.read())

    array1 = np.zeros((256,256), dtype=np.int)
    for i in range(len(buffer)-2):
        j = i+1
        array1[buffer[i]][buffer[j]] += 1

    array2 = np.zeros((256,256), dtype=np.int)
    for i in range(len(buffer)-3):
        j = i+2
        array2[buffer[i]][buffer[j]] += 1

    array3 = np.zeros((256,256), dtype=np.int)
    for i in range(len(buffer)-3):
        j = i+3
        array3[buffer[i]][buffer[j]] += 1

    array1 = guiyi(array1)
    array2 = guiyi(array2)
    array3 = guiyi(array3)

    array1 = keras.preprocessing.image.img_to_array(array1)
    array2 = keras.preprocessing.image.img_to_array(array2)
    array3 = keras.preprocessing.image.img_to_array(array3)
    array4 = np.concatenate((array1, array2, array3), axis=-1)

#     np.save(file_save_path,array)
    return array4
leibie = 29
to_base_dir = "D:\dataset\GCI\code_30\code"
to_list = [os.path.join(to_base_dir,str(i)) for i in range(leibie)]
data = []
labels = []
count = 0
for to_dir in to_list:
    print (to_dir)
    for file in os.listdir(to_dir):
        output = file2arr(os.path.join(to_dir,file))
#         output2 = keras.preprocessing.image.img_to_array(output)
    #     output2 = np.expand_dims(output, axis=2)                   #扩维
    #     output2 = np.concatenate((output2, output2, output2), axis=-1)
        data.append(output)
        labels.append(count)
    count+=1
data_array = np.array(data)
labels = np.array(labels)
#打乱数据
import numpy as np
index = np.random.permutation(len(labels))

labels = labels[index]
data_array = data_array[index]
#网络模型
from tensorflow.keras.layers import Convolution2D, MaxPooling2D, Flatten, Dropout, Dense, Activation
from tensorflow.keras.optimizers import Adam
from tensorflow.keras import applications
from tensorflow.keras.models import Model

base_model = applications.VGG16(weights='imagenet', include_top=False, input_shape=(256, 256, 3))
add_model = Sequential()
add_model.add(Flatten(input_shape=base_model.output_shape[1:]))
add_model.add(Dense(256, activation='relu'))
add_model.add(Dense(29, activation='softmax'))
model = Model(inputs=base_model.input, outputs=add_model(base_model.output))
model.compile(loss='sparse_categorical_crossentropy', optimizer=optimizers.SGD(lr=1e-4, momentum=0.9),
            metrics=['accuracy'])

history = model.fit(data_array, labels, batch_size=32, epochs=50, validation_split=0.2)
三通道图像29分类(原模型)
[0.22141561, 0.45735028, 0.5856019, 0.6678766, 0.70840895, 0.70780396, 0.78100425, 0.77979434, 0.8336358, 0.82758623, 0.8215366, 0.8717483, 0.877193, 0.90804595, 0.8844525, 0.85904413, 0.9159105, 0.8892922, 0.9274047, 0.92558986, 0.8814277, 0.91167575, 0.93768907, 0.94494855, 0.9419238, 0.9509982, 0.9503932, 0.9183303, 0.9497883, 0.9509982, 0.93163943, 0.9267998, 0.9443436, 0.9310345, 0.9249849, 0.95462793, 0.9425287, 0.9552329, 0.9522081, 0.94555354, 0.95825773, 0.9425287, 0.954023, 0.9522081, 0.9165154, 0.95462793, 0.95583785, 0.9503932, 0.95462793, 0.95583785]
三通道图像29分类(VGG16 )
[0.03448276, 0.2552934, 0.62068963, 0.7616455, 0.77918935, 0.8215366, 0.8784029, 0.89897156, 0.9019964, 0.9140956, 0.9201452, 0.9165154, 0.9032063, 0.9183303, 0.938294, 0.93587416, 0.9413188, 0.9425287, 0.9516032, 0.96249247, 0.9165154, 0.9649123, 0.96672714, 0.969147, 0.96672714, 0.9673321, 0.9679371, 0.9679371, 0.9673321, 0.96672714, 0.96672714, 0.96672714, 0.9673321, 0.96672714, 0.9661222, 0.9673321, 0.96672714, 0.9679371, 0.9679371, 0.9673321, 0.9679371, 0.9673321, 0.9679371, 0.9673321, 0.9679371, 0.9673321, 0.9673321, 0.9679371, 0.9679371, 0.9673321]
对比图
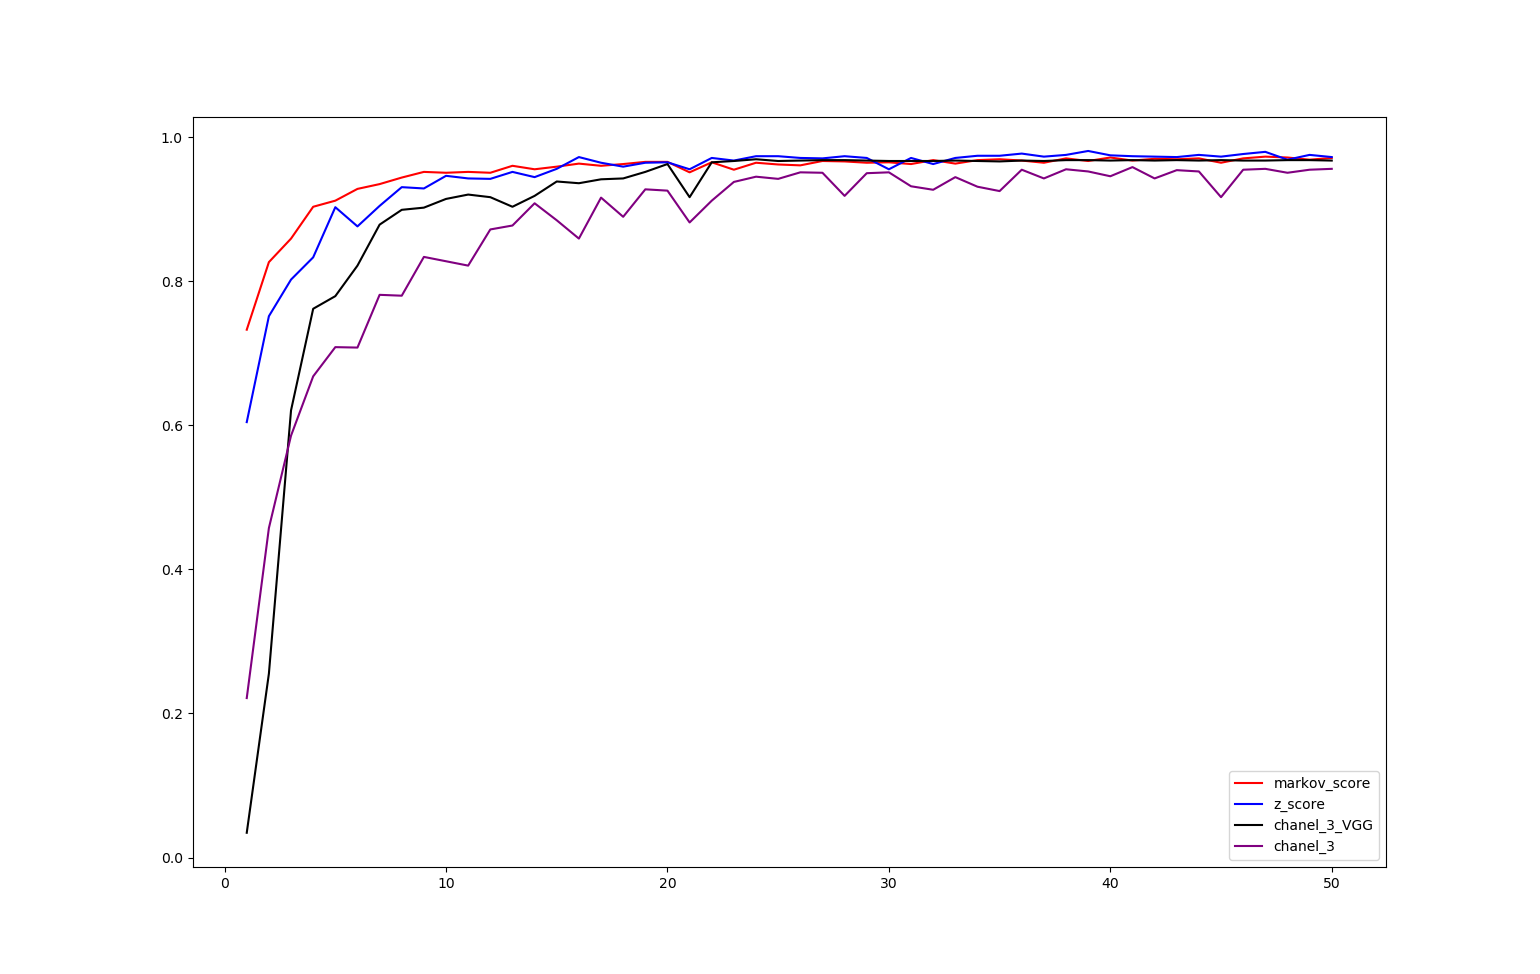
可以看出,z-score确实对分类精度有微小的提升,而三通道反而有所下降,可能是三个通道之间有所冲突