前几天Insus.NET有在数据库实现过对某一字段进行加密码与解密《使用EncryptByPassPhrase和DecryptByPassPhrase对MS SQLServer某一字段时行加密和解密》http://www.cnblogs.com/insus/p/5983645.html
那今次Insus.NET在ASP.NET MVC实现自定义验证Authorize Attribute。
实现之前,Insus.NET对usp_Users_VeryLoginVerify修改一下,改为更好理解与使用:

SET ANSI_NULLS ON
GO
SET QUOTED_IDENTIFIER ON
GO
ALTER PROCEDURE [dbo].[usp_Users_VeryLoginVerify]
(
    @U_nbr NVARCHAR(20),
    @pwd NVARCHAR(100)
)
AS
BEGIN
    DECLARE @errmsg NVARCHAR(50) = N'用户名或密码错误。'

    IF NOT EXISTS(SELECT TOP 1 1 FROM [dbo].[Users] WHERE [U_nbr] = @U_nbr)
    BEGIN
        RAISERROR(@errmsg,16,1)
        RETURN
    END

    SELECT [U_nbr] AS [Account] FROM [dbo].[Users] WHERE [U_nbr] = @U_nbr AND CONVERT(NVARCHAR(100),DECRYPTBYPASSPHRASE('insus#sec!%y',[Pwd]))  = @pwd

    IF @@ROWCOUNT <= 0
    BEGIN
        RAISERROR(@errmsg,16,1)
        RETURN
    END
END
OK,上面是数据库方面。
接下你需要在ASP.NET MVC写程序:
使用Cookie来存储登录以及验证信息,写一个Cookie类别:

using System;
using System.Collections.Generic;
using System.Linq;
using System.Web;

namespace Insus.NET.Utilities
{
    public abstract class CookieBase
    {
        private static HttpResponse Response
        {
            get
            {
                return HttpContext.Current.Response;
            }
        }

        private static HttpRequest Request
        {
            get
            {
                return HttpContext.Current.Request;
            }
        }

        public static HttpCookie Cookie
        {
            get
            {
                return Request.Cookies["CookieBase"] as HttpCookie;
            }
            set
            {
                if (Request.Cookies["CookieBase"] != null)
                {
                    Request.Cookies.Remove("CookieBase");
                }
                Response.Cookies.Add(value);
            }
        }

        public static HttpCookie NewCookie
        {
            get
            {
                return new HttpCookie("CookieBase");
            }
        }

        public static void RemoveCookie()
        {
            if (Cookie == null)
                Response.Cookies.Remove("CookieBase");
            else
                Response.Cookies["CookieBase"].Expires = DateTime.Now.AddDays(-1);
        }
    }
}
其实上面这个CookeBase.cs是一个能存储多对象的集合类。在真正的程序中,你想存储什么信息,可以写一个如下面的类来操作:

using System;
using System.Collections.Generic;
using System.Linq;
using System.Text;
using System.Threading.Tasks;
using System.Web;

namespace Insus.NET.Utilities
{
   public class SecurityBase
    {
        public static bool IsAuthorized
        {
            get
            {
                return CookieBase.Cookie == null ? false : bool.Parse(CookieBase.Cookie.Values["IsAuthorized"]);
            }
            set
            {
                HttpCookie httpCookie = CookieBase.Cookie == null ? CookieBase.NewCookie : CookieBase.Cookie;
                httpCookie.Values["IsAuthorized"] = value.ToString();
                CookieBase.Cookie = httpCookie;
            }
        }

        public static string UserName
        {
            get
            {
                return CookieBase.Cookie == null ? string.Empty : CookieBase.Cookie.Values["UserName"];
            }
            set
            {
                HttpCookie httpCookie = CookieBase.Cookie == null ? CookieBase.NewCookie : CookieBase.Cookie;
                httpCookie.Values["UserName"] = value;
                CookieBase.Cookie = httpCookie;
            }
        }

        public static void RemoveCooke()
        {
            CookieBase.RemoveCookie();
        }
    }
}

using System;
using System.Collections.Generic;
using System.Linq;
using System.Text;
using System.Threading.Tasks;
using System.Web;
using System.Web.Mvc;
using Insus.NET.Utilities;
using System.Web.Routing;

namespace Insus.NET.Attributes
{
    public class SecurityAuthorizeAttribute : AuthorizeAttribute
    {
        protected override bool AuthorizeCore(HttpContextBase httpContext)
        {
            return SecurityBase.IsAuthorized;
        }

        public override void OnAuthorization(AuthorizationContext filterContext)
        {
            string controllerName = filterContext.ActionDescriptor.ControllerDescriptor.ControllerName;
            string actionName = filterContext.ActionDescriptor.ActionName;
            base.OnAuthorization(filterContext);
        }

        protected override void HandleUnauthorizedRequest(AuthorizationContext filterContext)
        {
            var routeValue = new RouteValueDictionary {
                { "Controller", "Home"},
                { "Action", "Index"}
            };
            filterContext.Result = new RedirectToRouteResult(routeValue);
        }
    }
}
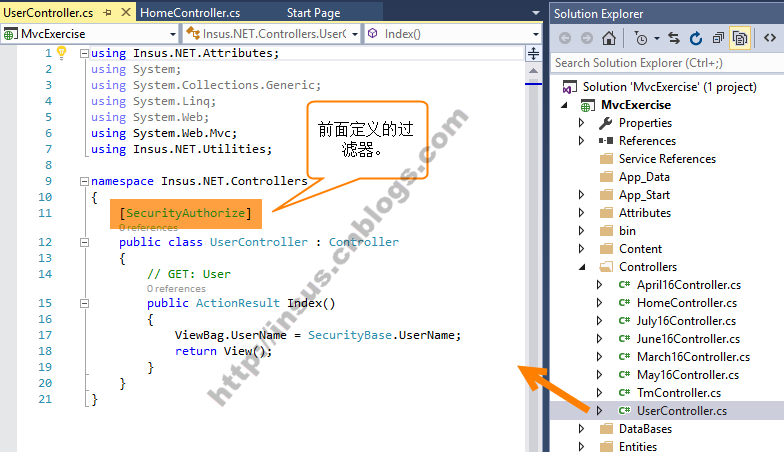
这个过滤器SecurityAuthorizeAttribute.cs,稍后我们会在控制器中应用到它。
接下你需要写控制器了,不,我们似乎少写了一些物件,如model和Entity:
Models写好,还差一个Entity,这个实体是与数据连接的物件:
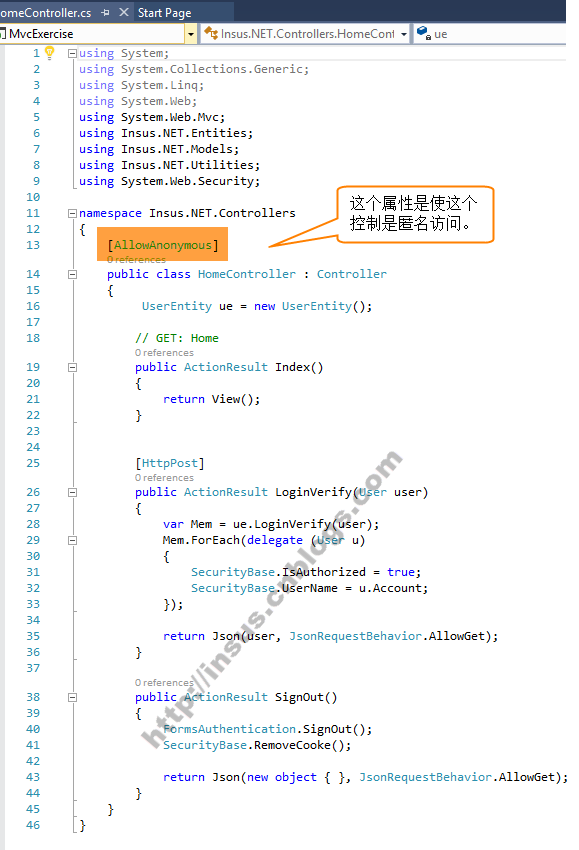
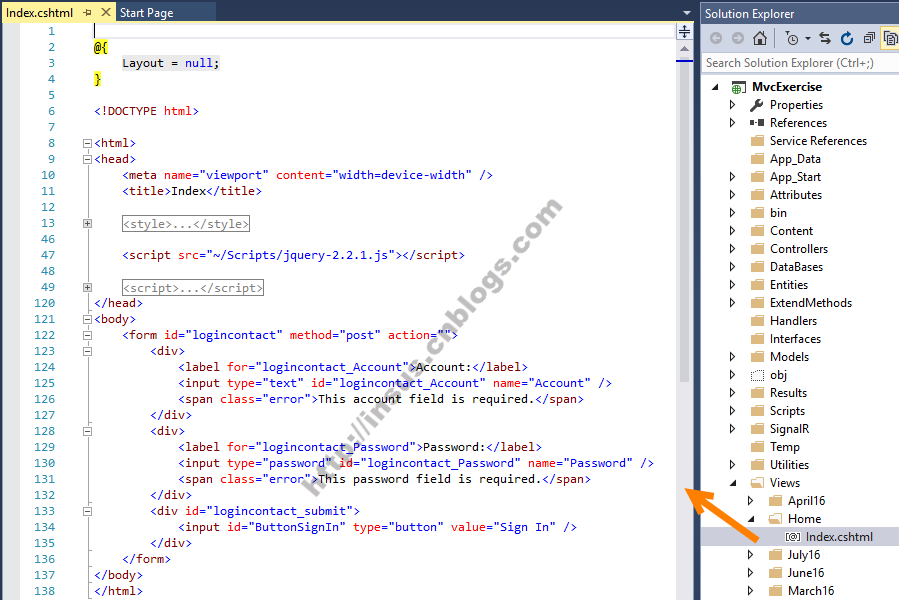
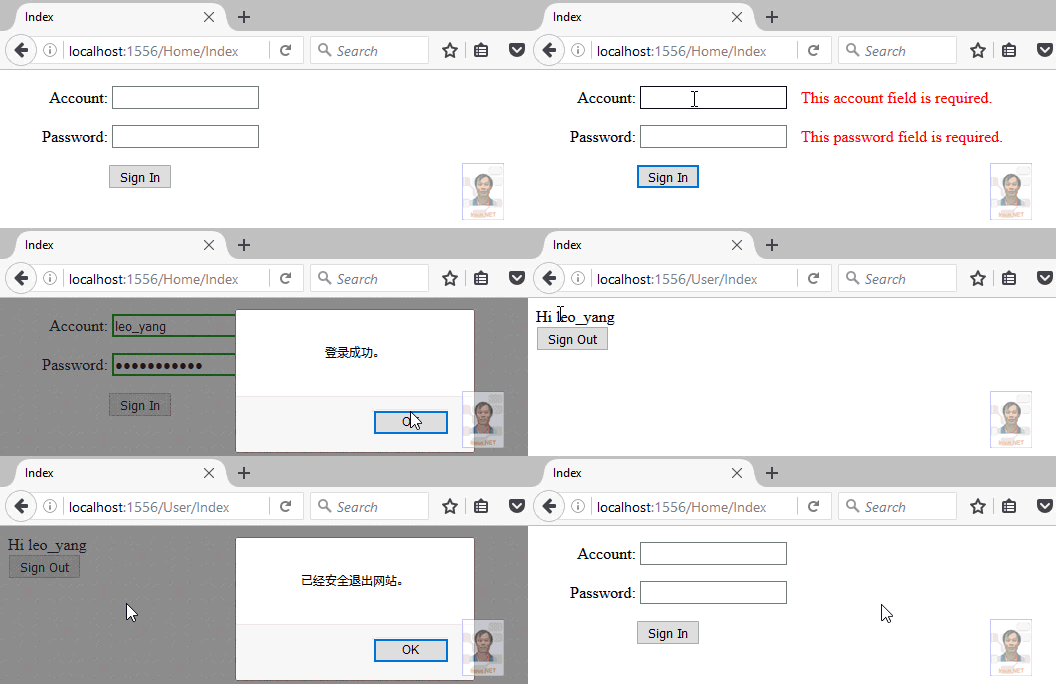
在ASP.NET MVC中,实现登录验证的演示,最少需要两个控制器,一个是给匿名用户访问的,它包含普通的页面和一些基本的操作。另一个控制器是经过验证通过之后才能访问的页面。

@{
    Layout = null;
}

<!DOCTYPE html>

<html>
<head>
    <meta name="viewport" content="width=device-width" />
    <title>Index</title>

    <style type="text/css">
        #logincontact label {
            display: inline-block;
            width: 100px;
            text-align: right;
        }

        #logincontact_submit {
            padding-left: 100px;
        }

        #logincontact div {
            margin-top: 1em;
        }

        .error {
            display: none;
            margin-left: 10px;
        }

        .error_show {
            color: red;
            margin-left: 10px;
        }

        input.invalid {
            border: 2px solid red;
        }

        input.valid {
            border: 2px solid green;
        }
    </style>

    <script src="~/Scripts/jquery-2.2.1.js"></script>

    <script type="text/javascript">
        ////<![CDATA[
        $(document).ready(function () {
            $('#logincontact_Account').on('input', function () {
                var input = $(this);
                var is_Account = input.val();
                if (is_Account) {
                    input.removeClass("invalid").addClass("valid");
                }
                else {
                    input.removeClass("valid").addClass("invalid");
                }
            });


            $('#logincontact_Password').on('input', function () {
                var input = $(this);
                var is_Password = input.val();
                if (is_Password) {
                    input.removeClass("invalid").addClass("valid");
                }
                else {
                    input.removeClass("valid").addClass("invalid");
                }
            });


            $('#ButtonSignIn').click(function (event) {
                var form_data = $("#logincontact").serializeArray();
                var error_free = true;
                for (var input in form_data) {
                    var element = $("#logincontact_" + form_data[input]['name']);
                    var valid = element.hasClass("valid");
                    var error_element = $("span", element.parent());

                    if (!valid) {
                        error_element.removeClass("error").addClass("error_show");
                        error_free = false;
                    }
                    else {
                        error_element.removeClass("error_show").addClass("error");
                    }
                }

                if (!error_free) {
                    event.preventDefault();
                }
                else {
                    var obj = {};
                    obj.Account = $('#logincontact_Account').val(),
                    obj.Password = $('#logincontact_Password').val()

                    $.ajax({
                        type: 'POST',
                        url: '/Home/LoginVerify',
                        dataType: 'json',
                        data: JSON.stringify(obj),
                        contentType: 'application/json; charset=utf-8',
                        success: function (data, textStatus) {
                            alert("登录成功。");
                            window.location.href = "/User/Index";
                        },
                        error: function (XMLHttpRequest, textStatus, errorThrown) {
                            alert(errorThrown);
                        },
                    });
                }
            });
        });
        //]]>
    </script>
</head>
<body>
    <form id="logincontact" method="post" action="">
        <div>
            <label for="logincontact_Account">Account:</label>
            <input type="text" id="logincontact_Account" name="Account" />
            <span class="error">This account field is required.</span>
        </div>
        <div>
            <label for="logincontact_Password">Password:</label>
            <input type="password" id="logincontact_Password" name="Password" />
            <span class="error">This password field is required.</span>
        </div>
        <div id="logincontact_submit">
            <input id="ButtonSignIn" type="button" value="Sign In" />
        </div>
    </form>
</body>
</html>

@{
    Layout = null;
}

<!DOCTYPE html>
<html>
<head>
    <meta name="viewport" content="width=device-width" />
    <title>Index</title>
    <script src="~/Scripts/jquery-2.2.1.js"></script>

    <script type="text/javascript">
        ////<![CDATA[
        $(document).ready(function () {

            $('#ButtonSignOut').click(function (event) {
                $.ajax({
                    type: 'POST',
                    url: '/Home/SignOut',
                    contentType: 'application/json; charset=utf-8',
                    success: function (data, textStatus) {
                        alert("已经安全退出网站。");
                        window.location.href = "/Home/Index";
                    },
                    error: function (XMLHttpRequest, textStatus, errorThrown) {
                        alert(errorThrown);
                    },
                });
            });
        });
        //]]>
    </script>
</head>
<body>
    <div>
        Hi @ViewBag.UserName
        <br />
        <input id="ButtonSignOut" type="button" value="Sign Out" />
    </div>
</body>
</html>


