ZZ FROM: http://blog.csdn.net/luoshengyang/article/details/6817933
==========================================================
Android应用程序是通过消息来驱动的,系统为每一个应用程序维护一个消息队例,应用程序的主线程不断地从这个消息队例中获取消息(Looper),然后对这些消息进行处理(Handler),这样就实现了通过消息来驱动应用程序的执行,本文将详细分析Android应用程序的消息处理机制。
前面我们学习Android应用程序中的Activity启动(Android应用程序启动过程源代码分析和Android应用程序内部启动Activity过程(startActivity)的源代码分析)、Service启动(Android系统在新进程中启动自定义服务过程(startService)的原理分析和Android应用程序绑定服务(bindService)的过程源代码分析)以及广播发送(Android应用程序发送广播(sendBroadcast)的过程分析)时,它们都有一个共同的特点,当ActivityManagerService需要与应用程序进行并互时,如加载Activity和Service、处理广播待,会通过Binder进程间通信机制来知会应用程序,应用程序接收到这个请求时,它不是马上就处理这个请求,而是将这个请求封装成一个消息,然后把这个消息放在应用程序的消息队列中去,然后再通过消息循环来处理这个消息。这样做的好处就是消息的发送方只要把消息发送到应用程序的消息队列中去就行了,它可以马上返回去处理别的事情,而不需要等待消息的接收方去处理完这个消息才返回,这样就可以提高系统的并发性。实质上,这就是一种异步处理机制。
这样说可能还是比较笼统,我们以Android应用程序启动过程源代码分析一文中所介绍的应用程序启动过程的一个片断来具体看看是如何这种消息处理机制的。在这篇文章中,要启动的应用程序称为Activity,它的默认Activity是MainActivity,它是由Launcher来负责启动的,而Launcher又是通过ActivityManagerService来启动的,当ActivityManagerService为这个即将要启的应用程序准备好新的进程后,便通过一个Binder进程间通信过程来通知这个新的进程来加载MainActivity,如下图所示:
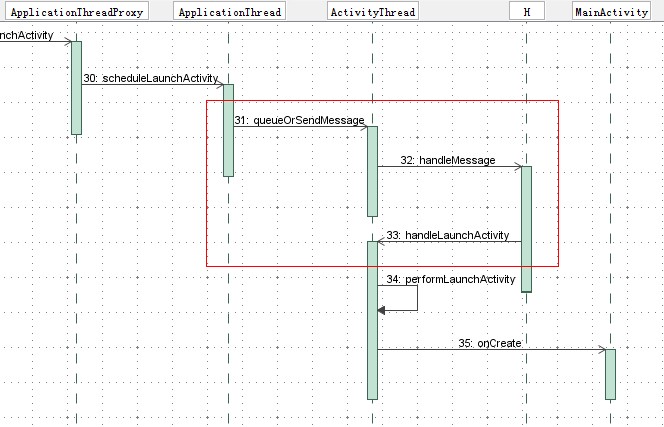
它对应Android应用程序启动过程中的Step 30到Step 35,有兴趣的读者可以回过头去参考Android应用程序启动过程源代码分析一文。这里的Step 30中的scheduleLaunchActivity是ActivityManagerService通过Binder进程间通信机制发送过来的请求,它请求应用程序中的ActivityThread执行Step 34中的performLaunchActivity操作,即启动MainActivity的操作。这里我们就可以看到,Step 30的这个请求并没有等待Step 34这个操作完成就返回了,它只是把这个请求封装成一个消息,然后通过Step 31中的queueOrSendMessage操作把这个消息放到应用程序的消息队列中,然后就返回了。应用程序发现消息队列中有消息时,就会通过Step 32中的handleMessage操作来处理这个消息,即调用Step 33中的handleLaunchActivity来执行实际的加载MainAcitivy类的操作。
了解Android应用程序的消息处理过程之后,我们就开始分样它的实现原理了。与Windows应用程序的消息处理过程一样,Android应用程序的消息处理机制也是由消息循环、消息发送和消息处理这三个部分组成的,接下来,我们就详细描述这三个过程。
1. 消息循环
在消息处理机制中,消息都是存放在一个消息队列中去,而应用程序的主线程就是围绕这个消息队列进入一个无限循环的,直到应用程序退出。如果队列中有消息,应用程序的主线程就会把它取出来,并分发给相应的Handler进行处理;如果队列中没有消息,应用程序的主线程就会进入空闲等待状态,等待下一个消息的到来。在Android应用程序中,这个消息循环过程是由Looper类来实现的,它定义在frameworks/base/core/java/android/os/Looper.java文件中,在分析这个类之前,我们先看一下Android应用程序主线程是如何进入到这个消息循环中去的。
在Android应用程序进程启动过程的源代码分析一文中,我们分析了Android应用程序进程的启动过程,Android应用程序进程在启动的时候,会在进程中加载ActivityThread类,并且执行这个类的main函数,应用程序的消息循环过程就是在这个main函数里面实现的,我们来看看这个函数的实现,它定义在frameworks/base/core/java/android/app/ActivityThread.java文件中:
- public final class ActivityThread {
- ......
- public static final void main(String[] args) {
- ......
- Looper.prepareMainLooper();
- ......
- ActivityThread thread = new ActivityThread();
- thread.attach(false);
- ......
- Looper.loop();
- ......
- thread.detach();
- ......
- }
- }
首先看Looper.prepareMainLooper函数的实现,这是一个静态成员函数,定义在frameworks/base/core/java/android/os/Looper.java文件中:
- public class Looper {
- ......
- private static final ThreadLocal sThreadLocal = new ThreadLocal();
- final MessageQueue mQueue;
- ......
- /** Initialize the current thread as a looper.
- * This gives you a chance to create handlers that then reference
- * this looper, before actually starting the loop. Be sure to call
- * {@link #loop()} after calling this method, and end it by calling
- * {@link #quit()}.
- */
- public static final void prepare() {
- if (sThreadLocal.get() != null) {
- throw new RuntimeException("Only one Looper may be created per thread");
- }
- sThreadLocal.set(new Looper());
- }
- /** Initialize the current thread as a looper, marking it as an application's main
- * looper. The main looper for your application is created by the Android environment,
- * so you should never need to call this function yourself.
- * {@link #prepare()}
- */
- public static final void prepareMainLooper() {
- prepare();
- setMainLooper(myLooper());
- if (Process.supportsProcesses()) {
- myLooper().mQueue.mQuitAllowed = false;
- }
- }
- private synchronized static void setMainLooper(Looper looper) {
- mMainLooper = looper;
- }
- /**
- * Return the Looper object associated with the current thread. Returns
- * null if the calling thread is not associated with a Looper.
- */
- public static final Looper myLooper() {
- return (Looper)sThreadLocal.get();
- }
- private Looper() {
- mQueue = new MessageQueue();
- mRun = true;
- mThread = Thread.currentThread();
- }
- ......
- }
- public class MessageQueue {
- ......
- private int mPtr; // used by native code
- private native void nativeInit();
- MessageQueue() {
- nativeInit();
- }
- ......
- }
- static void android_os_MessageQueue_nativeInit(JNIEnv* env, jobject obj) {
- NativeMessageQueue* nativeMessageQueue = new NativeMessageQueue();
- if (! nativeMessageQueue) {
- jniThrowRuntimeException(env, "Unable to allocate native queue");
- return;
- }
- android_os_MessageQueue_setNativeMessageQueue(env, obj, nativeMessageQueue);
- }
- NativeMessageQueue::NativeMessageQueue() {
- mLooper = Looper::getForThread();
- if (mLooper == NULL) {
- mLooper = new Looper(false);
- Looper::setForThread(mLooper);
- }
- }
这个Looper的创建过程也很重要,不过我们暂时放一放,先分析完android_os_MessageQueue_nativeInit函数的执行,它创建了本地消息队列NativeMessageQueue对象之后,接着调用android_os_MessageQueue_setNativeMessageQueue函数来把这个消息队列对象保存在前面我们在Java层中创建的MessageQueue对象的mPtr成员变量里面:
- static void android_os_MessageQueue_setNativeMessageQueue(JNIEnv* env, jobject messageQueueObj,
- NativeMessageQueue* nativeMessageQueue) {
- env->SetIntField(messageQueueObj, gMessageQueueClassInfo.mPtr,
- reinterpret_cast<jint>(nativeMessageQueue));
- }
我们再回到NativeMessageQueue的构造函数中,看看JNI层的Looper对象的创建过程,即看看它的构造函数是如何实现的,这个Looper类实现在frameworks/base/libs/utils/Looper.cpp文件中:
- Looper::Looper(bool allowNonCallbacks) :
- mAllowNonCallbacks(allowNonCallbacks),
- mResponseIndex(0) {
- int wakeFds[2];
- int result = pipe(wakeFds);
- ......
- mWakeReadPipeFd = wakeFds[0];
- mWakeWritePipeFd = wakeFds[1];
- ......
- #ifdef LOOPER_USES_EPOLL
- // Allocate the epoll instance and register the wake pipe.
- mEpollFd = epoll_create(EPOLL_SIZE_HINT);
- ......
- struct epoll_event eventItem;
- memset(& eventItem, 0, sizeof(epoll_event)); // zero out unused members of data field union
- eventItem.events = EPOLLIN;
- eventItem.data.fd = mWakeReadPipeFd;
- result = epoll_ctl(mEpollFd, EPOLL_CTL_ADD, mWakeReadPipeFd, & eventItem);
- ......
- #else
- ......
- #endif
- ......
- }
- int wakeFds[2];
- int result = pipe(wakeFds);
- ......
- mWakeReadPipeFd = wakeFds[0];
- mWakeWritePipeFd = wakeFds[1];
要使用Linux系统的epoll机制,首先要通过epoll_create来创建一个epoll专用的文件描述符:
- mEpollFd = epoll_create(EPOLL_SIZE_HINT);
接着还要通过epoll_ctl函数来告诉epoll要监控相应的文件描述符的什么事件:
- struct epoll_event eventItem;
- memset(& eventItem, 0, sizeof(epoll_event)); // zero out unused members of data field union
- eventItem.events = EPOLLIN;
- eventItem.data.fd = mWakeReadPipeFd;
- result = epoll_ctl(mEpollFd, EPOLL_CTL_ADD, mWakeReadPipeFd, & eventItem);
C++层的这个Looper对象创建好了之后,就返回到JNI层的NativeMessageQueue的构造函数,最后就返回到Java层的消息队列MessageQueue的创建过程,这样,Java层的Looper对象就准备好了。有点复杂,我们先小结一下这一步都做了些什么事情:
A. 在Java层,创建了一个Looper对象,这个Looper对象是用来进入消息循环的,它的内部有一个消息队列MessageQueue对象mQueue;
B. 在JNI层,创建了一个NativeMessageQueue对象,这个NativeMessageQueue对象保存在Java层的消息队列对象mQueue的成员变量mPtr中;
C. 在C++层,创建了一个Looper对象,保存在JNI层的NativeMessageQueue对象的成员变量mLooper中,这个对象的作用是,当Java层的消息队列中没有消息时,就使Android应用程序主线程进入等待状态,而当Java层的消息队列中来了新的消息后,就唤醒Android应用程序的主线程来处理这个消息。
回到ActivityThread类的main函数中,在上面这些工作都准备好之后,就调用Looper类的loop函数进入到消息循环中去了:
- public class Looper {
- ......
- public static final void loop() {
- Looper me = myLooper();
- MessageQueue queue = me.mQueue;
- ......
- while (true) {
- Message msg = queue.next(); // might block
- ......
- if (msg != null) {
- if (msg.target == null) {
- // No target is a magic identifier for the quit message.
- return;
- }
- ......
- msg.target.dispatchMessage(msg);
- ......
- msg.recycle();
- }
- }
- }
- ......
- }
这个函数最关键的地方便是从消息队列中获取下一个要处理的消息了,即MessageQueue.next函数,它实现frameworks/base/core/java/android/os/MessageQueue.java文件中:
- public class MessageQueue {
- ......
- final Message next() {
- int pendingIdleHandlerCount = -1; // -1 only during first iteration
- int nextPollTimeoutMillis = 0;
- for (;;) {
- if (nextPollTimeoutMillis != 0) {
- Binder.flushPendingCommands();
- }
- nativePollOnce(mPtr, nextPollTimeoutMillis);
- synchronized (this) {
- // Try to retrieve the next message. Return if found.
- final long now = SystemClock.uptimeMillis();
- final Message msg = mMessages;
- if (msg != null) {
- final long when = msg.when;
- if (now >= when) {
- mBlocked = false;
- mMessages = msg.next;
- msg.next = null;
- if (Config.LOGV) Log.v("MessageQueue", "Returning message: " + msg);
- return msg;
- } else {
- nextPollTimeoutMillis = (int) Math.min(when - now, Integer.MAX_VALUE);
- }
- } else {
- nextPollTimeoutMillis = -1;
- }
- // If first time, then get the number of idlers to run.
- if (pendingIdleHandlerCount < 0) {
- pendingIdleHandlerCount = mIdleHandlers.size();
- }
- if (pendingIdleHandlerCount == 0) {
- // No idle handlers to run. Loop and wait some more.
- mBlocked = true;
- continue;
- }
- if (mPendingIdleHandlers == null) {
- mPendingIdleHandlers = new IdleHandler[Math.max(pendingIdleHandlerCount, 4)];
- }
- mPendingIdleHandlers = mIdleHandlers.toArray(mPendingIdleHandlers);
- }
- // Run the idle handlers.
- // We only ever reach this code block during the first iteration.
- for (int i = 0; i < pendingIdleHandlerCount; i++) {
- final IdleHandler idler = mPendingIdleHandlers[i];
- mPendingIdleHandlers[i] = null; // release the reference to the handler
- boolean keep = false;
- try {
- keep = idler.queueIdle();
- } catch (Throwable t) {
- Log.wtf("MessageQueue", "IdleHandler threw exception", t);
- }
- if (!keep) {
- synchronized (this) {
- mIdleHandlers.remove(idler);
- }
- }
- }
- // Reset the idle handler count to 0 so we do not run them again.
- pendingIdleHandlerCount = 0;
- // While calling an idle handler, a new message could have been delivered
- // so go back and look again for a pending message without waiting.
- nextPollTimeoutMillis = 0;
- }
- }
- ......
- }
执行下面语句是看看当前消息队列中有没有消息:
- nativePollOnce(mPtr, nextPollTimeoutMillis);
当前nativePollOnce返回后,就去看看消息队列中有没有消息:
- final Message msg = mMessages;
- if (msg != null) {
- final long when = msg.when;
- if (now >= when) {
- mBlocked = false;
- mMessages = msg.next;
- msg.next = null;
- if (Config.LOGV) Log.v("MessageQueue", "Returning message: " + msg);
- return msg;
- } else {
- nextPollTimeoutMillis = (int) Math.min(when - now, Integer.MAX_VALUE);
- }
- } else {
- nextPollTimeoutMillis = -1;
- }
- nextPollTimeoutMillis = (int) Math.min(when - now, Integer.MAX_VALUE);
- nextPollTimeoutMillis = -1;
这里计算出来的等待时间都是在下次调用nativePollOnce时使用的。
这里说的等待,是空闲等待,而不是忙等待,因此,在进入空闲等待状态前,如果应用程序注册了IdleHandler接口来处理一些事情,那么就会先执行这里IdleHandler,然后再进入等待状态。IdlerHandler是定义在MessageQueue的一个内部类:
- public class MessageQueue {
- ......
- /**
- * Callback interface for discovering when a thread is going to block
- * waiting for more messages.
- */
- public static interface IdleHandler {
- /**
- * Called when the message queue has run out of messages and will now
- * wait for more. Return true to keep your idle handler active, false
- * to have it removed. This may be called if there are still messages
- * pending in the queue, but they are all scheduled to be dispatched
- * after the current time.
- */
- boolean queueIdle();
- }
- ......
- }
回到MessageQueue函数中,它接下来就是在进入等待状态前,看看有没有IdleHandler是需要执行的:
- // If first time, then get the number of idlers to run.
- if (pendingIdleHandlerCount < 0) {
- pendingIdleHandlerCount = mIdleHandlers.size();
- }
- if (pendingIdleHandlerCount == 0) {
- // No idle handlers to run. Loop and wait some more.
- mBlocked = true;
- continue;
- }
- if (mPendingIdleHandlers == null) {
- mPendingIdleHandlers = new IdleHandler[Math.max(pendingIdleHandlerCount, 4)];
- }
- mPendingIdleHandlers = mIdleHandlers.toArray(mPendingIdleHandlers);
接下来就是执行这些注册了的IdleHanlder了:
- // Run the idle handlers.
- // We only ever reach this code block during the first iteration.
- for (int i = 0; i < pendingIdleHandlerCount; i++) {
- final IdleHandler idler = mPendingIdleHandlers[i];
- mPendingIdleHandlers[i] = null; // release the reference to the handler
- boolean keep = false;
- try {
- keep = idler.queueIdle();
- } catch (Throwable t) {
- Log.wtf("MessageQueue", "IdleHandler threw exception", t);
- }
- if (!keep) {
- synchronized (this) {
- mIdleHandlers.remove(idler);
- }
- }
- }
- // While calling an idle handler, a new message could have been delivered
- // so go back and look again for a pending message without waiting.
- nextPollTimeoutMillis = 0;
- static void android_os_MessageQueue_nativePollOnce(JNIEnv* env, jobject obj,
- jint ptr, jint timeoutMillis) {
- NativeMessageQueue* nativeMessageQueue = reinterpret_cast<NativeMessageQueue*>(ptr);
- nativeMessageQueue->pollOnce(timeoutMillis);
- }
- void NativeMessageQueue::pollOnce(int timeoutMillis) {
- mLooper->pollOnce(timeoutMillis);
- }
- int Looper::pollOnce(int timeoutMillis, int* outFd, int* outEvents, void** outData) {
- int result = 0;
- for (;;) {
- ......
- if (result != 0) {
- ......
- return result;
- }
- result = pollInner(timeoutMillis);
- }
- }
函数pollInner的定义如下:
- int Looper::pollInner(int timeoutMillis) {
- ......
- int result = ALOOPER_POLL_WAKE;
- ......
- #ifdef LOOPER_USES_EPOLL
- struct epoll_event eventItems[EPOLL_MAX_EVENTS];
- int eventCount = epoll_wait(mEpollFd, eventItems, EPOLL_MAX_EVENTS, timeoutMillis);
- bool acquiredLock = false;
- #else
- ......
- #endif
- if (eventCount < 0) {
- if (errno == EINTR) {
- goto Done;
- }
- LOGW("Poll failed with an unexpected error, errno=%d", errno);
- result = ALOOPER_POLL_ERROR;
- goto Done;
- }
- if (eventCount == 0) {
- ......
- result = ALOOPER_POLL_TIMEOUT;
- goto Done;
- }
- ......
- #ifdef LOOPER_USES_EPOLL
- for (int i = 0; i < eventCount; i++) {
- int fd = eventItems[i].data.fd;
- uint32_t epollEvents = eventItems[i].events;
- if (fd == mWakeReadPipeFd) {
- if (epollEvents & EPOLLIN) {
- awoken();
- } else {
- LOGW("Ignoring unexpected epoll events 0x%x on wake read pipe.", epollEvents);
- }
- } else {
- ......
- }
- }
- if (acquiredLock) {
- mLock.unlock();
- }
- Done: ;
- #else
- ......
- #endif
- ......
- return result;
- }
- int eventCount = epoll_wait(mEpollFd, eventItems, EPOLL_MAX_EVENTS, timeoutMillis);
当mEpollFd所监控的文件描述符发生了要监控的IO事件后或者监控时间超时后,线程就从epoll_wait返回了,否则线程就会在epoll_wait函数中进入睡眠状态了。返回后如果eventCount等于0,就说明是超时了:
- if (eventCount == 0) {
- ......
- result = ALOOPER_POLL_TIMEOUT;
- goto Done;
- }
- for (int i = 0; i < eventCount; i++) {
- int fd = eventItems[i].data.fd;
- uint32_t epollEvents = eventItems[i].events;
- if (fd == mWakeReadPipeFd) {
- if (epollEvents & EPOLLIN) {
- awoken();
- } else {
- LOGW("Ignoring unexpected epoll events 0x%x on wake read pipe.", epollEvents);
- }
- } else {
- ......
- }
- }
函数awoken的实现很简单,它只是把管道中的内容都读取出来:
- void Looper::awoken() {
- ......
- char buffer[16];
- ssize_t nRead;
- do {
- nRead = read(mWakeReadPipeFd, buffer, sizeof(buffer));
- } while ((nRead == -1 && errno == EINTR) || nRead == sizeof(buffer));
- }
这样,消息的循环过程就分析完了,这部分逻辑还是比较复杂的,它利用Linux系统中的管道(pipe)进程间通信机制来实现消息的等待和处理,不过,了解了这部分内容之后,下面我们分析消息的发送和处理就简单多了。
2. 消息的发送
应用程序的主线程准备就好消息队列并且进入到消息循环后,其它地方就可以往这个消息队列中发送消息了。我们继续以文章开始介绍的Android应用程序启动过程源代码分析一文中的应用程序启动过为例,说明应用程序是如何把消息加入到应用程序的消息队列中去的。
在Android应用程序启动过程源代码分析这篇文章的Step 30中,ActivityManagerService通过调用ApplicationThread类的scheduleLaunchActivity函数通知应用程序,它可以加载应用程序的默认Activity了,这个函数定义在frameworks/base/core/java/android/app/ActivityThread.java文件中:
- public final class ActivityThread {
- ......
- private final class ApplicationThread extends ApplicationThreadNative {
- ......
- // we use token to identify this activity without having to send the
- // activity itself back to the activity manager. (matters more with ipc)
- public final void scheduleLaunchActivity(Intent intent, IBinder token, int ident,
- ActivityInfo info, Bundle state, List<ResultInfo> pendingResults,
- List<Intent> pendingNewIntents, boolean notResumed, boolean isForward) {
- ActivityClientRecord r = new ActivityClientRecord();
- r.token = token;
- r.ident = ident;
- r.intent = intent;
- r.activityInfo = info;
- r.state = state;
- r.pendingResults = pendingResults;
- r.pendingIntents = pendingNewIntents;
- r.startsNotResumed = notResumed;
- r.isForward = isForward;
- queueOrSendMessage(H.LAUNCH_ACTIVITY, r);
- }
- ......
- }
- ......
- }
- public final class ActivityThread {
- ......
- private final class ApplicationThread extends ApplicationThreadNative {
- ......
- // if the thread hasn't started yet, we don't have the handler, so just
- // save the messages until we're ready.
- private final void queueOrSendMessage(int what, Object obj) {
- queueOrSendMessage(what, obj, 0, 0);
- }
- ......
- private final void queueOrSendMessage(int what, Object obj, int arg1, int arg2) {
- synchronized (this) {
- ......
- Message msg = Message.obtain();
- msg.what = what;
- msg.obj = obj;
- msg.arg1 = arg1;
- msg.arg2 = arg2;
- mH.sendMessage(msg);
- }
- }
- ......
- }
- ......
- }
- public final class ActivityThread {
- ......
- private final class H extends Handler {
- ......
- public void handleMessage(Message msg) {
- ......
- switch (msg.what) {
- ......
- }
- ......
- }
- ......
- }
这个H类就是通过其成员函数handleMessage函数来处理消息的了,后面我们分析消息的处理过程时会看到。
ActivityThread类的这个mH成员变量是什么时候创建的呢?我们前面在分析应用程序的消息循环时,说到当应用程序进程启动之后,就会加载ActivityThread类的main函数里面,在这个main函数里面,在通过Looper类进入消息循环之前,会在当前进程中创建一个ActivityThread实例:
- public final class ActivityThread {
- ......
- public static final void main(String[] args) {
- ......
- ActivityThread thread = new ActivityThread();
- thread.attach(false);
- ......
- }
- }
- public final class ActivityThread {
- ......
- final H mH = new H();
- ......
- }
- public class Handler {
- ......
- public Handler() {
- ......
- mLooper = Looper.myLooper();
- ......
- mQueue = mLooper.mQueue;
- ......
- }
- final MessageQueue mQueue;
- final Looper mLooper;
- ......
- }
- public class Looper {
- ......
- public static final Looper myLooper() {
- return (Looper)sThreadLocal.get();
- }
- ......
- }
有了这个Handler对象mH后,就可以通过它来往应用程序的消息队列中加入新的消息了。回到前面的queueOrSendMessage函数中,当它准备好了一个Message对象msg后,就开始调用mH.sendMessage函数来发送消息了,这个函数定义在frameworks/base/core/java/android/os/Handler.java文件中:
- public class Handler {
- ......
- public final boolean sendMessage(Message msg)
- {
- return sendMessageDelayed(msg, 0);
- }
- public final boolean sendMessageDelayed(Message msg, long delayMillis)
- {
- if (delayMillis < 0) {
- delayMillis = 0;
- }
- return sendMessageAtTime(msg, SystemClock.uptimeMillis() + delayMillis);
- }
- public boolean sendMessageAtTime(Message msg, long uptimeMillis)
- {
- boolean sent = false;
- MessageQueue queue = mQueue;
- if (queue != null) {
- msg.target = this;
- sent = queue.enqueueMessage(msg, uptimeMillis);
- }
- else {
- ......
- }
- return sent;
- }
- ......
- }
在sendMessageAtTime函数,首先得到应用程序的消息队列mQueue,这是在Handler对象构造时初始化好的,前面已经分析过了,接着设置这个消息的目标对象target,即这个消息最终是由谁来处理的:
- msg.target = this;
函数最后调用queue.enqueueMessage来把这个消息加入到应用程序的消息队列中去,这个函数实现在frameworks/base/core/java/android/os/MessageQueue.java文件中:
- public class MessageQueue {
- ......
- final boolean enqueueMessage(Message msg, long when) {
- ......
- final boolean needWake;
- synchronized (this) {
- ......
- msg.when = when;
- //Log.d("MessageQueue", "Enqueing: " + msg);
- Message p = mMessages;
- if (p == null || when == 0 || when < p.when) {
- msg.next = p;
- mMessages = msg;
- needWake = mBlocked; // new head, might need to wake up
- } else {
- Message prev = null;
- while (p != null && p.when <= when) {
- prev = p;
- p = p.next;
- }
- msg.next = prev.next;
- prev.next = msg;
- needWake = false; // still waiting on head, no need to wake up
- }
- }
- if (needWake) {
- nativeWake(mPtr);
- }
- return true;
- }
- ......
- }
第一种情况比较简单,只要把消息放在消息队列头就可以了:
- msg.next = p;
- mMessages = msg;
- needWake = mBlocked; // new head, might need to wake up
- Message prev = null;
- while (p != null && p.when <= when) {
- prev = p;
- p = p.next;
- }
- msg.next = prev.next;
- prev.next = msg;
- needWake = false; // still waiting on head, no need to wake up
- static void android_os_MessageQueue_nativeWake(JNIEnv* env, jobject obj, jint ptr) {
- NativeMessageQueue* nativeMessageQueue = reinterpret_cast<NativeMessageQueue*>(ptr);
- return nativeMessageQueue->wake();
- }
- void NativeMessageQueue::wake() {
- mLooper->wake();
- }
- void Looper::wake() {
- ......
- ssize_t nWrite;
- do {
- nWrite = write(mWakeWritePipeFd, "W", 1);
- } while (nWrite == -1 && errno == EINTR);
- .......
- }
这时候既然管道中有内容可读了,应用程序的主线程就会从这里的Looper类的pollInner函数返回到JNI层的nativePollOnce函数,最后返回到Java层中的MessageQueue.next函数中去,这里它就会发现消息队列中有新的消息需要处理了,于就会处理这个消息。
3. 消息的处理
前面在分析消息循环时,说到应用程序的主线程是在Looper类的loop成员函数中进行消息循环过程的,这个函数定义在frameworks/base/core/java/android/os/Looper.java文件中:
- public class Looper {
- ......
- public static final void loop() {
- Looper me = myLooper();
- MessageQueue queue = me.mQueue;
- ......
- while (true) {
- Message msg = queue.next(); // might block
- ......
- if (msg != null) {
- if (msg.target == null) {
- // No target is a magic identifier for the quit message.
- return;
- }
- ......
- msg.target.dispatchMessage(msg);
- ......
- msg.recycle();
- }
- }
- }
- ......
- }
我们继续以前面分析消息的发送时所举的例子来分析消息的处理过程。前面说到,在Android应用程序启动过程源代码分析这篇文章的Step 30中,ActivityManagerService通过调用ApplicationThread类的scheduleLaunchActivity函数通知应用程序,它可以加载应用程序的默认Activity了,而ApplicationThread类的scheduleLaunchActivity函数最终把这个请求封装成一个消息,然后通过ActivityThread类的成员变量mH来把这个消息加入到应用程序的消息队列中去。现在要对这个消息进行处理了,于是就会调用H类的dispatchMessage函数进行处理。
H类没有实现自己的dispatchMessage函数,但是它继承了父类Handler的dispatchMessage函数,这个函数定义在frameworks/base/core/java/android/os/ Handler.java文件中:
- public class Handler {
- ......
- public void dispatchMessage(Message msg) {
- if (msg.callback != null) {
- handleCallback(msg);
- } else {
- if (mCallback != null) {
- if (mCallback.handleMessage(msg)) {
- return;
- }
- }
- handleMessage(msg);
- }
- }
- ......
- }
- public final class ActivityThread {
- ......
- private final class H extends Handler {
- ......
- public void handleMessage(Message msg) {
- ......
- switch (msg.what) {
- case LAUNCH_ACTIVITY: {
- ActivityClientRecord r = (ActivityClientRecord)msg.obj;
- r.packageInfo = getPackageInfoNoCheck(
- r.activityInfo.applicationInfo);
- handleLaunchActivity(r, null);
- } break;
- ......
- }
- ......
- }
- ......
- }
至此,我们就从消息循环、消息发送和消息处理三个部分分析完Android应用程序的消息处理机制了,为了更深理解,这里我们对其中的一些要点作一个总结:
A. Android应用程序的消息处理机制由消息循环、消息发送和消息处理三个部分组成的。
B. Android应用程序的主线程在进入消息循环过程前,会在内部创建一个Linux管道(Pipe),这个管道的作用是使得Android应用程序主线程在消息队列为空时可以进入空闲等待状态,并且使得当应用程序的消息队列有消息需要处理时唤醒应用程序的主线程。
C. Android应用程序的主线程进入空闲等待状态的方式实际上就是在管道的读端等待管道中有新的内容可读,具体来说就是是通过Linux系统的Epoll机制中的epoll_wait函数进行的。
D. 当往Android应用程序的消息队列中加入新的消息时,会同时往管道中的写端写入内容,通过这种方式就可以唤醒正在等待消息到来的应用程序主线程。
E. 当应用程序主线程在进入空闲等待前,会认为当前线程处理空闲状态,于是就会调用那些已经注册了的IdleHandler接口,使得应用程序有机会在空闲的时候处理一些事情。