UIScrollView用于显示多于一个屏幕的内容或者超过你能放在内存中的内容,Scroll View为你处理缩小放大手势,UIScrollView实现了这些手势,并且替你处理对于它们的探测和回应。其中需要注意的子类是UITableView以及UITextView(用来显示大量的文字)。还有一个UIWebView,尽管那不是UIScrollView的直接子类,它适用UIScrollView去显示网页内容,下面我们看一下如何使用:

1、首先我们初始化一个滚动视图,并且把尺寸设计的和苹果6一样大小。
   UIScrollView * scrollView=[[UIScrollView alloc] initWithFrame:CGRectMake(0, 0, kWidth, kHeight)];
[self.view addSubview:scrollView]; self.scrollView=scrollView;
2、向滚动视图ScrollView上面增加一个图片
UIImageView * imageView1=[[UIImageView alloc] initWithFrame:CGRectMake(0, 0, kWidth, kHeight)];
    imageView1.image=[UIImage imageNamed:@"01.jpg"];
[self.scrollView addSubview:imageView1];
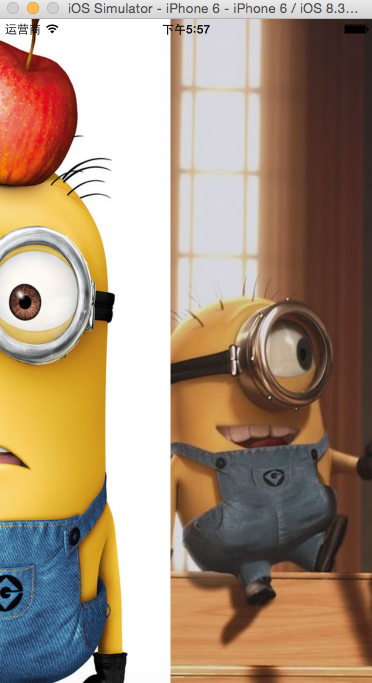
我们看到的结果是这样,图片只显示了一半,而且没法拖拽

出现这种情况的原因就是,我们虽然把滚动视图的窗口设计为如此大小,但是图片的尺寸并不是窗口的尺寸,因此我们需要设计滚动视图的内容尺寸,该尺寸与图片尺寸大小一样。
//设置内容尺寸
scrollView.contentSize=CGSizeMake(640, 960);
这样,我们就可以友好的滚动了。当然还有几个比较常用的属性,我们一一列出
//设置分页
    scrollView.pagingEnabled=YES;

    //隐藏水平滚动条
    scrollView.showsHorizontalScrollIndicator=NO;

    //隐藏垂直滚动条
    scrollView.showsVerticalScrollIndicator=NO;

    //设置初始位置
scrollView.contentOffset=CGPointMake(375*2, 0);
3、下面我们实现如何多张图片轮播呢,只需要同样的操作就可以了。只不过我们需要把图片并列排放
UIScrollView * scrollView=[[UIScrollView alloc] initWithFrame:CGRectMake(0, 0, kWidth, kHeight)];
    [self.view addSubview:scrollView];
    self.scrollView=scrollView;
    self.scrollView.contentSize=CGSizeMake(kWidth*3, 0);
    self.scrollView.showsHorizontalScrollIndicator=NO;
    self.scrollView.showsVerticalScrollIndicator=NO;
    self.scrollView.pagingEnabled=YES;
    self.scrollView.delegate=self;
    UIImageView * imageView1=[[UIImageView alloc] initWithFrame:CGRectMake(0, 0, kWidth, kHeight)];
    imageView1.image=[UIImage imageNamed:@"01.jpg"];
    [self.scrollView addSubview:imageView1];
    [self.allImage addObject:imageView1];

    UIImageView * imageView2=[[UIImageView alloc] initWithFrame:CGRectMake(kWidth, 0, kWidth, kHeight)];
    imageView2.image=[UIImage imageNamed:@"02.jpg"];
    [self.scrollView addSubview:imageView2];
    [self.allImage addObject:imageView2];

    UIImageView * imageView3=[[UIImageView alloc] initWithFrame:CGRectMake(kWidth*2, 0, kWidth, kHeight)];
    imageView3.image=[UIImage imageNamed:@"03.jpg"];
    [self.scrollView addSubview:imageView3];
    [self.allImage addObject:imageView3];
4、实现图片滚动难度不大,但是我们可能会遇到这么一种情况,如果你的需要滚动的图片非常多,多到上百张,这样会非常耗内存。我们需要优化内存。因此我们做到如下用三张来代替100张图片,首先定义一个数组用来存放上面的三张图片
@interface ViewController ()<UIScrollViewDelegate>
{

    NSInteger page;
}

/**滚动视图*/
@property(nonatomic,weak) UIScrollView * scrollView;

/**存放所有的图片*/
@property(nonatomic,strong) NSMutableArray * allImage;

@end
我们需要用三张来回切换。因此我们需要重写代理方法来实现坐标的切换
#pragma mark - UIScrollViewDelegate
-(void)scrollViewDidScroll:(UIScrollView *)scrollView{

    NSInteger nowPage=scrollView.contentOffset.x/kWidth;


    if (nowPage!=page) {
        //1 获取另外两个不用的imageView
        NSMutableArray * emptyArray=[NSMutableArray array];
        for (UIImageView * image in self.allImage) {
            if (image.frame.origin.x/kWidth!=nowPage) {
                [emptyArray addObject:image];
            }
        }

        //2 将两个不用的imageView放在两边
        UIImageView * first=[emptyArray firstObject];

        NSString * firstName=[NSString stringWithFormat:@"0%ld.jpg",nowPage-1+1];
        first.image=[UIImage imageNamed:firstName];
         first.frame=CGRectMake( (nowPage-1)*kWidth, 0, kWidth, kHeight);

        UIImageView * second=[emptyArray lastObject];
        NSString * secondName=[NSString stringWithFormat:@"0%ld.jpg",nowPage+1+1];
        second.image=[UIImage imageNamed:secondName];
        second.frame=CGRectMake((nowPage+1)*kWidth, 0, kWidth, kHeight);

        page=nowPage;
    }
}
这样就完美实现 内存的重复利用
作者:杰瑞教育
出处:http://www.cnblogs.com/jerehedu/
版权声明:本文版权归烟台杰瑞教育科技有限公司和博客园共有,欢迎转载,但未经作者同意必须保留此段声明,且在文章页面明显位置给出原文连接,否则保留追究法律责任的权利。
技术咨询:
出处:http://www.cnblogs.com/jerehedu/
版权声明:本文版权归烟台杰瑞教育科技有限公司和博客园共有,欢迎转载,但未经作者同意必须保留此段声明,且在文章页面明显位置给出原文连接,否则保留追究法律责任的权利。
技术咨询:
