SpringBoot 启动默认没有父子容器,只有一个容器
一、调试环境
依赖使用 Maven 管理,只用导入 spring-context 即可,这里的版本为 5.2.7
通常使用 spring 有两种配置方式:注解和配置文件
public static void main(String[] args) {
    ApplicationContext applicationContext = new AnnotationConfigApplicationContext(MainConfig.class);
    // ApplicationContext applicationContext = new ClassPathXmlApplicationContext("beans.xml");

    Person bean = applicationContext.getBean(Person.class);
    System.out.println(bean);

    // 打印 IOC 容器中所有 bean 的名称
    String[] namesForType = applicationContext.getBeanDefinitionNames();
    for (String name : namesForType) {
        System.out.println(name);
    }
}
两种配置方式都可以启动 IOC 容器
注解


import org.springframework.context.annotation.Bean;
import org.springframework.context.annotation.ComponentScan;
import org.springframework.context.annotation.Configuration;

@Configuration // 告诉 Spring 这是一个配置类
@ComponentScan // 默认扫描当前包(com.test.config)及其子包(com.test.config.*)
public class MainConfig {

    // 给容器中注册一个 Bean,类型为返回值的类型,id 默认是用方法名作为 id
    @Bean("person123")
    public Person person() {
        return new Person("lisi", 20, "nice");
    }
}
配置文件
<?xml version="1.0" encoding="UTF-8"?>
<beans xmlns="http://www.springframework.org/schema/beans"
       xmlns:xsi="http://www.w3.org/2001/XMLSchema-instance"
       xmlns:context="http://www.springframework.org/schema/context"
       xsi:schemaLocation="http://www.springframework.org/schema/beans http://www.springframework.org/schema/beans/spring-beans.xsd
       http://www.springframework.org/schema/context http://www.springframework.org/schema/context/spring-context.xsd">

    <!-- 包扫描、只要标注了@Controller、@Service、@Repository,@Component,禁用默认规则才可自定义扫描规则 -->
    <context:component-scan base-package="com.test" use-default-filters="false"/>

    <bean id="person" class="com.test.bean.Person" scope="prototype">
        <property name="age" value="29"></property>
        <property name="name" value="zhangsan"></property>
    </bean>
</beans>
一般情况下,我们不会像这样手动去初始化 IOC 容器,而是在 Web 环境下使用,它会自动初始化 IOC 容器,附上调试环境:https://www.cnblogs.com/jhxxb/p/10512553.html
二、开始源码
Tomcat 启动后会自动加载”配置类“:https://www.cnblogs.com/jhxxb/p/13596565.html
第一个被执行的 Spring 程序类应该就是 SpringServletContainerInitializer 类了
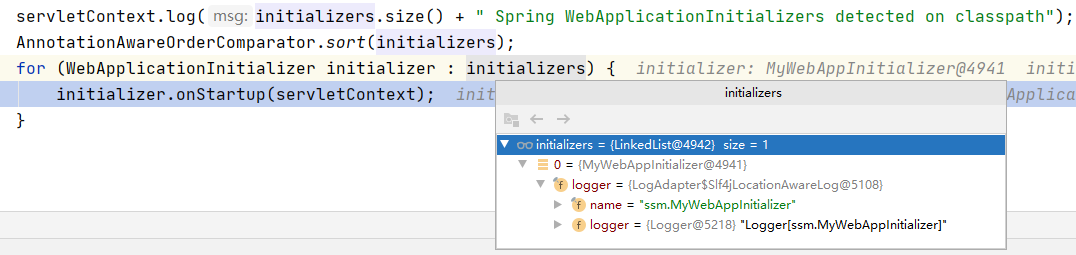
@HandlesTypes(WebApplicationInitializer.class)
public class SpringServletContainerInitializer implements ServletContainerInitializer {
    @Override
    public void onStartup(@Nullable Set<Class<?>> webAppInitializerClasses, ServletContext servletContext) throws ServletException {
        List<WebApplicationInitializer> initializers = new LinkedList<>();

        if (webAppInitializerClasses != null) {
            for (Class<?> waiClass : webAppInitializerClasses) {
                // 只处理实体类,接口和抽象类一概不管
                if (!waiClass.isInterface() && !Modifier.isAbstract(waiClass.getModifiers()) && WebApplicationInitializer.class.isAssignableFrom(waiClass)) {
                    try {
                        initializers.add((WebApplicationInitializer) ReflectionUtils.accessibleConstructor(waiClass).newInstance());
                    } catch (Throwable ex) {
                        throw new ServletException("Failed to instantiate WebApplicationInitializer class", ex);
                    }
                }
            }
        }

        if (initializers.isEmpty()) {
            servletContext.log("No Spring WebApplicationInitializer types detected on classpath");
            return;
        }

        servletContext.log(initializers.size() + " Spring WebApplicationInitializers detected on classpath");
        // 排序后,循环调用 onStartup 方法进行初始化
        AnnotationAwareOrderComparator.sort(initializers);
        for (WebApplicationInitializer initializer : initializers) {
            initializer.onStartup(servletContext);
        }
    }
}
可以看到这里只有我们写的一个配置类,抽象类和接口都被过滤掉了
往下走,onStartup 的实现在 AbstractDispatcherServletInitializer 类
public abstract class AbstractDispatcherServletInitializer extends AbstractContextLoaderInitializer {
    @Override
    public void onStartup(ServletContext servletContext) throws ServletException {
        super.onStartup(servletContext);
        // 注册 DispatcherServlet,让它去初始化 Spring MVC 的子容器
        registerDispatcherServlet(servletContext);
    }


public abstract class AbstractContextLoaderInitializer implements WebApplicationInitializer {
    // 父类方法,super.onStartup(servletContext)
    @Override
    public void onStartup(ServletContext servletContext) throws ServletException {
        // 注册 ContextLoaderListener 监听器,去初始化 Spring 父容器
        registerContextLoaderListener(servletContext);
    }
这里可以看出分两步,先初始化 Spring IOC,再初始化 Spring MVC IOC
注册 ContextLoaderListener,为了后续初始化 Spring IOC
public abstract class AbstractContextLoaderInitializer implements WebApplicationInitializer {
    protected void registerContextLoaderListener(ServletContext servletContext) {
        WebApplicationContext rootAppContext = createRootApplicationContext();
        if (rootAppContext != null) {
            // 创建 listener,并且把已经创建好的容器放进去
            ContextLoaderListener listener = new ContextLoaderListener(rootAppContext);
            // 放入监听器需要的一些上下文,此处没有。一般都为 null 即可。若有需要(自己定制),子类复写此方法即可
            listener.setContextInitializers(getRootApplicationContextInitializers());
            // 把监听器加入进来  这样该监听器就能监听 ServletContext 了,并且执行 contextInitialized 方法
            servletContext.addListener(listener);
        }
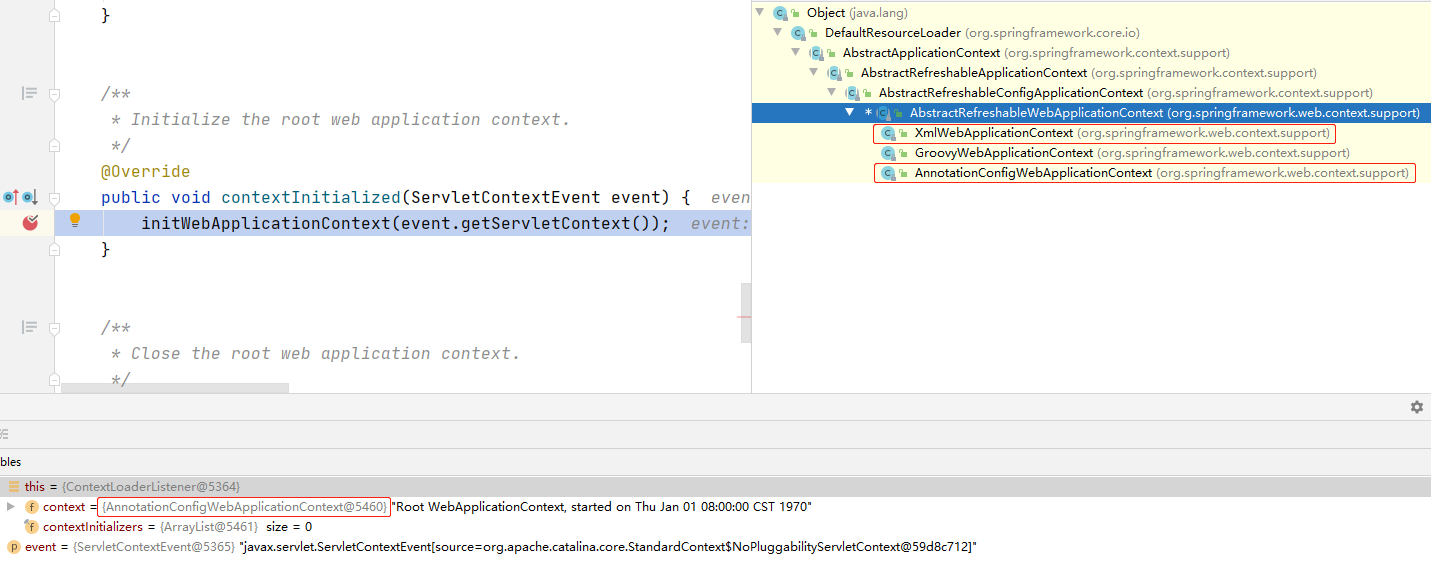
createRootApplicationContext 创建了一个 AnnotationConfigWebApplicationContext,并把配置文件注册了进去
public abstract class AbstractAnnotationConfigDispatcherServletInitializer extends AbstractDispatcherServletInitializer {
    @Override
    @Nullable // 返回值允许为 null,这里不分析为 null 的执行流程
    protected WebApplicationContext createRootApplicationContext() {
        Class<?>[] configClasses = getRootConfigClasses();
        if (!ObjectUtils.isEmpty(configClasses)) {
            AnnotationConfigWebApplicationContext context = new AnnotationConfigWebApplicationContext();
            // 配置文件可以有多个,会以累加的形式添加进去
            context.register(configClasses);
            return context;
        } else {
            return null;
        }
    }
注册 DispatcherServlet,为了后续初始化 Spring MVC IOC
public abstract class AbstractDispatcherServletInitializer extends AbstractContextLoaderInitializer {
    protected void registerDispatcherServlet(ServletContext servletContext) {
        // Servlet 名称,一般用系统默认的即可,否则自己复写此方法也成
        String servletName = getServletName();
        Assert.hasLength(servletName, "getServletName() must not return null or empty");

        // 创建 web 的子容器。创建的代码和上面差不多,也是使用调用者提供的配置文件,创建 AnnotationConfigWebApplicationContext,注:此处不可能为 null
        WebApplicationContext servletAppContext = createServletApplicationContext();
        Assert.notNull(servletAppContext, "createServletApplicationContext() must not return null");

        // 创建 DispatcherServlet,并且把子容器传进去了。其实就是 new 一个出来,最后加到容器里,就能够执行一些 init 初始化方法了
        FrameworkServlet dispatcherServlet = createDispatcherServlet(servletAppContext);
        Assert.notNull(dispatcherServlet, "createDispatcherServlet(WebApplicationContext) must not return null");

        // 同样的 getServletApplicationContextInitializers(),一般也为 null 即可
        dispatcherServlet.setContextInitializers(getServletApplicationContextInitializers());

        // 注册 servlet 到 web 容器里,这样就可以接收 HTTP 请求了
        ServletRegistration.Dynamic registration = servletContext.addServlet(servletName, dispatcherServlet);
        if (registration == null) {
            throw new IllegalStateException("Failed to register servlet with name '" + servletName + "'. Check if there is another servlet registered under the same name.");
        }

        // 1 表示立马执行
        registration.setLoadOnStartup(1);
        // 调用者必须实现
        registration.addMapping(getServletMappings());
        // 默认就是开启了支持异步的
        registration.setAsyncSupported(isAsyncSupported());

        // 处理自定义的 Filter 进来,一般我们 Filter 不这么加进来,而是自己 @WebFilter,或者借助 Spring。注:这里添加进来的 Filter 都仅仅只拦截过滤上面注册的 dispatchServlet
        Filter[] filters = getServletFilters();
        if (!ObjectUtils.isEmpty(filters)) {
            for (Filter filter : filters) {
                registerServletFilter(servletContext, filter);
            }
        }

        // 调用者若对 dispatcherServlet 有自己更个性化的参数设置,复写此方法即可
        customizeRegistration(registration);
    }
初始化 Spring IOC
继续执行,就来到了 ContextLoaderListener 的初始化方法,附带会初始化 Spring 容器(注:到了此处,就和 web.xml 方式启动一模一样了)
import javax.servlet.ServletContextEvent;
import javax.servlet.ServletContextListener;

public class ContextLoaderListener extends ContextLoader implements ServletContextListener {
    @Override
    public void contextInitialized(ServletContextEvent event) {
        initWebApplicationContext(event.getServletContext());
    }
和 web.xml 不一样的是,使用注解驱动启动的此时,ContextLoaderListener 对象已经持有 WebApplicationContext 的引用(但是还没有放进 ServletContext 里面去)
往下走,进入父类的 initWebApplicationContext 方法
public class ContextLoader {
    public WebApplicationContext initWebApplicationContext(ServletContext servletContext) {
        // 虽然注解驱动传进来的监听器对象持有 WebApplicationContext 的引用,但是并没有放进 ServletContext 容器
        if (servletContext.getAttribute(WebApplicationContext.ROOT_WEB_APPLICATION_CONTEXT_ATTRIBUTE) != null) {
            throw new IllegalStateException("Cannot initialize context because there is already a root application context present - " +
                    "check whether you have multiple ContextLoader* definitions in your web.xml!");
        }

        servletContext.log("Initializing Spring root WebApplicationContext");
        Log logger = LogFactory.getLog(ContextLoader.class);
        if (logger.isInfoEnabled()) {
            logger.info("Root WebApplicationContext: initialization started");
        }
        long startTime = System.currentTimeMillis();

        try {
            // 这句特别重要,兼容了 web.xml 的方式以及注解驱动的方式。这里是注解驱动的方式,所以此处不会为 null。用 web.xml 的方式的时候,会去详细看 createWebApplicationContext(servletContext) 方法
            if (this.context == null) {
                this.context = createWebApplicationContext(servletContext);
            }
            // 从上图可以看出:XmlWebApplicationContext(xml驱动) 和 AnnotationConfigWebApplicationContext(注解驱动) 是复合的,都会进来
            if (this.context instanceof ConfigurableWebApplicationContext) {
                ConfigurableWebApplicationContext cwac = (ConfigurableWebApplicationContext) this.context;
                // 一般刚创建的 context 不会处于激活状态,所以会进来完善一些更多的容器信息。比如刷新容器、设置父容器等
                if (!cwac.isActive()) {
                    if (cwac.getParent() == null) {
                        // Spring 5.0 开始,默认实现只是返回 null。绝大多数情况下,Spring 容器不用再给设置父容器。这里主要是想多个 Web 应用可以有一个共同的父容器,例如 EJB、EAR
                        ApplicationContext parent = loadParentContext(servletContext);
                        cwac.setParent(parent);
                    }
                    // 读取相应的配置并且刷新 context 对象,这一步极其重要了,因为刷新容器做了太多的事,属于容器的最最最核心逻辑(这里不做分析)
                    configureAndRefreshWebApplicationContext(cwac, servletContext);
                }
            }
            // 放进 ServletContext 上下文,避免再次被初始化,也让我们能更加方便的获取到容器
            servletContext.setAttribute(WebApplicationContext.ROOT_WEB_APPLICATION_CONTEXT_ATTRIBUTE, this.context);

            // 此处把容器和当前线程绑定,public static WebApplicationContext getCurrentWebApplicationContext() 这样就可以更加方便的得到容器,类为:ContextLoader
            ClassLoader ccl = Thread.currentThread().getContextClassLoader();
            if (ccl == ContextLoader.class.getClassLoader()) {
                currentContext = this.context;
            } else if (ccl != null) {
                currentContextPerThread.put(ccl, this.context);
            }

            if (logger.isInfoEnabled()) {
                long elapsedTime = System.currentTimeMillis() - startTime;
                logger.info("Root WebApplicationContext initialized in " + elapsedTime + " ms");
            }

            return this.context;
        } catch (RuntimeException | Error ex) {
            logger.error("Context initialization failed", ex);
            servletContext.setAttribute(WebApplicationContext.ROOT_WEB_APPLICATION_CONTEXT_ATTRIBUTE, ex);
            throw ex;
        }
    }


    // 最重要的一个方法
    protected void configureAndRefreshWebApplicationContext(ConfigurableWebApplicationContext wac, ServletContext sc) {
        // 一般此处为真,给 ApplicationContext 设置一个 id
        if (ObjectUtils.identityToString(wac).equals(wac.getId())) {
            // 获取 servletContext 中的 contextId 属性 contextId,可在 web.xml 里配置,一般也不用配置,采用 else 里的默认值即可
            String idParam = sc.getInitParameter(CONTEXT_ID_PARAM);
            if (idParam != null) {
                // 存在则设为指定的 id 名
                wac.setId(idParam);
            } else {
                // 生成默认 id,一般为 org.springframework.web.context.WebApplicationContext:${contextPath}
                wac.setId(ConfigurableWebApplicationContext.APPLICATION_CONTEXT_ID_PREFIX + ObjectUtils.getDisplayString(sc.getContextPath()));
            }
        }

        // 让 Spring 容器关联上 servlet 上下文
        wac.setServletContext(sc);
        // 读取 contextConfigLocation 属性(在 web.xml 配置,但是注解驱动里没有,因此为 null)
        String configLocationParam = sc.getInitParameter(CONFIG_LOCATION_PARAM);
        if (configLocationParam != null) {
            // 设置指定的 spring 文件所在地,支持 classpath 前缀并多文件,以 ,; 为分隔符
            wac.setConfigLocation(configLocationParam);
        }

        // 这里有一个注意的地方,ConfigurableEnvironment 生成的地方
        // wac.setConfigLocation(configLocationParam); 时根据 configLocationParam 设置配置参数路径时就会初始化 StandardServletEnvironment(ConfigurableEnvironment 的子类)
        // StandardServletEnvironment 符合条件,因此会执行 initPropertySources 方法
        ConfigurableEnvironment env = wac.getEnvironment();
        if (env instanceof ConfigurableWebEnvironment) {
            ((ConfigurableWebEnvironment) env).initPropertySources(sc, null);
        }

        // 检查 web.xml 是否有一些其余初始化类的配置,极大多数情况都不需要,所以粗暴理解为没什么用
        customizeContext(sc, wac);

        // 容器的核心方法,也是最难的一个方法
        // 这里先理解为就是初始化容器,比如加载 bean、拦截器、各种处理器的操作就够了(也是最耗时的一步操作)
        wac.refresh();
    }
该方法完成之后,看控制台日志:
Root WebApplicationContext initialized in 435212 ms
就说明 Spring 根容器初始化完成了
初始化 Spring MVC IOC
继续执行,就来到了 DispatcherServlet 的初始化方法,附带会初始化 Spring 子容器(Web 容器),首先要知道 Servlet 初始化的大致步骤:
- Servlet 容器加载 Servlet 类,把类的 .class 文件中的数据读到内存中
- Servlet 容器中创建一个 ServletConfig 对象。该对象中包含了 Servlet 的初始化配置信息
- Servlet 容器创建一个 Servlet 对象(我们也可以手动 new,然后手动添加进去)
- Servlet 容器调用 Servlet 对象的 init() 方法进行初始化
由于设置了 registration.setLoadOnStartup(1),在容器启动完成后就会调用 servlet 的 init()
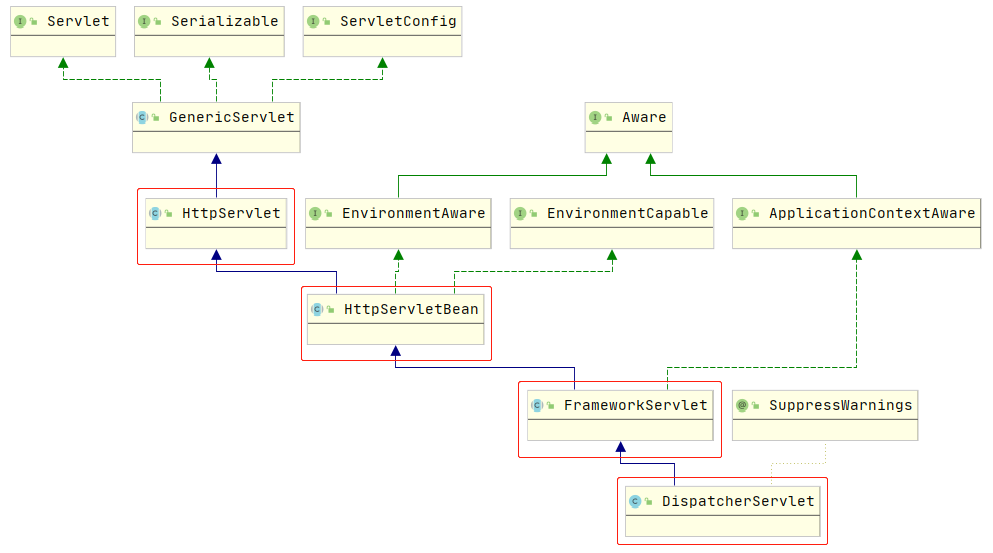
DispatcherServlet 继承 FrameworkServlet 继承 HttpServletBean 继承 HttpServlet,在 HttpServletBean 实现了 init()
先看 HttpServletBean 的 init 方法
public abstract class HttpServletBean extends HttpServlet implements EnvironmentCapable, EnvironmentAware {
    @Override
    public final void init() throws ServletException {
        // 把 Servlet 的初始化参数封装进来...
        PropertyValues pvs = new ServletConfigPropertyValues(getServletConfig(), this.requiredProperties);

        // 这里我们并没有给此 Servlet 初始化的一些参数,所以此处为空,为 false
        // 若进来了,可以看到里面会做一些处理:将这个 DispatcherServlet 转换成一个 BeanWrapper 对象,从而能够以 Spring 的方式来对初始化参数的值进行注入。这些属性如 contextConfigLocation、namespace 等等。
        // 同时注册一个属性编辑器,一旦在属性注入的时候遇到 Resource 类型的属性就会使用 ResourceEditor 去解析。再留一个 initBeanWrapper(bw) 方法给子类覆盖,让子类处真正执行 BeanWrapper 的属性注入工作。
        // 但是 HttpServletBean 的子类 FrameworkServlet 和 DispatcherServlet 都没有覆盖其 initBeanWrapper(bw) 方法,所以创建的 BeanWrapper 对象没有任何作用。

        // 备注:此部分把当前 Servlet 封装成一个 BeanWrapper,再把它交给 Spring 容器管理,这部分非常重要,使用 SpringBoot 启动的时候,会看出来这部分代码的重要性
        if (!pvs.isEmpty()) {
            try {
                BeanWrapper bw = PropertyAccessorFactory.forBeanPropertyAccess(this);
                ResourceLoader resourceLoader = new ServletContextResourceLoader(getServletContext());
                bw.registerCustomEditor(Resource.class, new ResourceEditor(resourceLoader, getEnvironment()));
                initBeanWrapper(bw);
                bw.setPropertyValues(pvs, true);
            } catch (BeansException ex) {
                if (logger.isErrorEnabled()) {
                    logger.error("Failed to set bean properties on servlet '" + getServletName() + "'", ex);
                }
                throw ex;
            }
        }
        // Spring 把这个 init 方法给 final 掉了,然后开了这个口子,子类可以根据自己的需要,在初始化的时候复写这个方法,而不再是 init 方法
        initServletBean();
    }
继续 initServletBean() 方法,它是由 FrameworkServlet 实现的
public abstract class FrameworkServlet extends HttpServletBean implements ApplicationContextAware {
    @Override
    protected final void initServletBean() throws ServletException {
        getServletContext().log("Initializing Spring " + getClass().getSimpleName() + " '" + getServletName() + "'");
        if (logger.isInfoEnabled()) {
            logger.info("Initializing Servlet '" + getServletName() + "'");
        }
        long startTime = System.currentTimeMillis();

        try {
            // 重点,开始初始化 Spring 子容器
            this.webApplicationContext = initWebApplicationContext();
            // 留一个口,给子类去复写初始化所需要的操作,一般都为空实现即可,除非自己要复写 DispatcherServlet
            initFrameworkServlet();
        } catch (ServletException | RuntimeException ex) {
            logger.error("Context initialization failed", ex);
            throw ex;
        }

        if (logger.isDebugEnabled()) {
            String value = this.enableLoggingRequestDetails ? "shown which may lead to unsafe logging of potentially sensitive data" : "masked to prevent unsafe logging of potentially sensitive data";
            logger.debug("enableLoggingRequestDetails='" + this.enableLoggingRequestDetails + "': request parameters and headers will be " + value);
        }

        // 当看到这句日志,dispatcherServlet 就已经初始化完成,Web 子容器也就初始化完成
        if (logger.isInfoEnabled()) {
            logger.info("Completed initialization in " + (System.currentTimeMillis() - startTime) + " ms");
        }
    }
继续 initWebApplicationContext 方法:创建一个 Web 子容器,并且和上面 Spring 已经创建好了的父容器关联上
public abstract class FrameworkServlet extends HttpServletBean implements ApplicationContextAware {
    protected WebApplicationContext initWebApplicationContext() {
        // 从 ServletContext 中把上面已经创建好的根容器拿到手
        WebApplicationContext rootContext = WebApplicationContextUtils.getWebApplicationContext(getServletContext());
        WebApplicationContext wac = null;

        // 上面注册 DispatcherServlet(createDispatcherServlet(servletAppContext)方法)的时候,已经传入了根据配置文件创建好了的子容器,因此,此处肯定是不为 null 的,会进去,和上面一样,完成子容器的初始化、刷新工作,这里就不再解释了
        if (this.webApplicationContext != null) {
            wac = this.webApplicationContext;
            if (wac instanceof ConfigurableWebApplicationContext) {
                ConfigurableWebApplicationContext cwac = (ConfigurableWebApplicationContext) wac;
                if (!cwac.isActive()) {
                    if (cwac.getParent() == null) {
                        // 把根容器,设置为自己的父容器
                        cwac.setParent(rootContext);
                    }
                    // 根据绑定的配置,初始化、刷新容器
                    configureAndRefreshWebApplicationContext(cwac);
                }
            }
        }

        // 若是 web.xml 方式,会走这里,进而走 findWebApplicationContext()
        if (wac == null) {
            wac = findWebApplicationContext();
        }
        if (wac == null) {
            wac = createWebApplicationContext(rootContext);
        }

        // 此处注意:下面有解释,refreshEventReceived 属性保证了 onRefresh 方法不会被重复执行
        if (!this.refreshEventReceived) {
            synchronized (this.onRefreshMonitor) {
                onRefresh(wac);
            }
        }

        // 是否需要把我们的容器发布出去,作为 ServletContext 的一个属性值?默认值为 true,一般情况下就让为 true 即可
        if (this.publishContext) {
            // 这个 attr 的 key 的默认值,就是 FrameworkServlet.SERVLET_CONTEXT_PREFIX,保证了全局唯一性
            // 这么一来,我们的根容器、web 子容器其实就都放进 ServletContext 上下文里了,拿取都非常的方便。只是我们一般拿这个容器的情况较少,一般都是拿根容器,比如那个工具类就是获取根容器的
            String attrName = getServletContextAttributeName();
            getServletContext().setAttribute(attrName, wac);
        }

        return wac;
    }
FrameworkServlet 策略式的实现了监听方法,监听应用的刷新事件。
当我们刷新应用的时候(比如上面执行 refresh() 方法,这里就会执行,并且打上标记说已经执行过了),然而 onRefresh() 是一个模版方法,具体实现交给子类,这样子 DispatcherServlet 就可以做初始化 Web 组件的一些事情
public abstract class FrameworkServlet extends HttpServletBean implements ApplicationContextAware {
    public void onApplicationEvent(ContextRefreshedEvent event) {
        this.refreshEventReceived = true;
        synchronized (this.onRefreshMonitor) {
            onRefresh(event.getApplicationContext());
        }
    }

    private class ContextRefreshListener implements ApplicationListener<ContextRefreshedEvent> {
        @Override
        public void onApplicationEvent(ContextRefreshedEvent event) {
            FrameworkServlet.this.onApplicationEvent(event);
        }
    }
这就是为何会抽象出 FrameworkServlet 的原因,因为它设计的初衷不仅仅只想支持到 Servlet
所以此处就不得不说一下,子类自己实现的 onRefresh() 方法:
public class DispatcherServlet extends FrameworkServlet {
    @Override
    protected void onRefresh(ApplicationContext context) {
        initStrategies(context);
    }

    // 初始化 Spring MVC 的 9 大组件(至此,才算全部初始化完成了)
    protected void initStrategies(ApplicationContext context) {
        initMultipartResolver(context);
        initLocaleResolver(context);
        initThemeResolver(context);
        initHandlerMappings(context);
        initHandlerAdapters(context);
        initHandlerExceptionResolvers(context);
        initRequestToViewNameTranslator(context);
        initViewResolvers(context);
        initFlashMapManager(context);
    }
该方法完成之后,看控制台日志:
INFO (FrameworkServlet.java:547)- Completed initialization in 2015760 ms
就说明整个 Spring 父子容器全部初始化、启动完成了
三、其他
SpringMVC 中的 Servlet 的三个层次:
- HttpServletBean 直接继承自 java 的 HttpServlet,其作用是将 Servlet 中配置的参数设置到相应的 Bean 属性上
- FrameworkServlet 初始化了 WebApplicationContext
- DispatcherServlet 初始化了自身的 9 个组件(重点)
在任何地方获取 Spring 容器(根容器):
@Autowired
private HttpServletRequest request;

@Override
public Object hello() {
    ApplicationContext ctx1 = WebApplicationContextUtils.getWebApplicationContext(request.getSession().getServletContext());
    WebApplicationContext ctx2 = ContextLoader.getCurrentWebApplicationContext();
    System.out.println(ctx1 == ctx2); // true

    return "service hello";
}
用了 ContextLoader 的静态方法
public static WebApplicationContext getCurrentWebApplicationContext() {
    ClassLoader ccl = Thread.currentThread().getContextClassLoader();
    if (ccl != null) {
        WebApplicationContext ccpt = currentContextPerThread.get(ccl);
        if (ccpt != null) {
            return ccpt;
        }
    }
    return currentContext;
}
关于 DispatcherServlet:
DispatcherServlet 创建自己的 WebApplicationContext 并管理这个 WebApplicationContext 里面的 handlers/controllers/view-resolvers
FrameworkServlet 实现(Spring 4.0 之后才实现的)了 ApplicationContextAware 接口的 setApplicationContext() 方法,可知 DispatcherServlet 的 applicationContext 来自 FrameworkServlet
setApplicationContext 方法只用于嵌入式的 Servlet 环境。war 环境这里是不会执行的,war 环境下 WebApplicationContext 不会以 Bean 的形式存在于 Spring 容器
在 DispatcherServlet 的 doService 方法里都有这样的一段代码,方便我们非常方便获取到一些参数,比如 web 子容器等等
public class DispatcherServlet extends FrameworkServlet {
    @Override
    protected void doService(HttpServletRequest request, HttpServletResponse response) throws Exception {
        // Make framework objects available to handlers and view objects.
        request.setAttribute(WEB_APPLICATION_CONTEXT_ATTRIBUTE, getWebApplicationContext());
        request.setAttribute(LOCALE_RESOLVER_ATTRIBUTE, this.localeResolver);
        request.setAttribute(THEME_RESOLVER_ATTRIBUTE, this.themeResolver);
        request.setAttribute(THEME_SOURCE_ATTRIBUTE, getThemeSource());
关于父子容器:
优点:能让 web 环境和普通的 Spring 环境达到隔离的效果。web 容器专注于管理 web 相关 Bean,其余 bean 的交给父容器。
缺点:父子容器的设计提高了 Spring 初始化、管理 Bean 的复杂度(虽然对使用者一般无感),但万一要用到相关功能时,若不理解原理会有莫名其妙的一些问题,提高了复杂性
理论上可以有任意多个容器(只是我们一般其它的 Bean 都只放进主容器统一管理,但 Spring 是提供了这样的功能的),比如:
- 主容器:applicationContext.xml(主文件,包括 JDBC 配置,hibernate.cfg.xml,与所有的 Service 与 DAO 基类)
- web 子容器:application-servlet.xml(管理 Spring MVC 9 大组件以及相关的Bean)
- cache 子容器:applicationContext-cache.xml(cache 策略配置,管理和缓存相关的Bean)
- JMX 子容器:applicationContext-jmx.xml(JMX 相关的 Bean)
- …
值得注意的是,SpringMVC 在调用 HandlerMapper 进行 url 到 controller 函数方法映射解析的时候,HandlerMapper 会在 SpringMVC 容器中寻找 controller,也就是在子容器中寻找,不会去父容器 spring 容器中寻找的。
所以如果用父容器来管理 controller 的话,子容器不去管理,在访问页面的时候会出现 404 错误。
Spring Boot 中只采用一个容器,也就没有这个问题