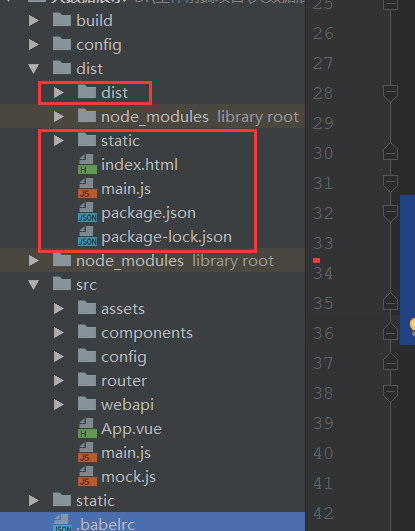
1.如何用electron-packager electron-builder打包vue项目,打包成桌面程序。
步骤一、
执行npm run build 打包你的vue项目。
打包成功后,生成dist打包后的文件。
在dist打开命令行, 安装electron-packager electron-builder
安装命令 npm install electron-packager npm install electron-builder
在dist中新增main.js文件,其中内容包括
const {app, BrowserWindow,globalShortcut,ipcMain} =require('electron')
let win;
let windowConfig = {
  fullscreen:true,
  800,
  height:600
};
const  {autoUpdater}=require('electron-updater');
function createWindow(){
  win = new BrowserWindow(windowConfig);
  win.loadURL(`file://${__dirname}/index.html`);
  app.setApplicationMenu(null);//关闭菜单栏
  // 注册一个 'CommandOrControl+X' 的全局快捷键
  globalShortcut.register('CommandOrControl+Alt+K', () => {
    win.webContents.openDevTools();  //开启调试工具
  });
  win.on('close',() => {
    //回收BrowserWindow对象
    win = null;
  });
  win.on('resize',() => {
    win.reload();
  })
}
app.on('ready',createWindow);
app.on('window-all-closed',() => {
  app.quit();
});
app.on('activate',() => {
  if(win == null){
    createWindow();
  }
});

// 检测更新,在你想要检查更新的时候执行,renderer事件触发后的操作自行编写
!function updateHandle() {
  let message = {
    error: '检查更新出错',
    checking: '正在检查更新……',
    updateAva: '检测到新版本,正在下载……',
    updateNotAva: '现在使用的就是最新版本,不用更新',
  };
  const uploadUrl = "更新包所在的服务器地址"; // 下载地址,不加后面的**.exe
  autoUpdater.setFeedURL(uploadUrl);
  autoUpdater.on('error', function (error) {
    console.log(autoUpdater.error);
    sendUpdateMessage(message.error)
  });
  autoUpdater.on('checking-for-update', function () {
    sendUpdateMessage(message.checking)
  });
  autoUpdater.on('update-available', function (info) {
    sendUpdateMessage(message.updateAva)
  });
  autoUpdater.on('update-not-available', function (info) {
    sendUpdateMessage(message.updateNotAva)
  });

  // 更新下载进度事件
  autoUpdater.on('download-progress', function (progressObj) {
    win.webContents.send('downloadProgress', progressObj)
  });
  autoUpdater.on('update-downloaded', function (event, releaseNotes, releaseName, releaseDate, updateUrl, quitAndUpdate) {

    ipcMain.on('isUpdateNow', (e, arg) => {
      //some code here to handle event
      autoUpdater.quitAndInstall();
    });

    win.webContents.send('isUpdateNow')
  });

  ipcMain.on("checkForUpdate",()=>{
    //执行自动更新检查
    autoUpdater.checkForUpdates();
  })
}();

// 通过main进程发送事件给renderer进程,提示更新信息
function sendUpdateMessage(text) {
  win.webContents.send('message', text)
}
在dist文件夹下新增package.json文件,其中包括内容为
{
  "name": "名称",
  "productName": "项目名称",
  "author": "作者",
  "version": "1.1.1",//版本
  "main": "main.js",
  "description": "项目描述",
  "scripts": {
    "pack": "electron-builder --dir",
    "dist": "electron-builder",
    "postinstall": "electron-builder install-app-deps"
  },
  "build": {
    "electronVersion": "1.8.4",
    "win": {
      "requestedExecutionLevel": "highestAvailable",
      "target": [
        {
          "target": "nsis",
          "arch": [
            "x64"
          ]
        }
      ]
    },
    "appId": "项目的id,唯一id",
    "artifactName": "名称-${version}-${arch}.${ext}",
    "nsis": {
      "artifactName": "名称-${version}-${arch}.${ext}"
    },
    "publish": [
      {
        "provider": "generic",
        "url": "服务器最新安装包的位置"
      }
    ]
  },
  "dependencies": {
    "core-js": "^2.4.1",
    "electron-updater": "^2.22.1",
    "fs-extra": "^4.0.1",
    "install.js": "^1.0.1",
    "moment": "^2.18.1",
    "moment-es6": "^1.0.0"
  }
}
在你的vue项目里面App.vue生命周期里面新增如下代码:这是自动检测更新
mounted: function () {
      if (window.require) {
        let ipc = window.require('electron').ipcRenderer;
        ipc.send("checkForUpdate");
        ipc.on("message", (event, text) => {
          this.tips = text;
          console.log('message1',this.tips)
        });
        ipc.on("downloadProgress", (event, progressObj)=> {
          this.downloadPercent = progressObj.percent || 0;
          console.log('message2',this.downloadPercent)
        });
        ipc.on("isUpdateNow", () => {
          ipc.send("isUpdateNow");
        });
      }
    },
一切准备就绪之后在终端里面执行命令: electron-builder
成功之后会生成一个安装包及版本文件

双击exe程序安装之后就在桌面有快捷图标就可以使用了,
如果你的程序有更新,一点要把你的安装包及latest.yml放到你刚刚在package.json里面更新文件在服务器的位置。
"publish": [
      {
        "provider": "generic",
        "url": "http:/xxxx.com/download/"
      }
    ]
download的文件下面,
注意有个坑:
http:/xxxx.com/download/latest.yml一定要能访问到并且在浏览器里面可以输出里面的内容,否则更新程序会失败。
文件目录如下:
