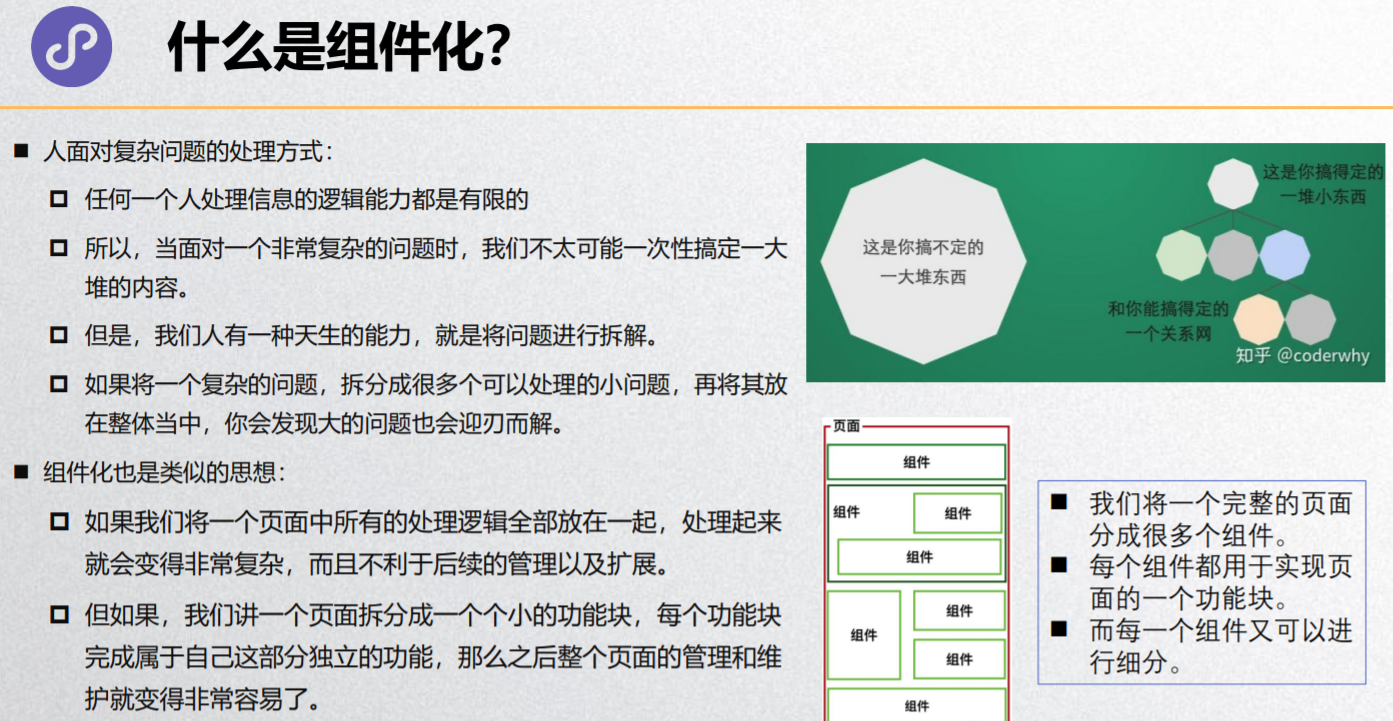
什么是组件化?
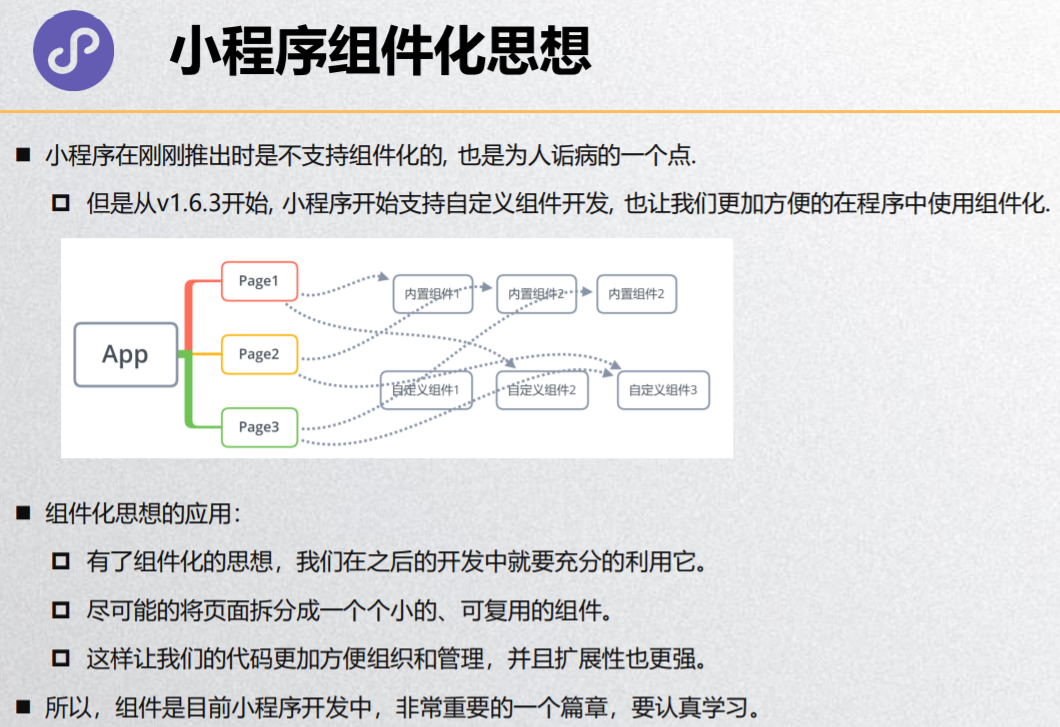
小程序组件化思想
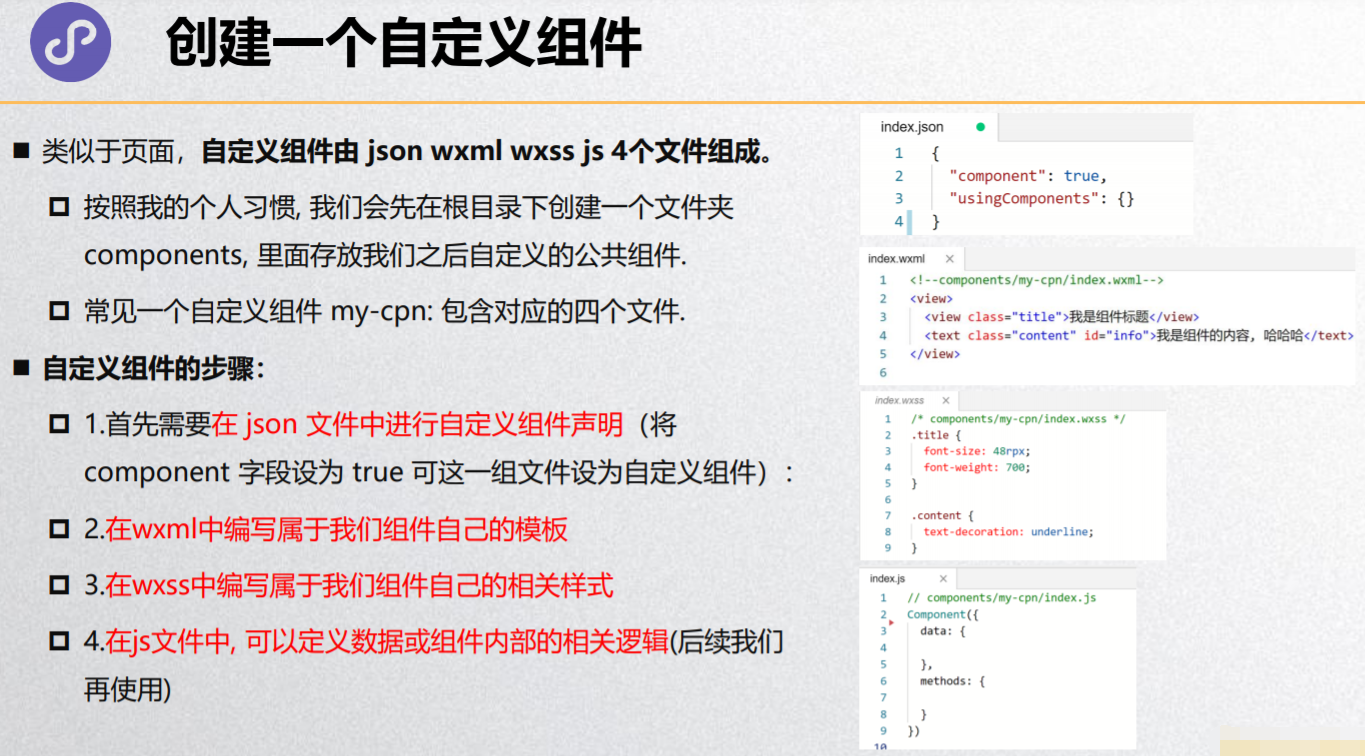
创建一个自定义组件
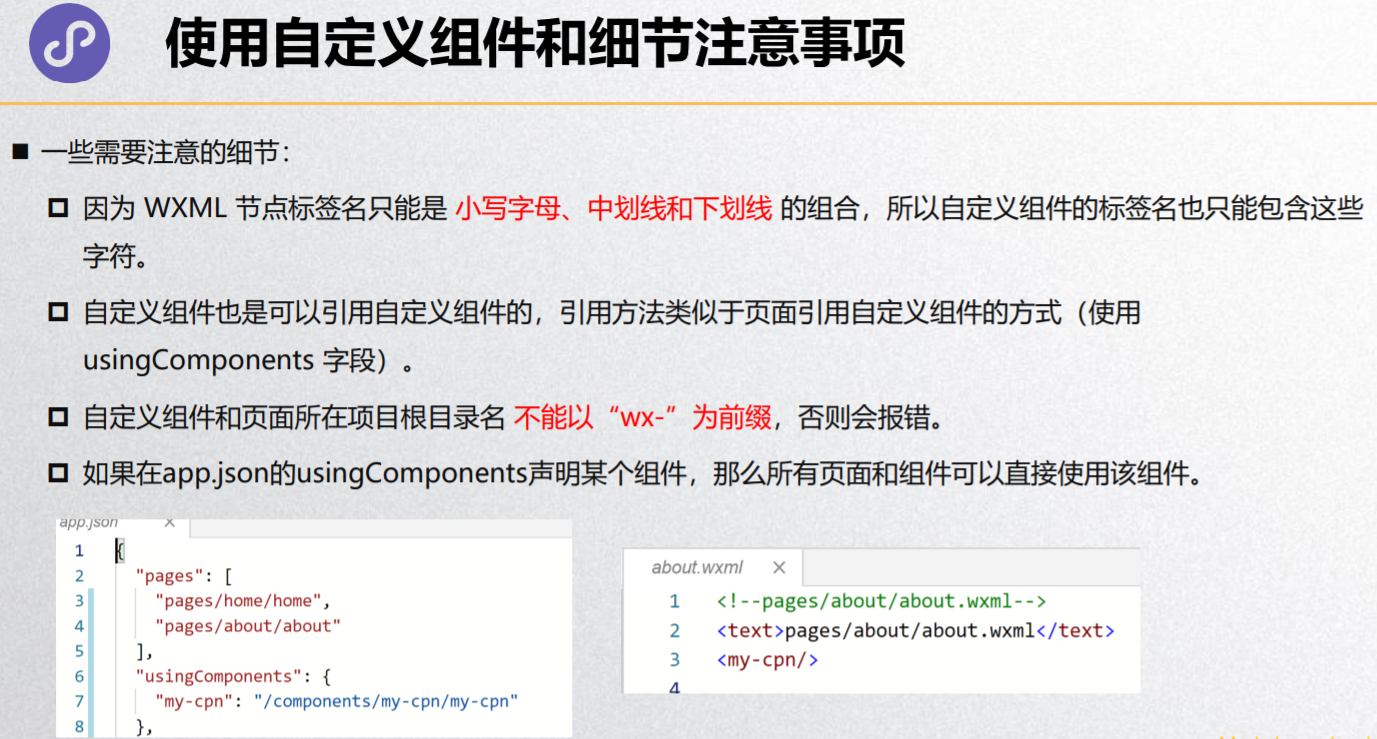
使用自定义组件和细节注意事项
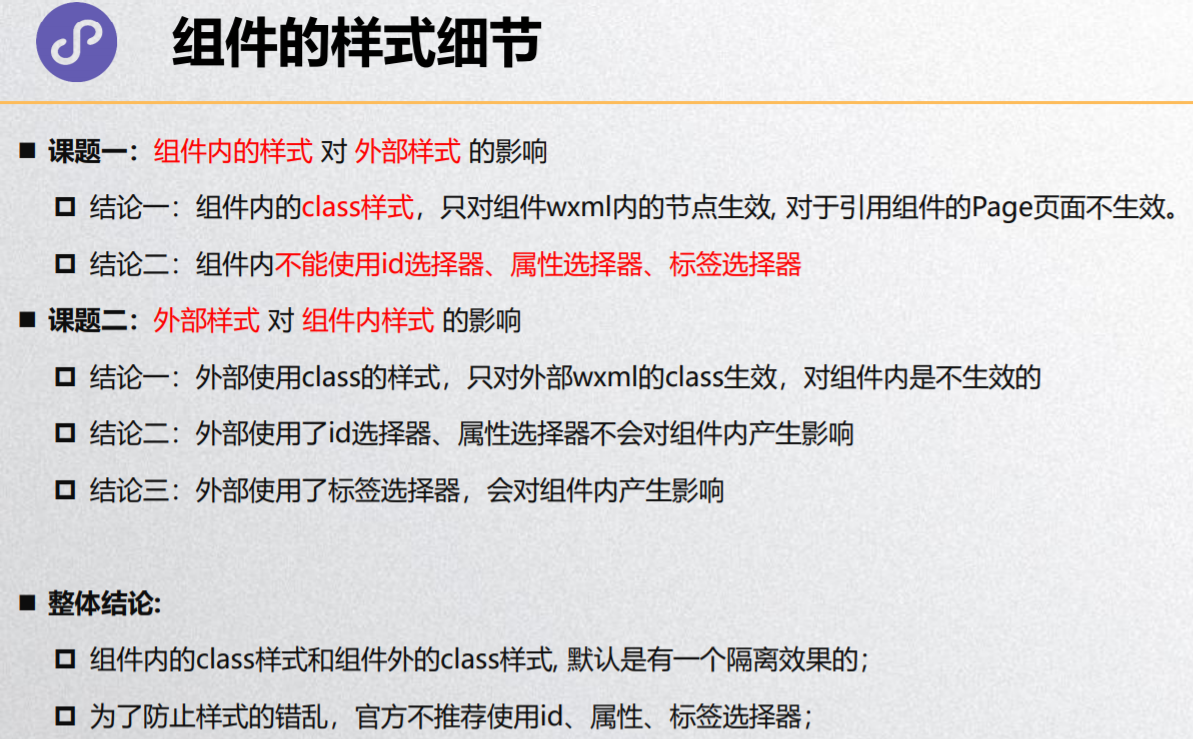
组件的样式细节
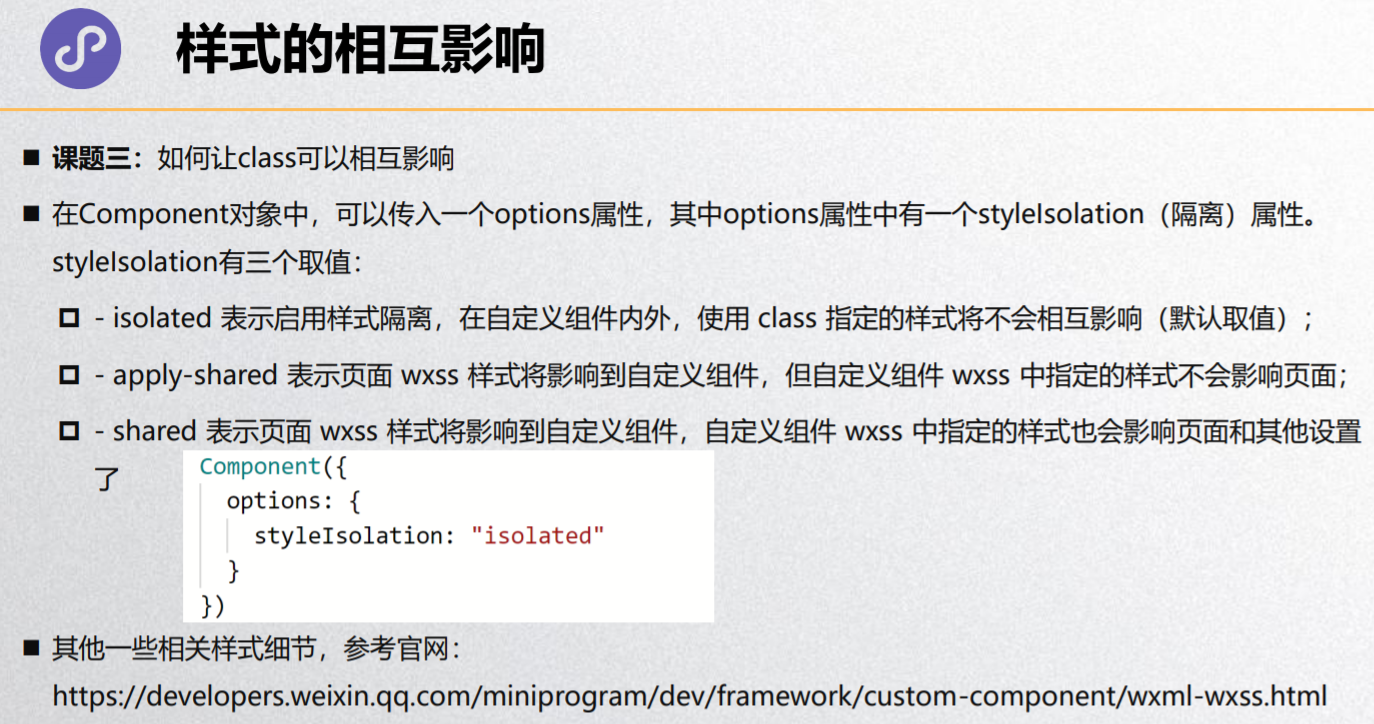
样式的相互影响
my-style.wxml
<!--components/my-style/my-style.wxml-->
<view class='title'>我是style标题</view>
<view class='content'>我是style的内容</view>
my-style.wxss
.title {
  font-size: 50rpx;
  font-weight: 700;
}

.content {
  font-size: 36rpx;
}
my-style.js
Component({
  options: {
    styleIsolation: "shared"
  }
})
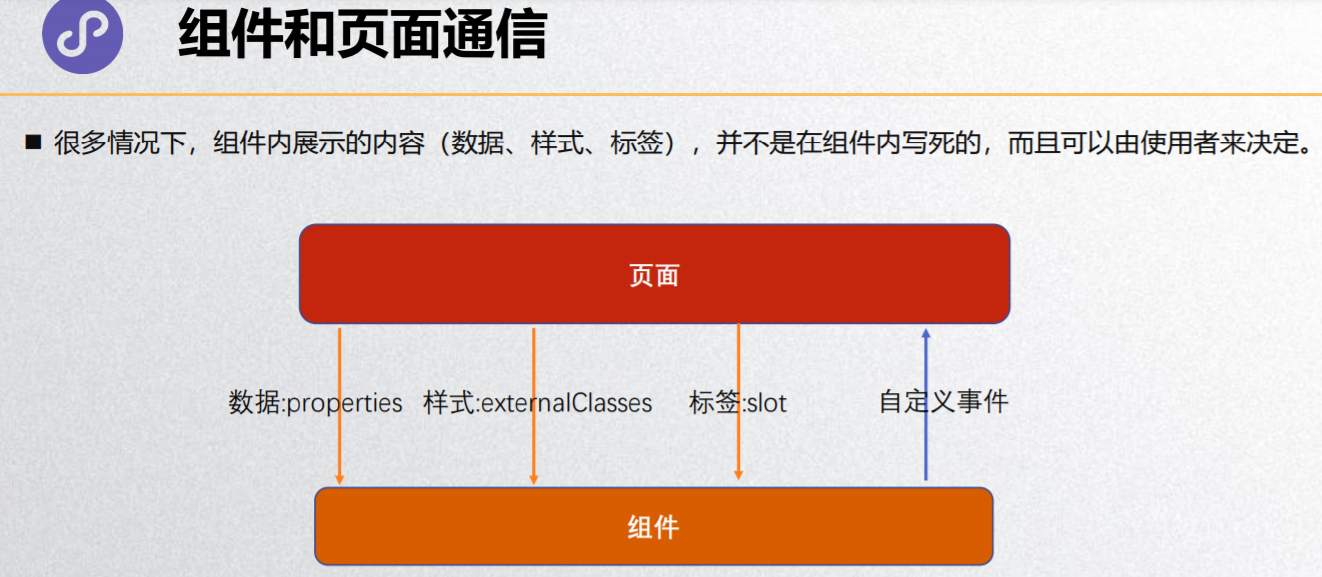
组件和页面通信
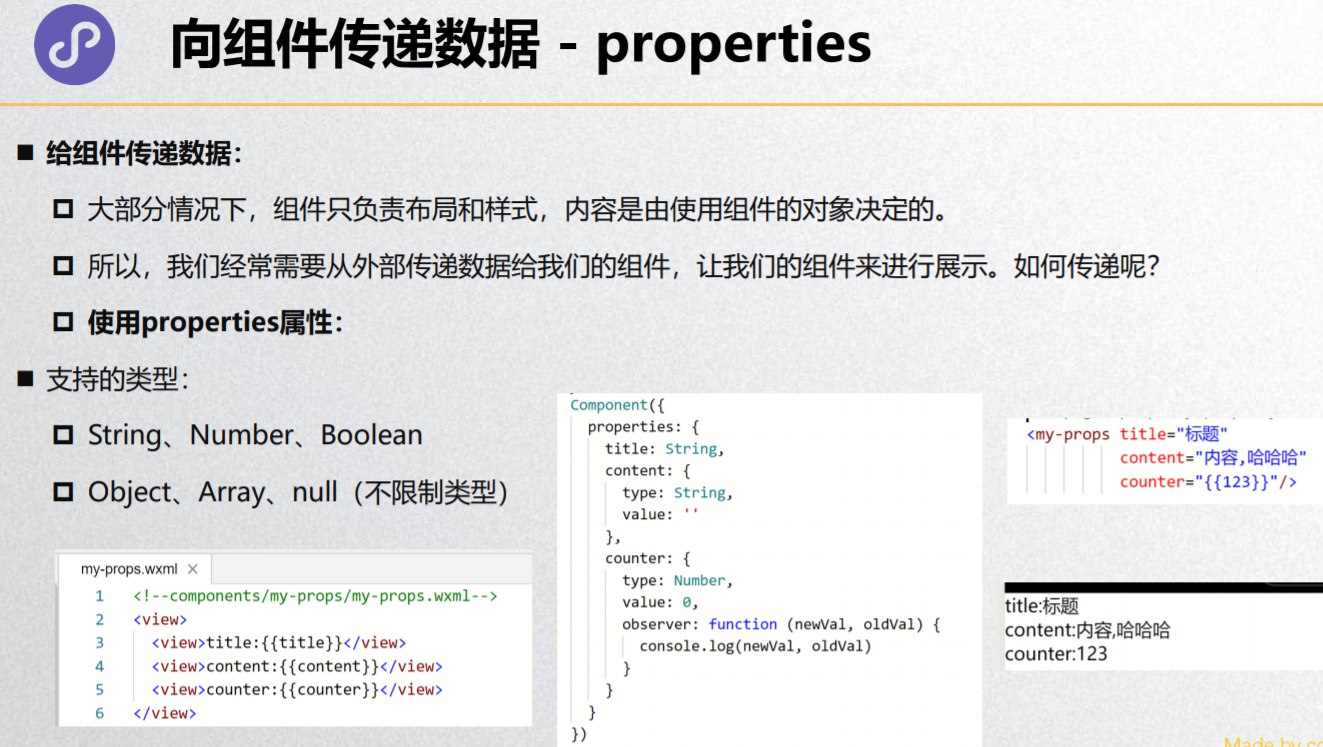
向组件传递数据 - properties
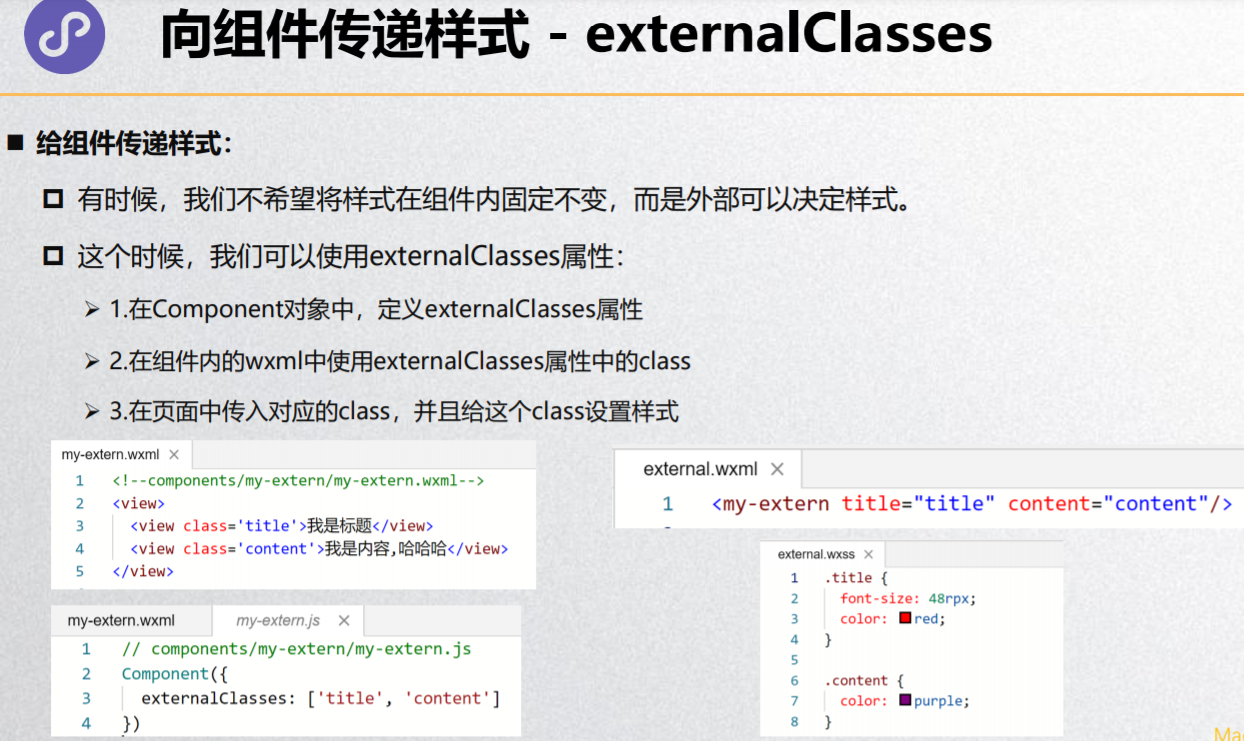
向组件传递样式 - externalClasses
my-prop.wxml
<!--components/my-prop/my-prop.wxml-->
<view class='title titleclass'>{{title}}</view>
<view class='content'>我是组件的内容</view>
my-prop.js
// components/my-prop/my-prop.js
Component({
  properties: {
    // title: String
    title: {
      type: String,
      value: '我是默认的标题',
      observer: function(newVal, oldVal) {
        console.log(newVal, oldVal)
      }
    }
  },
  // 类名不能是小驼峰titleClass,否则不生效
  externalClasses: ['titleclass']
})
home.wxml
<!-- 3.给自定义组件传递数据/样式 -->
<my-prop title="哈哈哈" titleclass="red" />
<my-prop title="呵呵呵" titleclass="green" />
<my-prop titleclass="blue" />
home.wxss
/* pages/home/home.wxss */
.title {
  color: red;
}

.red {
  color: red;
}

.green {
  color: green;
}

.blue {
  color: blue;
}
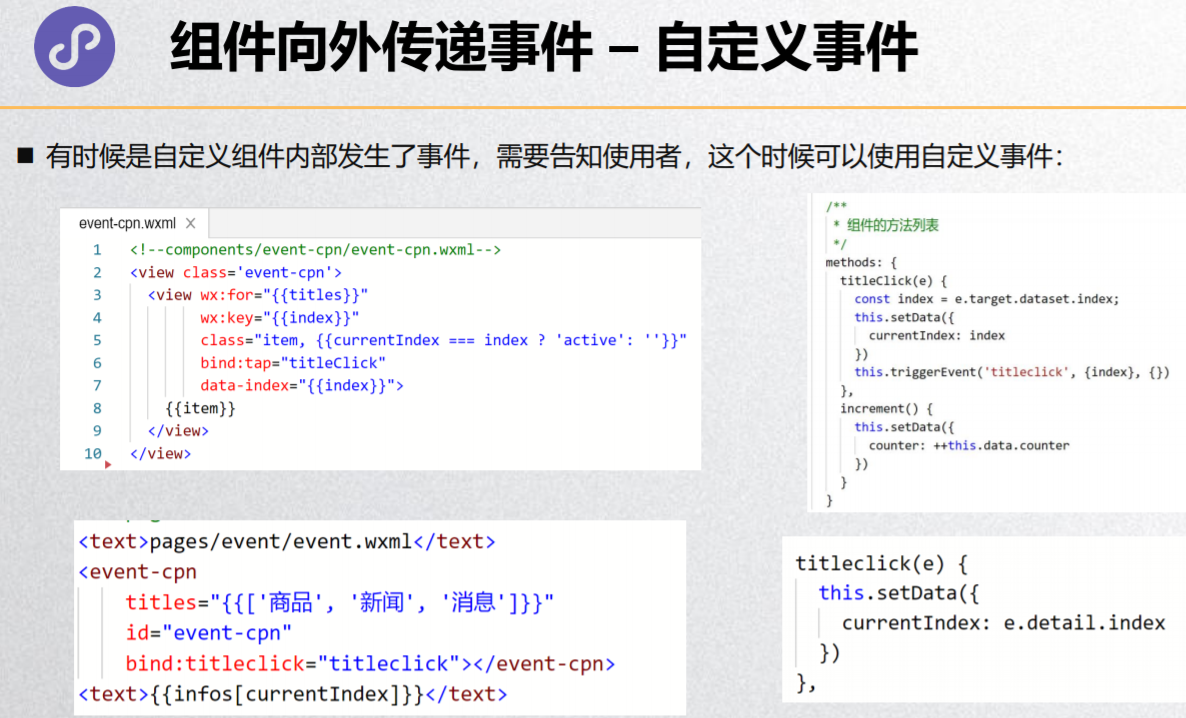
组件向外传递事件 – 自定义事件
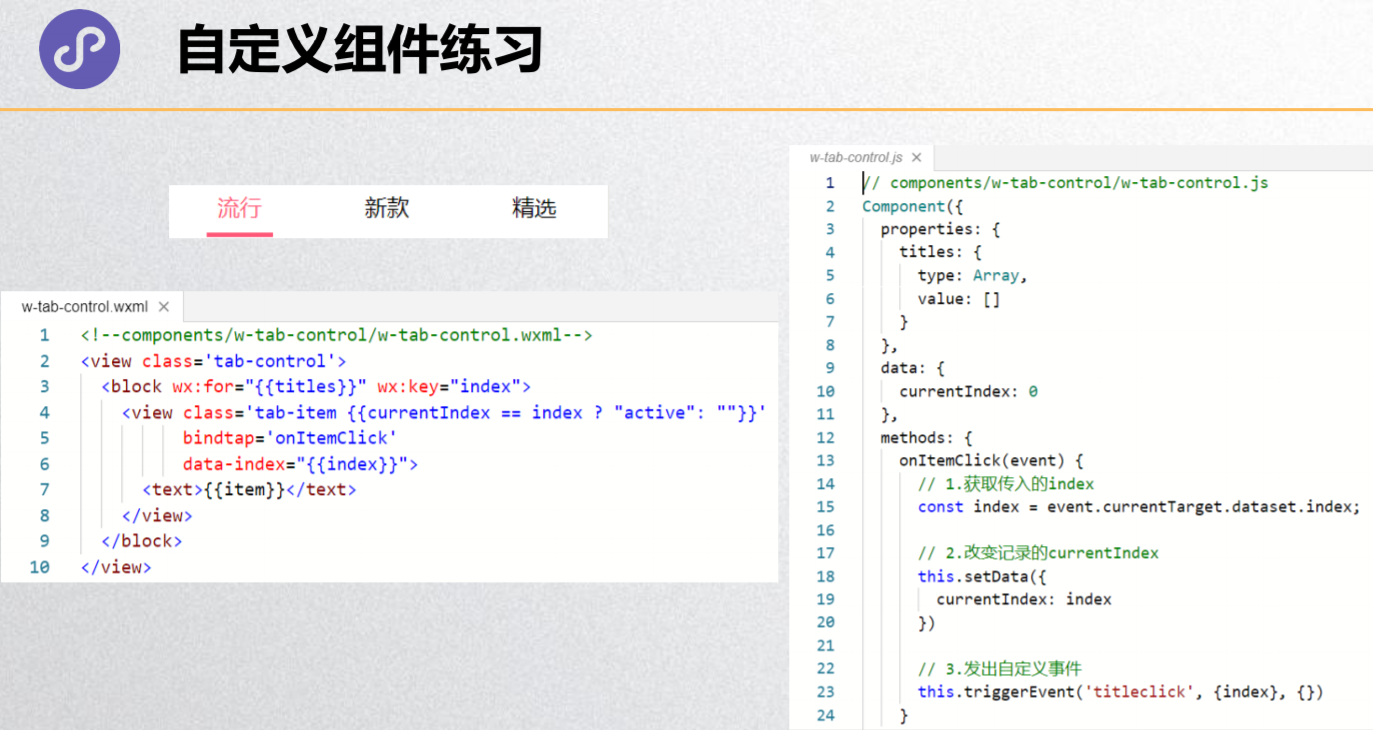
自定义组件练习
my-event.wxml
<button size='mini' bind:tap="handleIncrement">+1</button>
my-event.js
// components/my-event/my-event.js
Component({
  methods: {
    handleIncrement() {
      // console.log('---------')
      this.triggerEvent('increment', {name: 'why', age: 18}, {})
    }
  }
})
home.html
<!-- 4.组件内部发出事件 -->
<view>当前计数: {{counter}}</view>
<!-- 注意,这里不是 bind:tap -->
<my-event bind:increment="handleIncrement" />
home.js
handleIncrement(event) {
  console.log('---------', event)
  this.setData({
    counter: this.data.counter + 1
  })
}
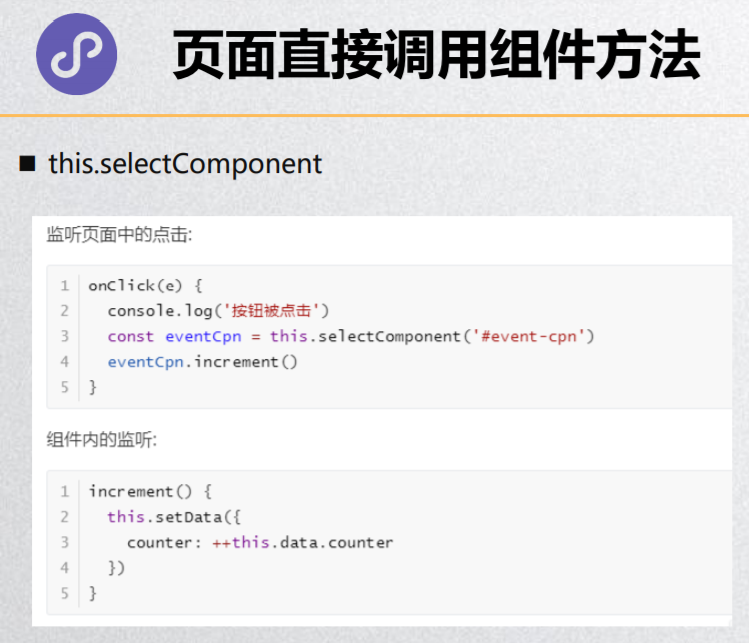
页面直接调用组件方法
home.html
<!-- 6.直接选中组件修改数据/调用方法 -->
<button size='mini' bind:tap="handleIncrementCpn">修改组件内的数据</button>
<my-sel class="sel-class" id="sel-id" />
home.js
handleIncrementCpn() {
  // 最终目的: 修改my-sel中的counter
  // 1.获取组件对象
  const my_sel = this.selectComponent('.sel-class')
  console.log(my_sel)

  // 2.通过setData修改组件中的数据(不合理)
  // my_sel.setData({
  //   counter: my_sel.data.counter + 20
  // })

  // 3.通过方法对数据进行修改
  my_sel.incrementCounter(10)
}
my-sel.wxml
<view>组件内的计数: {{counter}}</view>
my-sel.js
Component({
  data: {
    counter: 0
  },
  methods: {
    incrementCounter(num) {
      this.setData({
        counter: this.data.counter + num
      })
    }
  }

})
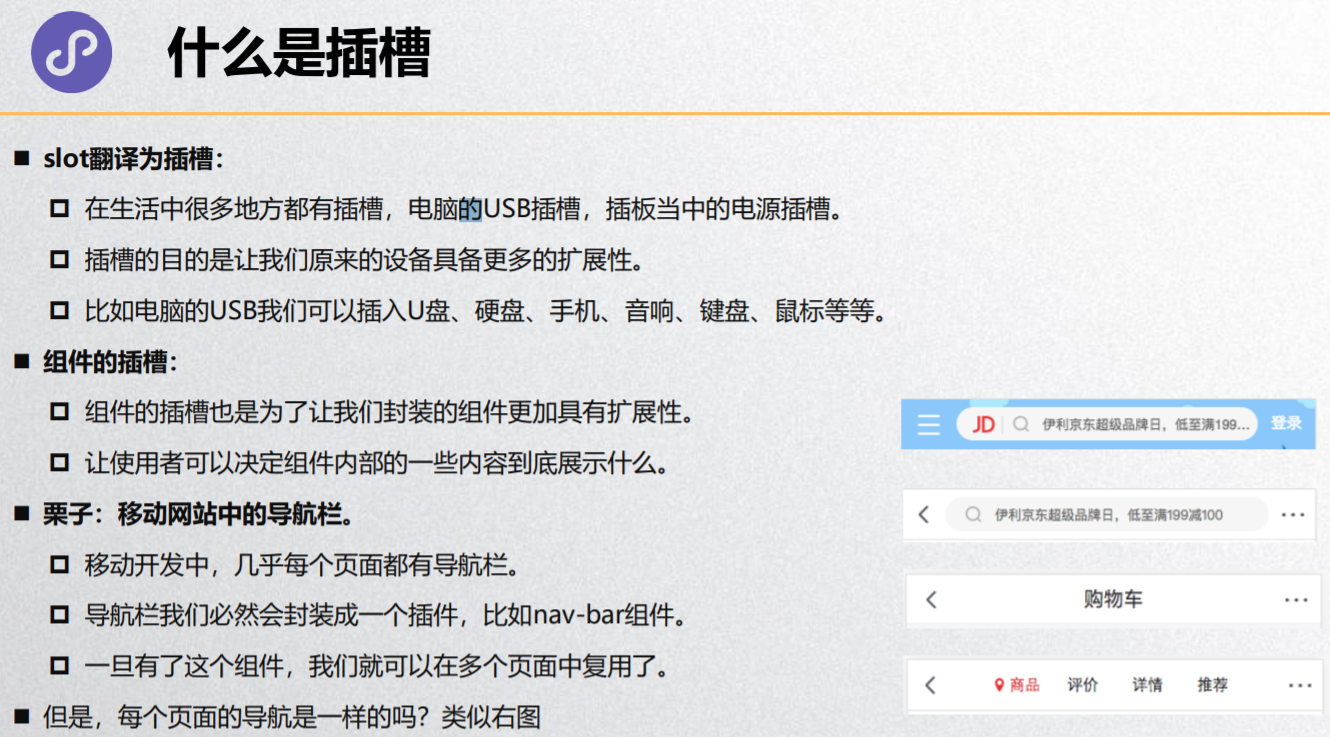
什么是插槽
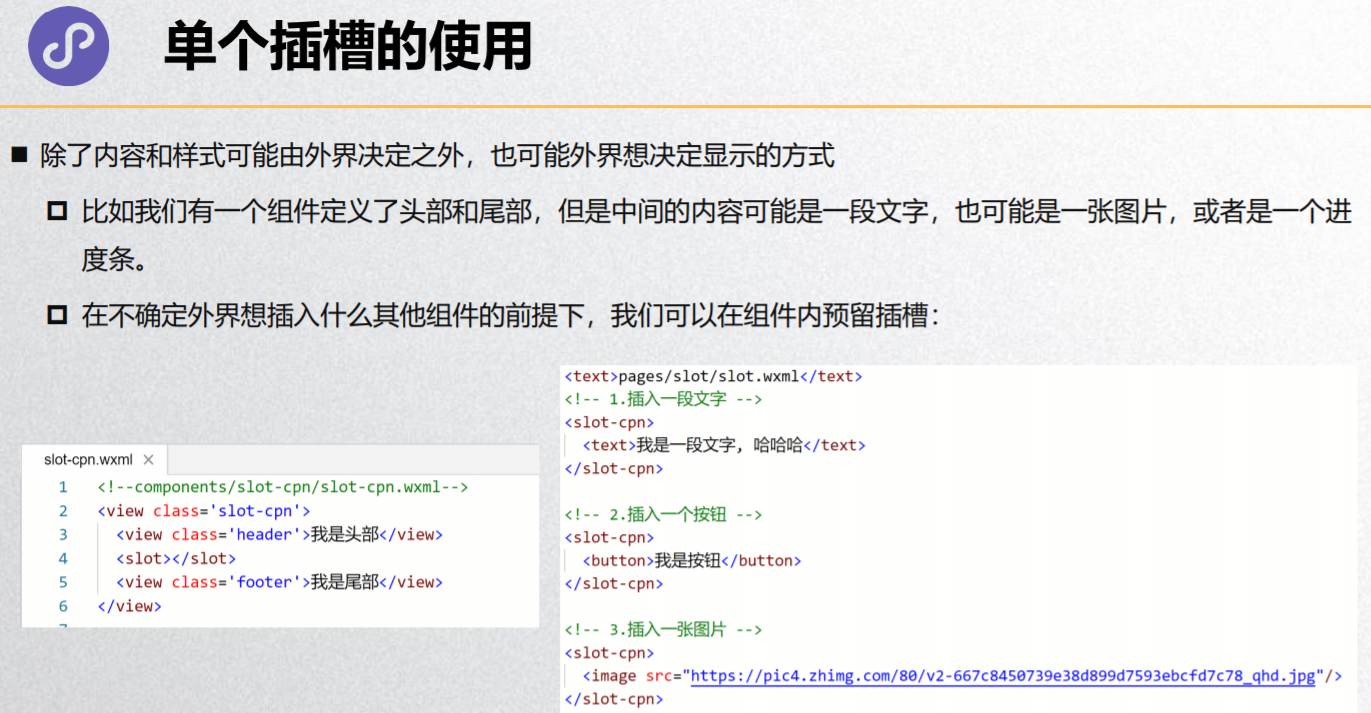
单个插槽的使用
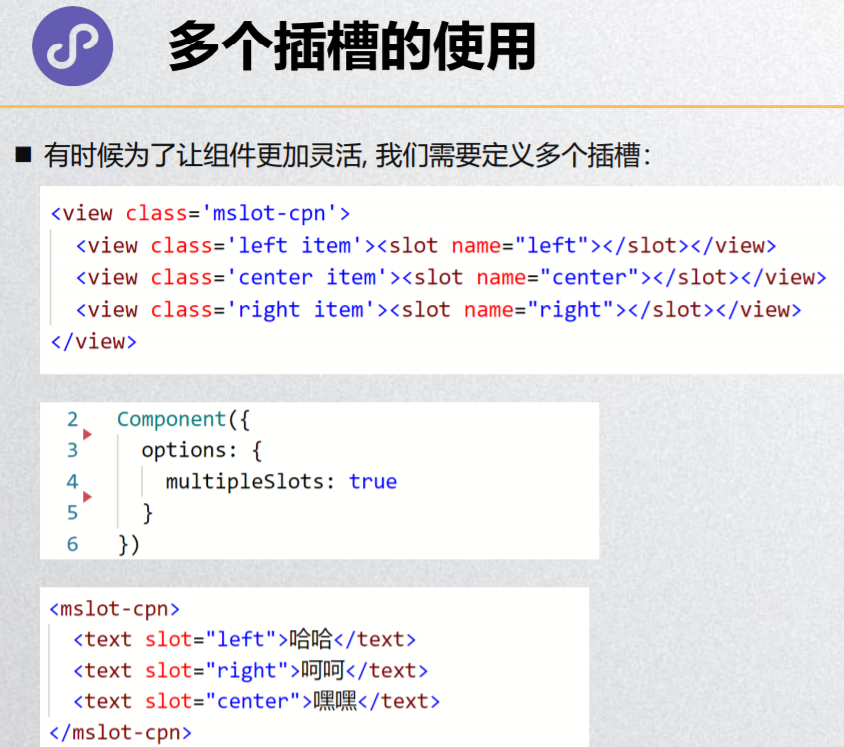
多个插槽的使用
my-slot.wxml
<!--components/my-slot/my-slot.wxml-->
<view>我是组件的头部</view>
<slot/>
<view>我是组件的尾部</view>
my-mslot.wxml
<!--components/my-mslot/my-mslot.wxml-->
<view>我是mslot组件的开始</view>
<view class='slot1'><slot name="slot1"/></view>
<view class='slot2'><slot name="slot2"/></view>
<view class='slot3'><slot name="slot3"/></view>
<view>我是mslot组件的结尾</view>
home.wxml
<!-- 7.插槽的使用 -->
<!-- 7.1.单个插槽的使用 -->
<my-slot>
  <button size='mini'>插入的按钮1</button>
  <button size='mini'>插入的按钮2</button>
  <button size='mini'>插入的按钮3</button>
</my-slot>

<my-slot>
  <text>哈哈哈哈哈哈</text>
</my-slot>

<my-slot>
  <image src="http://s3.mogucdn.com/mlcdn/c45406/170915_0a93207ci28kelh617k4hh62l65lb_640x960.jpg" />
</my-slot>

<my-slot>
  <slider value='60'></slider>
</my-slot>

<!-- 7.2.多个插槽的使用 -->
<!--
  注意事项:
    1.给每一个插槽起一个名字: name属性
    2.必须在Component对象中添加一个选项: options -> multipleSlots: true
 -->
<button size='mini' bind:tap="handleChangeShow">切换显示</button>
<block wx:if="{{isShow}}">
  <my-mslot>
    <button size='mini' slot="slot2">我是插入的按钮</button>
    <slider slot="slot1" />
    <text slot="slot3">哈哈哈哈</text>
  </my-mslot>
</block>
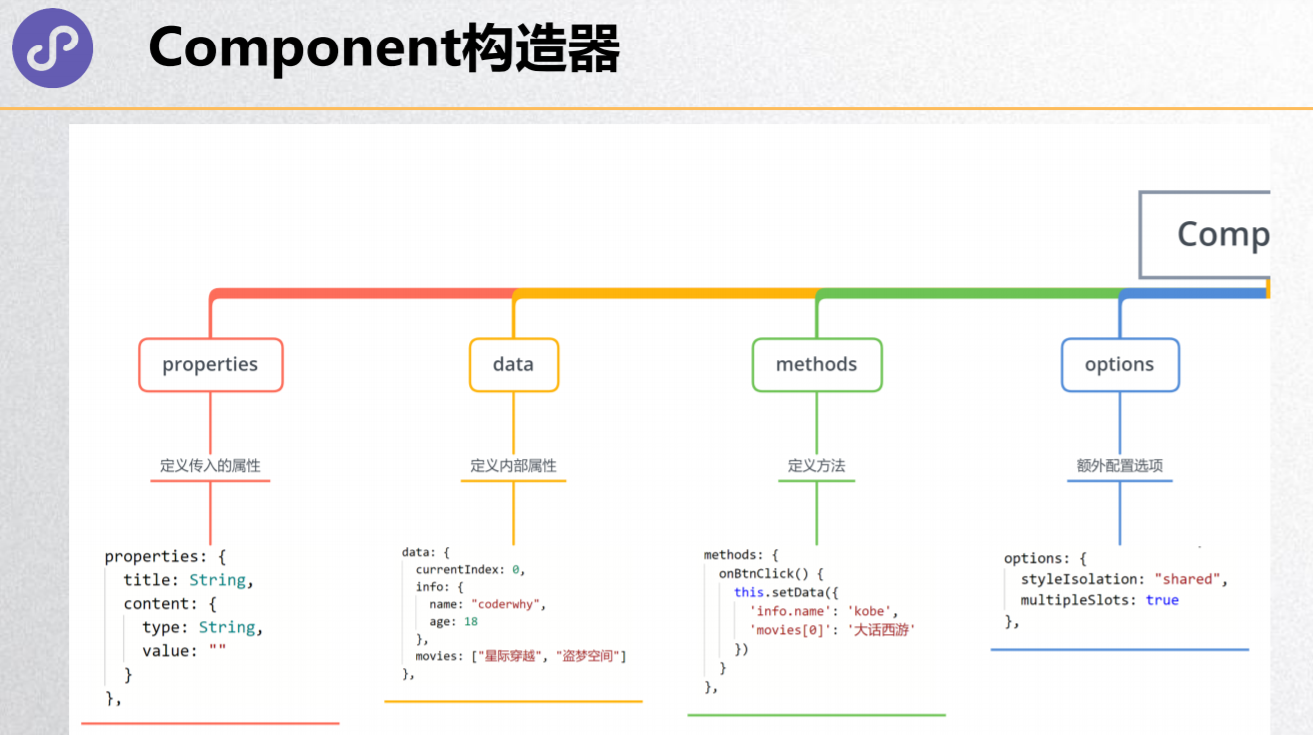
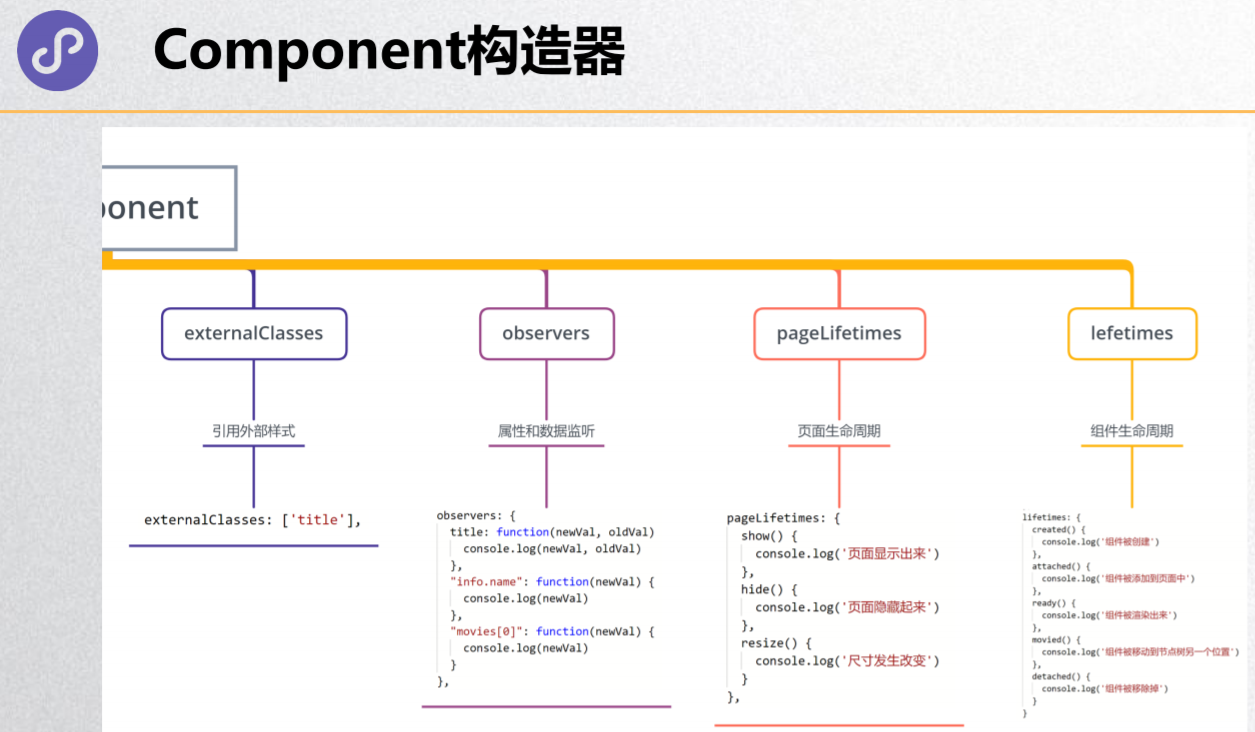
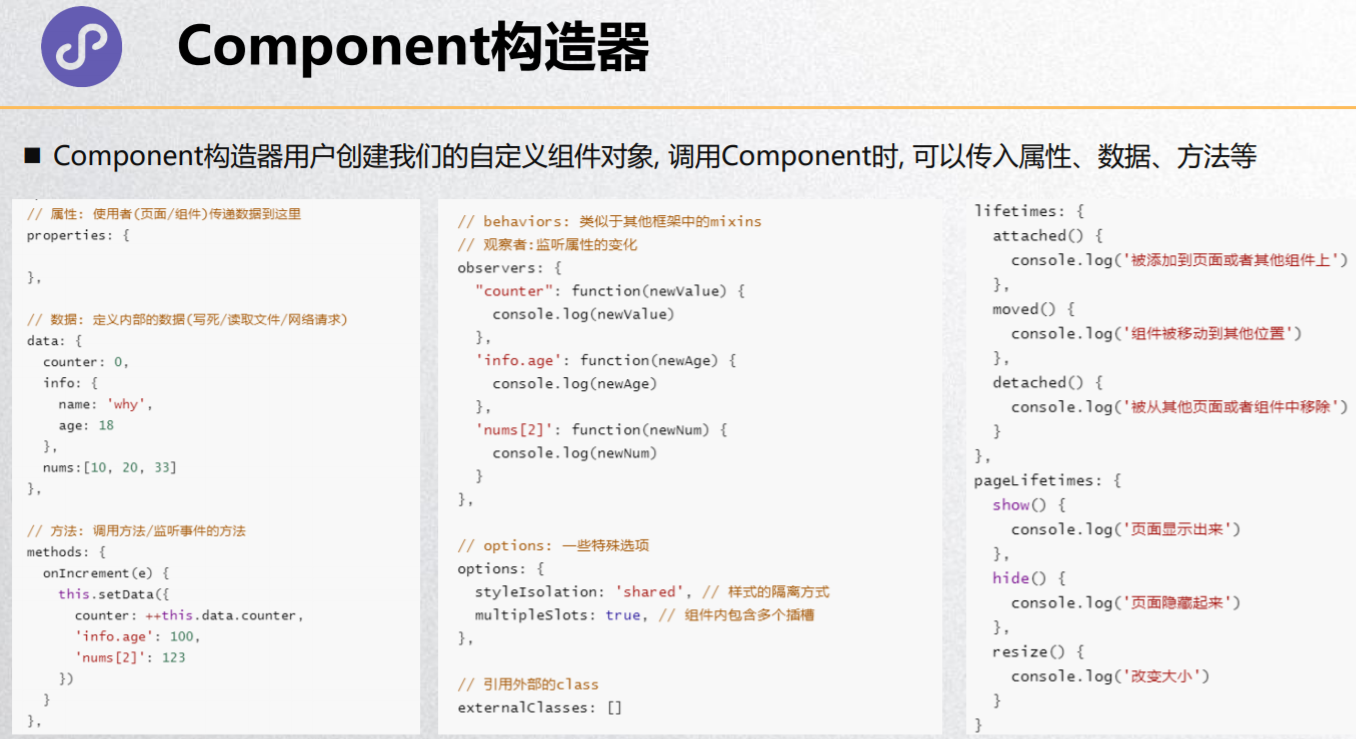
Component构造器
// components/my-mslot/my-mslot.js
Component({
  // ----------- 让使用者可以给组件传入数据 --------------
  properties: {
    title: {
      type: String,
      value: '',
      observer: function (newVal, oldVal) {

      }
    }
  },


  // ----------- 定义组件内部的初始化数据 --------------
  data: {
    counter: 0
  },


  // ----------- 用于定义组件内部的函数 --------------
  methods: {
    foo() {

    }
  },


  // ----------- 定义组件的配置选项 --------------
  // multipleSlots: 在使用多插槽时需要设置true
  // styleIsolation: 设置样式的隔离方式
  options: {
    multipleSlots: true
  },


  // ----------- 外界给组件传入额外的样式 --------------
  externalClasses: [],


  // ----------- 可以监听properties/data的改变 --------------
  observers: {
    // 【没有oldValue。】
    counter: function (newVal) {
      console.log(newVal)
    }
  },

  // ----------- 组件中监听生命周期函数 --------------
  // 1.监听所在页面的生命周期
  pageLifetimes: {
    show() {
      console.log('监听组件所在页面显示出来时')
    },
    hide() {
      console.log('监听组件所在页面隐藏起来时')
    },
    resize() {
      console.log('监听页面尺寸的改变')
    }
  },

  // 2.监听组件本身的生命周期
  lifetimes: {
    created() {
      console.log('组件被创建出来')
    },
    attached() {
      console.log('组件被添加到页面')
    },
    ready() {
      console.log('组件被渲染出来')
    },
    moved() {
      console.log('组件被移动到另外一个节点')
    },
    detached() {
      console.log('组件被移除掉')
    }
  }
})