本文主要实现手写数字识别,利用多类逻辑回归与神经网络两种方法实现
Multi-class Classification
数据源
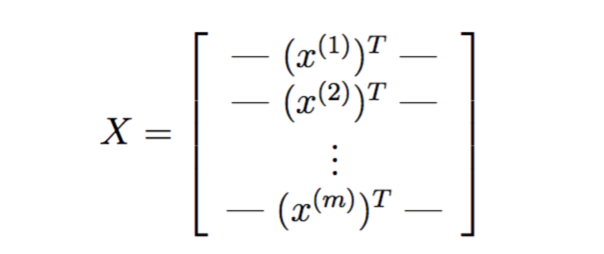
There are 5000 training examples in ex3data1.mat, where each training example is a 20 pixel by 20 pixel grayscale image of the digit. Each pixel is represented by a floating point number indicating the grayscale intensity at that location. The 20 by 20 grid of pixels is “unrolled” into a 400-dimensional vector. Each of these training examples becomes a single row in our data matrix X. This gives us a 5000 by 400 matrix X where every row is a training example for a handwritten digit image.
The second part of the training set is a 5000-dimensional vector y that contains labels for the training set. To make things more compatible with Octave/MATLAB indexing, where there is no zero index, we have mapped the digit zero to the value ten. Therefore, a “0” digit is labeled as “10”, while the digits “1” to “9” are labeled as “1” to “9” in their natural order.
数据可视化
通过displaydata函数可以察看数据
function [h, display_array] = displayData(X, example_width)
%DISPLAYDATA Display 2D data in a nice grid
%   [h, display_array] = DISPLAYDATA(X, example_width) displays 2D data
%   stored in X in a nice grid. It returns the figure handle h and the
%   displayed array if requested.

% Set example_width automatically if not passed in
if ~exist('example_width', 'var') || isempty(example_width)
    example_width = round(sqrt(size(X, 2)));
end

% Gray Image
colormap(gray);

% Compute rows, cols
[m n] = size(X);
example_height = (n / example_width);

% Compute number of items to display
display_rows = floor(sqrt(m));
display_cols = ceil(m / display_rows);

% Between images padding
pad = 1;

% Setup blank display
display_array = - ones(pad + display_rows * (example_height + pad), ...
                       pad + display_cols * (example_width + pad));

% Copy each example into a patch on the display array
curr_ex = 1;
for j = 1:display_rows
    for i = 1:display_cols
        if curr_ex > m,
            break;
        end
        % Copy the patch

        % Get the max value of the patch
        max_val = max(abs(X(curr_ex, :)));
        display_array(pad + (j - 1) * (example_height + pad) + (1:example_height), ...
                      pad + (i - 1) * (example_width + pad) + (1:example_width)) = ...
                        reshape(X(curr_ex, :), example_height, example_width) / max_val;
        curr_ex = curr_ex + 1;
    end
    if curr_ex > m,
        break;
    end
end

% Display Image
h = imagesc(display_array, [-1 1]);

% Do not show axis
axis image off

drawnow;

end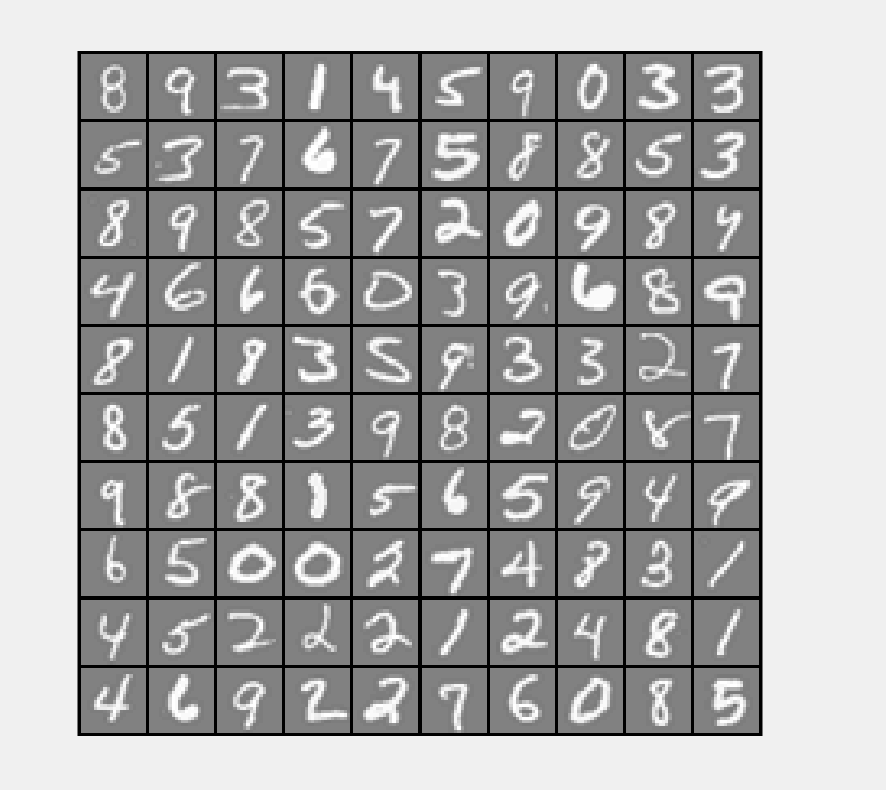
向量化逻辑回归
由于数据较多,使用向量化可以使训练更加高效,提高速度。
代价函数的向量化
代价函数为

Let us define X and θ as
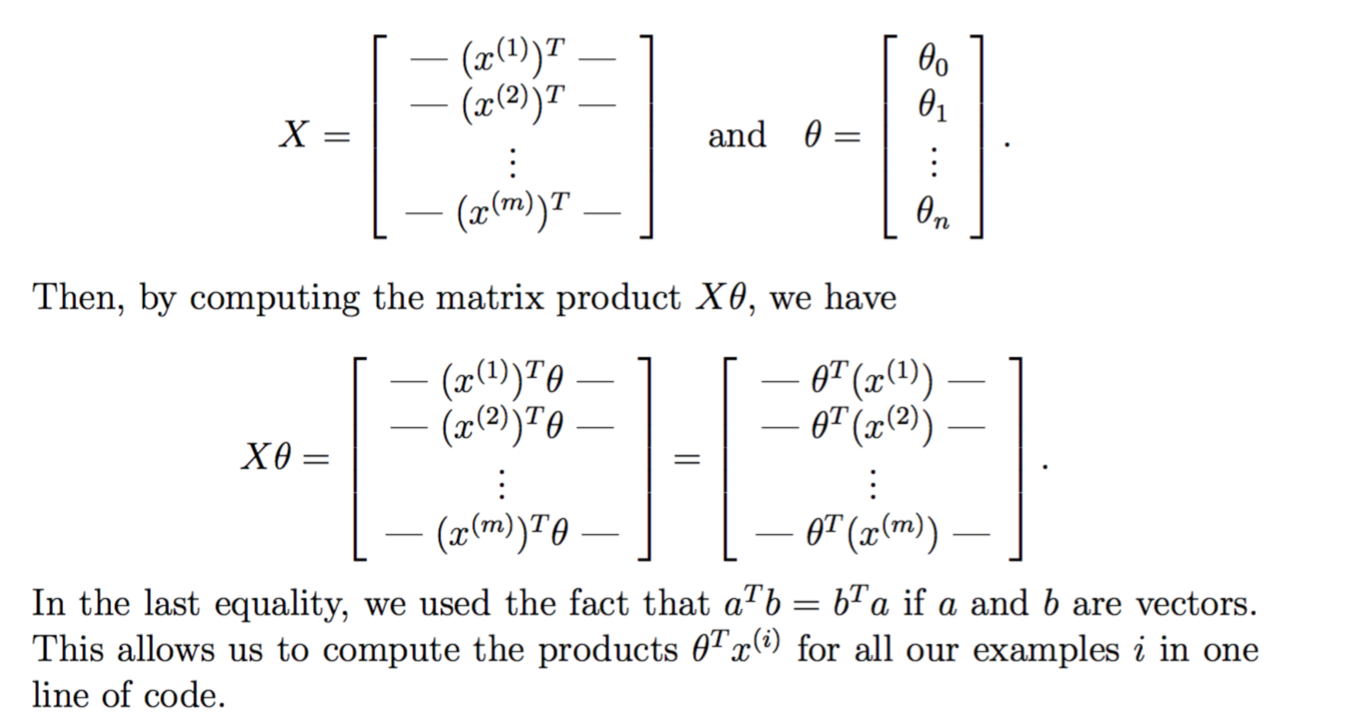
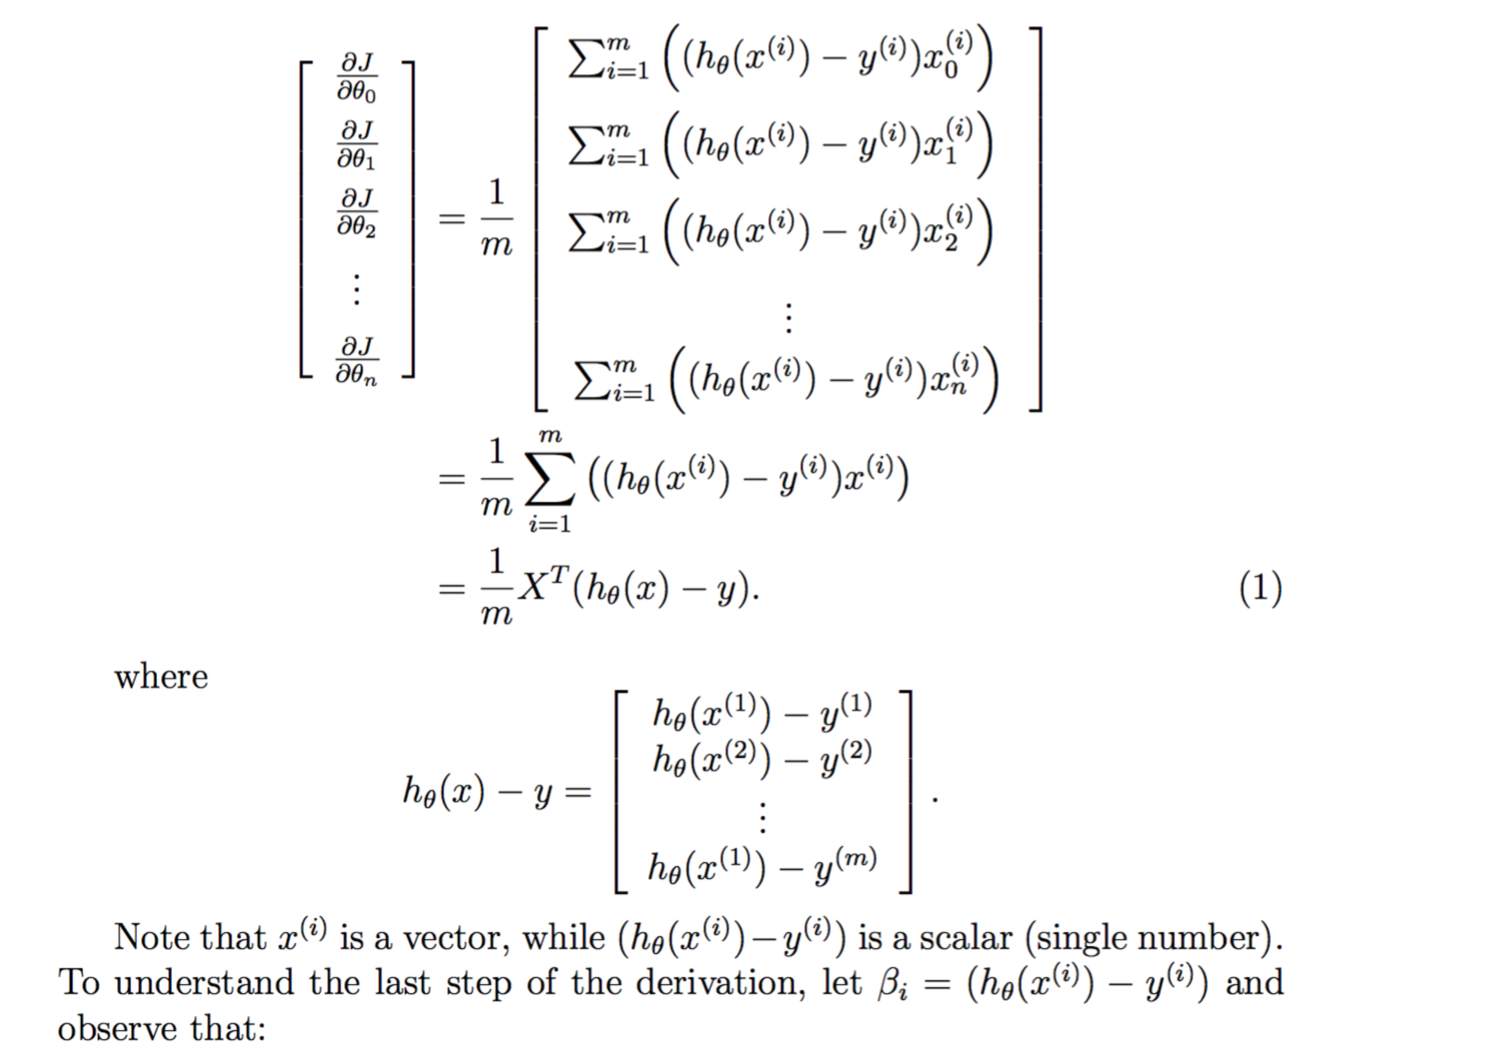
gradient向量化


小技巧
Debugging Tip: Vectorizing code can sometimes be tricky. One com- mon strategy for debugging is to print out the sizes of the matrices you are working with using the size function. For example, given a data ma- trix X of size 100 × 20 (100 examples, 20 features) and θ, a vector with dimensions 20×1, you can observe that Xθ is a valid multiplication oper- ation, while θX is not. Furthermore, if you have a non-vectorized version of your code, you can compare the output of your vectorized code and non-vectorized code to make sure that they produce the same outputs.
综上,可以写出lrCostFunction
function [J, grad] = lrCostFunction(theta, X, y, lambda)
m = length(y); % number of training examples

% You need to return the following variables correctly
J = 0;
grad = zeros(size(theta));
temp=[0;theta(2:end)];    % 先把theta(1)拿掉,不参与正则化
J= -1 * sum( y .* log( sigmoid(X*theta) ) + (1 - y ) .* log( (1 - sigmoid(X*theta)) ) ) / m  + lambda/(2*m) * temp' * temp ;
grad = ( X' * (sigmoid(X*theta) - y ) )/ m + lambda/m * temp ;

grad = grad(:);

end
一对多分类
在这个问题中,需要分成10份
小技巧
Octave/MATLAB Tip: Logical arrays in Octave/MATLAB are arrays which contain binary (0 or 1) elements. In Octave/MATLAB, evaluating the expression a == b for a vector a (of size m×1) and scalar b will return a vector of the same size as a with ones at positions where the elements of a are equal to b and zeroes where they are different. To see how this works for yourself, try the following code in Octave/MATLAB:
   a = 1:10; % Create a and b
   b = 3;
   a == b    % You should try different values of b here
由上可得oneVsAll function
function [all_theta] = oneVsAll(X, y, num_labels, lambda)
m = size(X, 1);
n = size(X, 2);
X = [ones(m, 1) X];

options = optimset('GradObj', 'on', 'MaxIter', 50);

initial_theta = zeros(n + 1, 1);

for c = 1:num_labels

all_theta(c,:) = fmincg (@(t)(lrCostFunction(t, X, (y == c), lambda)), ...
            initial_theta, options);
end

end
One-vs-all Prediction
根据上面得到了训练后的
function p = predictOneVsAll(all_theta, X)
[a,p] = max(sigmoid( X * all_theta'),[],2) ;    % 返回每行最大值的索引位置,也就是预测的数字
end
pred = predictOneVsAll(all_theta, X);
fprintf('
Training Set Accuracy: %f
', mean(double(pred == y)) * 100);可得准确率为95%
SourceCode:machine-learning-ex3
神经网络实现
神经网络实现主要步骤如下:
- 初始化与导入数据
- Compute Cost (Feedforward)
- Implement Regularization
- 随机初始化参数
- Implement Backpropagation
- 梯度检验
- 训练神经网络
- 预测
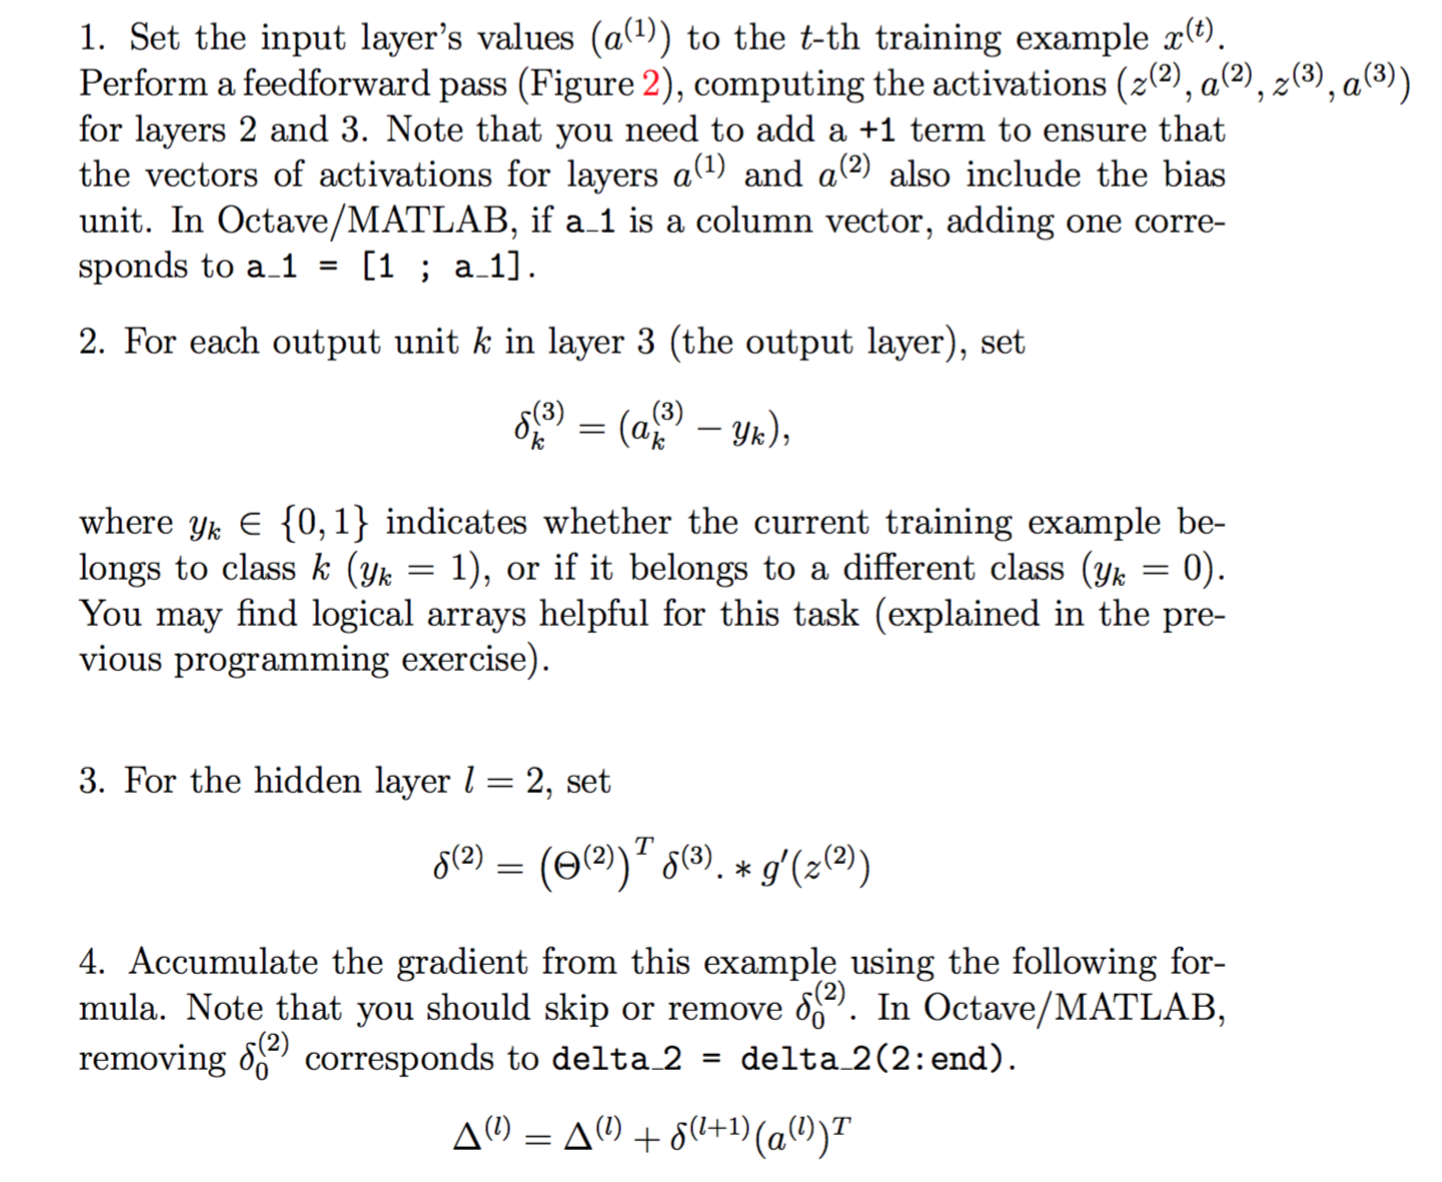
反向传播算法的具体实现
function [J grad] = nnCostFunction(nn_params, ...
input_layer_size, ...
hidden_layer_size, ...
num_labels, ...
X, y, lambda)
Theta1 = reshape(nn_params(1:hidden_layer_size * (input_layer_size + 1)), ...
hidden_layer_size, (input_layer_size + 1));
Theta2 = reshape(nn_params((1 + (hidden_layer_size * (input_layer_size + 1))):end), ...
num_labels, (hidden_layer_size + 1));
% Setup some useful variables
m = size(X, 1);
% You need to return the following variables correctly
J = 0;
Theta1_grad = zeros(size(Theta1));
Theta2_grad = zeros(size(Theta2));
%% 对y进行处理 Y(find(y==3))= [0 0 1 0 0 0 0 0 0 0]; 用于 Feedforward cost function 1和2
Y=[];
E = eye(num_labels); % 要满足K可以是任意,则不能写eye(10)!!
for i=1:num_labels
Y0 = find(y==i); % 找到等于y=i的序列号,替换向量
Y(Y0,:) = repmat(E(i,:),size(Y0,1),1);
end
%% regularized Feedforward cost function lambda=1
% 计算前向传输 Add ones to the X data matrix -jin
X = [ones(m, 1) X];
a2 = sigmoid(X * Theta1'); % 第二层激活函数输出
a2 = [ones(m, 1) a2]; % 第二层加入b
a3 = sigmoid(a2 * Theta2');
temp1 = [zeros(size(Theta1,1),1) Theta1(:,2:end)]; % 先把theta(1)拿掉,不参与正则化
temp2 = [zeros(size(Theta2,1),1) Theta2(:,2:end)];
temp1 = sum(temp1 .^2); % 计算每个参数的平方,再就求和
temp2 = sum(temp2 .^2);
cost = Y .* log(a3) + (1 - Y ) .* log( (1 - a3)); % cost是m*K(5000*10)的结果矩阵 sum(cost(:))全部求和
J= -1 / m * sum(cost(:)) + lambda/(2*m) * ( sum(temp1(:))+ sum(temp2(:)) );
%% 计算 Gradient
delta_1 = zeros(size(Theta1));
delta_2 = zeros(size(Theta2));
for t = 1:m
% step 1
a_1 = X(t,:)';
% a_1 = [1 ; a_1];
z_2 = Theta1 * a_1;
a_2 = sigmoid(z_2);
a_2 = [1 ; a_2];
z_3 = Theta2 * a_2;
a_3 = sigmoid(z_3);
% step 2
err_3 = zeros(num_labels,1);
for k = 1:num_labels
err_3(k) = a_3(k) - (y(t) == k);
end
% step 3
err_2 = Theta2' * err_3; % err_2有26行!!!
err_2 = err_2(2:end) .* sigmoidGradient(z_2); % 去掉第一个误差值,减少为25. sigmoidGradient(z_2)只有25行!!!
% step 4
delta_2 = delta_2 + err_3 * a_2';
delta_1 = delta_1 + err_2 * a_1';
end
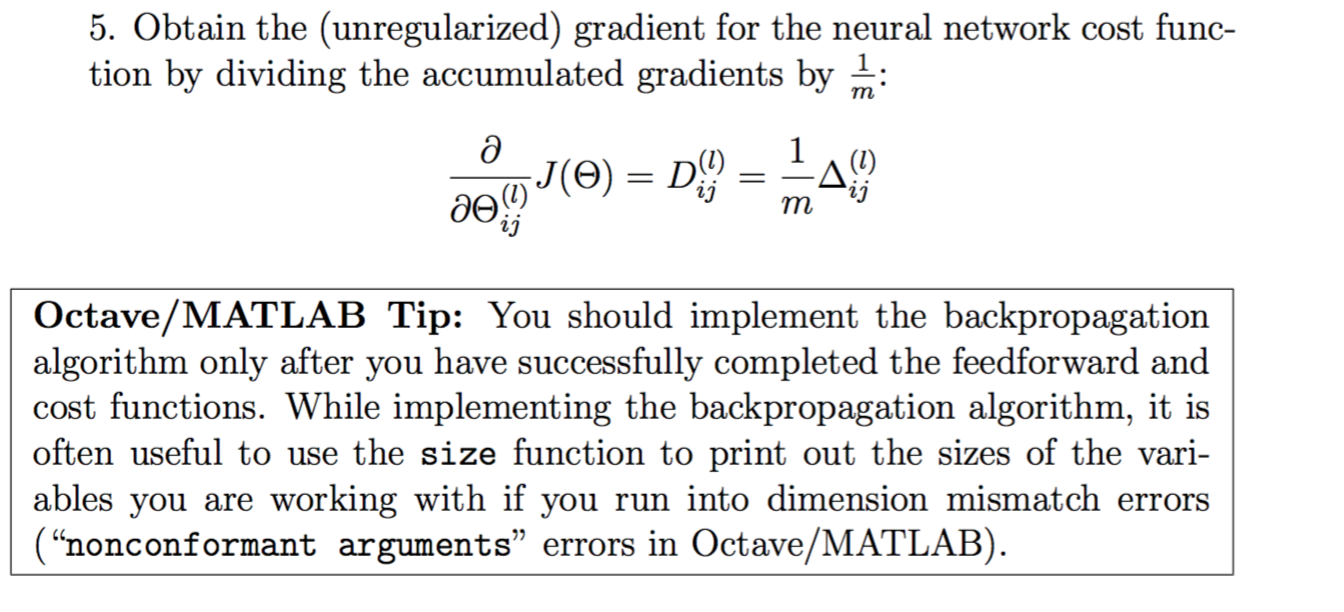
% step 5
Theta1_temp = [zeros(size(Theta1,1),1) Theta1(:,2:end)];
Theta2_temp = [zeros(size(Theta2,1),1) Theta2(:,2:end)];
Theta1_grad = 1 / m * delta_1 + lambda/m * Theta1_temp;
Theta2_grad = 1 / m * delta_2 + lambda/m * Theta2_temp ;
% Unroll gradients
grad = [Theta1_grad(:) ; Theta2_grad(:)];
end训练神经网络代码
options = optimset('MaxIter', 50);

%  You should also try different values of lambda
lambda = 1;

% Create "short hand" for the cost function to be minimized
costFunction = @(p) nnCostFunction(p, ...
                                   input_layer_size, ...
                                   hidden_layer_size, ...
                                   num_labels, X, y, lambda);

% Now, costFunction is a function that takes in only one argument (the
% neural network parameters)
[nn_params, cost] = fmincg(costFunction, initial_nn_params, options);
预测结果代码
function p = predict(Theta1, Theta2, X)
%PREDICT Predict the label of an input given a trained neural network
%   p = PREDICT(Theta1, Theta2, X) outputs the predicted label of X given the
%   trained weights of a neural network (Theta1, Theta2)

% Useful values
m = size(X, 1);
num_labels = size(Theta2, 1);

% You need to return the following variables correctly
p = zeros(size(X, 1), 1);

h1 = sigmoid([ones(m, 1) X] * Theta1');
h2 = sigmoid([ones(m, 1) h1] * Theta2');
[dummy, p] = max(h2, [], 2);

% =========================================================================


end
准确率大概95%左右,根据随机初始化的参数会有1%左右的误差
SourceCode:machine-learning-ex4