MySQL源码解读之数据结构-lf_alloc-pin
在无锁编程(Lock Free)中的存在这样一个问题:由于指针都是线程间共享的,当一个线程准备释放一个指针指向的内存时,它无法知道是否另有别的线程也同时持有该块内存的指针并需要访问,mysql就是通过lf_alloc-pin来解决此问题。同时无锁编程还存在另外一类问题:ABA问题,MySQL使用的是version pointer来解决ABA问题。
ABA Problem
通常在无锁编程中,我们通常用原子操作(CAS)来代替互斥锁和自旋锁。但是CAS会引入ABA问题,下边我们通过一段代码来看下什么是ABA问题。
/* Naive lock-free stack which suffers from ABA problem.*/
  class Stack {
    std::atomic<Obj*> top_ptr;
    //
    // Pops the top object and returns a pointer to it.
    //
    Obj* Pop() {
      while(1) {
        // 获取栈顶指针top_ptr, 赋值给ret_ptr
        Obj* ret_ptr = top_ptr;
        if (!ret_ptr) return nullptr;
        // 获取栈顶的下一个元素指针next_ptr
        Obj* next_ptr = ret_ptr->next;
        // 再次比较之前获取的栈顶指针ret_ptr和当前的栈顶指针top_ptr
        // 如果二者相等,则说明这段时间栈没有发生变化,可以操作,
        // 即修改栈顶指针top_ptr为next_ptr
        if (top_ptr.compare_exchange_weak(ret_ptr, next_ptr)) {
          return ret_ptr;
        }
        // The stack has changed, start over.
      }
    }
    //
    // Pushes the object specified by obj_ptr to stack.
    //
    void Push(Obj* obj_ptr) {
      while(1) {
        // 获取栈顶指针,赋值给next_ptr
        Obj* next_ptr = top_ptr;
        // 将opj_ptr的next指针指向栈顶next_ptr
        obj_ptr->next = next_ptr;
        // 在此比较之前获取的栈顶指针next_ptr和当前的栈顶top_ptr,
        // 如果二者相等,则说明这段时间栈没有发生变化,可以操作,
        // 即修改栈顶指针top_ptr为next_ptr
        if (top_ptr.compare_exchange_weak(next_ptr, obj_ptr)) {
          return;
        }
        // The stack has changed, start over.
      }
    }
  };
上面就是一个典型的通过CAS loop实现的lock free stack,试想如下场景:
假设当前stack是top->A -> B -> C,线程1在执行Pop操作,当它在最后一步compare_exchange_weak前被抢占挂起,此时线程2执行了下面一系列操作
POP // 弹出A
POP // 弹出B
delete B
PUSH A  // 重新压入A
之后当前的栈变成top->A->C,接着线程A继续执行,在compare_exchange_weak是比较之前获取的栈顶ret_ptr和当前栈顶top_ptr,发现相等(都是A),所以将栈顶top_ptr改成了之前获取的到next_ptr(B),然后返回。
注意,这里栈变成了top->B->C, 然而B已经被线程2 delete掉了,所以会出现各种未定义的问题,导致ABA Problem。这个问题MySQL使用的是version pointer来解决
LF_PINS
指针都是线程间共享的,当一个线程准备释放一个指针指向的内存时,它无法知道是否另有别的线程也同时持有该块内存的指针并需要访问。针对这个问题,MySQL使用LF_PINS来解决。每个线程从全局的LF_PINBOX中拿到一个LF_PINS, 当使用某个指针PTR之前,先将其赋值给LOCAL_PTR,然后再将PTR pin到自己的LF_PINS当中。
do
{
  LOCAL_PTR= PTR;
  pin(PTR, PIN_NUMBER);
} while (LOCAL_PTR != PTR)
之后就可以使用LOCAL_PTR并确保其指向的地址肯定不会被其他线程free,因为当其他线程想free某个指针的时候,它会扫描LF_PINBOX中所有LF_PINS,看是否有其他线程已经pin住了相同的地址,如果有的话则不能free。用do-while来pin呢,是为了确保pin住的PTR和之前取到的LOCAL_PTR是相等的,就是double check下来确保从获取PTR到pin住之间的这段时间,这个指针没有被free。如果出现一下情况:
线程1:LOCAL_PTR = PTR
线程2:free(PTR);PTR = 0
线程1:pin(PTR,PIN_NUMBER)
这样的顺序,线程1pin住的PTR是0,其之后要使用的LOCAL_PTR就指向已经被free的地址,会出问题。 LF_PINS结构代码如下:
struct LF_PINS {
  std::atomic<void *> pin[LF_PINBOX_PINS];
  LF_PINBOX *pinbox;
  void *purgatory;
  uint32 purgatory_count;
  std::atomic<uint32> link;
  /* we want sizeof(LF_PINS) to be 64 to avoid false sharing */
#if SIZEOF_INT * 2 + SIZEOF_CHARP * (LF_PINBOX_PINS + 2) != 64
  char pad[64 - sizeof(uint32) * 2 - sizeof(void *) * (LF_PINBOX_PINS + 2)];
#endif
};
pin[LF_PINBOX_PINS]存放被pin住的指针,最多pin住4个。LF_PINBOX_PINS的宏定义值为4。
pinbox 指向LF_PINBOX的指针
purgatort 一个类似回收站的链表,当lf_pinbox_free函数来尝试free指针addr的时,首先会将addr加入到LF_PINS的purgatory链表当中,直到链表当中的元素数LF_PURGATROY_SIZE(10)个时,才真正调用lf_pinbox_real_free来扫描比较LF_PINBOX中所有LF_PINS看addr是否被其他LF_PINS占用,没有的话才可以释放,所以引入purgatory是为了尽可能的减少这样全局扫描的开销。
purgatory_count 用来统计purgatory链表中的元素个数
link: 如果元素被分配,他就是它自己的索引。如果元素是被free的,它就是堆栈中的下一个元素。
char pad[64 - sizeof(uint32) * 2 - sizeof(void *) * (LF_PINBOX_PINS + 2)] 设置 LF_PINS的大小为64,避免内存共享错误
LF_PINBOX
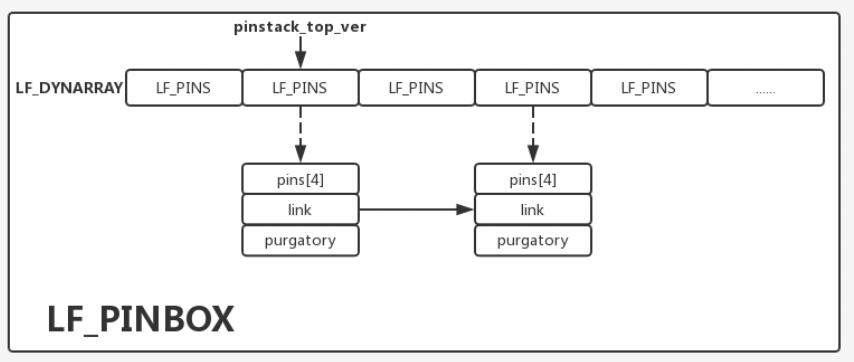
LF_PINBOX是用来管理所有的LF_PINS的,所有线程都从它里面申请一个LF_PINS使用,用完之后再放回来。它的数据结构如下:

LF_PINBOX的定义如下:
typedef struct {
  LF_DYNARRAY pinarray;
  lf_pinbox_free_func *free_func;
  void *free_func_arg;
  uint free_ptr_offset;
  std::atomic<uint32> pinstack_top_ver; /* this is a versioned pointer */
  std::atomic<uint32> pins_in_array;    /* number of elements in array */
} LF_PINBOX;
pinarray是一个LF_DYNARRAY,最多64k个元素,每个元素都是一个LF_PINS,pins_in_array这是当前数组的大小,所有已回收的LF_PINS还是在数组中,不过使用stack来管理,pinstack_top_ver就是这个栈顶。前面说每个LF_PINS都有一个purgatory链表,链表中每个元素的next指针实际上是在addr的指定偏移位置,这个位置即由free_ptr_offset指定,free_func和free_func_arg则是当某个LF_PINS的purgatory等于10时,真正释放他们的回调函数及参数。
LF_ALLOCATOR
LF_ALLOCATOR是一个简易的内存分配器,它里面包含一个LF_PINBOX,所有线程首先先从pinbox中申请一个LF_PINS,然后需要申请内存时就向LF_ALLOCATOR来申请(每次申请的大小固定),将申请到的地址pin在自己的LF_PINS当中。LF_ALLOCATOR将线程free掉的内存同样是用free stack来缓存起来,定义如下:

struct LF_ALLOCATOR {
  LF_PINBOX pinbox;
  std::atomic<uchar *> top;
  uint element_size;
  std::atomic<uint32> mallocs;
  lf_allocator_func *constructor; /* called, when an object is malloc()'ed */
  lf_allocator_func *destructor;  /* called, when an object is free()'d    */
};
top free stack的top地址
element_size 每次申请的内存大小
mallocs 每次执行my_malloc向系统申请内存时加1,记录一共向系统申请过多少次内存
constructor 从系统申请到内存之后回掉constructor
destructor destory遍历已缓存的内存块回调
函数介绍:
1、lf_pin 内联函数,将pin住的指针存放到pin[LF_PINBIX_PINS]数组。
2、lf_unpin 内联函数,释放pin住的指针
3、lf_alloc_direct_free 内联函数
4、lf_pinbox_init LF_PINBOX初始化
5、lf_pinbox_destroy 销毁LF_PINBOX
6、lf_pinbox_get_pins 从LF_PINBOX(lf_dynarray)中分配一个LF_PINS,或者从分配的中选一个未使用的
LF_PINS *lf_pinbox_get_pins(LF_PINBOX *pinbox) {
  uint32 pins, next, top_ver;
  LF_PINS *el;
  /*
    We have an array of max. 64k elements.
    The highest index currently allocated is pinbox->pins_in_array.
    Freed elements are in a lifo stack, pinstack_top_ver.
    pinstack_top_ver is 32 bits; 16 low bits are the index in the
    array, to the first element of the list. 16 high bits are a version
    (every time the 16 low bits are updated, the 16 high bits are
    incremented). Versioning prevents the ABA problem.
  */
  // 先检查free stack中是否有之前别的线程还回来的
  top_ver = pinbox->pinstack_top_ver;
  do {
    // 因为pinbox->pinarray最多64K个元素,而pinbox->pinstack_top_ver是32bit,
    // 所以他只有低16位是真正的stack top idx,高16位是version
    // 所以这里给top_ver取模LF_PINBOX_MAX_PINS便可以拿到stack top idx
    if (!(pins = top_ver % LF_PINBOX_MAX_PINS)) {
      /* the stack of free elements is empty */
      // 如果stack top index为0代表当前free stack里没有,则扩展pinbox->pinarray
      // 的元素个数,加1,取一个新的位置
      pins = pinbox->pins_in_array.fetch_add(1) + 1;
      if (unlikely(pins >= LF_PINBOX_MAX_PINS)) {
        return nullptr;
      }
      /*
        note that the first allocated element has index 1 (pins==1).
        index 0 is reserved to mean "NULL pointer"
      */
      // 拿到新位置对应在pinbox->pins_in_array中的元素地址
      el = (LF_PINS *)lf_dynarray_lvalue(&pinbox->pinarray, pins);
      if (unlikely(!el)) {
        return nullptr;
      }
      break;
    }
    // 如果free stack里有元素,则弹出top位置的元素
    el = (LF_PINS *)lf_dynarray_value(&pinbox->pinarray, pins);
    next = el->link;
    // CAS更新pinbox->pinstack_top_ver,后面+LF_PINBOX_MAX_PINS是为了
    // 更新前16位的version,这样,每次修改top位置之后,其version都会加1,然后
    // 在CAS中同时比较top idx和version来避免ABA问题
  } while (!atomic_compare_exchange_strong(
      &pinbox->pinstack_top_ver, &top_ver,
      top_ver - pins + next + LF_PINBOX_MAX_PINS));
  /*
    set el->link to the index of el in the dynarray (el->link has two usages:
    - if element is allocated, it's its own index
    - if element is free, it's its next element in the free stack
  */
  // 当LF_PINS分配出去的时候,其link指向的是自己在pinbox->pins_in_array
  // 中的index
  // 当LF_PINS被还回来push到free stack中时,其link指向的是next element
  el->link = pins;
  el->purgatory_count = 0;
  el->pinbox = pinbox;
  return el;
}
7、lf_pinbox_put_pins 把一个lf_pins放会到数组。使用栈来管理
8、add_to_purgatory 内联函数,把一个unpin的指针放入purgatory链表中
9、lf_pinbox_free 把一个对象放入 purgatory链表中,如果数量达到10,调用lf_pinbox_real_free
10、lf_pinbox_real_free 扫描purgatory,把可以释放的指针释放掉
11、match_and_save 扫描当前现场purgatory,把正在使用的指针放到一个新的purgatory,这样旧的purgatory就是没有任何线程pin的指针
12、lf_alloc_init2 LF_ALLOCATOR结构体初始化
13、lf_alloc_destroy 销毁LF_ALLOCATOR,释放里边所有对象
14、lf_alloc_new 分配内存并返回新对象,
// 线程在使用lf_alloc_new之前,需要先调用lf_pinbox_get_pins从LF_ALLOCATOR的pinbox
// 中申请一个LF_PINS,然后每次申请内存前,将其LF_PINS地址传入
void *lf_alloc_new(LF_PINS *pins) {
  LF_ALLOCATOR *allocator = (LF_ALLOCATOR *)(pins->pinbox->free_func_arg);
  uchar *node;
  for (;;) {
  // 先看allocator的free stack里是否有缓存
    do {
      node = allocator->top;
      // 有,将其地址赋值给local_ptr node,然后pin住
      lf_pin(pins, 0, node);
    } while (node != allocator->top && LF_BACKOFF);
    if (!node) {
    // free stack为空,需要向系统申请一块内存
      node = static_cast<uchar *>(
          my_malloc(key_memory_lf_node, allocator->element_size, MYF(MY_WME)));
      // 申请好之后回调constructor来初始化这块内存
      if (allocator->constructor) {
        allocator->constructor(node);
      }
#ifdef MY_LF_EXTRA_DEBUG
      if (likely(node != 0)) {
        ++allocator->mallocs;
      }
#endif
      break;
    }
    if (atomic_compare_exchange_strong(&allocator->top, &node,
                                       anext_node(node).load())) {
      break;
    }
  }
  // unpin前面的node
  lf_unpin(pins, 0);
  return node;
}
15、lf_alloc_pool_count 统计缓存中的对象数量
本文参考博客:https://kernelmaker.github.io/MySQL_lf_allocator