1.1,多线程的作用:
*线程是程序执行的一条路径, 一个进程中可以包含多条线程
*多线程并发执行可以提高程序的效率, 可以同时完成多项工作
1.2,多线程的应用场景:
* 红蜘蛛同时共享屏幕给多个电脑
* 迅雷开启多条线程一起下载
* QQ同时和多个人一起视频
* 服务器同时处理多个客户端请求
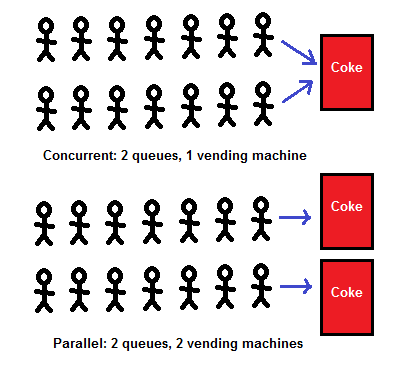
1.3,线程并发与并行的区别:
* 并发是指两个任务都请求运行,而处理器只能按受一个任务,就把这两个任务安排轮流进行,由于时间间隔较短,使人感觉两个任务都在运行。
* 并行就是两个任务同时运行,就是甲任务进行的同时,乙任务也在进行。(需要多核CPU)
* 如果用一台电脑我先给甲发个消息,然后立刻再给乙发消息,然后再跟甲聊,再跟乙聊。这就叫并发。
* 比如我跟两个网友聊天,左手操作一个电脑跟甲聊,同时右手用另一台电脑跟乙聊天,这就叫并行。
1.4,线程的生命周期:
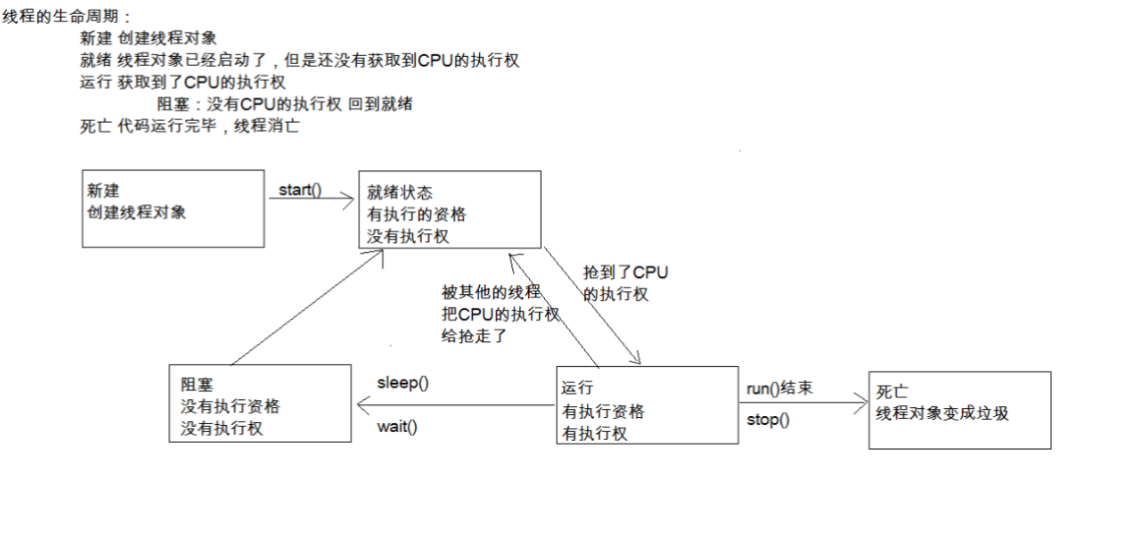
新建状态(New):当线程对象对创建后,即进入了新建状态,如:Thread t = new MyThread();
就绪状态(Runnable):当调用线程对象的start()方法(t.start();),线程即进入就绪状态。处于就绪状态的线程,只是说明此线程已经做好了准备,随时等待CPU调度执行,并不是说执行了t.start()此线程立即就会执行;
运行状态(Running):当CPU开始调度处于就绪状态的线程时,此时线程才得以真正执行,即进入到运行状态。注:就 绪状态是进入到运行状态的唯一入口,也就是说,线程要想进入运行状态执行,首先必须处于就绪状态中;
阻塞状态(Blocked):处于运行状态中的线程由于某种原因,暂时放弃对CPU的使用权,停止执行,此时进入阻塞状态,直到其进入到就绪状态,才 有机会再次被CPU调用以进入到运行状态。根据阻塞产生的原因不同,阻塞状态又可以分为三种:
1.等待阻塞:运行状态中的线程执行wait()方法,使本线程进入到等待阻塞状态;
2.同步阻塞 -- 线程在获取synchronized同步锁失败(因为锁被其它线程所占用),它会进入同步阻塞状态;
3.其他阻塞 -- 通过调用线程的sleep()或join()或发出了I/O请求时,线程会进入到阻塞状态。当sleep()状态超时、join()等待线程终止或者超时、或者I/O处理完毕时,线程重新转入就绪状态。
死亡状态(Dead):线程执行完了或者因异常退出了run()方法,该线程结束生命周期。
1.5,线程的三种创建方式:
1.5.1,继承Thread类,重写run方法:
 1 public class Demo01_Thread {
 2     public static void main(String[] args) {
 3         MyThread mh = new MyThread();    //4.创建Thread类的子类对象
 4         mh.start();                        //5.开启线程
 5     }
 6 }
 7 class MyThread extends Thread{                //1.继承Thread
 8     @Override
 9     public void run() {                        //2.重写run方法
10         for (int i = 0; i < 10000; i++) {    //3.将要执行的代码写在run方法中
11             System.out.println(getName+"继承线程已执行"+i);
12         }
13     }
14 }
如上图所示,创建MyThread实例进入新建状态,然后调用start()方法启动,但是线程不一定会立马启动,因为要看cpu的资源分配
1.5.2,实现Runnable,重写run方法:
 1     public static void main(String[] args) {
 2         MyRunnable mr = new MyRunnable();    //4.创建Runnable中的子类实例
 3         Thread tr = new Thread(mr);    //将Runnable中的子类变量放入Thread类中
 4         tr.start();
 5     }
 6 }
 7 class MyRunnable implements Runnable{    //1.定义类实现Runnable
 8
 9     @Override
10     public void run() {
11         for (int i = 0; i < 10000; i++) {    //2.重写Run方法
12             System.out.println(Thread.currentThread().getName()+"Runnable中的线程执行:"+i);    //3.将要执行代码写在run方法中
13         }
14     }
15 }
1.5.3,继承Thread与Runnable有什么区别:
源码的区别:
* a.继承Thread : 由于子类重写了Thread类的run(), 当调用start()时, 直接找子类的run()方法
* b.实现Runnable : 构造函数中传入了Runnable的引用, 成员变量记住了它, start()调用run()方法时内部判断成员变量Runnable的引用是否为空, 不为空编译时看的是Runnable的run(),运行时执行的是子类的run()方法
总结的好处与坏处:
* 继承Thread * 实现Runnable接口
* 好处是:可以直接使用Thread类中的方法,代码简单 * 好处是:即使自己定义的线程类有了父类也没关系,因为有了父类也可以实现接口,而且接口是可以多实现的
* 弊端是:如果已经有了父类,就不能用这种方法 * 弊端是:不能直接使用Thread中的方法需要先获取到线程对象后,才能得到Thread的方法,代码复杂
1.6,实现Callable创建线程(了解就好,弊处代码太复杂一般不用):
 1         // 创建线程池对象
 2         ExecutorService pool = Executors.newFixedThreadPool(2);
 3
 4         // 可以执行Runnable对象或者Callable对象代表的线程
 5         Future<Integer> f1 = pool.submit(new MyCallable(100));
 6         Future<Integer> f2 = pool.submit(new MyCallable(200));
 7
 8         // V get()
 9         Integer i1 = f1.get();
10         Integer i2 = f2.get();
11
12         System.out.println(i1);
13         System.out.println(i2);
14
15         // 结束
16         pool.shutdown();
17
18         public class MyCallable implements Callable<Integer> {
19
20             private int number;
21
22             public MyCallable(int number) {
23                 this.number = number;
24             }
25
26             @Override
27             public Integer call() throws Exception {
28                 int sum = 0;
29                 for (int x = 1; x <= number; x++) {
30                     sum += x;
31                 }
32                 return sum;
33             }
34
35         }
上面是线程的作用,以及五种状态的详细讲解还有线程的创建方式,下面是对线程进行的一些操作。
1.7,多线程之同步代码块:
什么情况下需要同步?
* 当多线程并发, 有多段代码同时执行时, 我们希望某一段代码执行的过程中CPU不要切换到其他线程工作. 这时就需要同步.
* 如果两段代码是同步的, 那么同一时间只能执行一段, 在一段代码没执行结束之前, 不会执行另外一段代码.
同步代码块?
* 使用synchronized关键字加上一个锁对象来定义一段代码, 这就叫同步代码块
* 多个同步代码块如果使用相同的锁对象, 那么他们就是同步的
1.7.1,非静态方法使用锁让代码进行同步,锁对象可以是任意对象,只要相同就好:
 1     class Printer {
 2                 Demo d = new Demo();
 3                 public static void print1() {
 4                     synchronized(d){                //锁对象可以是任意对象,但是被锁的代码需要保证是同一把锁,不能用匿名对象
 5                         System.out.print("我");
 6                         System.out.print("爱");
 7                         System.out.print("程");
 8                         System.out.print("序");
 9                         System.out.print("员");
10                         System.out.print("
");
11                     }
12                 }
13
14                 public static void print2() {
15                     synchronized(d){
16                         System.out.print("噢");
17                         System.out.print("我");
18                         System.out.print("不");
19                         System.out.print("信");
20                         System.out.print("
");
21                     }
22                 }
23             }
1.7.2,静态方法使用锁,让代码进行同步:
 1         class Printer {
 2             public static void print1() {
 3                 synchronized(Printer.class){                //锁对象可以是任意对象,但是被锁的代码需要保证是同一把锁,不能用匿名对象
 4                     System.out.print("黑");
 5                     System.out.print("马");
 6                     System.out.print("程");
 7                     System.out.print("序");
 8                     System.out.print("员");
 9                     System.out.print("
");
10                 }
11             }
12             /*
13              * 非静态同步函数的锁是:this
14              * 静态的同步函数的锁是:字节码对象
15              */
16             public static synchronized void print2() {
17                 System.out.print("传");
18                 System.out.print("智");
19                 System.out.print("播");
20                 System.out.print("客");
21                 System.out.print("
");
22             }
23         }
1.8,多线程之多线程休眠(顾名思义就是休眠线程的):
* Thread.sleep(毫秒,纳秒), 控制当前线程休眠若干毫秒1秒= 1000毫秒 1秒 = 1000 * 1000 * 1000纳秒 1000000000
 1     public static void main(String[] args) {
 2         new Thread(){
 3             @Override
 4             public void run() {
 5                 for (int i = 0; i < 100; i++) {
 6                     try {
 7                         Thread.sleep(1000);
 8                     } catch (InterruptedException e) {
 9                         // TODO Auto-generated catch block
10                         e.printStackTrace();
11                     }
12                     System.out.println(getName()+"aaaaaaaaaaaa");
13                 }
14             }
15         }.start();
16         new Thread(){
17             @Override
18             public void run() {
19                 for (int i = 0; i < 100; i++) {
20                     try {
21                         Thread.sleep(1000);
22                     } catch (InterruptedException e) {
23                         // TODO Auto-generated catch block
24                         e.printStackTrace();
25                     }
26                     System.out.println(getName()+"bb");
27                 }
28             }
29         }.start();
30     }
31 }
1.9,多线程之守护线程:
*setDaemon(), 设置一个线程为守护线程, 该线程不会单独执行, 当其他非守护线程都执行结束后, 自动退出
 1     Thread t1 = new Thread() {
 2                 public void run() {
 3                     for(int i = 0; i < 50; i++) {
 4                         System.out.println(getName() + "...aaaaaaaaaaaaaaaaaaaaaa");
 5                         try {
 6                             Thread.sleep(10);
 7                         } catch (InterruptedException e) {
 8                             e.printStackTrace();
 9                         }
10                     }
11                 }
12             };
13
14             Thread t2 = new Thread() {
15                 public void run() {
16                     for(int i = 0; i < 5; i++) {
17                         System.out.println(getName() + "...bb");
18                         try {
19                             Thread.sleep(10);
20                         } catch (InterruptedException e) {
21                             e.printStackTrace();
22                         }
23                     }
24                 }
25             };
26
27             t1.setDaemon(true);                        //将t1设置为守护线程
28
29             t1.start();
30             t2.start();
2.0,多线程之加入线程:
* join(), 当前线程暂停, 等待指定的线程执行结束后, 当前线程再继续
* join(int), 可以等待指定的毫秒之后继续
 1 final Thread t1 = new Thread() {
 2                 public void run() {
 3                     for(int i = 0; i < 50; i++) {
 4                         System.out.println(getName() + "...aaaaaaaaaaaaaaaaaaaaaa");
 5                         try {
 6                             Thread.sleep(10);
 7                         } catch (InterruptedException e) {
 8                             e.printStackTrace();
 9                         }
10                     }
11                 }
12             };
13
14             Thread t2 = new Thread() {
15                 public void run() {
16                     for(int i = 0; i < 50; i++) {
17                         if(i == 2) {
18                             try {
19                                 //t1.join();                        //插队,加入
20                                 t1.join(30);                        //加入,有固定的时间,过了固定时间,继续交替执行
21                                 Thread.sleep(10);
22                             } catch (InterruptedException e) {
23
24                                 e.printStackTrace();
25                             }
26                         }
27                         System.out.println(getName() + "...bb");
28
29                     }
30                 }
31             };
32
33             t1.start();
34             t2.start();
2.1,多线程之礼让线程(了解):
 1     public static void main(String[] args) {
 2         new MyTread().start();
 3         new MyTread().start();
 4
 5     }
 6 }
 7 class MyTread extends Thread{
 8     @Override
 9     public void run() {
10         for (int i = 0; i < 1000; i++) {
11             if(i % 10 == 0){
12                 Thread.yield();//让出cpu
13             }
14             System.out.println(getName()+"..."+i);
15         }
16     }
17 }
2.2,多线程之设置线程的优先级(了解):
 1     public static void main(String[] args) {
 2         Thread t1 = new Thread(){
 3             public void run() {
 4                 for (int i = 0; i < 100; i++) {
 5                     System.out.println(getName()+"aaaaaaaaaaaaa			"+i);
 6                 }
 7             };
 8         };
 9
10         Thread t2 = new Thread(){
11             public void run() {
12                 for (int i = 0; i < 100; i++) {
13                     System.out.println(getName()+"bb			"+i);
14                 }
15             };
16         };
17 //        t1.setPriority(10);        //设置最大优先级
18 //        t2.setPriority(1);
19         t2.setPriority(Thread.MIN_PRIORITY);    //最小
20         t1.setPriority(Thread.MAX_PRIORITY);    //最大
21         t1.start();
22         t2.start();
23     }
24 }
2.3,多线程之死锁(了解)
* 多线程同步的时候, 如果同步代码嵌套, 使用相同锁, 就有可能出现死锁
* 尽量不要嵌套使用
 1             private static String s1 = "筷子左";
 2             private static String s2 = "筷子右";
 3             public static void main(String[] args) {
 4                 new Thread() {
 5                     public void run() {
 6                         while(true) {
 7                             synchronized(s1) {
 8                                 System.out.println(getName() + "...拿到" + s1 + "等待" + s2);
 9                                 synchronized(s2) {
10                                     System.out.println(getName() + "...拿到" + s2 + "开吃");
11                                 }
12                             }
13                         }
14                     }
15                 }.start();
16
17                 new Thread() {
18                     public void run() {
19                         while(true) {
20                             synchronized(s2) {
21                                 System.out.println(getName() + "...拿到" + s2 + "等待" + s1);
22                                 synchronized(s1) {
23                                     System.out.println(getName() + "...拿到" + s1 + "开吃");
24                                 }
25                             }
26                         }
27                     }
28                 }.start();
29             }
2.4,多线程(两个线程间的通信)(掌握):
* 1.什么时候需要通信
* 多个线程并发执行时, 在默认情况下CPU是随机切换线程的
* 如果我们希望他们有规律的执行, 就可以使用通信, 例如每个线程执行一次打印
* 2.怎么通信
* 如果希望线程等待, 就调用wait()
* 如果希望唤醒等待的线程, 就调用notify();
* 这两个方法必须在同步代码中执行, 并且使用同步锁对象来调用
 1     public static void main(String[] args) {
 2         MyThread mt = new MyThread();
 3         new Thread(){
 4             @Override
 5             public void run() {
 6                 while(true){
 7                     try {
 8                         mt.print1();
 9                     } catch (InterruptedException e) {
10                         // TODO Auto-generated catch block
11                         e.printStackTrace();
12                     }
13                 }
14             }
15         }.start();
16
17         new Thread(){
18             @Override
19             public void run() {
20                 while(true){
21                     try {
22                         mt.print2();
23                     } catch (InterruptedException e) {
24                         // TODO Auto-generated catch block
25                         e.printStackTrace();
26                     }
27                 }
28             }
29         }.start();
30     }
31 }
32 class MyThread{
33     int flag =1;
34     public void print1() throws InterruptedException{
35         synchronized(this){
36           if(flag !=1){                //当前线程等待
37                 this.wait();
38           }
39           System.out.print("第一个线程~");
40           System.out.print("
");
41           flag = 2;
42           this.notify();        //随机唤醒等待的线程
43         }
44     }
45       public void print2() throws InterruptedException{
46
47           synchronized(this){
48           if(flag !=2){
49             this.wait();
50           }
51           System.out.print("第二个线程~");
52           System.out.print("
");
53           flag = 1;
54           this.notify();
55          }
56      }
57 }
2.5,多线程(三个或三个以上间的线程通信):
* 多个线程通信的问题
* notify()方法是随机唤醒一个线程
* notifyAll()方法是唤醒所有线程
* JDK5之前无法唤醒指定的一个线程
* 如果多个线程之间通信, 需要使用notifyAll()通知所有线程, 用while来反复判断条件
 1     public static void main(String[] args) {
 2         MyThread1 mt = new MyThread1();
 3         new Thread(){
 4             @Override
 5             public void run() {
 6                 while(true){
 7                     try {
 8                         mt.print1();
 9                     } catch (InterruptedException e) {
10                         // TODO Auto-generated catch block
11                         e.printStackTrace();
12                     }
13                 }
14             }
15         }.start();
16
17         new Thread(){
18             @Override
19             public void run() {
20                 while(true){
21                     try {
22                         mt.print2();
23                     } catch (InterruptedException e) {
24                         // TODO Auto-generated catch block
25                         e.printStackTrace();
26                     }
27                 }
28             }
29         }.start();
30         new Thread(){
31             @Override
32             public void run() {
33                 while(true){
34                     try {
35                         mt.print3();
36                     } catch (InterruptedException e) {
37                         // TODO Auto-generated catch block
38                         e.printStackTrace();
39                     }
40                 }
41             }
42         }.start();
43     }
44 }
45 class MyThread1{
46     int flag =1;
47     public void print1() throws InterruptedException{
48         synchronized(this){
49         while(flag !=1){                //当前线程等待
50                 this.wait();
51           }
52                   System.out.print("第一条线程~");
53           System.out.print("
");
54           flag = 2;
55 //          this.notify();        //随机唤醒等待的线程
56           this.notifyAll(); //唤醒全部~
57         }
58     }
59       public void print2() throws InterruptedException{
60
61           synchronized(this){
62           while(flag !=2){
63             this.wait();
64           }
65               System.out.print("第二条线程~");
66           System.out.print("
");
67           flag = 3;
68 //          this.notify();
69           this.notifyAll(); //唤醒全部~
70          }
71      }
72
73       public void print3() throws InterruptedException{
74
75           synchronized(this){
76            while(flag !=3){    //线程3再次等待,if语句是在那里等待就在那里起来
77             this.wait();
78           }
79           System.out.print("第三条线程~");
80           System.out.print("
");
81           flag = 1;
82 //          this.notify();
83           this.notifyAll(); //唤醒全部~
84          }
85      }
86 }
2.6,JDK1.5的新特性互斥锁)(掌握):
* 1.同步
* 使用ReentrantLock类的lock()和unlock()方法进行同步
* 2.通信
* 使用ReentrantLock类的newCondition()方法可以获取Condition对象
* 需要等待的时候使用Condition的await()方法, 唤醒的时候用signal()方法
* 不同的线程使用不同的Condition, 这样就能区分唤醒的时候找哪个线程了
 1     public static void main(String[] args) {
 2         MyThread2 mt = new MyThread2();
 3         new Thread(){
 4             public void run(){
 5                 while(true){
 6                     try {
 7                         mt.print1();
 8                     } catch (InterruptedException e) {
 9                         // TODO Auto-generated catch block
10                         e.printStackTrace();
11                     }
12                 }
13             };
14         }.start();
15         new Thread(){
16             public void run(){
17                 while(true){
18                     try {
19                         mt.print2();
20                     } catch (InterruptedException e) {
21                         // TODO Auto-generated catch block
22                         e.printStackTrace();
23                     }
24                 }
25             };
26         }.start();
27
28         new Thread(){
29             public void run(){
30                 while(true){
31                     try {
32                         mt.print3();
33                     } catch (InterruptedException e) {
34                         // TODO Auto-generated catch block
35                         e.printStackTrace();
36                     }
37                 }
38             };
39         }.start();
40     }
41 }
42 class MyThread2{
43     private ReentrantLock r = new ReentrantLock();
44     private Condition c1 = r.newCondition();
45     private Condition c2 = r.newCondition();
46     private Condition c3 = r.newCondition();
47
48     private int flag =1;
49     public void print1() throws InterruptedException{
50         r.lock();    //获取锁
51         if(flag !=1){
52                 c1.await();    //await线程等待
53           }
54           System.out.print("第一条线程~");
55           System.out.print("
");
56           flag = 2;
57           c2.signal();    //线程唤醒
58           r.unlock();//释放锁
59     }
60       public void print2() throws InterruptedException{
61         r.lock();
62           if(flag !=2){
63             c2.await();
64           }
65           System.out.print("第二条线程~");
66           System.out.print("
");
67           flag = 3;
68           c3.signal();
69           r.unlock();
70      }
71
72       public void print3() throws InterruptedException{
73           r.lock();
74           if(flag !=3){
75             c3.await();
76           }
77           System.out.print("第三条线程~");
78           System.out.print("
");
79           flag = 1;
80          c1.signal();
81          r.unlock();
82      }
83 }
2.7_多线程(线程组的概述和使用)(了解):
* A:线程组概述
* Java中使用ThreadGroup来表示线程组,它可以对一批线程进行分类管理,Java允许程序直接对线程组进行控制。
* 默认情况下,所有的线程都属于主线程组。
* public final ThreadGroup getThreadGroup()//通过线程对象获取他所属于的组
* public final String getName()//通过线程组对象获取他组的名字
* 我们也可以给线程设置分组
* 1,ThreadGroup(String name) 创建线程组对象并给其赋值名字
* 2,创建线程对象
* 3,Thread(ThreadGroup?group, Runnable?target, String?name)
* 4,设置整组的优先级或者守护线程
* B:案例演示
* 线程组的使用,默认是主线程组
 1     public static void main(String[] args) {
 2 //        demo1();
 3         ThreadGroup tg = new ThreadGroup("我是一个新的线程组");    //创建新的线程组
 4         MyThread4 mt = new MyThread4();                        //创建Runnable的子类对象
 5         Thread m1 = new Thread(tg, mt,"张三");                //将线程m1放在族中
 6         Thread m2 = new Thread(tg, mt,"李四");                //将线程m1放在族中
 7         System.out.println(m1.getThreadGroup().getName());    //获取组名
 8         System.out.println(m2.getThreadGroup().getName());
 9
10     }
11
12     private static void demo1() {
13         MyThread4 mt = new MyThread4();
14
15         Thread m1 = new Thread(mt,"张三");
16         Thread m2 = new Thread(mt,"李四");
17         ThreadGroup tg1 =m1.getThreadGroup();
18         ThreadGroup tg2 =m2.getThreadGroup();
19         System.out.println(tg1.getName());
20         System.out.println(tg2.getName());
21     }
22 }
23 class MyThread4 implements Runnable{
24     @Override
25     public void run() {
26         for (int i = 0; i < 1000; i++) {
27             System.out.println(Thread.currentThread().getName()+"..."+i);
28         }
29     }
30 }
2.8_多线程(线程池的概述和使用)(了解):
* A:线程池概述
* 程序启动一个新线程成本是比较高的,因为它涉及到要与操作系统进行交互。而使用线程池可以很好的提高性能,尤其是当程序中要创建大量生存期很短的线程时,更应该考虑使用线程池。线程池里的每一个线程代码结束后,并不会死亡,而是再次回到线程池中成为空闲状态,等待下一个对象来使用。在JDK5之前,我们必须手动实现自己的线程池,从JDK5开始,Java内置支持线程池
* B:内置线程池的使用概述
* JDK5新增了一个Executors工厂类来产生线程池,有如下几个方法
* public static ExecutorService newFixedThreadPool(int nThreads)
* public static ExecutorService newSingleThreadExecutor()
1     public static void main(String[] args) {
2         ExecutorService pool = Executors.newFixedThreadPool(2); //创建一个线程池,可容纳俩线程
3         pool.submit(new MyThread4());    //把线程放入线程池中
4         pool.submit(new MyThread4());
5         pool.shutdown();//关闭线程池
6     }
7 }