回顾
上一篇软文主要是介绍了项目的搭建,实现了一个基本的框架。引入 mocha + chai + supertest 测试加入项目中,实现了服务器的启动、app 对象get方法的简化版本以及项目基本结构的确定。对于get方法只实现到通过path找到对应的callback。稍简单的功能
实现目标
gitee: gitee.com/kaisela/mye…
迭代二的实现目标主要是引入简化版的router,并对/get/:id 式的路由进行解析。同时实现app.Methods相应的接口
项目结构
express2
  |
  |-- lib
  |    |-- router // 实现简化板的router
  |    |    |-- index.js // 实现路由的遍历等功能
  |    |    |-- layer.js // 装置path,method cb对应的关系
  |    |    |-- route.js // 将path和fn的关系实现一对多
  |    |-- express.js //负责实例化application对象
  |    |-- application.js //包裹app层
  |
  |-- examples
  |    |-- index.js // express1 实现的使用例子
  |
  |-- test
  |    |
  |    |-- index.js // 自动测试examples的正确性
  |
  |-- index.js //框架入口
  |-- package.json // node配置文件

复制代码
问题分析
本迭代的重点在于理清method,url,callback之间的关系,先看express源码开放出来的api:
app.get(path, callback [, callback ...])

app.get('/', function (req, res, next) {
  next()
})

app.get('/', function (req, res) {
  res.send('GET request to homepage');
})
app.post('/', function (req, res) {
  res.send('POST request to homepage');
})
复制代码
从上面的接口可以看出:
1、一个path是可以对应多个callback
2、一个path甚至可以对应多个method
3、一个method可以对应多个path
4、一个callback只能对应一个method和path
迭代二目标就是准确的通过url解析找到对应的path,并确定method,在这两个变量确定的情况下将其对应的callback逐个执行一遍,顺带将“/get/:id”形式的参数进行分析剥离一下
执行流程
express有两大核心,第一个是路由的处理,第二个是中间件装载。理解路由的实现尤为关键。在上一次迭代中,我们是在appliction中定义了一个paths数组,用来预存path和callback的对应关系并且他们之间的关系我们视为简单的一对一。在迭代二中,我们path和callback的关系变得复杂起来,不但从一对一变成了一对多,而且还引入了method。对于迭代二的整个实现过程,我们可以分解为以下几个步骤:
1、创建route实例确定path和route实例的关系,path通过path-to-regexp包进行正则解析
2、在path一定的情况下,在route实例中确定method和callback对应预存
3、通过application的listen拦截所有请求
4、分析url,遍历所有的path,与path的正则进行匹配找到path对应的route
5、匹配request中的method,遍历path对应的route中所有的callback,method的关系,找到method对应的callback,逐个执行。
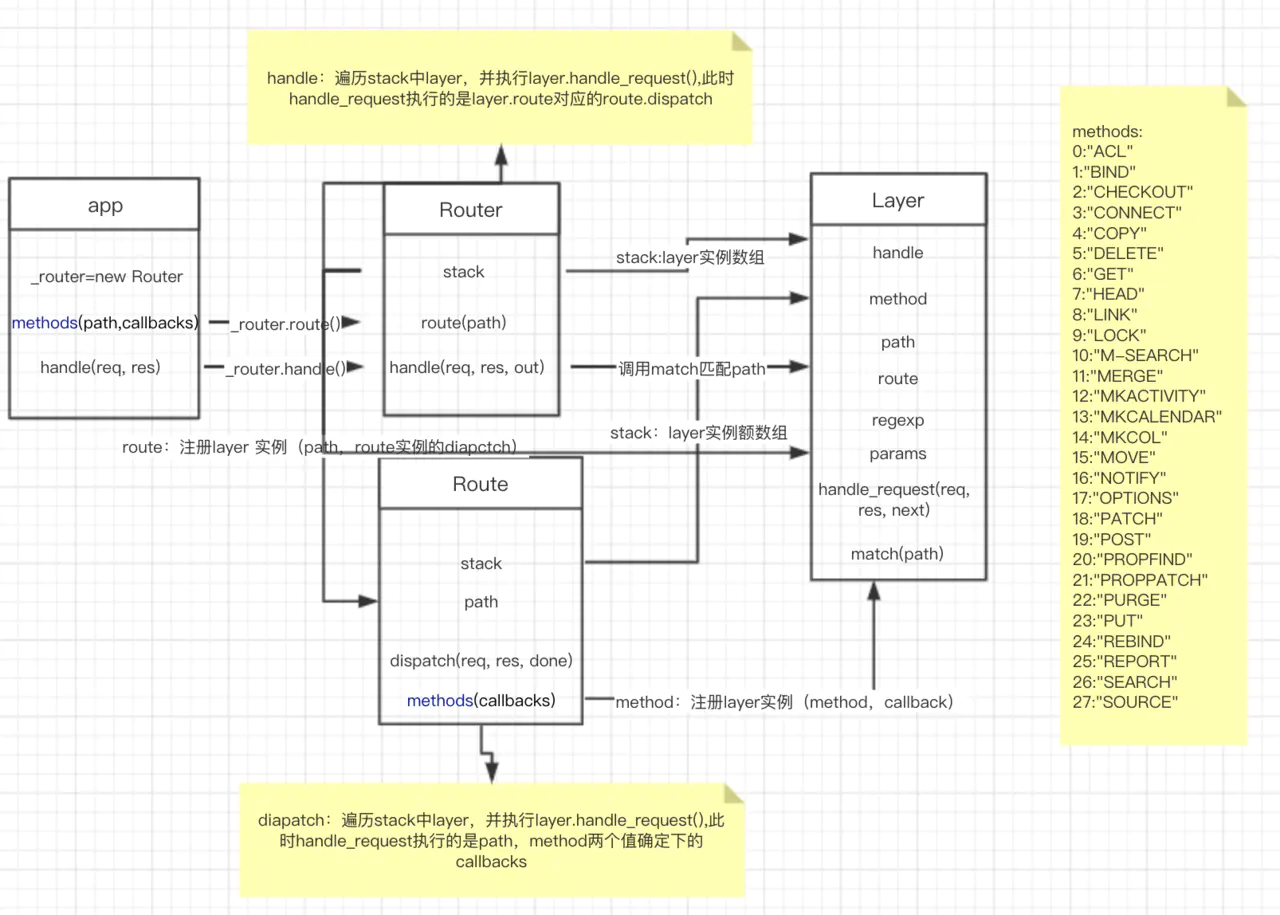
从以上的描述中path和route的关系,method和callback的关系需要地方存放。在此引入Layer类。而整个服务的route执行流程等放入Router类中管理。至此,路由由3个类组成:Router,Layer,Route。关系如下图所示
实例关系图如下:
 --------------
| Application  |                                 ---------------------------------------------------------
|     |        |        ----- -----------        |     0     |     1     |     2     |     3     |  ...  |
|     |-router | ----> |     | Layer      |       ---------------------------------------------------------
--------------        |  0  |   |-path    |       | Layer     | Layer     | Layer     | Layer     |       |
 application          |     |   |-route   |---->  |  |- method|  |- method|  |- method|  |- method|  ...  |
                      |     |   |-dispatch|       |  |- callback||- callback||- callback||- callback|     |
                      |-----|-------------|       ---------------------------------------------------------
                      |     | Layer       |                               route
                      |  1  |   |-path    |
                      |     |   |-route   |
                      |     |   |-dispatch|
                      |-----|-------------|
                      |     | Layer       |
                      |  2  |   |-path    |
                      |     |   |-route   |
                      |     |   |-dispatch|
                      |-----|-------------|
                      | ... |   ...       |
                       ----- -------------
                            router
复制代码
代码解析
首先看看lib/application.js,迭代二中在app中加入了_router属性,app[method]方法,lazyrouter方法:
_router: 存储Router对应的实例
app[method]: 对应的app.get,app.post等方法,对应的参数为path,callbacks。其中method对应的是http.METHODS("ACL,BIND,CHECKOUT,CONNECT,COPY,DELETE,GET,HEAD,LINK,LOCK,M-SEARCH,MERGE,MKACTIVITY,MKCALENDAR,MKCOL,MOVE,NOTIFY,OPTIONS,PATCH,POST,PROPFIND,PROPPATCH,PURGE,PUT,REBIND,REPORT,SEARCH,SOURCE,SUBSCRIBE,TRACE,UNBIND,UNLINK,UNLOCK,UNSUBSCRIBE")中的方法。这个方法为app在这次迭代中的主角,主要是对上面的实例关系图进行注册。每执行一次app[method]方法其实就是在注册路由,将参数中的path和route对应起来,同时将method和callbacks对应。分别存在router的stack,route的stack中。
lazyrouter:实例化_router
源码:
/**
 * 对路由实现装载,实例化
 */
app.lazyrouter = function () {
  if (!this._router) {
    this._router = new Router()
  }
}

/**
 * 实现post,get等http.METHODS 对应的方法
 * http.METHODS: "ACL,BIND,CHECKOUT,CONNECT,COPY,DELETE,GET,HEAD,LINK,LOCK,M-SEARCH,MERGE,MKACTIVITY,MKCALENDAR,MKCOL,MOVE,NOTIFY,OPTIONS,PATCH,POST,PROPFIND,PROPPATCH,PURGE,PUT,REBIND,REPORT,SEARCH,SOURCE,SUBSCRIBE,TRACE,UNBIND,UNLINK,UNLOCK,UNSUBSCRIBE"
 */

methods.forEach((method) => {
  method = method.toLowerCase()
  app[method] = function (path) {
    if (method === 'get' && arguments.length === 1) { // 当为一个参数时app的get方法,返回settings中的属性值
      return this.set(path)
    }
    this.lazyrouter()
    let route = this
      ._router
      .route(path) // 调用_router的route方法,对path和route注册
    route[method].apply(route, slice.call(arguments, 1)) // 调用route的method方法,对method和callbacks注册
  }
})
复制代码
application对原来的handle方法也做出了修改,调用的是_router.handle 对url进行精确定位和匹配。在handle中还引入了finalhandler方法,对http请求发生错误时做最后的处理,具体查看: www.npmjs.com/package/fin…
/**
 * http.createServer 中的回调函数最终执行
 * 调用的是_router.handle 对url进行精确定位和匹配
 */
app.handle = function handle(req, res) {
  let router = this._router
  let done = finalhandler(req, res, {
    env: this.get('env'),
    onerror: logerror.bind(this)
  })
  if (!router) {
    done()
  }
  router.handle(req, res, done)
}

function logerror(err) {
  if (this.get('env') !== 'test')
    console.error(err.stack || err.toString());
  }
复制代码
Router类的实现主要关注在route方法和handle两个方法中,一个是用来注册,一个是遍历注册的数组.
route方法简单明了一看就明白,最后将route返回到app中,再调用当前的实例route[method]方法注册method和callbacks的关系
handle方法就比较复杂,主要分为两块,一个是对错误的处理,发生错误是调用app中的finalhandle,一个是对stack数组的遍历,找到url匹配的路由。对stack遍历的方式采用的是next方法递归调用的方式。这种思想类似于es6中的Iterator接口的实现
/**
 * 将path和route对应起来,并放进stack中,对象实例为layer
 */
proto.route = function route(path) {
  let route = new Route(path)
  let layer = new Layer(path, {
    end: true
  }, route.dispatch.bind(route))
  layer.route = route
  this
    .stack
    .push(layer)
  return route
}

/**
 * 遍历stack数组,并处理函数, 将res req 传给route
 */

proto.handle = function handle(req, res, out) {
  let self = this
  debug('dispatching %s %s', req.method, req.url)
  let idx = 0
  let stack = self.stack
  let url = req.url
  let done = out
  next() //第一次调用next
  function next(err) {
    let layerError = err === 'route'
      ? null
      : err
    if (layerError === 'router') { //如果错误存在,再当前任务结束前调用最终处理函数
      setImmediate(done, null)
      return
    }

    if (idx >= stack.length) { // 遍历完成之后调用最终处理函数
      setImmediate(done, layerError)
      return
    }

    let layer
    let match
    let route
    while (match !== true && idx < stack.length) { //从数组中找到匹配的路由
      layer = stack[idx++]
      match = matchLayer(layer, url)
      route = layer.route
      if (typeof match !== 'boolean') {
        layerError = layerError || match
      }

      if (match !== true) {
        continue
      }
      if (layerError) {
        match = false
        continue
      }
      let method = req.method
      let has_method = route._handles_method(method)
      if (!has_method) {
        match = false
        continue
      }
    }
    if (match !== true) { // 循环完成没有匹配的路由,调用最终处理函数
      return done(layerError)
    }
    res.params = Object.assign({}, layer.params) // 将解析的‘/get/:id’ 中的id剥离出来
    layer.handle_request(req, res, next) //调用route的dispatch方法,dispatch完成之后在此调用next,进行下一次循环

  }
}

复制代码
Route类的实现主要是在route[method]方法和dispatch,和Router中的route和handle的功能类似,只是route[method]注册是的method和callback的对应关系,而dispatch遍历的则是callbacks
route[method]同样比较简单,主要是将app中对应method的第二个以后的参数进行遍历,并将其和method对应起来
dispatch采用的是和router中的handle一样的方式--> next递归遍历stack。处理完成后回调router的next
/**
 * 对同一path对应的methods进行注册,存放入stack中
 */
methods.forEach((method) => {
  method = method.toLowerCase()

  Route.prototype[method] = function () {
    let handles = arguments

    for (let i = 0; i < handles.length; i++) {
      let handle = handles[i]
      if (typeof handle !== 'function') {// 如果handle不是function,则对外抛出异常
        let msg = `Route.${method}() requires a callback function but not a ${type}`
        throw new Error(msg)
      }

      debug('%s %o', method, this.path)

      let layer = new Layer('/', {}, handle) // 注册method和handle的关系
      layer.method = method

      this.methods[method] = true
      this
        .stack
        .push(layer)
    }
    return this
  }
})

/**
 * 遍历stack数组,并处理函数
 */
Route.prototype.dispatch = function dispatch(req, res, done) {
  let idx = 0
  let stack = this.stack
  if (stack.length === 0) {
    return done() // 函数出来完成之后,将执行入口交给母函数管理,此处的done为router handle中的next
  }

  let method = req
    .method
    .toLowerCase()
  req.route = this
  next()
  function next() {
    let layer = stack[idx++]
if (!layer) { // 当循环完成,调回router handle中的next
      return done()
    }
    if (layer.method && layer.method !== method) { // 不符合要求,继续调用next进行遍历
      return next()
    }

    layer.handle_request(req, res, next)
  }

}
复制代码
Layer类的作用主要是关系的关联,path和route的关联,path对应的route中method和callback的关联。再有就是对path的处理,主要的方法也有两个:match、handle_request
handle_request:主要是执行layer中的handle,在router中layer对应的handle为layer.route对应的dispatch,在route中的handle对应的则是app的method传进来的callback函数
match:对uri和path进行匹配,匹配上了返回true否侧false。中间还对'/get/:id'式的路由中的id进行参数剥离,存入params中.在这个类中用到了path-to-regexp包,主要是对path进行解析,具体查看:www.npmjs.com/package/pat…
Layer.prototype.handle_request = function handle(req, res, next) {
  let fn = this.handle
  fn(req, res, next)
}


Layer.prototype.match = function match(path) {
  let match
  if (path) {
    match = this
      .regexp
      .exec(path)
  }

  if (!match) {
    this.params = undefined
    this.path = undefined
    return false
  }

  this.params = {}
  this.path = match[0]
  if (this.keys) {
    let keys = this.keys
    let params = this.params
    for (let i = 1; i < match.length; i++) {
      let key = keys[i - 1]
      let prop = key.name
      let val = decode_param(match[i])

      if (val !== undefined) {
        params[prop] = val
      }
    }
  }
  return true
}
复制代码
exammple/index.js 在入口文件中加入了一些新的路由
// localhost:3000/path 时调用
app.get('/path', function (req, res, next) {
  console.log('visite /path , send : path')
  // res.end('path')
  pathJson.index = 1
  next()
})
// localhost:3000/path 时调用,先走第一个,再走这个
app.get('/path', function (req, res) {
  console.log('visite /path , send : path')
  pathJson.end = true
  res.end(JSON.stringify(pathJson))
})
// localhost:3000/ 时调用
app.get('/', function (req, res) {
  console.log('visite /, send: root')
  res.end('root')
})
// 发生post请求的时候调用
app.post('/post/path', function (req, res) {
  res.end('post path')
})
// 输出传入的id
app.get('/get/:id', function (req, res) {
  res.end(`{"id":${res.params.id}}`)
})
复制代码
test/index.js 测试exapmles中的代码,验证是否按照地址的不同,进了不同的回调函数
// 如果走的不是examples中的get:/path 测试不通过;
  it('GET /path', (done) => {
    request
      .get('/path')
      .expect(200)
      .end((err, res) => {
        if (err)
          return done(err)
        let json = JSON.parse(res.text)
        assert.equal(json.index, 1, 'didn`t visite the first route /path') // 查看是否调用了第一次的注册
        assert.equal(json.end, true, 'res is wrong') // 查看是否调用了第二次注册
        done()
      })
  })
  // 测试get: /get/:id 并输出{id:12}
  it('GET /get/:id', (done) => {
    request
      .get('/get/12')
      .expect(200)
      .end((err, res) => {
        if (err)
          return done(err)
        let params = JSON.parse(res.text)
        assert.equal(params.id, 12, 'id is wrong') // 如果输出的不是传入的12,测试不通过
        done()
      })
  })
  // 如果走的不是examples中的post:/post/path 测试不通过
  it('POST /post/path', (done) => {
    request
      .post('/post/path')
      .expect(200)
      .end((err, res) => {
        if (err)
          return done(err)
        assert.equal(res.text, 'post path', 'res is wrong') // 根据response调用end方法时的输出为: post path
        done()
      })
  })


复制代码
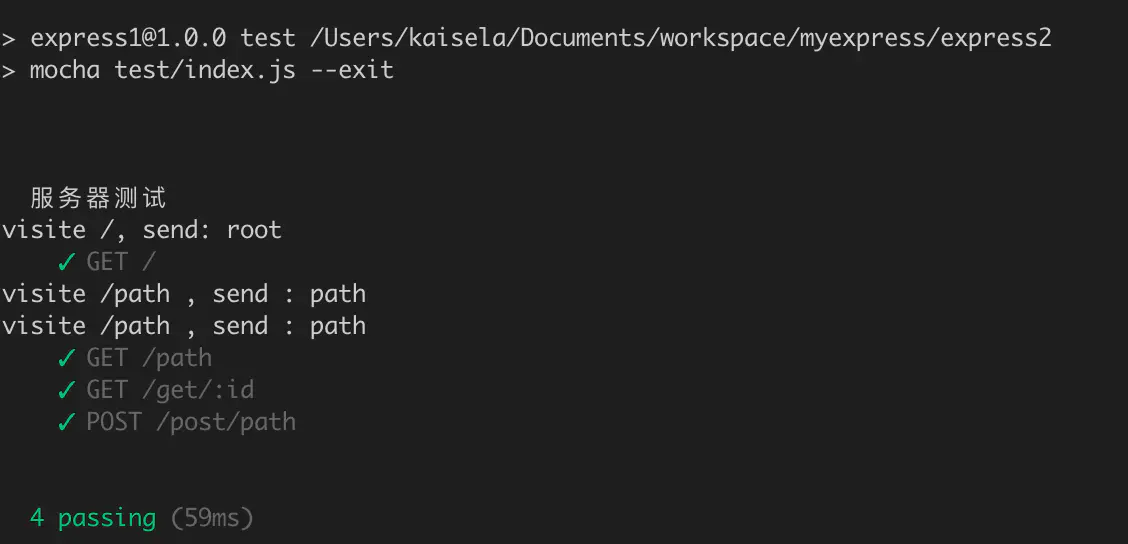
test测试结果如下:
写在最后
总结一下当前expross各个部分的工作。
application代表一个应用程序,expross是一个工厂类负责创建application对象。Router代表路由组件,负责应用程序的整个路由系统。组件内部由一个Layer数组构成,每个Layer代表一组路径相同的路由信息,具体信息存储在Route内部,每个Route内部也是一个Layer对象,但是Route内部的Layer和Router内部的Layer是存在一定的差异性。
Router内部的Layer,主要包含path、route、handle(route.dispatch)属性。 Route内部的Layer,主要包含method、handle属性。 如果一个请求来临,会现从头至尾的扫描router内部的每一层,而处理每层的时候会先对比URI,相同则扫描route的每一项,匹配成功则返回具体的信息,没有任何匹配则返回未找到。
下期预告
完善router,实现app.use 和app.params接口