CKEditor的编辑器工具栏中有一项“图片域”,该工具可以贴上图片地址来在文本编辑器中加入图片,但是没有图片上传功能。
去掉预览中的英文 ,在ckeditor/config.js中加上一个配置项:
config.image_previewText = ' '; 注意引号里面一定要有个空格,不能是空字符串。
图片上传实现
第一步:
要开启图片上传功能。
找到ckeditor/plugins/image/dialogs/image.js这个文件,CTRL+F搜索下面一段JS:
id:'Upload',hidden:!0 把感叹号去掉
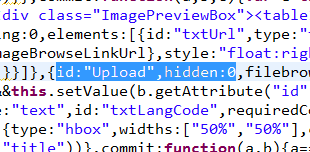
这个时候编辑器上已经有上传功能了

第二步:(这里用struct2实现上传)
下面是action的代码
package com.sdhf.eam.web.action;import java.io.File;import java.io.FileInputStream;import java.io.FileOutputStream;import java.io.InputStream;import java.io.OutputStream;import java.io.PrintWriter;import javax.servlet.http.HttpServletResponse;import org.apache.struts2.ServletActionContext;import com.sdhf.action._BaseAction;public class CkeditorUploadAction extends _BaseAction{private File upload;private String uploadContentType;private String uploadFileName;public File getUpload() {return upload;}public void setUpload(File upload) {this.upload = upload;}public String getUploadContentType() {return uploadContentType;}public void setUploadContentType(String uploadContentType) {this.uploadContentType = uploadContentType;}public String getUploadFileName() {return uploadFileName;}public void setUploadFileName(String uploadFileName) {this.uploadFileName = uploadFileName;}public String execute() throws Exception {HttpServletResponse response = ServletActionContext.getResponse();response.setCharacterEncoding("GBK");PrintWriter out = response.getWriter();// CKEditor提交的很重要的一个参数String callback = ServletActionContext.getRequest().getParameter("CKEditorFuncNum");String expandedName = ""; // 文件扩展名if (uploadContentType.equals("image/pjpeg") || uploadContentType.equals("image/jpeg")) {// IE6上传jpg图片的headimageContentType是image/pjpeg,而IE9以及火狐上传的jpg图片是image/jpegexpandedName = ".jpg";} else if (uploadContentType.equals("image/png") || uploadContentType.equals("image/x-png")) {// IE6上传的png图片的headimageContentType是"image/x-png"expandedName = ".png";} else if (uploadContentType.equals("image/gif")) {expandedName = ".gif";} else if (uploadContentType.equals("image/bmp")) {expandedName = ".bmp";} else {out.println("<script type="text/javascript">");out.println("window.parent.CKEDITOR.tools.callFunction(" + callback+ ",'','文件格式不正确(必须为.jpg/.gif/.bmp/.png文件)');");out.println("</script>");return null;}if (upload.length() > 600 * 1024) {out.println("<script type="text/javascript">");out.println("window.parent.CKEDITOR.tools.callFunction(" + callback+ ",''," + "'文件大小不得大于600k');");out.println("</script>");return null;}InputStream is = new FileInputStream(upload);String uploadPath = ServletActionContext.getServletContext().getRealPath("/images/ckeditor");String fileName = java.util.UUID.randomUUID().toString(); // 采用UUID的方式命名保证不会重复fileName += expandedName;File toFile = new File(uploadPath, fileName);OutputStream os = new FileOutputStream(toFile);// 文件复制到指定位置byte[] buffer = new byte[1024];int length = 0;while ((length = is.read(buffer)) > 0) {os.write(buffer, 0, length);}is.close();os.close();// 返回“图像”选项卡并显示图片out.println("<script type="text/javascript">");out.println("window.parent.CKEDITOR.tools.callFunction(" + callback+ ",'"+ServletActionContext.getRequest().getContextPath()+"/images/ckeditor/"+ fileName + "','')"); // 相对路径用于显示图片out.println("</script>");return null;}}
这里有几个注意的地方:
1、 String uploadPath = ServletActionContext.getServletContext().getRealPath("/images/ckeditor");
"/images/ckeditor" 为服务器存放的目录,目录一定要存在,不然会报错
2、

这个是上传完后前台显示的路径,即下图

如果路径没有设置好,预览就会没有图片显示,如图
第三步:写xml配置文件,我这里是spring+struct2
applicationContext.xml文件加上
<!-- ckeditor 图片上传action --><bean id="ckeditorUpload" class="com.sdhf.eam.web.action.CkeditorUploadAction" parent="_baseAction"scope="prototype"></bean>
struts.xml文件加上
<!-- CKEditor 上传图片 --><action name="ckeditorUpload" class="ckeditorUpload" method="execute"></action>
第四步:
在ckeditor/config.js加上配置项
config.filebrowserUploadUrl = ctx+"/ckeditorUpload.action";