目录
1 ReentrantReadWriteLock原理
1-1 概述
1)内部实现了AQS的同步器Sync,并派生出NonfairSync与FairSync两个同步器子类(见下面源码)
- 读锁与写锁是共用一个同步器的,所以等待队列,锁的state也是只有一个
abstract static class Sync extends AbstractQueuedSynchronizer

static final class NonfairSync extends Sync {
    private static final long serialVersionUID = -8159625535654395037L;
    final boolean writerShouldBlock() {
        return false; // writers can always barge
    }
    final boolean readerShouldBlock() {
        /* As a heuristic to avoid indefinite writer starvation,
             * block if the thread that momentarily appears to be head
             * of queue, if one exists, is a waiting writer.  This is
             * only a probabilistic effect since a new reader will not
             * block if there is a waiting writer behind other enabled
             * readers that have not yet drained from the queue.
             */
        return apparentlyFirstQueuedIsExclusive();
    }
}

    /**
     * Fair version of Sync
     */
    static final class FairSync extends Sync {
        private static final long serialVersionUID = -2274990926593161451L;
        final boolean writerShouldBlock() {
            return hasQueuedPredecessors();
        }
        final boolean readerShouldBlock() {
            return hasQueuedPredecessors();
        }
    }
2)由于state是读写锁共享的,所以内部表示锁的32位state进行了切分,写锁状态占了state的低16位,读锁则使用高16位。
Read vs write count extraction constants and functions.
Lock state is logically divided into two unsigned shorts:
The lower one representing the exclusive (writer) lock hold count,and the upper the shared (reader) hold count.
the exclusive (writer) lock:独占锁(低16位)
shared (reader):共享锁(高16位)
1-2 写锁加锁成功,读锁加锁失败源码分析
step1:线程t1加写锁成功

由于之间没有其他线程加锁,因此t1线程直接将state设置为1并且设置线程拥有者为当前线程。
private ReentrantReadWriteLock rw = new ReentrantReadWriteLock();
private ReentrantReadWriteLock.ReadLock r = rw.readLock();
private ReentrantReadWriteLock.WriteLock w = rw.writeLock();
======================================================================================
w.lock();
================01 调用AQS的提供的acquire方法======================================
public void lock() {
    sync.acquire(1);         // 调用AQS提供的方法,参数1代表将锁的状态设为1
}
    public final void acquire(int arg) {
        if (!tryAcquire(arg) &&
            acquireQueued(addWaiter(Node.EXCLUSIVE), arg))
            selfInterrupt();
    }
================02 调用读写锁重写的tryAcquire方法===========================================
    protected final boolean tryAcquire(int acquires) {
            /*
             * Walkthrough:
             * 1. If read count nonzero or write count nonzero
             *    and owner is a different thread, fail.
             * 2. If count would saturate, fail. (This can only
             *    happen if count is already nonzero.)
             * 3. Otherwise, this thread is eligible for lock if
             *    it is either a reentrant acquire or
             *    queue policy allows it. If so, update state
             *    and set owner.
             */
            Thread current = Thread.currentThread();
            int c = getState();
            int w = exclusiveCount(c);
            // 注意:这里c != 0 是能说明读锁和写锁中有锁被使用了,还需要进一步区分
            if (c != 0) {
                /*w == 0(用于处理加写锁): w表示state的写锁部分,如果等于0,表明当前的锁是读锁,
                  读锁与当前线程要加的写锁互斥,所以false
                  current != getExclusiveOwnerThread():已经知道当前的锁是读锁,
                  如果当前的读锁不是自己加的,同样不能升级为写锁,返回false
                */
                // (Note: if c != 0 and w == 0 then shared count != 0)
                if (w == 0 || current != getExclusiveOwnerThread())
                    return false;
                // 如果写锁的state值大于16位表示的最大值,抛出异常
                if (w + exclusiveCount(acquires) > MAX_COUNT)
                    throw new Error("Maximum lock count exceeded");
                // Reentrant acquire
                setState(c + acquires);
                return true;
            }
            // 当前还没有加锁,进入if语句判断
            /*writerShouldBlock():写锁是否应该阻塞,对于非公平锁总是返回false,公平锁则是去检查AQS队                列中是否有线程阻塞。
               compareAndSetState(c, c + acquires):尝试修改锁的状态,如果成功锁的状态将0改为1.
            */
            if (writerShouldBlock() ||
                !compareAndSetState(c, c + acquires))
                return false;
            // 设置锁的拥有者为当前线程
            setExclusiveOwnerThread(current);
            return true;
        }
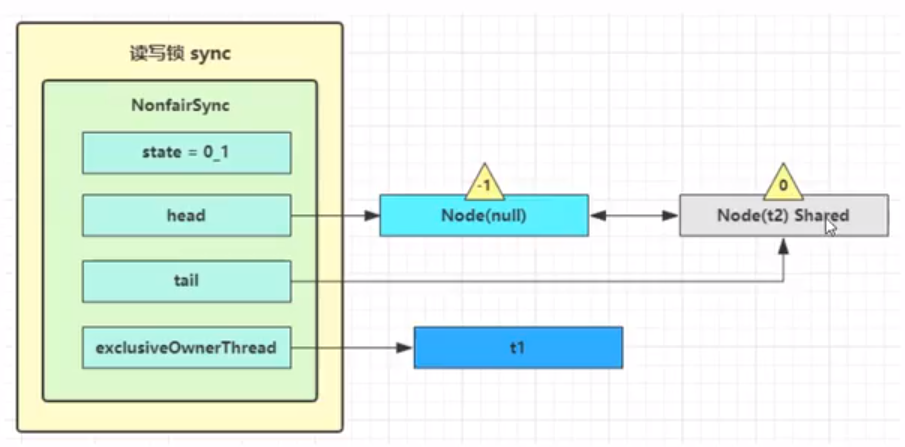
step2:线程t2首次加读锁失败,调用tryAcquireShared失败。
t2 执行 r.lock,这时进入读锁的 sync.acquireShared(1) 流程,首先会进入 tryAcquireShared 流程。如果有写锁占据,那么 tryAcquireShared 返回 -1 表示失败
tryAcquireShared 返回值说明:
- 这个函数在读写锁中返回值比较简单-1表示失败,0表示成功,更加复杂的返回值在信号量被用到。
| -1 | 0 | 正数 |
|---|---|---|
| 失败 | 成功,后继节点不会继续唤醒 | 成功,数值表示后面还有几个后继节点需要唤醒 |

tryAcquireShared代码逻辑(如上图所示):
线程t1进入后,检查state发现有写锁存在,且写锁的线程拥有者不是自己,直接返回-1,表示加锁失败,加锁失败后进入
AQS的等待队列。
=========================================================================
private ReentrantReadWriteLock.ReadLock r = rw.readLock();
r.lock();
==========================================================================
        public void lock() {
            sync.acquireShared(1);
        }
    public final void acquireShared(int arg) {
        if (tryAcquireShared(arg) < 0)
            doAcquireShared(arg);
    }
==========================================================================
protected final int tryAcquireShared(int unused) {
            /*
             * Walkthrough:
             * 1. If write lock held by another thread, fail.
             * 2. Otherwise, this thread is eligible for
             *    lock wrt state, so ask if it should block
             *    because of queue policy. If not, try
             *    to grant by CASing state and updating count.
             *    Note that step does not check for reentrant
             *    acquires, which is postponed to full version
             *    to avoid having to check hold count in
             *    the more typical non-reentrant case.
             * 3. If step 2 fails either because thread
             *    apparently not eligible or CAS fails or count
             *    saturated, chain to version with full retry loop.
             */
            Thread current = Thread.currentThread();
            int c = getState();
    /* exclusiveCount(c) != 0:存在独占锁即写锁 */
    /* getExclusiveOwnerThread() != current:独占锁不属于当前线程(同一线程可以先加写锁后加读锁)*/
            if (exclusiveCount(c) != 0 &&
                getExclusiveOwnerThread() != current)
                return -1;
            int r = sharedCount(c);
            if (!readerShouldBlock() &&
                r < MAX_COUNT &&
                compareAndSetState(c, c + SHARED_UNIT)) {
                if (r == 0) {
                    firstReader = current;
                    firstReaderHoldCount = 1;
                } else if (firstReader == current) {
                    firstReaderHoldCount++;
                } else {
                    HoldCounter rh = cachedHoldCounter;
                    if (rh == null || rh.tid != getThreadId(current))
                        cachedHoldCounter = rh = readHolds.get();
                    else if (rh.count == 0)
                        readHolds.set(rh);
                    rh.count++;
                }
                return 1;
            }
            return fullTryAcquireShared(current);
        }
step3: 线程t2进入doAcquireShared的逻辑,进入AQS等待队列,并最终park停止运行。

syn.doAcquireShared的逻辑如下所示:
1)为当前线程创建关联节点并加入到AQS等待队列中,注意节点的状态为Shared。(如上图所示,队列中首次插入节点还会添加一个伪节点)
2)进入到死循环,t2线程首先检查AQS等待队列中发现只有自己一个线程在等待,进入if再次调用tryAcquireShared去竞争锁
3)第二次竞争失败依旧失败,调用shouldParkAfterFailedAcquire(p, node)函数将前驱节点的waitStatus设为-1,该函数返回false(表示让前驱节点负责唤醒自己)。
4)再次进入循环,t2线程再次调用tryAcquireShared 竞争失败,调用 shouldParkAfterFailedAcquire(p, node) 返回true,会再次调用parkAndCheckInterrupt())函数,此时线程会调用park停止运行(上面图中第二张图变为灰色)。
/**
     * Acquires in shared uninterruptible mode.
     * @param arg the acquire argument
     */
    private void doAcquireShared(int arg) {
        // 对比ReentrantLock的acquireQueued源码会发现这里加的Node的属性是SHARED而不是EXCLUSIVE
        /*为当前线程创建节点并加入AQS等待队列,函数返回当前节点。*/
        final Node node = addWaiter(Node.SHARED);
        boolean failed = true;
        try {
            boolean interrupted = false;
            // 进入死循环
            for (;;) {
                // 获取当前节点的前驱节点
                final Node p = node.predecessor();
                // 如果前驱节点是dummy node,说明当前等待队列中只有自己一个,再次尝试竞争锁。
                if (p == head) {
                    int r = tryAcquireShared(arg);
                    if (r >= 0) {
                        setHeadAndPropagate(node, r);
                        p.next = null; // help GC
                        if (interrupted)
                            selfInterrupt();
                        failed = false;
                        return;
                    }
                }
                if (shouldParkAfterFailedAcquire(p, node) &&
                    parkAndCheckInterrupt())
                    interrupted = true;
            }
        } finally {
            if (failed)
                cancelAcquire(node);
        }
    }
总结:可以看到t2线程从开始加锁到park()停止运行,总共调用了三次tryAcquireShared,值得注意是这里加锁失败后在AQS阻塞队列中的Node状态时Shared而不是Exculsive的,这一点需要Reentrant的lock过程进行区分。
1-3 读锁加锁失败,写锁加锁失败
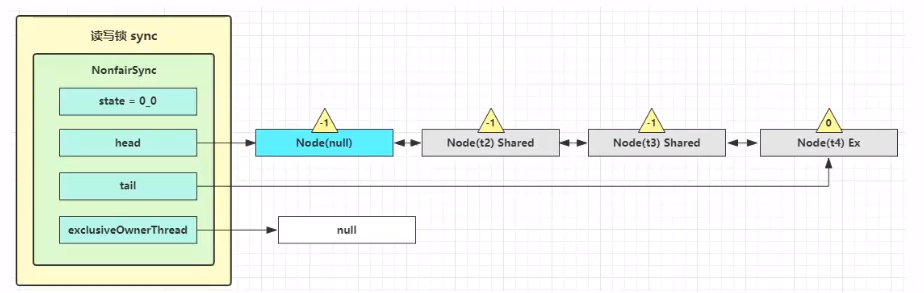
这种情景下,由于线程t1没有解除写锁,所以t3与t4都是加锁失败,进入到AQS的等待队列中,这里需要注意的是t3加读锁,所以其关联的Node实例的状态是Shared,而t4加的是写锁,所以其Node实例状态是Exculsive的。其加锁失败去之前的Reentrantlock的加锁失败原理基本一致

注意点:上图中多个线程在阻塞队列中,节点的waitstatus为-1,表示该节点有义务在释放锁的时候唤醒后面节点关联的线程,为0表示是队列中最后一个(队尾)线程。
1-4 写锁解锁源码分析
step1:t1线程写操作完成,进入锁的 sync.release(1) 流程,调用 sync.tryRelease(1) 成功。
此时同步器的state的写锁部分变为0,线程拥有者变为null,如下图所示。
===================================================================================
    w.unlock();
=========================AQS提供的方法===================================================
    public void unlock() {
            sync.release(1);
        }
        public final boolean release(int arg) {
            if (tryRelease(arg)) {
                Node h = head;
                if (h != null && h.waitStatus != 0)
                    unparkSuccessor(h);
                return true;
        }
        return false;
    }
============================sync方法======================================================
protected final boolean tryRelease(int releases) {
        if (!isHeldExclusively())
            throw new IllegalMonitorStateException();
        // 将写锁的state减1
        int nextc = getState() - releases;
        boolean free = exclusiveCount(nextc) == 0;
        if (free)
            setExclusiveOwnerThread(null);
        setState(nextc);
        return free;
}
step2: 设置好同步器的的state以及线程拥有者后,进入unparkSuccessor(h)逻辑唤醒t2线程
    private void unparkSuccessor(Node node) {
        /*
         * If status is negative (i.e., possibly needing signal) try
         * to clear in anticipation of signalling.  It is OK if this
         * fails or if status is changed by waiting thread.
         */
        int ws = node.waitStatus;
        if (ws < 0)
            compareAndSetWaitStatus(node, ws, 0);

        /*
         * Thread to unpark is held in successor, which is normally
         * just the next node.  But if cancelled or apparently null,
         * traverse backwards from tail to find the actual
         * non-cancelled successor.
         */
        Node s = node.next;
        if (s == null || s.waitStatus > 0) {
            s = null;
            for (Node t = tail; t != null && t != node; t = t.prev)
                if (t.waitStatus <= 0)
                    s = t;
        }
        if (s != null)
            LockSupport.unpark(s.thread);   //唤醒AQS阻塞队列的t2线程。
    }
step3: t2线程从之前的park位置(doAcquireShared函数内部)苏醒继续执行for循环内部代码
1)线程t2之前要加读锁但是由于已经有写锁了,所以主动调用park停止运行,现在在park处唤醒,继续for循环去竞争锁。
2)调用tryAcquireShared(arg),给state读锁所对应的高16位加上1。
3)之后调用setHeadAndPropagate(node, r),从这个函数名就可以看出该函数完成2个功能:
---功能1:由于线程t2已经获得锁,所以将该线程所在节点设置位新的伪节点 (head节点)
---功能2:完成功能1后,查看head.next指向的node的模式是否位Shared模式,如果是说明是读锁,由于读锁可以并发进行,因此将该节点关联的线程也unpark。
上述2个功能的执行,直到碰到写锁的节点才停止propagate(扩散)
    private void doAcquireShared(int arg) {
        final Node node = addWaiter(Node.SHARED);
        boolean failed = true;
        try {
            boolean interrupted = false;
            for (;;) {
                final Node p = node.predecessor();
                if (p == head) {
                    int r = tryAcquireShared(arg);  //2)线程t2获取读锁成功,读锁对应的高16位+1
                    if (r >= 0) {
                        setHeadAndPropagate(node, r);//
                        p.next = null; // help GC
                        if (interrupted)
                            selfInterrupt();
                        failed = false;
                        return;
                    }
                }
                if (shouldParkAfterFailedAcquire(p, node) &&
                    parkAndCheckInterrupt())    // 1)线程t2被唤醒后从从此继续执行
                    interrupted = true;
            }
        } finally {
            if (failed)
                cancelAcquire(node);
        }
    }
======================================================================================
    protected final int tryAcquireShared(int unused) {
            Thread current = Thread.currentThread();
            int c = getState();
            if (exclusiveCount(c) != 0 &&
                getExclusiveOwnerThread() != current)
                return -1;
            int r = sharedCount(c);     // 获取state的高l6位数值
            // !readerShouldBlock():当前线程没有被阻塞
            //  r < MAX_COUNT :读锁的数量不超过最大限制
            if (!readerShouldBlock() &&
                r < MAX_COUNT &&
                compareAndSetState(c, c + SHARED_UNIT)) {  // 给高16位+1
                if (r == 0) {
                    firstReader = current;
                    firstReaderHoldCount = 1;
                } else if (firstReader == current) {
                    firstReaderHoldCount++;
                } else {
                    HoldCounter rh = cachedHoldCounter;
                    if (rh == null || rh.tid != getThreadId(current))
                        cachedHoldCounter = rh = readHolds.get();
                    else if (rh.count == 0)
                        readHolds.set(rh);
                    rh.count++;
                }
                return 1;
            }
            return fullTryAcquireShared(current);
        }
==================================================================================
        private void setHeadAndPropagate(Node node, int propagate) {
        Node h = head; // Record old head for check below
        setHead(node);
        if (propagate > 0 || h == null || h.waitStatus < 0 ||
            (h = head) == null || h.waitStatus < 0) {
            Node s = node.next;             // 3)获取t3线程关联的节点
            if (s == null || s.isShared())  // 如果该节点不为null并且该节点是shared的
                doReleaseShared();          // 将头节点的waitstatus由-1改为0,然后将线程t3关联的
                                            // 的线程唤醒
        }
    }
=======================================================================================
        private void doReleaseShared() {
        for (;;) {
            Node h = head;
            if (h != null && h != tail) {
                int ws = h.waitStatus;
                if (ws == Node.SIGNAL) {
                    if (!compareAndSetWaitStatus(h, Node.SIGNAL, 0))
                        continue;            // loop to recheck cases
                    unparkSuccessor(h);
                }
                else if (ws == 0 &&
                         !compareAndSetWaitStatus(h, 0, Node.PROPAGATE))
                    continue;                // loop on failed CAS
            }
            if (h == head)                   // loop if head changed
                break;
        }
    }
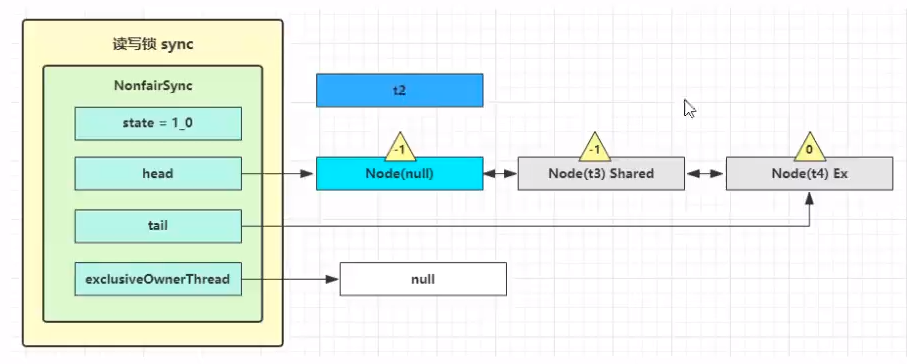

- 从上面三张图可以看出关联读锁的线程被唤醒会产生连锁反应,AQS阻塞队列中后续的设置读锁的线程都被唤醒。
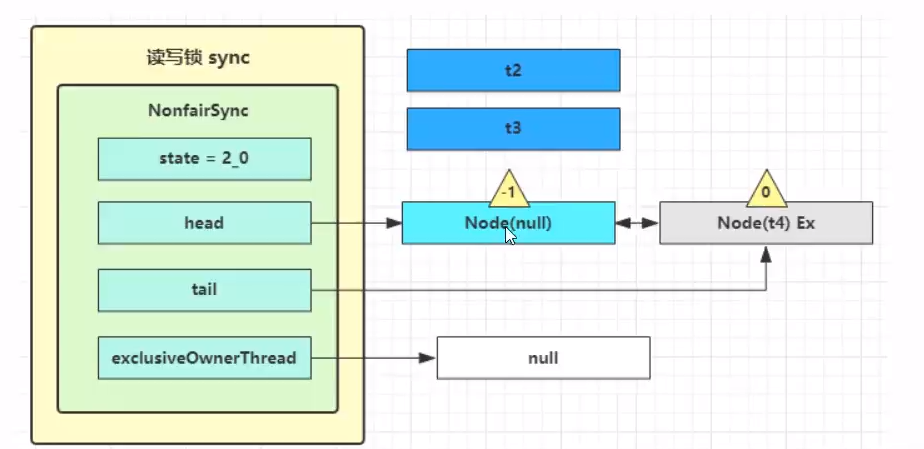
step4: 线程t2与t3都成功加上读锁。
1-5 读锁解锁,等待队列中的写锁竞争锁的源码分析
 d
d


1)t3 进入 sync.releaseShared(1) 中,调用 tryReleaseShared(1) 让计数减一,这回计数为零了,进入
doReleaseShared() 将头节点从 -1 改为 0 并唤醒老二
2)之后 t4 在 acquireQueued 中 parkAndCheckInterrupt 处恢复运行,再次 for (;;) 这次自己是老二,并且没有其他竞争,tryAcquire(1) 成功,修改头结点。
        r.unlock();
        public void unlock() {
            sync.releaseShared(1);
        }
==============step1:调用tryReleaseShared=====================================
    public final boolean releaseShared(int arg) {
        if (tryReleaseShared(arg)) {
            doReleaseShared();
            return true;
        }
        return false;
    }
============step2:在tryReleaseShared让写锁对应的state减去1========================
    protected final boolean tryReleaseShared(int unused) {
            Thread current = Thread.currentThread();
            if (firstReader == current) {
                // assert firstReaderHoldCount > 0;
                if (firstReaderHoldCount == 1)
                    firstReader = null;
                else
                    firstReaderHoldCount--;
            } else {
                HoldCounter rh = cachedHoldCounter;
                if (rh == null || rh.tid != getThreadId(current))
                    rh = readHolds.get();
                int count = rh.count;
                if (count <= 1) {
                    readHolds.remove();
                    if (count <= 0)
                        throw unmatchedUnlockException();
                }
                --rh.count;
            }
            for (;;) {
                int c = getState();
                int nextc = c - SHARED_UNIT;
                if (compareAndSetState(c, nextc))
                    // Releasing the read lock has no effect on readers,
                    // but it may allow waiting writers to proceed if
                    // both read and write locks are now free.
                    return nextc == 0;
            }
        }
=========step3:在doReleaseShared()修改头节点并唤醒下一个节点==================================
private void doReleaseShared() {
        /*
         * Ensure that a release propagates, even if there are other
         * in-progress acquires/releases.  This proceeds in the usual
         * way of trying to unparkSuccessor of head if it needs
         * signal. But if it does not, status is set to PROPAGATE to
         * ensure that upon release, propagation continues.
         * Additionally, we must loop in case a new node is added
         * while we are doing this. Also, unlike other uses of
         * unparkSuccessor, we need to know if CAS to reset status
         * fails, if so rechecking.
         */
        for (;;) {
            Node h = head;
            if (h != null && h != tail) {
                int ws = h.waitStatus;
                if (ws == Node.SIGNAL) {
                    if (!compareAndSetWaitStatus(h, Node.SIGNAL, 0))
                        continue;            // loop to recheck cases
                    unparkSuccessor(h);      // 唤醒节点下一个线程
                }
                else if (ws == 0 &&
                         !compareAndSetWaitStatus(h, 0, Node.PROPAGATE))
                    continue;                // loop on failed CAS
            }
            if (h == head)                   // loop if head changed
                break;
        }
    }
========step4:关联写锁的线程会在parkAndCheckInterrupt())处苏醒================
        final boolean acquireQueued(final Node node, int arg) {
        boolean failed = true;
        try {
            boolean interrupted = false;
            for (;;) {
                final Node p = node.predecessor();
                if (p == head && tryAcquire(arg)) {
                    setHead(node);
                    p.next = null; // help GC
                    failed = false;
                    return interrupted;
                }
                if (shouldParkAfterFailedAcquire(p, node) &&
                    parkAndCheckInterrupt())
                    interrupted = true;
            }
        } finally {
            if (failed)
                cancelAcquire(node);
        }
    }
总结:无论是加锁还是解锁主要关注同步器中几个关键属性的维护
1.锁的state
2.锁的当前线程j拥有者。
3.锁的等待队列维护,头节点的维护,节点的waitState的维护。
在读写锁中,节点的属性Shared主要用于标识加读锁进程,方便在竞争锁的时候连锁(propagate)唤醒AQS等待队列中的读进程。
2 StampedLock的作用以及简单应用
2-1 作用
为什么需要stampedLock这种类型的读写锁?
原始的ReentrantReadWriteLock并发读的时候依旧需要进行CAS操作去修改同步器的state,性能还可以进一步优化,而stampedLock正是基于这一点采用stamp进一步优化并发读的效率。
stampedLock相比较ReentrantReadWriteLock的区别:
- 提供的乐观读机制:乐观读,StampedLock 支持 tryOptimisticRead() 方法(乐观读本质上就是不加锁的读并产生一个stamp),读取完毕后需要校验 stamp , 如果校验通过,表示这期间确实没有写操作,数据可以安全使用,如果校验没通过,需要重新获取读锁,保证数据安全。
- 相比ReentrantReadWriteLock,StampedLock 不支持条件变量,不支持可重入。
    long stamp = lock.tryOptimisticRead();
       // 验戳
    if(!lock.validate(stamp)){
       // 锁升级
    }
2-2 StampedLock使用的实例
package chapter8;
import lombok.extern.slf4j.Slf4j;
import java.util.concurrent.locks.StampedLock;

@Slf4j(topic = "c.DataContainerStamped")
class DataContainerStamped {
    private int data;
    private final StampedLock lock = new StampedLock();
    public DataContainerStamped(int data) {
        this.data = data;
    }
    /*采用StampedLock的读操作,首先进行乐观读(不加锁读)并获取一个stamp,
    * 然后校验这个stamp,如果stamp发生改变则说明读取过程中,有线程修改了读取的值,
    *则此时在真正的加锁(锁升级)去读取数据。
    * */
    public int read(int readTime){
        long stamp = lock.tryOptimisticRead();
        log.warn("optimistic read locking...{}", stamp);
        try {
            Thread.sleep(readTime);
        } catch (InterruptedException e) {
            e.printStackTrace();
        }
        if (lock.validate(stamp)) {
            log.warn("read finish...{}, data:{}", stamp, data);
            return data;
        }
        // 锁升级 - 读锁
        log.warn("updating to read lock... {}", stamp);
        try {
            stamp = lock.readLock();
            log.warn("read lock {}", stamp);
            try {
                Thread.sleep(readTime);
            } catch (InterruptedException e) {
                e.printStackTrace();
            }
            log.warn("read finish...{}, data:{}", stamp, data);
            return data;
        } finally {
            log.warn("read unlock {}", stamp);
            lock.unlockRead(stamp);
        }
    }
    public void write(int newData){
        long stamp = lock.writeLock();
        log.warn("write lock {}", stamp);
        try {
            try {
                Thread.sleep(2);
            } catch (InterruptedException e) {
                e.printStackTrace();
            }
            this.data = newData;
        } finally {
            log.warn("write unlock {}", stamp);
            lock.unlockWrite(stamp);
        }
    }
}
并发读测试
@Slf4j(topic = "c.TestStampedLock")
public class test18 {
    public static void main(String[] args) throws InterruptedException {
        DataContainerStamped dataContainer = new DataContainerStamped(1);
        new Thread(() -> {
            dataContainer.read(1);
        }, "t1").start();
        Thread.sleep(500);
        new Thread(() -> {
            dataContainer.read(0);
        }, "t2").start();
    }
}
执行结果
- 可以看到只要stamp没有发生改变,多线程环境下就不会为读操作加锁。
20:53:51.097 [t1] WARN c.DataContainerStamped - optimistic read locking...256
20:53:51.104 [t1] WARN c.DataContainerStamped - read finish...256, data:1
20:53:51.596 [t2] WARN c.DataContainerStamped - optimistic read locking...256
20:53:51.596 [t2] WARN c.DataContainerStamped - read finish...256, data:1
并发读写测试
@Slf4j(topic = "c.TestStampedLock")
public class test18 {
    public static void main(String[] args) throws InterruptedException {
        DataContainerStamped dataContainer = new DataContainerStamped(1);
        new Thread(() -> {
            dataContainer.read(1);
        }, "t1").start();
        new Thread(() -> {
            dataContainer.write(100);
        }, "t2").start();
    }
}
执行结果:当stamp被修改后,需要给读操作加锁(用户自己实现)
20:57:49.483 [t1] WARN c.DataContainerStamped - optimistic read locking...256
20:57:49.483 [t2] WARN c.DataContainerStamped - write lock 384
20:57:49.491 [t1] WARN c.DataContainerStamped - updating to read lock... 256
20:57:49.492 [t2] WARN c.DataContainerStamped - write unlock 384
20:57:49.492 [t1] WARN c.DataContainerStamped - read lock 513
20:57:49.493 [t1] WARN c.DataContainerStamped - read finish...513, data:100
20:57:49.493 [t1] WARN c.DataContainerStamped - read unlock 513