经历了3天左右的挣扎,终于在Linux下将 php开发工具 Zend Studio 的 xdebug安装成功,分享如下:
1,装XAMPP,安装方法链接如下:这里假设XAMPP的安装路径为:/opt/lampp,安装命令
tar xvfz xampp-linux-1.4.7.tar.gz -C /opt (详细说明 http://unixfans.blogbus.com/logs/34373510.html)
为避免和其他端口冲突,在httpd.conf文件中我将Listen配置为18000。以后用http://127.0.0.1:18000/ 访问
2,安装Zend Studio
下好后直接解压到你希望的目录地址就算安装完成了,我这里假设安装在:/home/yourname/zend studio
第一次运行Zend Studio时,需要指定workspace的地址,如果你只是为了开发php,那么可以把工作区地址指定到:/opt/lampp/htdocs ,因为这里是XAMPP中apache的docs地址,添加的php文件可以直接在浏览器中运行。但坏处是删除文件时要小心,不然把XAMPP中htdocs文件夹里原有的文件删除了。也可以不这样做,将工作区用ln命令链接到htdocs文件夹下即可。
以上两样的安装都比较简单,直接解压就搞定了。
3,下面开始装Xdebug。
我最开始按照xdebug官方的办法http://xdebug.org/docs/install 安装时,在Zend studio 中运行xdebug总是提示57% debug session 上,另外启动Apache时有如下提示:
"Xdebug requires Zend Engine API version 220090626.
The Zend Engine API version 220060519 which is installed, is outdated."
在这里下载已经编译好的Xdebug remote文件,注意你的版本和系统类型。
Link : http://aspn.activestate.com/ASPN/Downloads/Komodo/RemoteDebugging
下载好后j将xdebug.so文件,拷贝到你的LAMPP文件夹内,本文中路径如下:/opt/lampp/lib/php/extensions/
然后打开php.ini进行编辑,路径如下/opt/lampp/etc/php.ini
在此文件倒数第二行加入如下代码段,注意zend_extension和xdebug.profiler_output_dir要对应你的lampp的安装地址,我这里红色高亮。
[XDebug]
zend_extension="/opt/lampp/lib/php/extensions/xdebug.so"
xdebug.remote_enable=true
xdebug.remote_host=127.0.0.1
xdebug.remote_port=19000
xdebug.remote_handler=dbgp
xdebug.profiler_enable=1
xdebug.profiler_output_dir="/opt/lampp/tmp"
注意我这里输入的端口号是19000,不是默认的9000。9000端口很可能已被占用,并导致在Zend studio 中运行xdebug总是提示57% debug session 。
保存,退出。好,到此,xdebug安装完成,如果已经开启xampp了,请重启。
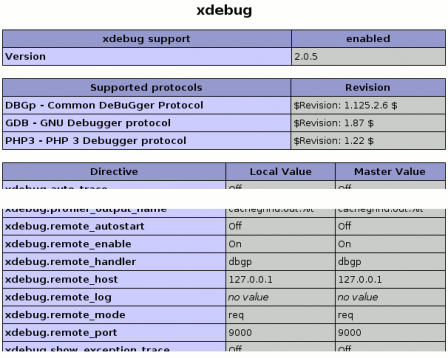
登录http://127.0.0.1:18000/xampp ,点左边栏的phpinfo() ,查找“xdebug”关键字,如果有xdebug的详细信息,说明安装成功。
参考图:
这里有个小问题:官站说明文档中介绍:http://www.xdebug.org/docs/install#configure-php
add the following line to php.ini: zend_extension="/wherever/you/put/it/xdebug.so" (for non-threaded use of PHP, for example the CLI, CGI or Apache 1.3 module)
or: zend_extension_ts="/wherever/you/put/it/xdebug.so" (for threaded usage of PHP, for example the Apache 2 work MPM or the the ISAPI module).
虽然我的XAMPP中的apache版本是2.2.11,但是使用zend_extension_ts语句是无法加载xdebug的,请读者自行测试,如果zend_extension_ts不能加载,那么和我一样请用zend_extension。
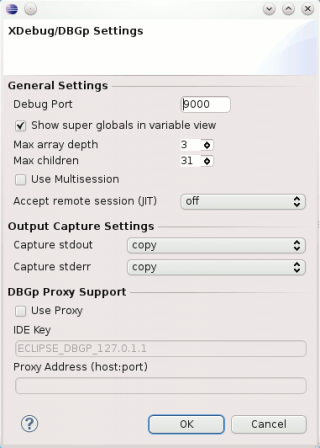
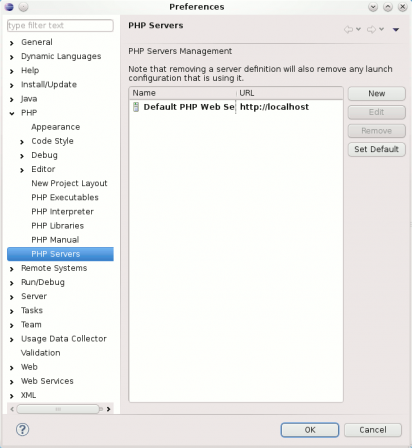
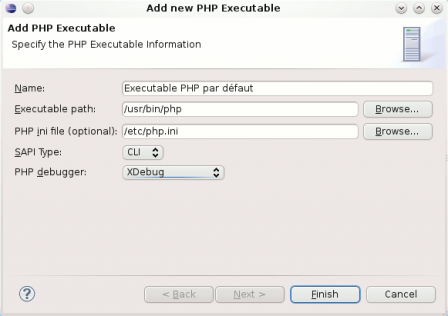
4, 打开Zend studio,在里面设定xdebug,
<html xmlns="http://www.w3.org/1999/xhtml" xml:lang="en" lang="en">
<head>
<meta http-equiv="content-type" content="text/html; charset=iso-8859-1" />
<title>Basic PHP Page</title>
</head>
<body>
<p>This is standard HTML.</p>
</body>
</html>
致谢:
以下作者和网站对本文完成有帮助:
http://unixfans.blogbus.com/logs/34375330.html
http://blog.sina.com.cn/s/blog_4dda073c0100bikk.html
http://www.ibm.com/developerworks/cn/linux/l-xampp/
http://www.latenightpc.com/blog/archives/2008/05/24/a-complete-lamp-development-environment-xampp-eclipse-pdt-and-xdebug