一、入门
1. 消息中间件的定义
没有标准定义,一般认为,采用消息传送机制/消息队列 的中间件技术,进行数据交流,用在分布式系统的集成
2. 为什么要用消息中间件
解决分布式系统之间消息的传递。
电商场景:
用户下单减库存,调用物流系统。随着业务量的增大,需要对系统进行拆分(服务化和业务拆分),拆分后的系统之间的交互一般用RPC(远程过程调用)。如果系统扩充到有几十个接口,就需要用消息中间件来解决问题。
3. 消息中间件和RPC有什么区别
3.1 功能特点:
在架构上,RPC和Message的差异点:Message有一个中间结点Message Queue,可以把消息存储。
3.2 消息的特点
Message Queue把请求的压力保存一下,逐渐释放出来,让处理者按照自己的节奏来处理。
Message Queue引入一下新的结点,让系统的可靠性会受Message Queue结点的影响。
Message Queue是异步单向的消息。发送消息设计成是不需要等待消息处理的完成。
所以对于有同步返回需求,用Message Queue则变得麻烦了。
3.3 PRC的特点
同步调用,对于要等待返回结果/处理结果的场景,RPC是可以非常自然直觉的使用方式。
# RPC也可以是异步调用。
由于等待结果,Consumer(Client)会有线程消耗。
如果以异步RPC的方式使用,Consumer(Client)线程消耗可以去掉。但不能做到像消息一样暂存消息/请求,压力会直接传导到服务Provider。
3.4 适用场合说明
希望同步得到结果的场合,RPC合适。
希望使用简单,则RPC;RPC操作基于接口,使用简单,使用方式模拟本地调用。异步的方式编程比较复杂。
不希望发送端(RPC Consumer、Message Sender)受限于处理端(RPC Provider、Message Receiver)的速度时,使用Message Queue。
随着业务增长,有的处理端处理量会成为瓶颈,会进行同步调用到异步消息的改造。
这样的改造实际上有调整业务的使用方式。
比如原来一个操作页面提交后就下一个页面会看到处理结果;改造后异步消息后,下一个页面就会变成“操作已提交,完成后会得到通知”。
4. 消息中间件的使用场景
4.1 异步处理
用户注册(50ms),还需发送邮件(50ms)和短信(50ms)
串行:(150ms)用户注册—》发送邮件----》发送短信
并行(100ms):用户注册—》发送邮件----》发送短信
消息中间件(56ms):
用户注册(50ms)—》(6ms)消息中间件《-----发送邮件《-----发送短信
说明:
用户注册时,可能还需要同时发送邮件和短信,使用串行的方式进行处理时花费的时间比较久;这时就会考虑并行处理,即用户注册完以后,同时启动两个两个线程去发送邮件和短信,这样时间就会花费得更少。
如果引入消息中间件的话就会比并行处理更快,即用户注册时,把注册信息放到消息中间件里面,然后发送邮件和短信的程序自己去消息中间件里面那用户注册的消息来消费
4.2 应用的解耦
订单系统---》库存系统(强耦合)
消息中间件:订单系统---》消息中间件《----库存系统(解耦)
原因:下订单以后还要同步去修改库存,没有必要耦合在一起
说明:
用户下订单时,可能还需要去更新库存,这个时候下订单的后,还需要同步去更新库存,这样两个系统之间就会有很强的耦合。
所以这个时候引入消息中间件,当用户下订单后,直接把订单信息放入消息中间件里面,接着就不用管了,库存系统直接去消息中间件里面那订单信息来消费就行了,这样订单系统和库存系统之间就解耦了
4.3 流量的削峰
用户请求-----》秒杀应用
应用的前端加入消息队列
用户请求-----》消息队列《----秒杀应用
原因:用户访问太多,服务器承受不了
说明:
在做秒杀的时候会有许多访问,可能导致系统承受不住。这个时候就需要在应用的前端加入消息队列,然后秒杀系统就可以直接去消息队列里面拿消息来消费就行了,秒杀系统是可以选择性的拿消息过来消费的,如果消息太多就会选择性的丢弃一些消息
4.4 日志处理
错误日志---》消息队列《----日志处理
用户行为日志--》消息队列(kafka)《-----日志的存储或流式处理
原因:机器太多,日志查看不方便
说明:
当系统太多的时候,部署了很多机器,每台机器上面都有日志,定位问题的时候不可能去每一台机器去看日志。
这个时候就需要引入消息中间件,把所有的日志放到消息中间件里面,然后在通过一个应用去读取日志存库或者展示
4.5 纯粹的消息通信
点对点通信
5. 常见消息中间件比较
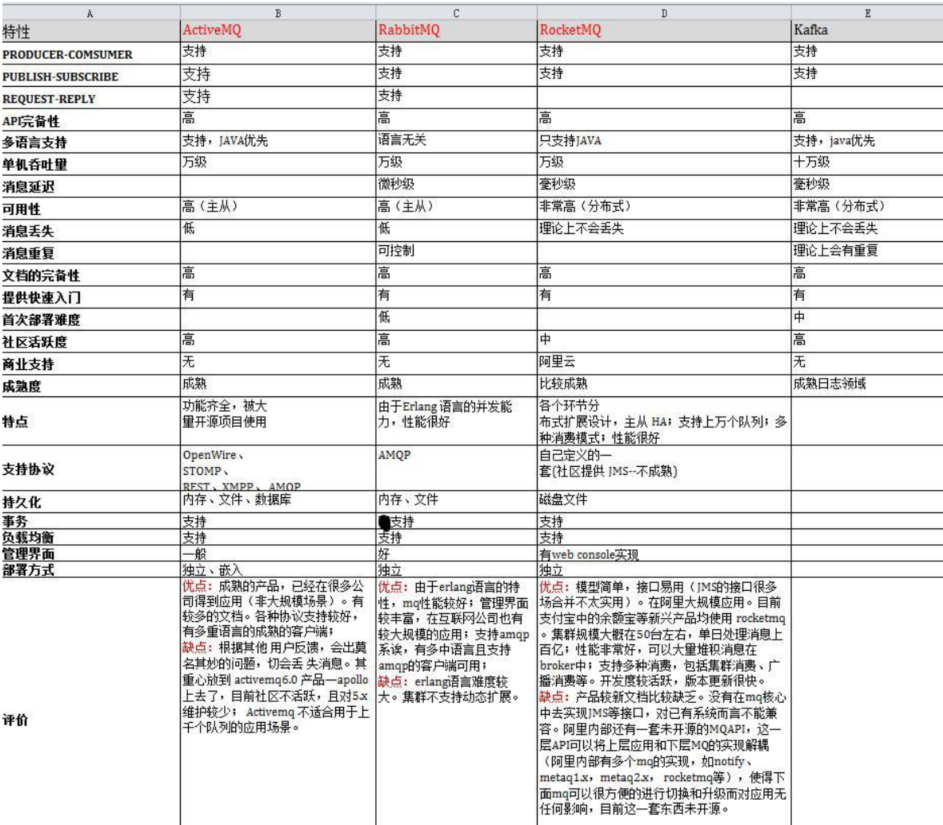
说明:
kafka和RabbitMQ的比较
1)RabbitMq比kafka成熟,在可用性上,稳定性上,可靠性上,RabbitMq超过kafka
2)Kafka设计的初衷就是处理日志的,可以看做是一个日志系统,针对性很强,所以它并没有具备一个成熟MQ应该具备的特性
3)Kafka的性能(吞吐量、tps)比RabbitMq要强
二、JMS规范
1. 什么是JMS规范
JMS(Java Messaging Service)规范,本质是API,Java平台消息中间件的规范,java应用程序之间进行消息交换。并且通过提供标准的产生、发送、接收消息的接口简化企业应用的开发。对应的实现ActiveMQ
2. JMS对象模型包含如下几个要素
1)连接工厂:创建一个JMS连接
2)JMS连接:客户端和服务器之间的一个连接。
3)JMS会话:客户端和服务器会话的状态,建立在连接之上的
4)JMS目的:消息队列
5)JMS生产者:消息的生成
6)JMS消费者:接收和消费消息
7)Broker:消息中间件的实例(ActiveMQ)
3. JMS规范中的点对点模式
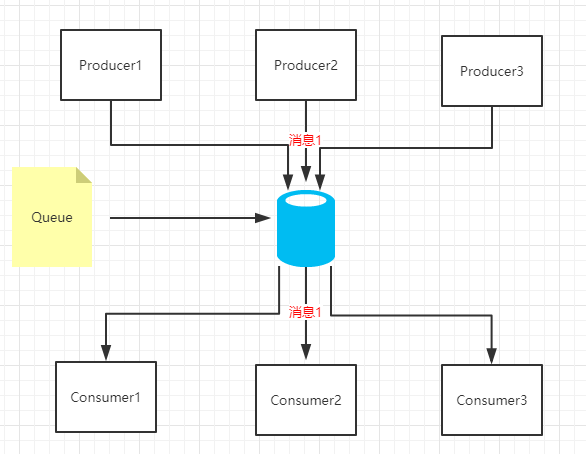
队列,一个消息只有一个消费者(即使有多个接受者监听队列),消费者是要向队列应答成功
4. JMS规范中的主题模式(发布订阅)
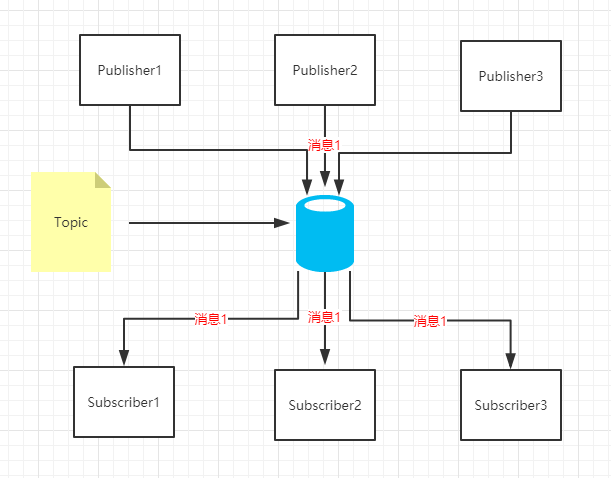
发布到Topic的消息会被当前主题所有的订阅者消费
5. JMS规范中的消息类型
TextMessage,MapMessage,ObjectMessage,BytesMessage,StreamMessage
三、ActiveMQ使用
1. 原生ActiveMQ的API的使用
编码过程参考JMS对象模型的几个要素:
1)连接工厂:创建一个JMS连接
2)JMS连接:客户端和服务器之间的一个连接。
3)JMS会话:客户端和服务器会话的状态,建立在连接之上的
4)JMS目的:消息队列
5)JMS生产者:消息的生成
6)JMS消费者:接收和消费消息
7)Broker:消息中间件的实例(ActiveMQ)
1.1 准备工作:
1)在ActiveMQ官网下载windows版的ActiveMQ,下载地址:http://activemq.apache.org/activemq-580-release.html
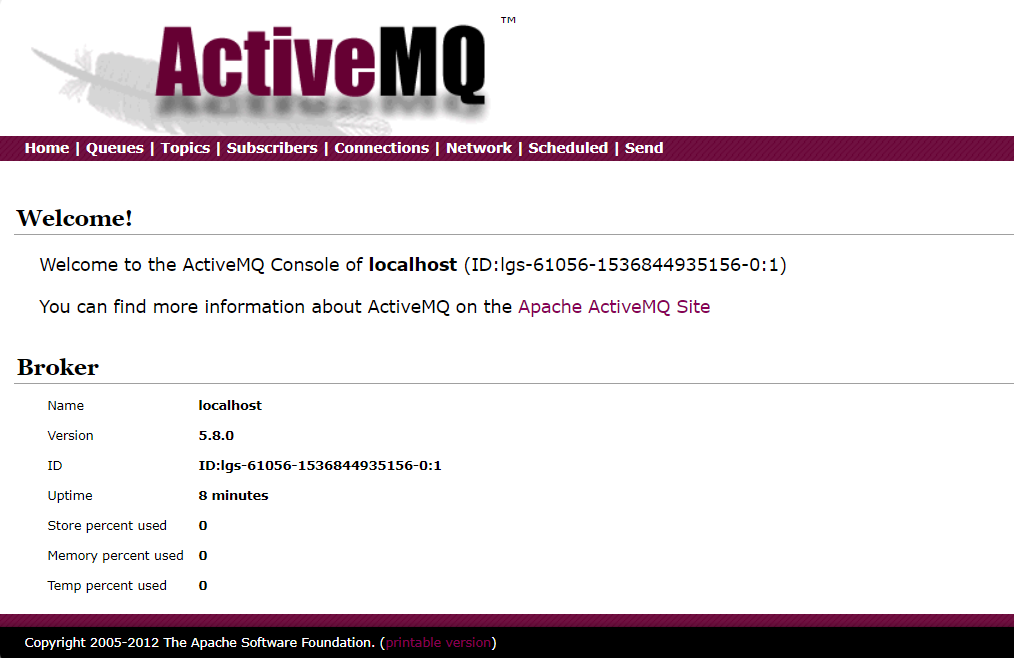
下载后启动,

在浏览器中输入地址http://127.0.0.1:8161/admin访问,用户名和密码为admin/admin
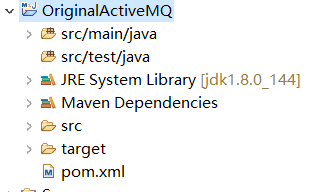
2)新建一名为OriginalActiveMQ的maven工程,结构如下:
1.2 在pom.xml文件里面引入如下依赖
        <dependency>
            <groupId>org.apache.activemq</groupId>
            <artifactId>activemq-all</artifactId>
            <version>5.8.0</version>
        </dependency>
1.3 新建一个JMS消息生产者
package com.study.demo;

import org.apache.activemq.ActiveMQConnection;
import org.apache.activemq.ActiveMQConnectionFactory;

import javax.jms.*;

/**
 *
 * @Description: java原生ActiveMQ的API的使用-JMS消息生产者
 * @author leeSmall
 * @date 2018年9月13日
 *
 */
public class JmsProducer {

    //默认连接用户名
    private static final String USERNAME = ActiveMQConnection.DEFAULT_USER;
    //默认连接密码
    private static final String PASSWORD = ActiveMQConnection.DEFAULT_PASSWORD;
    //默认连接地址
    private static final String BROKEURL = ActiveMQConnection.DEFAULT_BROKER_URL;
    //发送的消息数量
    private static final int SENDNUM = 10;

    //编码过程参考JMS对象模型的几个要素
    public static void main(String[] args) {
        //1.连接工厂:创建一个JMS连接
        ConnectionFactory connectionFactory;

        //2.JMS连接:客户端和服务器之间的一个连接
        Connection connection = null;

        //3.JMS会话:客户端和服务器会话的状态,建立在JMS连接之上的
        Session session;

        //4.JMS目的:消息队列
        Destination destination;

        //5.JMS生产者:消息的生成
        MessageProducer messageProducer;

        //创建一个ActiveMQ的连接工厂
        connectionFactory = new ActiveMQConnectionFactory(USERNAME,PASSWORD,BROKEURL);

        try {
            //通过连接工厂创建一个JMS连接
            connection = connectionFactory.createConnection();

            //开启JMS连接
            connection.start();

            /*
             * 通过JMS连接创建一个JMS会话
             *
             * createSession参数取值说明:
             *  第一个参数:为true表示启用事务
             *  第二个参数:消息的确认模式:
             *                 AUTO_ACKNOWLEDGE 自动签收
             *                 CLIENT_ACKNOWLEDGE 客户端自行调用
             *                 ACKNOWLEDGE 方法签收
             *                 DUPS_OK_ACKNOWLEDGE 不是必须签收
             * 消息可能会重复发送 在第二次重新传送消息的时候,消息头的JmsDelivered会被置为true标示当前消息已经传送过一次,
             * 客户端需要进行消息的重复处理控制。
             */
            session = connection.createSession(true,Session.AUTO_ACKNOWLEDGE);

            //通过JMS会话创建一个JMS目的,即消息队列
            destination = session.createQueue("firstMSG");

            //通过JMS会话和JMS目的创建一个JMS生产者,即消息生产者
            messageProducer = session.createProducer(destination);

            //发送10条消息
            for(int i=0;i<SENDNUM;i++){
                //生成消息
                String msg = "发送消息"+i+" "+System.currentTimeMillis();
                TextMessage message = session.createTextMessage(msg);
                System.out.println("发送消息:"+msg);

                //发送消息
                messageProducer.send(message);
            }
            //提交JMS会话
            session.commit();


        } catch (JMSException e) {
            e.printStackTrace();
        }finally {
            if(connection!=null){
                try {
                    connection.close();
                } catch (JMSException e) {
                    e.printStackTrace();
                }
            }
        }


    }


}
1.4 新建一个JMS消息消费者
package com.study.demo;

import org.apache.activemq.ActiveMQConnection;
import org.apache.activemq.ActiveMQConnectionFactory;

import javax.jms.*;

/**
 *
 * @Description: java原生ActiveMQ的API的使用-JMS消息消费者
 * @author leeSmall
 * @date 2018年9月13日
 *
 */
public class JmsConsumer {

    //默认连接用户名
    private static final String USERNAME = ActiveMQConnection.DEFAULT_USER;
    //默认连接密码
    private static final String PASSWORD = ActiveMQConnection.DEFAULT_PASSWORD;
    //默认连接地址
    private static final String BROKEURL = ActiveMQConnection.DEFAULT_BROKER_URL;

    //编码过程参考JMS对象模型的几个要素
    public static void main(String[] args) {
        //1.连接工厂:创建一个JMS连接
        ConnectionFactory connectionFactory;

        //2.JMS连接:客户端和服务器之间的一个连接
        Connection connection = null;

        //3.JMS会话:客户端和服务器会话的状态,建立在JMS连接之上的
        Session session;

        //4.JMS目的:消息队列
        Destination destination;

        //5.JMS消费者:接收和消费消息
        MessageConsumer messageConsumer;

        //创建一个ActiveMQ的连接工厂
        connectionFactory = new ActiveMQConnectionFactory(USERNAME,PASSWORD,BROKEURL);

        try {
            //通过连接工厂创建一个JMS连接
            connection = connectionFactory.createConnection();

            //开启JMS连接
            connection.start();

            /*
             * 通过JMS连接创建一个JMS会话
             *
             * createSession参数取值说明:
             *  第一个参数:为true表示启用事务
             *  第二个参数:消息的确认模式:
             *                 AUTO_ACKNOWLEDGE 自动签收
             *                 CLIENT_ACKNOWLEDGE 客户端自行调用
             *                 ACKNOWLEDGE 方法签收
             *                 DUPS_OK_ACKNOWLEDGE 不是必须签收
             * 消息可能会重复发送 在第二次重新传送消息的时候,消息头的JmsDelivered会被置为true标示当前消息已经传送过一次,
             * 客户端需要进行消息的重复处理控制。
             */
            session = connection.createSession(false, Session.AUTO_ACKNOWLEDGE);

            //通过JMS会话创建一个JMS目的,即消息队列
            destination = session.createQueue("firstMSG");

            //通过JMS会话和JMS目的创建一个JMS消费者,即消息消费者
            messageConsumer = session.createConsumer(destination);

            //读取消息
            while(true){
                //使用receive方法消费一个消息,如果超过10s没有得到消息就跳过
                TextMessage textMessage = (TextMessage)messageConsumer.receive(10000);
                if(textMessage != null){
                    System.out.println("Accept msg : "+textMessage.getText());
                }else{
                    break;
                }

            }


        } catch (JMSException e) {
            e.printStackTrace();
        }

    }
}
1.5 启动JMS消息生产者,查看ActiveMQ管理界面

说明:
可以看到有10条消息待消费,0个消费者,10条消息入队,0条消息出队
1.6 启动JMS消息消费者,查看ActiveMQ管理界面

说明:
可以看到,此时有0条消息待消费,1个消费者,10条消息入队,10条消息出队
2. Spring提供的ActiveMQ的使用
2.1 新建1个名为ActiveMQProducer的maven web工程,结构如下

2.2 在pom.xml文件里面引入如下依赖
<project xmlns="http://maven.apache.org/POM/4.0.0" xmlns:xsi="http://www.w3.org/2001/XMLSchema-instance"
    xsi:schemaLocation="http://maven.apache.org/POM/4.0.0 http://maven.apache.org/maven-v4_0_0.xsd">
    <modelVersion>4.0.0</modelVersion>
    <groupId>com.study.demo</groupId>
    <artifactId>ActiveMQProducer</artifactId>
    <packaging>war</packaging>
    <version>0.0.1-SNAPSHOT</version>
    <name>ActiveMQProducer Maven Webapp</name>
    <url>http://maven.apache.org</url>
    <dependencies>
        <dependency>
            <groupId>junit</groupId>
            <artifactId>junit</artifactId>
            <version>3.8.1</version>
            <scope>test</scope>
        </dependency>

        <dependency>
            <groupId>javax</groupId>
            <artifactId>javaee-web-api</artifactId>
            <version>7.0</version>
            <scope>provided</scope>
        </dependency>

        <dependency>
            <groupId>org.springframework</groupId>
            <artifactId>spring-webmvc</artifactId>
            <version>4.3.11.RELEASE</version>
        </dependency>

        <dependency>
            <groupId>javax.servlet</groupId>
            <artifactId>jstl</artifactId>
            <version>1.2</version>
        </dependency>

        <!--日志 -->
        <dependency>
            <groupId>org.slf4j</groupId>
            <artifactId>slf4j-api</artifactId>
            <version>1.7.5</version>
        </dependency>
        <dependency>
            <groupId>log4j</groupId>
            <artifactId>log4j</artifactId>
            <version>1.2.16</version>
        </dependency>
        <dependency>
            <groupId>org.slf4j</groupId>
            <artifactId>jcl-over-slf4j</artifactId>
            <version>1.7.5</version>
        </dependency>
        <dependency>
            <groupId>ch.qos.logback</groupId>
            <artifactId>logback-classic</artifactId>
            <version>1.0.13</version>
        </dependency>
        <dependency>
            <groupId>ch.qos.logback</groupId>
            <artifactId>logback-core</artifactId>
            <version>1.0.13</version>
        </dependency>
        <dependency>
            <groupId>ch.qos.logback</groupId>
            <artifactId>logback-access</artifactId>
            <version>1.0.13</version>
        </dependency>

        <!--JSON -->
        <dependency>
            <groupId>com.fasterxml.jackson.core</groupId>
            <artifactId>jackson-core</artifactId>
            <version>2.9.6</version>
        </dependency>

        <dependency>
            <groupId>com.fasterxml.jackson.core</groupId>
            <artifactId>jackson-databind</artifactId>
            <version>2.9.6</version>
        </dependency>
        <dependency>
            <groupId>com.fasterxml.jackson.core</groupId>
            <artifactId>jackson-annotations</artifactId>
            <version>2.9.6</version>
        </dependency>

        <!-- xbean -->
        <dependency>
            <groupId>org.apache.xbean</groupId>
            <artifactId>xbean-spring</artifactId>
            <version>3.16</version>
        </dependency>
        <dependency>
            <groupId>com.thoughtworks.xstream</groupId>
            <artifactId>xstream</artifactId>
            <version>1.3.1</version>
        </dependency>

        <!--ActiveMq -->
        <dependency>
            <groupId>org.apache.activemq</groupId>
            <artifactId>activemq-all</artifactId>
            <version>5.8.0</version>
        </dependency>
        <dependency>
            <groupId>org.springframework</groupId>
            <artifactId>spring-jms</artifactId>
            <version>4.3.11.RELEASE</version>
        </dependency>

    </dependencies>
    <build>
        <finalName>ActiveMQProducer</finalName>
        <resources>
            <resource>
                <directory>${basedir}/src/main/java</directory>
                <includes>
                    <include>**/*.xml</include>
                </includes>
            </resource>
        </resources>
    </build>
</project>
2.3 新建一个/ActiveMQProducer/src/main/java/applicationContext.xml文件,并在里面添加Spring的ActiveMQ相关配置
<?xml version="1.0" encoding="UTF-8"?>
<!-- 查找最新的schemaLocation 访问 http://www.springframework.org/schema/ -->
<beans xmlns="http://www.springframework.org/schema/beans"
       xmlns:context="http://www.springframework.org/schema/context"
       xmlns:xsi="http://www.w3.org/2001/XMLSchema-instance"
       xmlns:amq="http://activemq.apache.org/schema/core"
       xmlns:jms="http://www.springframework.org/schema/jms"
       xsi:schemaLocation="http://www.springframework.org/schema/beans
        http://www.springframework.org/schema/beans/spring-beans-4.0.xsd
        http://www.springframework.org/schema/context
        http://www.springframework.org/schema/context/spring-context-4.0.xsd
        http://www.springframework.org/schema/jms
        http://www.springframework.org/schema/jms/spring-jms-4.0.xsd
        http://activemq.apache.org/schema/core
        http://activemq.apache.org/schema/core/activemq-core-5.8.0.xsd">

     <!-- 配置扫描路径 -->
     <context:component-scan base-package="com.study.demo">
         <context:exclude-filter type="annotation"
              expression="org.springframework.stereotype.Controller"/>
     </context:component-scan>

    <!-- ActiveMQ 连接工厂 -->
    <amq:connectionFactory id="amqConnectionFactory"
             brokerURL="tcp://127.0.0.1:61616" userName="admin" password="admin" />

    <!-- Spring Caching连接工厂 -->
    <!-- Spring用于管理真正的ConnectionFactory的ConnectionFactory -->
    <bean id="connectionFactory"
          class="org.springframework.jms.connection.CachingConnectionFactory">
        <property name="targetConnectionFactory" ref="amqConnectionFactory"></property>
        <property name="sessionCacheSize" value="100"></property>
    </bean>


    <!-- Spring JmsTemplate 的消息生产者 start-->
    <!-- 定义JmsTemplate的Queue类型 -->
    <bean id="jmsQueueTemplate" class="org.springframework.jms.core.JmsTemplate">
        <constructor-arg ref="connectionFactory"></constructor-arg>
        <!-- 队列模式-->
        <property name="pubSubDomain" value="false"></property>
    </bean>


    <!-- 定义JmsTemplate的Topic类型 -->
    <bean id="jmsTopicTemplate" class="org.springframework.jms.core.JmsTemplate">
        <constructor-arg ref="connectionFactory"></constructor-arg>
        <!-- 发布订阅模式-->
        <property name="pubSubDomain" value="true"></property>
    </bean>
    <!--Spring JmsTemplate 的消息生产者 end-->


</beans>
说明:
要在Spring的配置文件中增加命名空间
xmlns:amq="http://activemq.apache.org/schema/core"
xmlns:jms=http://www.springframework.org/schema/jms

http://www.springframework.org/schema/jms
http://www.springframework.org/schema/jms/spring-jms-4.0.xsd
http://activemq.apache.org/schema/core
http://activemq.apache.org/schema/core/activemq-core-5.8.0.xsd"
2.4 新建一个队列消息生产者
package com.study.demo.mq.producer.queue;

import javax.jms.JMSException;
import javax.jms.Message;
import javax.jms.Session;

import org.springframework.beans.factory.annotation.Autowired;
import org.springframework.beans.factory.annotation.Qualifier;
import org.springframework.jms.core.JmsTemplate;
import org.springframework.jms.core.MessageCreator;
import org.springframework.stereotype.Component;

/**
 *
 * @Description: 队列消息生产者,发送消息到队列
 * @author leeSmall
 * @date 2018年9月13日
 *
 */
@Component("queueSender")
public class QueueSender {

    @Autowired
    @Qualifier("jmsQueueTemplate")
    private JmsTemplate jmsTemplate;

    /*@Autowired
    private GetResponse getResponse;*/

    public void send(String queueName,final String message){
        jmsTemplate.send(queueName, new MessageCreator() {
            public Message createMessage(Session session) throws JMSException {
                Message msg = session.createTextMessage(message);
                return msg;
            }
        });
    }


}
2.5 新建一个Topic生产者
package com.study.demo.mq.producer.topic;

import org.springframework.beans.factory.annotation.Autowired;
import org.springframework.beans.factory.annotation.Qualifier;
import org.springframework.jms.core.JmsTemplate;
import org.springframework.jms.core.MessageCreator;
import org.springframework.stereotype.Component;

import javax.jms.JMSException;
import javax.jms.Message;
import javax.jms.Session;

/**
 *
 * @Description: Topic生产者发送消息到Topic
 * @author leeSmall
 * @date 2018年9月13日
 *
 */
@Component("topicSender")
public class TopicSender {

    @Autowired
    @Qualifier("jmsTopicTemplate")
    private JmsTemplate jmsTemplate;

    public void send(String queueName,final String message){
        jmsTemplate.send(queueName, new MessageCreator() {
            public Message createMessage(Session session) throws JMSException {
                Message msg = session.createTextMessage(message);
                return msg;
            }
        });
    }
}
2.6 新建一个控制器来接收从页面发送的消息和调用消息生产者发送消息
package com.study.demo.controller;

import com.study.demo.mq.producer.queue.QueueSender;
import com.study.demo.mq.producer.topic.TopicSender;
import org.springframework.stereotype.Controller;
import org.springframework.web.bind.annotation.RequestMapping;
import org.springframework.web.bind.annotation.RequestParam;
import org.springframework.web.bind.annotation.ResponseBody;

import javax.annotation.Resource;


/**
 *
 * @Description: controller测试
 * @author leeSmall
 * @date 2018年9月13日
 *
 */
@Controller
public class ActivemqController {

    @Resource
    QueueSender queueSender;
    @Resource
    TopicSender topicSender;

    /**
     * 发送消息到队列
     * Queue队列:仅有一个订阅者会收到消息,消息一旦被处理就不会存在队列中
     * @param message
     * @return String
     */
    @ResponseBody
    @RequestMapping("queueSender")
    public String queueSender(@RequestParam("message")String message){
        String opt="";
        try {
            queueSender.send("test.queue",message);
            opt = "suc";
        } catch (Exception e) {
            opt = e.getCause().toString();
        }
        return opt;
    }

    /**
     * 发送消息到主题
     * Topic主题 :放入一个消息,所有订阅者都会收到
     * 这个是主题目的地是一对多的
     * @param message
     * @return String
     */
    @ResponseBody
    @RequestMapping("topicSender")
    public String topicSender(@RequestParam("message")String message){
        String opt = "";
        try {
            topicSender.send("test.topic",message);
            opt = "suc";
        } catch (Exception e) {
            opt = e.getCause().toString();
        }
        return opt;
    }

}
2.7 新增/ActiveMQProducer/src/main/java/spring-mvc.xml配置文件
<?xml version="1.0" encoding="UTF-8"?>
<!-- 查找最新的schemaLocation 访问 http://www.springframework.org/schema/ -->
<beans xmlns="http://www.springframework.org/schema/beans"
       xmlns:aop="http://www.springframework.org/schema/aop"
       xmlns:context="http://www.springframework.org/schema/context"
       xmlns:mvc="http://www.springframework.org/schema/mvc"
       xmlns:tx="http://www.springframework.org/schema/tx"
       xmlns:xsi="http://www.w3.org/2001/XMLSchema-instance"
       xsi:schemaLocation="http://www.springframework.org/schema/aop
        http://www.springframework.org/schema/aop/spring-aop-4.0.xsd
        http://www.springframework.org/schema/beans
        http://www.springframework.org/schema/beans/spring-beans-4.0.xsd
        http://www.springframework.org/schema/context
        http://www.springframework.org/schema/context/spring-context-4.0.xsd
        http://www.springframework.org/schema/mvc
        http://www.springframework.org/schema/mvc/spring-mvc-4.0.xsd
        http://www.springframework.org/schema/tx
        http://www.springframework.org/schema/tx/spring-tx-4.0.xsd">

<!--    <mvc:default-servlet-handler />-->
    <mvc:resources mapping="/js/**" location="/js/"/>
    <mvc:annotation-driven
            content-negotiation-manager="contentNegotiationManager" />

    <context:component-scan base-package="com.study.demo">
        <context:include-filter type="annotation"
                                expression="org.springframework.stereotype.Controller" />
    </context:component-scan>


    <bean id="stringHttpMessageConverter"
          class="org.springframework.http.converter.StringHttpMessageConverter">
        <property name="supportedMediaTypes">
            <list>
                <bean class="org.springframework.http.MediaType">
                    <constructor-arg index="0" value="text" />
                    <constructor-arg index="1" value="plain" />
                    <constructor-arg index="2" value="UTF-8" />
                </bean>
            </list>
        </property>
    </bean>
    <bean id="mappingJackson2HttpMessageConverter"
          class="org.springframework.http.converter.json.MappingJackson2HttpMessageConverter" />

    <bean class="org.springframework.web.servlet.mvc.annotation.AnnotationMethodHandlerAdapter">
        <property name="messageConverters">
            <list>
                <ref bean="stringHttpMessageConverter" />
                <ref bean="mappingJackson2HttpMessageConverter" />
            </list>
        </property>
    </bean>

    <bean id="contentNegotiationManager"
          class="org.springframework.web.accept.ContentNegotiationManagerFactoryBean">
        <property name="mediaTypes">
            <map>
                <entry key="html" value="text/html" />
                <entry key="pdf" value="application/pdf" />
                <entry key="xsl" value="application/vnd.ms-excel" />
                <entry key="xml" value="application/xml" />
                <entry key="json" value="application/json" />
            </map>
        </property>
        <property name="defaultContentType" value="text/html" />
    </bean>

    <bean id="viewResolver"
          class="org.springframework.web.servlet.view.ContentNegotiatingViewResolver">
        <property name="order" value="0" />
        <property name="contentNegotiationManager" ref="contentNegotiationManager" />

        <property name="viewResolvers">
            <list>
                <bean class="org.springframework.web.servlet.view.BeanNameViewResolver" />
                <bean class="org.springframework.web.servlet.view.InternalResourceViewResolver">
                    <property name="viewClass"
                              value="org.springframework.web.servlet.view.JstlView" />
                    <property name="prefix" value="/WEB-INF/pages/" />
                    <property name="suffix" value=".jsp"></property>
                </bean>
            </list>
        </property>

        <property name="defaultViews">
            <list>
                <bean  class="org.springframework.web.servlet.view.json.MappingJackson2JsonView">
                    <property name="extractValueFromSingleKeyModel" value="true" />
                </bean>
            </list>
        </property>
    </bean>

</beans>
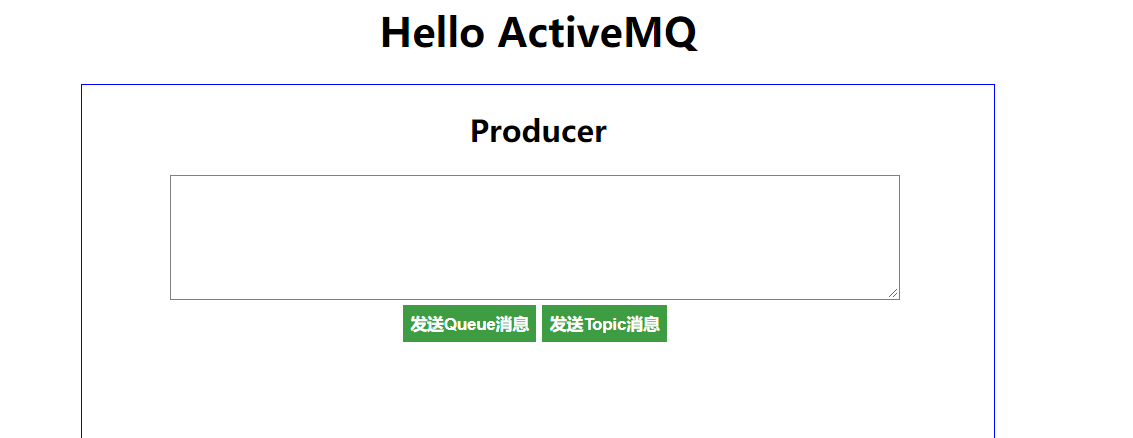
2.8 新增一个页面/ActiveMQProducer/src/main/webapp/index.jsp来发送消息
<%@ page language="java" import="java.util.*" pageEncoding="UTF-8"%>
<%
    String path = request.getContextPath();
    System.out.println(path);
    String basePath = request.getScheme() + "://"
            + request.getServerName() + ":" + request.getServerPort()
            + path + "/";
    System.out.println(basePath);
%>

<!DOCTYPE HTML PUBLIC "-//W3C//DTD HTML 4.01 Transitional//EN">
<html>
<head>
<base href="<%=basePath%>">

<title>ActiveMQ Demo程序</title>

<meta http-equiv="pragma" content="no-cache">
<meta http-equiv="cache-control" content="no-cache">
<meta http-equiv="expires" content="0">
<script type="text/javascript" src="<%=basePath%>js/jquery-1.11.0.min.js"></script>
<style type="text/css">
.h1 {
    margin: 0 auto;
}

#producer{
    width: 48%;
     border: 1px solid blue;
    height: 80%;
    align:center;
    margin:0 auto;
}

body{
    text-align :center;
}
div {
    text-align :center;
}
textarea{
    width:80%;
    height:100px;
    border:1px solid gray;
}
button{
    background-color: rgb(62, 156, 66);
    border: none;
    font-weight: bold;
    color: white;
    height:30px;
}
</style>
<script type="text/javascript">

    function send(controller){
        if($("#message").val()==""){
            $("#message").css("border","1px solid red");
            return;
        }else{
            $("#message").css("border","1px solid gray");
        }
        $.ajax({
            type: 'post',
            url:'<%=basePath%>/'+controller,
            dataType:'text',
            data:{"message":$("#message").val()},
            success:function(data){
                if(data=="suc"){
                    $("#status").html("<font color=green>发送成功</font>");
                    setTimeout(clear,1000);
                }else{
                    $("#status").html("<font color=red>"+data+"</font>");
                    setTimeout(clear,5000);
                }
            },
            error:function(data){
                $("#status").html("<font color=red>ERROR:"+data["status"]+","+data["statusText"]+"</font>");
                setTimeout(clear,5000);
            }

        });
    }

    function clear(){
        $("#status").html("");
    }

</script>
</head>

<body>
    <h1>Hello ActiveMQ</h1>
    <div id="producer">
        <h2>Producer</h2>
        <textarea id="message"></textarea>
        <br>
        <button onclick="send('queueSender')">发送Queue消息</button>
        <button onclick="send('topicSender')">发送Topic消息</button>
        <br>
        <span id="status"></span>
    </div>
</body>
</html>
到此生产者代码编写完成!
2.9 在8080端口的Tomcat启动ActiveMQProducer,在浏览器输入http://localhost:8080/ActiveMQProducer/地址访问

2.10 新建一个名为ActiveMQConsumer的maven web工程,结构如下:

2.11 在pom.xml文件里面引入如下依赖
<project xmlns="http://maven.apache.org/POM/4.0.0" xmlns:xsi="http://www.w3.org/2001/XMLSchema-instance"
    xsi:schemaLocation="http://maven.apache.org/POM/4.0.0 http://maven.apache.org/maven-v4_0_0.xsd">
    <modelVersion>4.0.0</modelVersion>
    <groupId>com.study.demo</groupId>
    <artifactId>ActiveMQConsumer</artifactId>
    <packaging>war</packaging>
    <version>0.0.1-SNAPSHOT</version>
    <name>ActiveMQConsumer Maven Webapp</name>
    <url>http://maven.apache.org</url>
    <dependencies>
        <dependency>
            <groupId>junit</groupId>
            <artifactId>junit</artifactId>
            <version>3.8.1</version>
            <scope>test</scope>
        </dependency>

        <dependency>
            <groupId>javax</groupId>
            <artifactId>javaee-web-api</artifactId>
            <version>7.0</version>
            <scope>provided</scope>
        </dependency>

        <dependency>
            <groupId>org.springframework</groupId>
            <artifactId>spring-webmvc</artifactId>
            <version>4.3.11.RELEASE</version>
        </dependency>

        <dependency>
            <groupId>javax.servlet</groupId>
            <artifactId>jstl</artifactId>
            <version>1.2</version>
        </dependency>

        <!--日志 -->
        <dependency>
            <groupId>org.slf4j</groupId>
            <artifactId>slf4j-api</artifactId>
            <version>1.7.5</version>
        </dependency>
        <dependency>
            <groupId>log4j</groupId>
            <artifactId>log4j</artifactId>
            <version>1.2.16</version>
        </dependency>
        <dependency>
            <groupId>org.slf4j</groupId>
            <artifactId>jcl-over-slf4j</artifactId>
            <version>1.7.5</version>
        </dependency>
        <dependency>
            <groupId>ch.qos.logback</groupId>
            <artifactId>logback-classic</artifactId>
            <version>1.0.13</version>
        </dependency>
        <dependency>
            <groupId>ch.qos.logback</groupId>
            <artifactId>logback-core</artifactId>
            <version>1.0.13</version>
        </dependency>
        <dependency>
            <groupId>ch.qos.logback</groupId>
            <artifactId>logback-access</artifactId>
            <version>1.0.13</version>
        </dependency>

        <!--JSON -->
        <dependency>
            <groupId>org.codehaus.jackson</groupId>
            <artifactId>jackson-mapper-asl</artifactId>
            <version>1.9.9</version><!-- 1.9.13 -->
        </dependency>
        <dependency>
            <groupId>org.codehaus.jackson</groupId>
            <artifactId>jackson-core-asl</artifactId>
            <version>1.9.9</version><!-- 1.9.13 -->
        </dependency>
        <dependency>
            <groupId>com.fasterxml.jackson.core</groupId>
            <artifactId>jackson-core</artifactId>
            <version>2.9.6</version>
        </dependency>

        <dependency>
            <groupId>com.fasterxml.jackson.core</groupId>
            <artifactId>jackson-databind</artifactId>
            <version>2.9.6</version>
        </dependency>

        <!-- xbean -->
        <dependency>
            <groupId>org.apache.xbean</groupId>
            <artifactId>xbean-spring</artifactId>
            <version>3.16</version>
        </dependency>
        <dependency>
            <groupId>com.thoughtworks.xstream</groupId>
            <artifactId>xstream</artifactId>
            <version>1.3.1</version>
        </dependency>

        <!--ActiveMq -->
        <dependency>
            <groupId>org.apache.activemq</groupId>
            <artifactId>activemq-all</artifactId>
            <version>5.8.0</version>
        </dependency>
        <dependency>
            <groupId>org.springframework</groupId>
            <artifactId>spring-jms</artifactId>
            <version>4.3.11.RELEASE</version>
        </dependency>

    </dependencies>
    <build>
        <finalName>ActiveMQConsumer</finalName>
        <resources>
            <resource>
                <directory>${basedir}/src/main/java</directory>
                <includes>
                    <include>**/*.xml</include>
                </includes>
            </resource>
        </resources>
    </build>
</project>
2.12 新建一个/ActiveMQConsumer/src/main/java/applicationContext.xml文件,并在里面添加Spring的ActiveMQ相关配置
<?xml version="1.0" encoding="UTF-8"?>
<!-- 查找最新的schemaLocation 访问 http://www.springframework.org/schema/ -->
<beans xmlns="http://www.springframework.org/schema/beans"
       xmlns:context="http://www.springframework.org/schema/context"
       xmlns:xsi="http://www.w3.org/2001/XMLSchema-instance"
       xmlns:amq="http://activemq.apache.org/schema/core"
       xmlns:jms="http://www.springframework.org/schema/jms"
       xsi:schemaLocation="http://www.springframework.org/schema/beans
        http://www.springframework.org/schema/beans/spring-beans-4.0.xsd
        http://www.springframework.org/schema/context
        http://www.springframework.org/schema/context/spring-context-4.0.xsd
        http://www.springframework.org/schema/jms
        http://www.springframework.org/schema/jms/spring-jms-4.0.xsd
        http://activemq.apache.org/schema/core
        http://activemq.apache.org/schema/core/activemq-core-5.8.0.xsd">

     <!-- 配置扫描路径 -->
     <context:component-scan base-package="com.study.demo">
         <context:exclude-filter type="annotation" expression="org.springframework.stereotype.Controller"/>
     </context:component-scan>

    <!-- ActiveMQ 连接工厂 -->
    <amq:connectionFactory id="amqConnectionFactory"
                           brokerURL="tcp://127.0.0.1:61616" userName="admin" password="admin"  />

    <!-- Spring Caching连接工厂 -->
    <bean id="connectionFactory" class="org.springframework.jms.connection.CachingConnectionFactory">
        <property name="targetConnectionFactory" ref="amqConnectionFactory"></property>
        <property name="sessionCacheSize" value="100" />
    </bean>


    <bean id="jmsQueueTemplate" class="org.springframework.jms.core.JmsTemplate">
        <constructor-arg ref="connectionFactory"></constructor-arg>
        <!-- 队列模式-->
        <property name="pubSubDomain" value="false"></property>
    </bean>

</beans>
2.13 新建两个队列消息监听器,并在applicationContext.xml里面配置
队列消息监听器1:
package com.study.demo.mq.consumer.queue;

import javax.jms.JMSException;
import javax.jms.Message;
import javax.jms.MessageListener;
import javax.jms.TextMessage;

import org.springframework.stereotype.Component;

/**
 *
 * @Description: 队列消息监听器
 * @author leeSmall
 * @date 2018年9月13日
 *
 */
@Component
public class QueueReceiver1 implements MessageListener {


    public void onMessage(Message message) {
        try {
            String textMsg = ((TextMessage)message).getText();
            System.out.println("QueueReceiver1 accept msg : "+textMsg);
        } catch (JMSException e) {
            e.printStackTrace();
        }

    }
}
队列消息监听器2:
package com.study.demo.mq.consumer.queue;

import org.springframework.stereotype.Component;

import javax.jms.JMSException;
import javax.jms.Message;
import javax.jms.MessageListener;
import javax.jms.TextMessage;

/**
 *
 * @Description: 队列消息监听器
 * @author leeSmall
 * @date 2018年9月13日
 *
 */
@Component
public class QueueReceiver2 implements MessageListener {

    public void onMessage(Message message) {
        try {
            String textMsg = ((TextMessage)message).getText();
            System.out.println("QueueReceiver2 accept msg : "+textMsg);
        } catch (JMSException e) {
            e.printStackTrace();
        }
    }

}
applicationContext.xml配置:
<!-- 定义Queue监听器 -->
    <jms:listener-container destination-type="queue" container-type="default"
                            connection-factory="connectionFactory" acknowledge="auto">
        <jms:listener destination="test.queue" ref="queueReceiver1"></jms:listener>
        <jms:listener destination="test.queue" ref="queueReceiver2"></jms:listener>
    </jms:listener-container>
2.14 新建两个Topic消息监听器,并在applicationContext.xml里面配置
Topic消息监听器1:
package com.study.demo.mq.consumer.topic;

import org.springframework.stereotype.Component;

import javax.jms.JMSException;
import javax.jms.Message;
import javax.jms.MessageListener;
import javax.jms.TextMessage;


/**
 *
 * @Description: Topic消息监听器
 * @author leeSmall
 * @date 2018年9月13日
 *
 */
@Component
public class TopicReceiver1 implements MessageListener {


    public void onMessage(Message message) {
        try {
            String textMsg = ((TextMessage)message).getText();
            System.out.println("TopicReceiver1 accept msg : "+textMsg);
        } catch (JMSException e) {
            e.printStackTrace();
        }
    }

}
Topic消息监听器2:
package com.study.demo.mq.consumer.topic;

import org.springframework.stereotype.Component;

import javax.jms.JMSException;
import javax.jms.Message;
import javax.jms.MessageListener;
import javax.jms.TextMessage;

/**
 *
 * @Description: Topic消息监听器
 * @author leeSmall
 * @date 2018年9月13日
 *
 */
@Component
public class TopicReceiver2 implements MessageListener {

    public void onMessage(Message message) {
        try {
            String textMsg = ((TextMessage)message).getText();
            System.out.println("TopicReceiver2 accept msg : "+textMsg);
        } catch (JMSException e) {
            e.printStackTrace();
        }
    }

}
applicationContext.xml配置:
<!-- 定义Topic监听器 -->
    <jms:listener-container destination-type="topic" container-type="default"
                            connection-factory="connectionFactory" acknowledge="auto">
        <jms:listener destination="test.topic" ref="topicReceiver1"></jms:listener>
        <jms:listener destination="test.topic" ref="topicReceiver2"></jms:listener>
    </jms:listener-container>
2.15 新增/ActiveMQConsumer/src/main/java/spring-mvc.xml配置
<?xml version="1.0" encoding="UTF-8"?>
<!-- 查找最新的schemaLocation 访问 http://www.springframework.org/schema/ -->
<beans xmlns="http://www.springframework.org/schema/beans"
       xmlns:aop="http://www.springframework.org/schema/aop"
       xmlns:context="http://www.springframework.org/schema/context"
       xmlns:mvc="http://www.springframework.org/schema/mvc"
       xmlns:tx="http://www.springframework.org/schema/tx"
       xmlns:xsi="http://www.w3.org/2001/XMLSchema-instance"
       xsi:schemaLocation="http://www.springframework.org/schema/aop
        http://www.springframework.org/schema/aop/spring-aop-4.0.xsd
        http://www.springframework.org/schema/beans
        http://www.springframework.org/schema/beans/spring-beans-4.0.xsd
        http://www.springframework.org/schema/context
        http://www.springframework.org/schema/context/spring-context-4.0.xsd
        http://www.springframework.org/schema/mvc
        http://www.springframework.org/schema/mvc/spring-mvc-4.0.xsd
        http://www.springframework.org/schema/tx
        http://www.springframework.org/schema/tx/spring-tx-4.0.xsd">

<!--    <mvc:default-servlet-handler />-->
    <mvc:resources mapping="/js/**" location="/js/"/>
    <mvc:annotation-driven
            content-negotiation-manager="contentNegotiationManager" />

    <context:component-scan base-package="com.study.demo">
        <context:include-filter type="annotation"
                                expression="org.springframework.stereotype.Controller" />
    </context:component-scan>


    <bean id="stringHttpMessageConverter"
          class="org.springframework.http.converter.StringHttpMessageConverter">
        <property name="supportedMediaTypes">
            <list>
                <bean class="org.springframework.http.MediaType">
                    <constructor-arg index="0" value="text" />
                    <constructor-arg index="1" value="plain" />
                    <constructor-arg index="2" value="UTF-8" />
                </bean>
            </list>
        </property>
    </bean>
    <bean id="mappingJacksonHttpMessageConverter"
          class="org.springframework.http.converter.json.MappingJackson2HttpMessageConverter" />

    <bean
            class="org.springframework.web.servlet.mvc.annotation.AnnotationMethodHandlerAdapter">
        <property name="messageConverters">
            <list>
                <ref bean="stringHttpMessageConverter" />
                <ref bean="mappingJacksonHttpMessageConverter" />
            </list>
        </property>
    </bean>

    <bean id="contentNegotiationManager"
          class="org.springframework.web.accept.ContentNegotiationManagerFactoryBean">
        <property name="mediaTypes">
            <map>
                <entry key="html" value="text/html" />
                <entry key="pdf" value="application/pdf" />
                <entry key="xsl" value="application/vnd.ms-excel" />
                <entry key="xml" value="application/xml" />
                <entry key="json" value="application/json" />
            </map>
        </property>
        <property name="defaultContentType" value="text/html" />
    </bean>

    <bean id="viewResolver"
          class="org.springframework.web.servlet.view.ContentNegotiatingViewResolver">
        <property name="order" value="0" />
        <property name="contentNegotiationManager" ref="contentNegotiationManager" />

        <property name="viewResolvers">
            <list>
                <bean class="org.springframework.web.servlet.view.BeanNameViewResolver" />
                <bean
                        class="org.springframework.web.servlet.view.InternalResourceViewResolver">
                    <property name="viewClass"
                              value="org.springframework.web.servlet.view.JstlView" />
                    <property name="prefix" value="/WEB-INF/pages/" />
                    <property name="suffix" value=".jsp"></property>
                </bean>
            </list>
        </property>

        <property name="defaultViews">
            <list>
                <bean
                        class="org.springframework.web.servlet.view.json.MappingJackson2JsonView">
                    <property name="extractValueFromSingleKeyModel" value="true" />
                </bean>
            </list>
        </property>
    </bean>

</beans>
到此消费者代码编写完成!
2.16 在Tomcat8081下启动ActiveMQConsumer

2.17 测试
在生产者的消息发送页面分别发送队列消息和topic消息查看效果
发送队列消息:

查看消费者的状态:
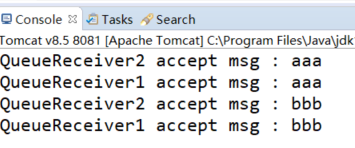
发送topic消息

查看消费者的状态:

可以看到一个队列消息只能被一个队列消费者消费,一个topic消息可以被多个topic消费者消费
参考文章: