LVS配置
ipvsadm命令
用户空间的命令行工具,用于管理集群服务;(即规则的增删查改)
//查看帮助
ipvsadm v1.31 2019/12/24 (compiled with popt and IPVS v1.2.1)
Usage:
  ipvsadm -A|E virtual-service [-s scheduler] [-p [timeout]] [-M netmask] [--pe persistence_engine] [-b sched-flags]
  ipvsadm -D virtual-service
  ipvsadm -C
  ipvsadm -R
  ipvsadm -S [-n]
  ipvsadm -a|e virtual-service -r server-address [options]
  ipvsadm -d virtual-service -r server-address
  ipvsadm -L|l [virtual-service] [options]
  ipvsadm -Z [virtual-service]
  ipvsadm --set tcp tcpfin udp
  ipvsadm --start-daemon {master|backup} [daemon-options]
  ipvsadm --stop-daemon {master|backup}
  ipvsadm -h

Commands:
Either long or short options are allowed.
  --add-service     -A        add virtual service with options
  --edit-service    -E        edit virtual service with options
  --delete-service  -D        delete virtual service
  --clear           -C        clear the whole table
  --restore         -R        restore rules from stdin
  --save            -S        save rules to stdout
  --add-server      -a        add real server with options
  --edit-server     -e        edit real server with options
  --delete-server   -d        delete real server
  --list            -L|-l     list the table
  --zero            -Z        zero counters in a service or all services
  --set tcp tcpfin udp        set connection timeout values
  --start-daemon              start connection sync daemon
  --stop-daemon               stop connection sync daemon
  --help            -h        display this help message

virtual-service:
  --tcp-service|-t  service-address   service-address is host[:port]
  --udp-service|-u  service-address   service-address is host[:port]
  --sctp-service    service-address   service-address is host[:port]
  --fwmark-service|-f fwmark          fwmark is an integer greater than zero

Options:
  --ipv6         -6                   fwmark entry uses IPv6
  --scheduler    -s scheduler         one of rr|wrr|lc|wlc|lblc|lblcr|dh|sh|sed|nq|fo|ovf|mh,
                                      the default scheduler is wlc.
  --pe            engine              alternate persistence engine may be sip,
                                      not set by default.
  --persistent   -p [timeout]         persistent service
  --netmask      -M netmask           persistent granularity mask
  --real-server  -r server-address    server-address is host (and port)
  --gatewaying   -g                   gatewaying (direct routing) (default)
  --ipip         -i                   ipip encapsulation (tunneling)
  --masquerading -m                   masquerading (NAT)
  --tun-type      type                one of ipip|gue|gre,
                                      the default tunnel type is ipip.
  --tun-port      port                tunnel destination port
  --tun-nocsum                        tunnel encapsulation without checksum
  --tun-csum                          tunnel encapsulation with checksum
  --tun-remcsum                       tunnel encapsulation with remote checksum
  --weight       -w weight            capacity of real server
  --u-threshold  -x uthreshold        upper threshold of connections
  --l-threshold  -y lthreshold        lower threshold of connections
  --connection   -c                   output of current IPVS connections
  --timeout                           output of timeout (tcp tcpfin udp)
  --daemon                            output of daemon information
  --stats                             output of statistics information
  --rate                              output of rate information
  --exact                             expand numbers (display exact values)
  --thresholds                        output of thresholds information
  --persistent-conn                   output of persistent connection info
  --tun-info                          output of tunnel information
  --nosort                            disable sorting output of service/server entries
  --sort                              does nothing, for backwards compatibility
  --ops          -o                   one-packet scheduling
  --numeric      -n                   numeric output of addresses and ports
  --sched-flags  -b flags             scheduler flags (comma-separated)
Daemon Options:
  --syncid sid                        syncid for connection sync (default=255)
  --sync-maxlen length                Max sync message length (default=1472)
  --mcast-interface interface         multicast interface for connection sync
  --mcast-group address               IPv4/IPv6 group (default=224.0.0.81)
  --mcast-port port                   UDP port (default=8848)
  --mcast-ttl ttl                     Multicast TTL (default=1)
管理集群服务
//语法
#下面的表格中有选项含义说明
ipvsadm -A|E -t|u|f service-address [-s scheduler][-p [timeout]][-M netmask]

//常见的service-address
  tcp:-t ip:port
  udp:-u ip:port
  fwm:-f mark

//选项-s scheduler
默认为wlc

//选项 -p [timeout]:
定义持久连接,timeout不指定时默认300妙
选项含义详情如下:
| 选项 | 含义 |
|---|---|
| -A | 添加虚拟服务器 |
| -E | 修改虚拟服务器 |
| -D | 删除虚拟服务器 |
| -C,--clear | 清除所有虚拟服务 |
| -R,--restore | 从标准输入获取ipvsadm命令。一般结合下边的-S使用。 |
| -S,--save | 从标准输出输出虚拟服务器的规则。可以将虚拟服务器的规则保存,在以后通过-R直接读入,以实现自动化配置。 |
| -L,-l,--list | 列出虚拟服务表中的所有虚拟服务。可以指定地址。添加-c显示连接表 |
| -Z,--zero | 将所有数据相关的记录清零,这些记录一般用于调度策略 |
| --set tcp tcpfin udp | 修改协议的超时时间 |
| --start-daemon state | 设置虚拟服务器的备服务器,用来实现主备服务器冗余(注:该功能只支持ipv4) |
| --stop-daemon | 停止备服务器 |
管理集群服务中的RS
//语法
#下面的表格中有选项含义说明
ipvsadm -a|e -t|u|f service-address -r server-address [-g|i|m][-w weight][-x upper][-y lower]

ipvsadm -d -t|u|f service-address-r server-address

//查看
ipvsadm -L|l[options]
#选项内容、含义
options:
  -n:numeric,基于数字格式显示地址和端口
  -c:connecion,显示当前ipvs连接
  --stats:统计数据
  --rate:输出速率信息
  --exact:显示精确值,不做单位换算
选项含义详情如下:
| 选项 | 含义 |
|---|---|
| -a | 添加真实服务器 |
| -e | 修改真实服务器 |
| -d | 删除真实服务器 |
| -r | 指定真实服务器(Real Server)的地址 |
| -m | 使用NAT模式 |
| -g | 使用DR模式 |
| -i | 使用TUN模式 |
| -h,--help | 查看帮助 |
| -t | 设置集群地址(VIP,Virtual IP) |
| -s | 指定负载调度算法 |
| -u,--udp-service service-address | 使用udp服务,其他同上 |
| -w | 为节点服务器设置权重,默认为1,权重是0~65535的整数。如果将某个真实服务器的权重设置为0,那么它不会收到新的连接,但是已有连接还会继续维持(这点和直接把某个真实服务器删除时不同的),权重值越大表示性能越好,被调度的资源也会更多 |
| -f,--fwmark-service integer | 用firewall mark取代虚拟地址来指定要被负载均衡的数据包,可以通过这个命令实现把不同地址、端口的虚拟地址整合成一个虚拟服务,可以让虚拟服务器同时截获处理去往多个不同地址的数据包。fwmark可以通过iptables命令指定。如果用在ipv6需要加上-6 |
| -p,--persistent [timeout] | 设置持久连接,这个模式可以使来自客户的多个请求被送到同一个真实服务器,通常用于ftp或者ssl中 |
| -M,--netmask netmask | 指定客户地址的子网掩码。用于将同属一个子网的客户的请求转发到相同服务器 |
| -x,--u-threshold uthreshold | 设置一个服务器可以维持的连接上限。0~65535。设置为0表示没有上限 |
| --syncid syncid | 指定syncid,同样用于主备服务器的同步 |
| --mcast-interface interface | 指定使用备服务器时候的广播接口 |
实例部署
情景一:NAT模式负载均衡
搭建HTTP负载均衡(NAT模式)
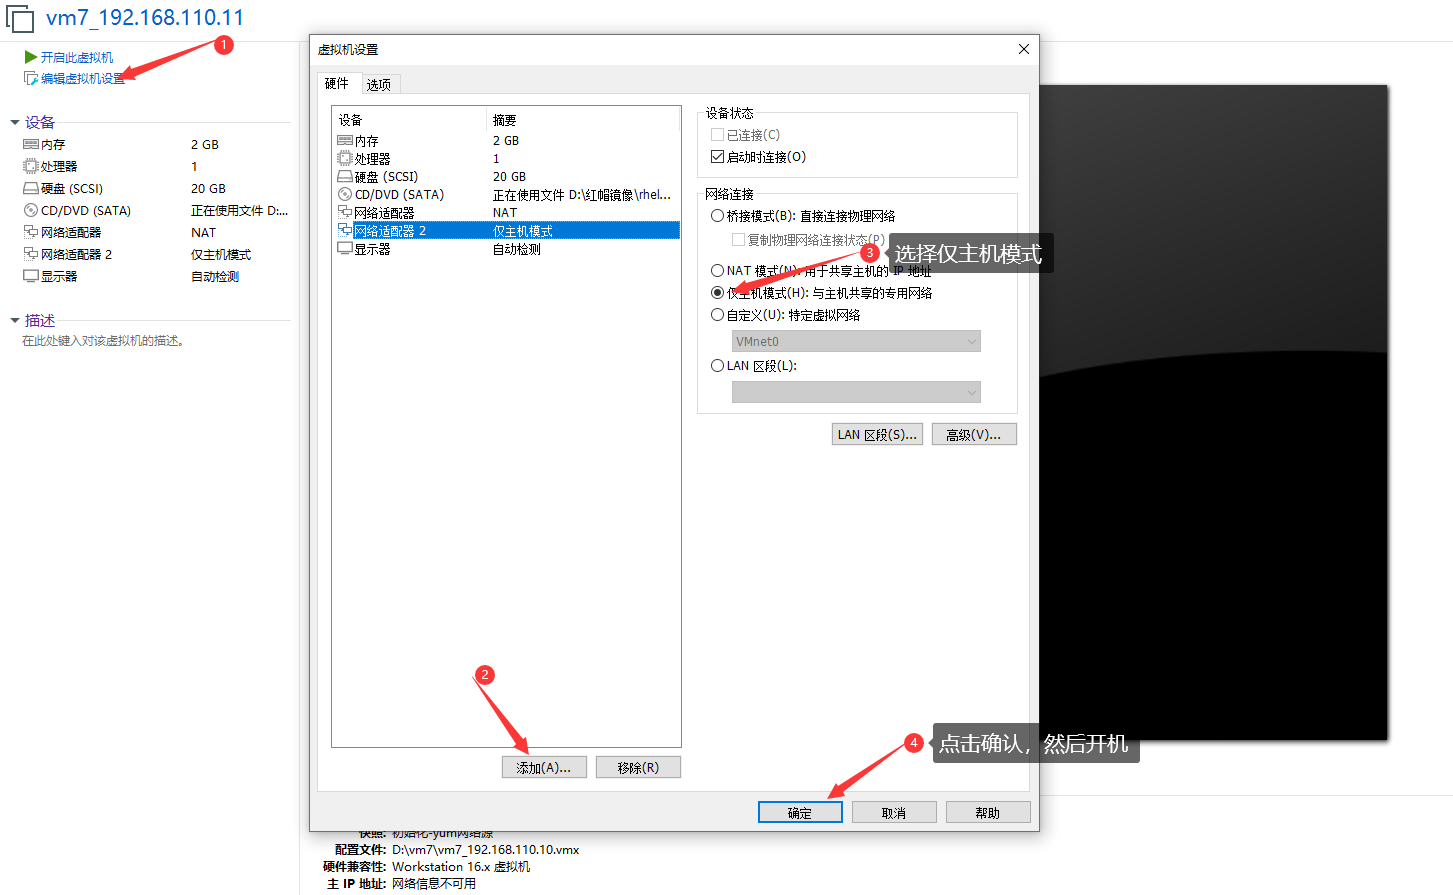
搭建NAT模式负载均衡步骤:
- 需要两张不同模式的网卡(添加一个仅主机模式的网卡)
- 配置IP地址:
DR端:DIP、VIP
RS端:RIP
-
开启的DR的IP转发功能
-
在DR端添加并保存规则
ipvsadm -A -t vip:port -s rr
ipvsadm -a -t vip:prot -r rip -m
ipvsadm -S > /etc/sysconfig/ipvsadm
环境说明:
| 主机名称 | 网卡信息(ens160 NAT模式;ens192仅主机模式) | 需要安装的应用 | 系统版本 |
|---|---|---|---|
| client | 192.168.110.60(ens160) | 无 | redhat 8 |
| DR | DIP:192.168.110.11(ens160) --- VIP:192.168.72.250(ens192) | ipvsadm | redhat 8 |
| RS1 | RIP:192.168.110.12(ens160) --- gw:192.168.110.11 | httpd | redhat 8 |
| RS2 | RIP:192.168.110.13(ens160) --- gw:192.168.110.11 | httpd | redhat 8 |
准备工作:
注意:NAT模式调度器(DR)上要保证有两个不同类型的网卡
这里我们添加一个仅主机模式的网卡
//DR
#关闭防火墙,关闭selinux,设置开启开机不自启动
[root@DR ~]# systemctl disable --now firewalld
Removed /etc/systemd/system/multi-user.target.wants/firewalld.service.
Removed /etc/systemd/system/dbus-org.fedoraproject.FirewallD1.service.
[root@DR ~]# sed -i "s/SELINUX=enforcing/SELINUX=disabled/g" /etc/selinux/config
[root@DR ~]# setenforce 0
#安装ipvsadm应用
[root@DR ~]# yum -y install ipvsadm

//RS1
#关闭防火墙,关闭selinux,设置开启开机不自启动
[root@RS1 ~]# systemctl disable --now firewalld
Removed /etc/systemd/system/multi-user.target.wants/firewalld.service.
Removed /etc/systemd/system/dbus-org.fedoraproject.FirewallD1.service.
[root@RS1 ~]#  sed -i "s/SELINUX=enforcing/SELINUX=disabled/g" /etc/selinux/config
[root@RS1 ~]# setenforce 0
#安装httpd服务
[root@RS1 ~]# yum -y install httpd
#设置httpd开机自启动
[root@RS1 ~]# systemctl enable --now httpd
Created symlink /etc/systemd/system/multi-user.target.wants/httpd.service → /usr/lib/systemd/system/httpd.service.

//RS2
#关闭防火墙,关闭selinux,设置开启开机不自启动
[root@RS2 ~]# systemctl disable --now firewalld
Removed /etc/systemd/system/multi-user.target.wants/firewalld.service.
Removed /etc/systemd/system/dbus-org.fedoraproject.FirewallD1.service.
[root@RS2 ~]#  sed -i "s/SELINUX=enforcing/SELINUX=disabled/g" /etc/selinux/config
[root@RS2 ~]# setenforce 0
#安装httpd服务
[root@RS2 ~]# yum -y install httpd
#设置httpd开机自启动
[root@RS2 ~]# systemctl enable --now httpd
Created symlink /etc/systemd/system/multi-user.target.wants/httpd.service → /usr/lib/systemd/system/httpd.service.
开始部署
查看DR的网卡信息
[root@DR ~]# ip a
1: lo: <LOOPBACK,UP,LOWER_UP> mtu 65536 qdisc noqueue state UNKNOWN group default qlen 1000
    link/loopback 00:00:00:00:00:00 brd 00:00:00:00:00:00
    inet 127.0.0.1/8 scope host lo
       valid_lft forever preferred_lft forever
    inet6 ::1/128 scope host
       valid_lft forever preferred_lft forever
2: ens160: <BROADCAST,MULTICAST,UP,LOWER_UP> mtu 1500 qdisc fq_codel state UP group default qlen 1000
    link/ether 00:0c:29:ea:5b:7a brd ff:ff:ff:ff:ff:ff
    inet 192.168.110.11/24 brd 192.168.110.255 scope global noprefixroute ens160
       valid_lft forever preferred_lft forever
    inet6 fe80::20c:29ff:feea:5b7a/64 scope link
       valid_lft forever preferred_lft forever
3: ens192: <BROADCAST,MULTICAST,UP,LOWER_UP> mtu 1500 qdisc fq_codel state UP group default qlen 1000
    link/ether 00:0c:29:ea:5b:84 brd ff:ff:ff:ff:ff:ff
    inet 192.168.72.130/24 brd 192.168.72.255 scope global dynamic noprefixroute ens192
       valid_lft 1526sec preferred_lft 1526sec
    inet6 fe80::1ec:69c4:6c00:a8a2/64 scope link noprefixroute
       valid_lft forever preferred_lft forever
配置DR端的网络环境
//DR
#配置DIP
[root@DR ~]# vim /etc/sysconfig/network-scripts/ifcfg-ens160
TYPE=Ethernet
BOOTPROTO=static
NAME=ens160
DEVICE=ens160
ONBOOT=yes
IPADDR=192.168.110.11
PREFIX=24
DNS1=114.114.114.114

#配置VIP
[root@DR ~]# vim /etc/sysconfig/network-scripts/ifcfg-ens192
TYPE=Ethernet
BOOTPROTO=static
NAME=ens192
DEVICE=ens192
ONBOOT=yes
IPADDR=192.168.72.250
PREFIX=24
DNS1=114.114.114.114

#重启网卡服务
[root@DR ~]# systemctl restart NetworkManager

[root@DR ~]# ifdown ens160;ifup ens160
Connection 'ens160' successfully deactivated (D-Bus active path: /org/freedesktop/NetworkManager/ActiveConnection/1)
Connection successfully activated (D-Bus active path: /org/freedesktop/NetworkManager/ActiveConnection/3)

[root@DR ~]# ifdown ens192;ifup ens192
Error: '/etc/sysconfig/network-scripts/ifcfg-ens192' is not an active connection.
Error: no active connection provided.
Connection successfully activated (D-Bus active path: /org/freedesktop/NetworkManager/ActiveConnection/4)

#查看网卡信息,已经修改成功
[root@DR ~]# ip a
1: lo: <LOOPBACK,UP,LOWER_UP> mtu 65536 qdisc noqueue state UNKNOWN group default qlen 1000
    link/loopback 00:00:00:00:00:00 brd 00:00:00:00:00:00
    inet 127.0.0.1/8 scope host lo
       valid_lft forever preferred_lft forever
    inet6 ::1/128 scope host
       valid_lft forever preferred_lft forever
2: ens160: <BROADCAST,MULTICAST,UP,LOWER_UP> mtu 1500 qdisc fq_codel state UP group default qlen 1000
    link/ether 00:0c:29:ea:5b:7a brd ff:ff:ff:ff:ff:ff
    inet 192.168.110.11/24 brd 192.168.110.255 scope global noprefixroute ens160
       valid_lft forever preferred_lft forever
    inet6 fe80::20c:29ff:feea:5b7a/64 scope link
       valid_lft forever preferred_lft forever
3: ens192: <BROADCAST,MULTICAST,UP,LOWER_UP> mtu 1500 qdisc fq_codel state UP group default qlen 1000
    link/ether 00:0c:29:ea:5b:84 brd ff:ff:ff:ff:ff:ff
    inet 192.168.72.250/24 brd 192.168.72.255 scope global noprefixroute ens192
       valid_lft forever preferred_lft forever
    inet6 fe80::20c:29ff:feea:5b84/64 scope link
       valid_lft forever preferred_lft forever
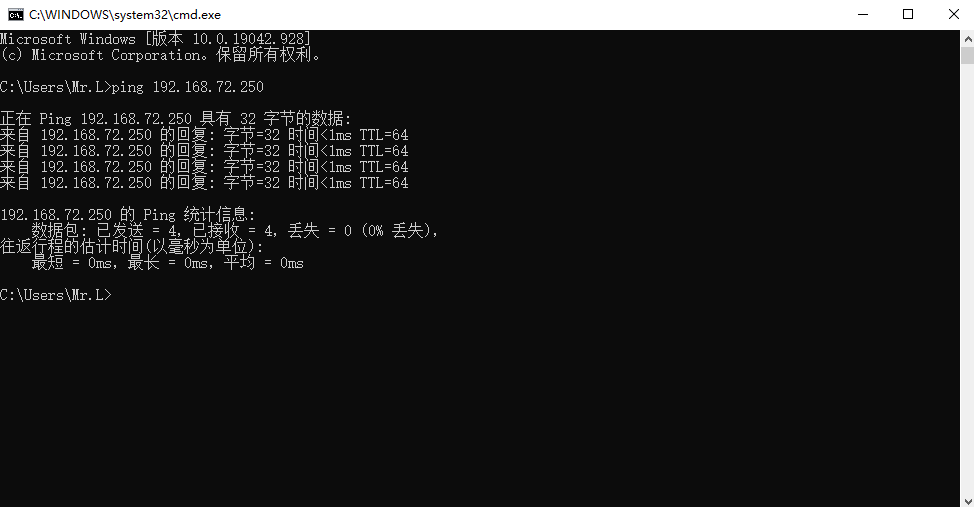
测试是否可以在本机ping通
配置RS端的网络环境
//RS1
#RS1的网关指定为DR的DIP
[root@RS1 ~]# vim /etc/sysconfig/network-scripts/ifcfg-ens160
TYPE=Ethernet
BOOTPROTO=static
NAME=ens160
DEVICE=ens160
ONBOOT=yes
IPADDR=192.168.110.12
PREFIX=24
GATEWAY=192.168.110.11   //指定为DR的DIP
DNS1=114.114.114.114
#重启网卡服务
[root@RS1 ~]# nmcli c reload
[root@RS1 ~]# nmcli c up ens160
Connection successfully activated (D-Bus active path: /org/freedesktop/NetworkManager/ActiveConnection/4)

//RS2
#RS2的网关指定为DR的DIP
[root@RS2 ~]# vim /etc/sysconfig/network-scripts/ifcfg-ens160
TYPE=Ethernet
BOOTPROTO=static
NAME=ens160
DEVICE=ens160
ONBOOT=yes
IPADDR=192.168.110.13
PREFIX=24
GATEWAY=192.168.110.11
DNS1=114.114.114.114
#重启网卡服务
[root@RS2 ~]# nmcli c reload
[root@RS2 ~]# nmcli c up ens160
Connection successfully activated (D-Bus active path: /org/freedesktop/NetworkManager/ActiveConnection/5)
开启IP转发功能
配置NAT模式下的ip转发,让通过Load Balancer的ip包能够转发到真正提供服务的Real Server之上进行处理
//DR
#编辑sysctl.conf文件
[root@RS2 ~]# echo "net.ipv4.ip_forward = 1" >> /etc/sysctl.conf
[root@RS2 ~]# cat /etc/sysctl.conf
# sysctl settings are defined through files in
# /usr/lib/sysctl.d/, /run/sysctl.d/, and /etc/sysctl.d/.
#
# Vendors settings live in /usr/lib/sysctl.d/.
# To override a whole file, create a new file with the same in
# /etc/sysctl.d/ and put new settings there. To override
# only specific settings, add a file with a lexically later
# name in /etc/sysctl.d/ and put new settings there.
#
# For more information, see sysctl.conf(5) and sysctl.d(5).
net.ipv4.ip_forward = 1

[root@RS2 ~]# sysctl -p
net.ipv4.ip_forward = 1
添加调度器并保存规则
//DR
#添加调度器
[root@DR ~]# ipvsadm -A -t 192.168.72.250:80 -s rr

#添加跳转的IP地址规则
[root@DR ~]# ipvsadm -a -t 192.168.72.250:80 -r 192.168.110.12:80 -m
[root@DR ~]# ipvsadm -a -t 192.168.72.250:80 -r 192.168.110.13:80 -m
[root@DR ~]# ipvsadm -Ln
IP Virtual Server version 1.2.1 (size=4096)
Prot LocalAddress:Port Scheduler Flags
  -> RemoteAddress:Port           Forward Weight ActiveConn InActConn
TCP  192.168.72.250:80 rr
  -> 192.168.110.12:80            Masq    1      0          0
  -> 192.168.110.13:80            Masq    1      0          0

#保存规则
[root@DR ~]# ipvsadm -Sn > /etc/sysconfig/ipvsadm

#查看规则
[root@DR ~]# cat /etc/sysconfig/ipvsadm
-A -t 192.168.72.250:80 -s rr
-a -t 192.168.72.250:80 -r 192.168.110.12:80 -m -w 1
-a -t 192.168.72.250:80 -r 192.168.110.13:80 -m -w 1
访问测试
//RS1
#为了更加方便的查看效果,添加一个测试网页
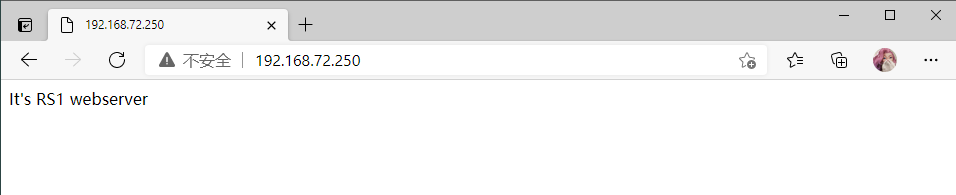
[root@RS1 ~]# echo "It's RS1 webserver" > /var/www/html/index.html
[root@RS1 ~]# curl localhost
It's RS1 webserver
//RS2
#为了更加方便的查看效果,添加一个测试网页
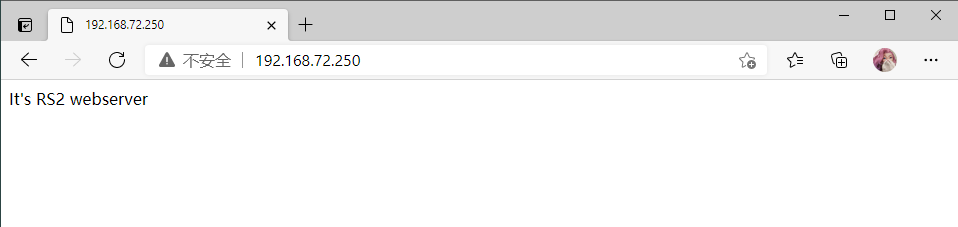
[root@RS2 ~]# echo "It's RS2 webserver" > /var/www/html/index.html
[root@RS2 ~]# curl localhost
It's RS2 webserver
//client
#开始访问
[root@DR ~]# curl 192.168.72.250
It's RS2 webserver
[root@DR ~]# curl 192.168.72.250
It's RS1 webserver
[root@DR ~]# curl 192.168.72.250
It's RS2 webserver
[root@DR ~]# curl 192.168.72.250
It's RS1 webserver
//DR
#测试清空规则后,重读规则是否可以成功访问
[root@DR ~]# ipvsadm -C
[root@DR ~]# ipvsadm -Ln
IP Virtual Server version 1.2.1 (size=4096)
Prot LocalAddress:Port Scheduler Flags
-> RemoteAddress:Port Forward Weight ActiveConn InActConn
[root@DR ~]# ipvsadm -R < /etc/sysconfig/ipvsadm
[root@DR ~]# ipvsadm -Ln
IP Virtual Server version 1.2.1 (size=4096)
Prot LocalAddress:Port Scheduler Flags
-> RemoteAddress:Port Forward Weight ActiveConn InActConn
TCP 192.168.72.250:80 rr
-> 192.168.110.12:80 Masq 1 0 0
-> 192.168.110.13:80 Masq 1 0 0
//client
#成功访问
[root@client ~]# curl 192.168.72.250
It's RS2 webserver
[root@client ~]# curl 192.168.72.250
It's RS1 webserver
[root@client ~]# curl 192.168.72.250
It's RS2 webserver
[root@client ~]# curl 192.168.72.250
It's RS1 webserver
网页测试
RS1
RS2
搭建HTTP负载均衡(NAT模式)
准备工作:
实验环境如上不变
//RS1
#配置本地源,因为上面修改了网卡信息,这里需要使用本地源装包
[root@RS1 ~]# mount /dev/cdrom /mnt/
mount: /mnt: WARNING: device write-protected, mounted read-only.
[root@RS1 ~]# cd /etc/yum.repos.d/
[root@RS1 yum.repos.d]# rm -f *
[root@RS1 yum.repos.d]# vi xx.repo
[BaseOS]
name=baseos
baseurl=file:///mnt/BaseOS
enabled=1
gpgcheck=0
[AppStream]
name=appstream
baseurl=file:///mnt/AppStream
enabled=1
gpgcheck=0

//RS2
#配置本地源,因为上面修改了网卡信息,这里需要使用本地源装包
[root@RS2 ~]# mount /dev/cdrom /mnt/
mount: /mnt: WARNING: device write-protected, mounted read-only.
[root@RS2 ~]# cd /etc/yum.repos.d/
[root@RS2 yum.repos.d]# rm -f *
[root@RS2 yum.repos.d]# vi xx.repo
[BaseOS]
name=baseos
baseurl=file:///mnt/BaseOS
enabled=1
gpgcheck=0
[AppStream]
name=appstream
baseurl=file:///mnt/AppStream
enabled=1
gpgcheck=0
开始部署
在DR服务器搭建CA服务器
//DR
#生成一对密钥
[root@DR ~]# mkdir -p /etc/pki/CA/private
[root@DR ~]# cd /etc/pki/CA
[root@DR CA]# (umask 077;openssl genrsa -out private/cakey.pem 2048)
Generating RSA private key, 2048 bit long modulus (2 primes)
.........................................+++++
....................................+++++
e is 65537 (0x010001)
[root@DR CA]# openssl rsa -in private/cakey.pem -pubout
writing RSA key
-----BEGIN PUBLIC KEY-----
MIIBIjANBgkqhkiG9w0BAQEFAAOCAQ8AMIIBCgKCAQEA4wAMYLm1DLgztV9z3+Fa
WXxCVVLdl3nMoAIG6DHjLn58VSqZss1tW4stl2/02inc/40/MuMeEZ6twWLH3DpG
iVKUuDmHJXOtB7qST+Xe85bcN7asdtdQav0QCuOhMP9id38PzfWLX5Y/rTyys5ed
/+v1S33MJ/XeTGMUFRKn2K4KveyYuRV8mvKimJWh9ha0rawJ/Zx3BPPcbSoV1WNG
t1v2t8a5QjqyeXdtDaFQI7z5U/5iy7hqljiF9bC1WHnD7leDlfDX/mX1b7VsRdUC
5ZI9/6dJ3pGkIYQpJIhDMVzO9HWM2wlYhZ6RvKZ81ayN2kBsVPmXZ5MQTp/yD7eq
3QIDAQAB
-----END PUBLIC KEY-----

#生成自签署证书
[root@DR CA]# openssl req -new -x509 -key private/cakey.pem -out cacert.pem -days 1024
You are about to be asked to enter information that will be incorporated
into your certificate request.
What you are about to enter is what is called a Distinguished Name or a DN.
There are quite a few fields but you can leave some blank
For some fields there will be a default value,
If you enter '.', the field will be left blank.
-----
Country Name (2 letter code) [XX]:CN
State or Province Name (full name) []:HB
Locality Name (eg, city) [Default City]:WH
Organization Name (eg, company) [Default Company Ltd]:ldaz
Organizational Unit Name (eg, section) []:ldaz
Common Name (eg, your name or your server's hostname) []:ldaz
Email Address []:1@2.com
[root@DR CA]# touch index.txt && echo 01 > serial

//RS1
#RS1生成证书签署请求,并发送给CA
[root@RS1 ~]# yum -y install mod_ssl
[root@RS1 ~]# mkdir /etc/httpd/ssl
[root@RS1 ~]# cd /etc/httpd/ssl
[root@RS1 ssl]# (umask 077;openssl genrsa -out httpd.key 2048)
Generating RSA private key, 2048 bit long modulus (2 primes)
.........................................................................................+++++
...........+++++
e is 65537 (0x010001)
[root@RS1 ssl]# openssl req -new -key httpd.key -days 1024 -out httpd.csr
Ignoring -days; not generating a certificate
You are about to be asked to enter information that will be incorporated
into your certificate request.
What you are about to enter is what is called a Distinguished Name or a DN.
There are quite a few fields but you can leave some blank
For some fields there will be a default value,
If you enter '.', the field will be left blank.
-----
Country Name (2 letter code) [XX]:CN
State or Province Name (full name) []:HB
Locality Name (eg, city) [Default City]:WH
Organization Name (eg, company) [Default Company Ltd]:ldaz
Organizational Unit Name (eg, section) []:ldaz
Common Name (eg, your name or your server's hostname) []:ldaz
Email Address []:1@2.com

Please enter the following 'extra' attributes
to be sent with your certificate request
A challenge password []:(直接回车)
An optional company name []:(直接回车)

#把证书签署请求文件发送给CA
[root@RS1 ssl]# scp httpd.csr root@192.168.110.11:/root/
The authenticity of host '192.168.110.11 (192.168.110.11)' can't be established.
ECDSA key fingerprint is SHA256:7Kqh1XILaVXU3uGikQSF3V6RXoZB9X5zyLVPDzfyaus.
Are you sure you want to continue connecting (yes/no/[fingerprint])? yes
Warning: Permanently added '192.168.110.11' (ECDSA) to the list of known hosts.
root@192.168.110.11's password:
httpd.csr
[root@RS1 ssl]# ls
httpd.csr  httpd.key

//DR
#在DR上查看
[root@DR ~]# ls
anaconda-ks.cfg  httpd.csr

#CA签署证书并发给RS1
[root@DR ~]# mkdir /etc/pki/CA/newcerts
[root@DR ~]# touch /etc/pki/CA/index.txt

#跟踪最后一次颁发证书的序列号
[root@DR ~]# echo "01" > /etc/pki/CA/serial
[root@DR ~]# openssl ca -in httpd.csr -out httpd.crt -days 1024
Using configuration from /etc/pki/tls/openssl.cnf
Check that the request matches the signature
Signature ok
Certificate Details:
        Serial Number: 1 (0x1)
        Validity
            Not Before: May  9 08:49:03 2021 GMT
            Not After : Feb 27 08:49:03 2024 GMT
        Subject:
            countryName               = CN
            stateOrProvinceName       = HB
            organizationName          = ldaz
            organizationalUnitName    = ldaz
            commonName                = ldaz
            emailAddress              = 1@2.com
        X509v3 extensions:
            X509v3 Basic Constraints:
                CA:FALSE
            Netscape Comment:
                OpenSSL Generated Certificate
            X509v3 Subject Key Identifier:
                13:45:39:AF:6F:97:C1:79:BE:E4:B2:B8:81:61:96:54:0B:BC:B5:3C
            X509v3 Authority Key Identifier:
                keyid:B6:5A:51:56:14:38:FA:32:65:76:64:31:94:D9:29:EA:5F:2C:E4:99

Certificate is to be certified until Feb 27 08:49:03 2024 GMT (1024 days)
Sign the certificate? [y/n]:y


1 out of 1 certificate requests certified, commit? [y/n]y
Write out database with 1 new entries
Data Base Updated
[root@DR ~]# ls
anaconda-ks.cfg  httpd.crt  httpd.csr

#CA把签署的证书httpd.crt和服务端的证书cacert.pem发给RS1
[root@DR ~]# scp httpd.crt root@192.168.110.12:/etc/httpd/ssl
[root@DR ~]# scp /etc/pki/CA/cacert.pem root@192.168.110.12:/etc/httpd/ssl
配置https
//RS2
#安装mod_ssl,创建目录
[root@RS2 ~]# yum -y install mod_ssl
[root@RS2 ~]# mkdir /etc/httpd/ssl

//RS1
#把RS1的证书和密钥发送给RS2
[root@RS1 ~]# cd /etc/httpd/ssl/
[root@RS1 ssl]# scp cacert.pem httpd.crt httpd.key root@192.168.110.13:/etc/httpd/ssl
The authenticity of host '192.168.110.13 (192.168.110.13)' can't be established.
ECDSA key fingerprint is SHA256:+UR5bwjFNEKZsJ+X/qSSsMGCvtq5ByludUEL47JqwoU.
Are you sure you want to continue connecting (yes/no/[fingerprint])? yes
Warning: Permanently added '192.168.110.13' (ECDSA) to the list of known hosts.
root@192.168.110.13's password:
cacert.pem                                        100% 1350     1.5MB/s   00:00
httpd.crt                                         100% 4489     3.7MB/s   00:00
httpd.key                                         100% 1675     2.6MB/s   00:00

//RS2
#查看
[root@RS2 ~]# ls /etc/httpd/ssl/
cacert.pem  httpd.crt  httpd.key
修改https配置文件
//RS1
#修改配置文件
[root@RS1 ~]# vim /etc/httpd/conf.d/ssl.conf
...
SSLCertificateFile /etc/httpd/ssl/httpd.crt    //修改路径
...
SSLCertificateKeyFile /etc/httpd/ssl/httpd.key    //修改路径
...
SSLCACertificateFile /etc/httpd/ssl/cacert.pem    //添加此行

#重启服务
[root@RS1 ~]# systemctl restart httpd
[root@RS1 ~]# ss -antl
State     Recv-Q     Send-Q         Local Address:Port         Peer Address:Port
LISTEN    0          128                  0.0.0.0:22                0.0.0.0:*
LISTEN    0          128                  0.0.0.0:443               0.0.0.0:*
LISTEN    0          128                  0.0.0.0:80                0.0.0.0:*
LISTEN    0          128                     [::]:22                   [::]:*

//RS2
#修改配置文件
[root@RS2 ~]# vim /etc/httpd/conf.d/ssl.conf
...
SSLCertificateFile /etc/httpd/ssl/httpd.crt    //修改路径
...
SSLCertificateKeyFile /etc/httpd/ssl/httpd.key    //修改路径
...
SSLCACertificateFile /etc/httpd/ssl/cacert.pem    //添加此行

#重启服务
[root@RS2 ~]# systemctl restart httpd
[root@RS2 ~]# ss -antl
State     Recv-Q     Send-Q         Local Address:Port         Peer Address:Port
LISTEN    0          128                  0.0.0.0:22                0.0.0.0:*
LISTEN    0          128                  0.0.0.0:443               0.0.0.0:*
LISTEN    0          128                  0.0.0.0:80                0.0.0.0:*
LISTEN    0          128                     [::]:22                   [::]:*
添加调度器并保存规则
//DR
#添加调度器
[root@DR ~]# ipvsadm -A -t 192.168.72.250:443 -s rr

#添加跳转的IP地址规则
[root@DR ~]# ipvsadm -a -t 192.168.72.250:443 -r 192.168.110.12 -m
[root@DR ~]# ipvsadm -a -t 192.168.72.250:443 -r 192.168.110.13 -m
[root@DR ~]# ipvsadm -Ln
IP Virtual Server version 1.2.1 (size=4096)
Prot LocalAddress:Port Scheduler Flags
  -> RemoteAddress:Port           Forward Weight ActiveConn InActConn
TCP  192.168.72.250:80 rr
  -> 192.168.110.12:80            Masq    1      0          0
  -> 192.168.110.13:80            Masq    1      0          0
TCP  192.168.72.250:443 rr
  -> 192.168.110.12:443           Masq    1      0          0
  -> 192.168.110.13:443           Masq    1      0          0

#保存规则
[root@DR ~]# ipvsadm -Sn > /etc/sysconfig/ipvsadm

#查看规则
[root@DR ~]# cat /etc/sysconfig/ipvsadm
-A -t 192.168.72.250:80 -s rr
-a -t 192.168.72.250:80 -r 192.168.110.12:80 -m -w 1
-a -t 192.168.72.250:80 -r 192.168.110.13:80 -m -w 1
-A -t 192.168.72.250:443 -s rr
-a -t 192.168.72.250:443 -r 192.168.110.12:443 -m -w 1
-a -t 192.168.72.250:443 -r 192.168.110.13:443 -m -w 1
访问测试
//client
#成功访问
[root@client ~]# curl -k https://192.168.72.250
It's RS2 webserver
[root@client ~]# curl -k https://192.168.72.250
It's RS1 webserver
[root@client ~]# curl -k https://192.168.72.250
It's RS2 webserver
[root@client ~]# curl -k https://192.168.72.250
It's RS1 webserver
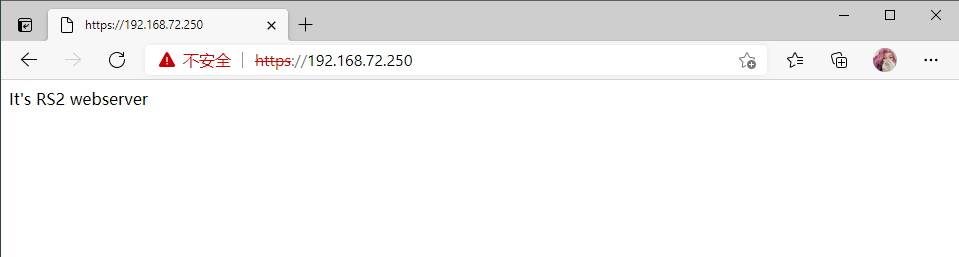
网页测试
RS1

RS2
情景二:DR模式负载均衡
搭建HTTP负载均衡(DR模式)
环境说明:
| 主机名称 | DIP | VIP | 需要安装的应用 | 系统版本 |
|---|---|---|---|---|
| client | 192.168.100.2 | / | / | redhat 8 |
| DR | 192.168.100.3 | 192.168.222.250 | ipvsadm | redhat 8 |
| RS1 | 192.168.100.4 | / | httpd | redhat 8 |
| RS2 | 192.168.100.5 | / | httpd | redhat 8 |
准备工作:
删除默认网关,所以需要使用yum本地源仓库
//DR
#关闭防火墙,关闭selinux,设置开启开机不自启动
systemctl disable --now firewalld
sed -i "s/SELINUX=enforcing/SELINUX=disabled/g" /etc/selinux/config
setenforce 0

#安装ipvsadm应用
[root@DR ~]# yum -y install ipvsadm

#配置VIP
[root@DR ~]# ip addr add 192.168.100.250/32 dev ens160
[root@DR ~]# ip a
2: ens160: <BROADCAST,MULTICAST,UP,LOWER_UP> mtu 1500 qdisc fq_codel state UP group default qlen 1000
    link/ether 00:0c:29:56:9e:92 brd ff:ff:ff:ff:ff:ff
    inet 192.168.100.3/24 brd 192.168.100.255 scope global noprefixroute ens160
       valid_lft forever preferred_lft forever
    inet 192.168.100.250/32 scope global ens160
       valid_lft forever preferred_lft forever
    inet6 fe80::20c:29ff:fe56:9e92/64 scope link
       valid_lft forever preferred_lft forever

//RS1
#关闭防火墙,关闭selinux,设置开启开机不自启动
systemctl disable --now firewalld
sed -i "s/SELINUX=enforcing/SELINUX=disabled/g" /etc/selinux/config
setenforce 0

#安装ipvsadm,httpd应用
[root@RS1 ~]# yum -y install httpd net-tools

#设置httpd开机自启,创建测试网页
[root@RS1 ~]# systemctl enable --now httpd
[root@RS1 ~]# echo RS1 > /var/www/html/index.html

//RS2
#关闭防火墙,关闭selinux,设置开启开机不自启动
systemctl disable --now firewalld
sed -i "s/SELINUX=enforcing/SELINUX=disabled/g" /etc/selinux/config
setenforce 0

#安装ipvsadm,httpd应用
[root@RS2 ~]# yum -y install httpd net-tools

#设置httpd开机自启,创建测试网页
[root@RS2 ~]# systemctl enable --now httpd
[root@RS2 ~]# echo RS2 > /var/www/html/index.html
开始部署
配置RS端服务器
//RS1
[root@RS1 ~]# vim /etc/sysctl.conf
# 在最后面插入如下两行
net.ipv4.conf.all.arp_ignore = 1	# 将对应网卡设置为只回应目标IP为自身接口地址的ARP请求
net.ipv4.conf.all.arp_announce = 2	# 将ARP请求的源IP设置为eth0上的IP,也就是RIP

[root@RS1 ~]# sysctl -p
net.ipv4.conf.all.arp_ignore = 1
net.ipv4.conf.all.arp_announce = 2

//RS2
[root@RS2 ~]# vim /etc/sysctl.conf
# 在最后面插入如下两行
net.ipv4.conf.all.arp_ignore = 1
net.ipv4.conf.all.arp_announce = 2

[root@RS2 ~]# sysctl -p
net.ipv4.conf.all.arp_ignore = 1
net.ipv4.conf.all.arp_announce = 2
配置VIP
一定要先设置好内核参数在配置VIP,如果先配置VIP,VIP配置好后会立即通告给所有人,而修改内核参数就是为了不通告
//RS1
[root@RS1 ~]# ip addr add 192.168.100.250/32 dev ens160
[root@RS1 ~]# ip a
2: ens160: <BROADCAST,MULTICAST,UP,LOWER_UP> mtu 1500 qdisc fq_codel state UP group default qlen 1000
    link/ether 00:0c:29:61:17:d4 brd ff:ff:ff:ff:ff:ff
    inet 192.168.100.4/24 brd 192.168.100.255 scope global noprefixroute ens160
       valid_lft forever preferred_lft forever
    inet 192.168.100.250/32 scope global ens160
       valid_lft forever preferred_lft forever
    inet6 fe80::20c:29ff:fe61:17d4/64 scope link
       valid_lft forever preferred_lft forever

//RS2
[root@RS2 ~]# ip addr add 192.168.100.250/32 dev ens160
[root@RS2 ~]# ip a
2: ens160: <BROADCAST,MULTICAST,UP,LOWER_UP> mtu 1500 qdisc fq_codel state UP group default qlen 1000
    link/ether 00:0c:29:24:c8:11 brd ff:ff:ff:ff:ff:ff
    inet 192.168.100.5/24 brd 192.168.100.255 scope global noprefixroute ens160
       valid_lft forever preferred_lft forever
    inet 192.168.100.250/32 scope global ens160
       valid_lft forever preferred_lft forever
    inet6 fe80::20c:29ff:fe24:c811/64 scope link
       valid_lft forever preferred_lft forever
配置路由信息
//RS1
[root@RS1 ~]# route add -host 192.168.100.250/32 dev ens160
[root@RS1 ~]# echo '192.168.100.250/32 via 192.168.100.3' > /etc/sysconfig/network-Sncripts/route-ens160

//RS2
[root@RS2 ~]# route add -host 192.168.100.250/32 dev ens160
[root@RS2 ~]# echo '192.168.100.250/32 via 192.168.100.3' > /etc/sysconfig/network-Sncripts/route-ens160
添加并保存规则
//DR
[root@DR ~]# ipvsadm -A -t 192.168.100.250:80 -s wrr
[root@DR ~]# ipvsadm -a -t 192.168.100.250:80 -r 192.168.100.4 -g
[root@DR ~]# ipvsadm -a -t 192.168.100.250:80 -r 192.168.100.5 -g

[root@DR ~]# ipvsadm -Ln
IP Virtual Server version 1.2.1 (size=4096)
Prot LocalAddress:Port Scheduler Flags
  -> RemoteAddress:Port           Forward Weight ActiveConn InActConn
TCP  192.168.100.250:80 wrr
  -> 192.168.100.4:80             Route   1      0          0
  -> 192.168.100.5:80             Route   1      0          0

[root@DR ~]# ipvsadm -Sn > /etc/sysconfig/ipvsadm
[root@DR ~]# systemctl enable --now ipvsadm
client上访问测试
//client
[root@client ~]# curl 192.168.100.250
RS2
[root@client ~]# curl 192.168.100.250
RS1
[root@client ~]# curl 192.168.100.250
RS2
[root@client ~]# curl 192.168.100.250
RS1
[root@client ~]# curl 192.168.100.250
RS2
[root@client ~]# curl 192.168.100.250
RS1
搭建HTTPS负载均衡(DR模式)
注意:在以上配置基础下搭建https
安装mod_ssl,开启https
//RS1和RS2
#安装mod_ssl
[root@RS1 ~]# yum -y install mod_ssl
[root@RS2 ~]# yum -y install mod_ssl

#这里就不做证书,使用默认的证书,重启服务查看443是否启动
[root@RS1 ~]# systemctl restart httpd
[root@RS2 ~]# systemctl restart httpd

# 443端口已经起来
[root@RS1 ~]# ss -antl
State       Recv-Q      Send-Q           Local Address:Port             Peer Address:Port
LISTEN      0           128                    0.0.0.0:22                    0.0.0.0:*
LISTEN      0           128                          *:80                          *:*
LISTEN      0           128                       [::]:22                       [::]:*
LISTEN      0           128                          *:443                         *:*

[root@RS2 ~]# ss -antl
State       Recv-Q      Send-Q           Local Address:Port             Peer Address:Port
LISTEN      0           128                    0.0.0.0:22                    0.0.0.0:*
LISTEN      0           128                          *:80                          *:*
LISTEN      0           128                       [::]:22                       [::]:*
LISTEN      0           128                          *:443                         *:*
添加并保存规则
//DR
[root@DR ~]# ipvsadm -C
[root@DR ~]# ipvsadm -A -t 192.168.100.250:443 -s wrr
[root@DR ~]# ipvsadm -a -t 192.168.100.250:443 -r 192.168.100.4 -g
[root@DR ~]# ipvsadm -a -t 192.168.100.250:443 -r 192.168.100.5 -g
[root@DR ~]# ipvsadm -Ln
IP Virtual Server version 1.2.1 (size=4096)
Prot LocalAddress:Port Scheduler Flags
  -> RemoteAddress:Port           Forward Weight ActiveConn InActConn
TCP  192.168.100.250:443 wrr
  -> 192.168.100.4:443            Route   1      0          0
  -> 192.168.100.5:443            Route   1      0          0

[root@DR ~]# ipvsadm -Sn > /etc/sysconfig/ipvsadm
client上访问测试
//client
[root@client ~]# curl -k https://192.168.100.250
RS2
[root@client ~]# curl -k https://192.168.100.250
RS1
[root@client ~]# curl -k https://192.168.100.250
RS2
[root@client ~]# curl -k https://192.168.100.250
RS1
[root@client ~]# curl -k https://192.168.100.250
RS2
[root@client ~]# curl -k https://192.168.100.250
Rs1