虽然现在慢慢在流行前后端分离开发,但是据松哥所了解到的,还是有一些公司在做前后端不分的开发,而在前后端不分的开发中,我们就会需要后端页面模板(实际上,即使前后端分离,也会在一些场景下需要使用页面模板,例如邮件发送模板)。
早期的 Spring Boot 中还支持使用 Velocity 作为页面模板,现在的 Spring Boot 中已经不支持 Velocity 了,页面模板主要支持 Thymeleaf 和 Freemarker ,当然,作为 Java 最最基本的页面模板 Jsp ,Spring Boot 也是支持的,只是使用比较麻烦。
松哥打算用三篇文章分别向大家介绍一下这三种页面模板技术。
今天我们主要来看看 Thymeleaf 在 Spring Boot 中的整合!
Thymeleaf 简介
Thymeleaf 是新一代 Java 模板引擎,它类似于 Velocity、FreeMarker 等传统 Java 模板引擎,但是与传统 Java 模板引擎不同的是,Thymeleaf 支持 HTML 原型。
它既可以让前端工程师在浏览器中直接打开查看样式,也可以让后端工程师结合真实数据查看显示效果,同时,SpringBoot 提供了 Thymeleaf 自动化配置解决方案,因此在 SpringBoot 中使用 Thymeleaf 非常方便。
事实上, Thymeleaf 除了展示基本的 HTML ,进行页面渲染之外,也可以作为一个 HTML 片段进行渲染,例如我们在做邮件发送时,可以使用 Thymeleaf 作为邮件发送模板。
另外,由于 Thymeleaf 模板后缀为 .html,可以直接被浏览器打开,因此,预览时非常方便。
整合
- 创建项目
Spring Boot 中整合 Thymeleaf 非常容易,只需要创建项目时添加 Thymeleaf 即可:
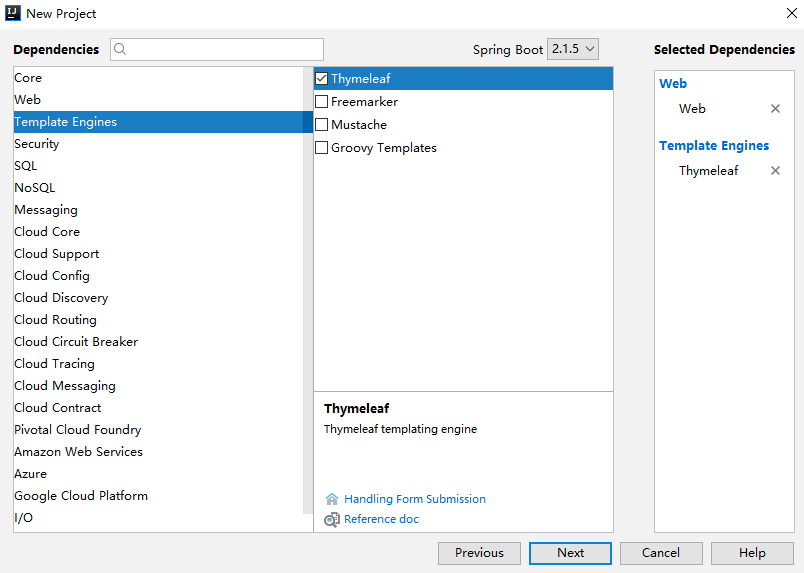
创建完成后,pom.xml 依赖如下:
<dependency>
    <groupId>org.springframework.boot</groupId>
    <artifactId>spring-boot-starter-thymeleaf</artifactId>
</dependency>
<dependency>
    <groupId>org.springframework.boot</groupId>
    <artifactId>spring-boot-starter-web</artifactId>
</dependency>
当然,Thymeleaf 不仅仅能在 Spring Boot 中使用,也可以使用在其他地方,只不过 Spring Boot 针对 Thymeleaf 提供了一整套的自动化配置方案,这一套配置类的属性在 org.springframework.boot.autoconfigure.thymeleaf.ThymeleafProperties 中,部分源码如下:
@ConfigurationProperties(prefix = "spring.thymeleaf")
public class ThymeleafProperties {
        private static final Charset DEFAULT_ENCODING = StandardCharsets.UTF_8;
        public static final String DEFAULT_PREFIX = "classpath:/templates/";
        public static final String DEFAULT_SUFFIX = ".html";
        private boolean checkTemplate = true;
        private boolean checkTemplateLocation = true;
        private String prefix = DEFAULT_PREFIX;
        private String suffix = DEFAULT_SUFFIX;
        private String mode = "HTML";
        private Charset encoding = DEFAULT_ENCODING;
        private boolean cache = true;
        //...
}
- 首先通过
@ConfigurationProperties注解,将application.properties前缀为spring.thymeleaf的配置和这个类中的属性绑定。 - 前三个
static变量定义了默认的编码格式、视图解析器的前缀、后缀等。 - 从前三行配置中,可以看出来,
Thymeleaf模板的默认位置在resources/templates目录下,默认的后缀是html。 - 这些配置,如果开发者不自己提供,则使用 默认的,如果自己提供,则在
application.properties中以spring.thymeleaf开始相关的配置。
而我们刚刚提到的,Spring Boot 为 Thymeleaf 提供的自动化配置类,则是 org.springframework.boot.autoconfigure.thymeleaf.ThymeleafAutoConfiguration ,部分源码如下:
@Configuration
@EnableConfigurationProperties(ThymeleafProperties.class)
@ConditionalOnClass({ TemplateMode.class, SpringTemplateEngine.class })
@AutoConfigureAfter({ WebMvcAutoConfiguration.class, WebFluxAutoConfiguration.class })
public class ThymeleafAutoConfiguration {
}
可以看到,在这个自动化配置类中,首先导入 ThymeleafProperties ,然后 @ConditionalOnClass 注解表示当当前系统中存在 TemplateMode 和 SpringTemplateEngine 类时,当前的自动化配置类才会生效,即只要项目中引入了 Thymeleaf 相关的依赖,这个配置就会生效。
这些默认的配置我们几乎不需要做任何更改就可以直接使用了。如果开发者有特殊需求,则可以在 application.properties 中配置以 spring.thymeleaf 开头的属性即可。
- 创建 Controller
接下来我们就可以创建 Controller 了,实际上引入 Thymeleaf 依赖之后,我们可以不做任何配置。新建的 IndexController 如下:
@Controller
public class IndexController {
    @GetMapping("/index")
    public String index(Model model) {
        List<User> users = new ArrayList<>();
        for (int i = 0; i < 10; i++) {
            User u = new User();
            u.setId((long) i);
            u.setName("javaboy:" + i);
            u.setAddress("深圳:" + i);
            users.add(u);
        }
        model.addAttribute("users", users);
        return "index";
    }
}
public class User {
    private Long id;
    private String name;
    private String address;
    //省略 getter/setter
}
在 IndexController 中返回逻辑视图名+数据,逻辑视图名为 index ,意思我们需要在 resources/templates 目录下提供一个名为 index.html 的 Thymeleaf 模板文件。
- 创建 Thymeleaf
<!DOCTYPE html>
<html lang="en" xmlns:th="http://www.thymeleaf.org">
<head>
    <meta charset="UTF-8">
    <title>Title</title>
</head>
<body>
<table border="1">
    <tr>
        <td>编号</td>
        <td>用户名</td>
        <td>地址</td>
    </tr>
    <tr th:each="user : ${users}">
        <td th:text="${user.id}"></td>
        <td th:text="${user.name}"></td>
        <td th:text="${user.address}"></td>
    </tr>
</table>
</body>
</html>
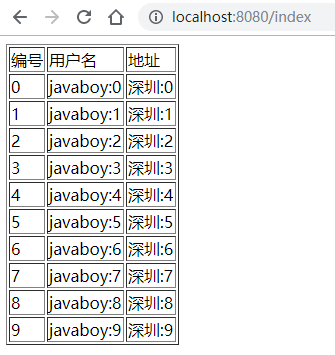
在 Thymeleaf 中,通过 th:each 指令来遍历一个集合,数据的展示通过 th:text 指令来实现,
注意 index.html 最上面要引入 thymeleaf 名称空间。
配置完成后,就可以启动项目了,访问 /index 接口,就能看到集合中的数据了:
另外,Thymeleaf 支持在 js 中直接获取 Model 中的变量。例如,在 IndexController 中有一个变量 username :
@Controller
public class IndexController {
    @GetMapping("/index")
    public String index(Model model) {
        model.addAttribute("username", "李四");
        return "index";
    }
}
在页面模板中,可以直接在 js 中获取到这个变量:
<script th:inline="javascript">
    var username = [[${username}]];
    console.log(username)
</script>
这个功能算是 Thymeleaf 的特色之一吧。
手动渲染
前面我们说的是返回一个 Thymeleaf 模板,我们也可以手动渲染 Thymeleaf 模板,这个一般在邮件发送时候有用,例如我在 resources/templates 目录下新建一个邮件模板,如下:
<!DOCTYPE html>
<html lang="en" xmlns:th="http://www.thymeleaf.org">
<head>
    <meta charset="UTF-8">
    <title>Title</title>
</head>
<body>
<p>hello 欢迎 <span th:text="${username}"></span>加入 XXX 集团,您的入职信息如下:</p>
<table border="1">
    <tr>
        <td>职位</td>
        <td th:text="${position}"></td>
    </tr>
    <tr>
        <td>薪水</td>
        <td th:text="${salary}"></td>
    </tr>
</table>
<img src="http://www.javaboy.org/images/sb/javaboy.jpg" alt="">
</body>
</html>
这一个 HTML 模板中,有几个变量,我们要将这个 HTML 模板渲染成一个 String 字符串,再把这个字符串通过邮件发送出去,那么如何手动渲染呢?
@Autowired
TemplateEngine templateEngine;
@Test
public void test1() throws MessagingException {
    Context context = new Context();
    context.setVariable("username", "javaboy");
    context.setVariable("position", "Java工程师");
    context.setVariable("salary", 99999);
    String mail = templateEngine.process("mail", context);
    //省略邮件发送
}
- 渲染时,我们需要首先注入一个 TemplateEngine 对象,这个对象就是在 Thymeleaf 的自动化配置类中配置的(即当我们引入 Thymeleaf 的依赖之后,这个实例就有了)。
- 然后构造一个 Context 对象用来存放变量。
- 调用 process 方法进行渲染,该方法的返回值就是渲染后的 HTML 字符串,然后我们将这个字符串发送出去。
这是 Spring Boot 整合 Thymeleaf 的几个关键点,关于 Thymeleaf 这个页面模板本身更多的用法,大家可以参考 Thymeleaf 的文档:https://www.thymeleaf.org。
总结
本文主要向大家简单介绍了 Spring Boot 和 Thymeleaf 整合时的几个问题,还是比较简单的,大家可以阅读 Thymeleaf 官方文档学习 Thymeleaf 的更多用法。本文案例我已上传到 GitHub ,欢迎大家 star :https://github.com/lenve/javaboy-code-samples
关于本文,有问题欢迎留言讨论。
关注公众号【江南一点雨】,专注于 Spring Boot+微服务以及前后端分离等全栈技术,定期视频教程分享,关注后回复 Java ,领取松哥为你精心准备的 Java 干货!