Hadoop相关的配置信息
core  # 基础通用配置内容 1.namenode总入口 2.临时目录
hdfs  # hdfs相关内容的配置 1.权限 2.副本 3. HA高可用
mapred # mapreduce相关的配置
yarn   # yarn相关的配置
#底层的配置文件,存储都是默认值,根据需要进行修改
core-default.xml
hdfs-default.xml
marpred-default.xml
yarn-default.xml
# HADOOP_HOME/etc/hadoop
core-site.xml
hdfs-site.xml
mapred-site.xml
yarn-site.xml
# 代码级 维护性查 优先级高
Configuration configuration = new Configuration();
configuration.set("fs.default.name","hdfs://hadoop:8020");
configuration.set("key","value");
.....
FileSystem fileSystem = FileSystem.get(configuration);
# 代码级 维护性好 优先级低
Configuration configuration = new Configuration();
configuration.addResource("core-site.xml");
configuration.addResource("hdfs-site.xml");
configuration.addResource("marpred-site.xml");
configuration.addResource("yarn-site.xml");
FileSystem fileSystem = FileSystem.get(configuration);
#Hadoop shell命令 直接指定 配置信息
#测试
bin/hdfs dfs -ls /  -Dfs.defaultFS=xxxx
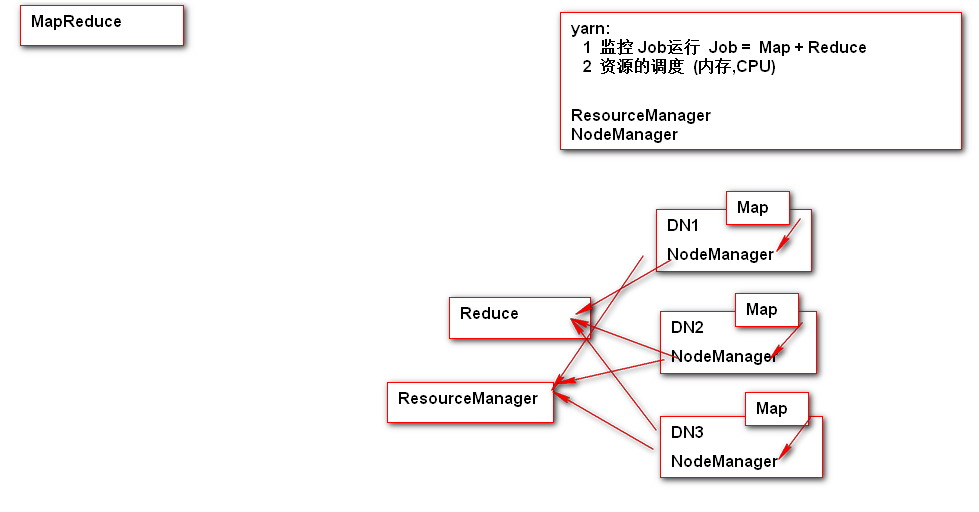
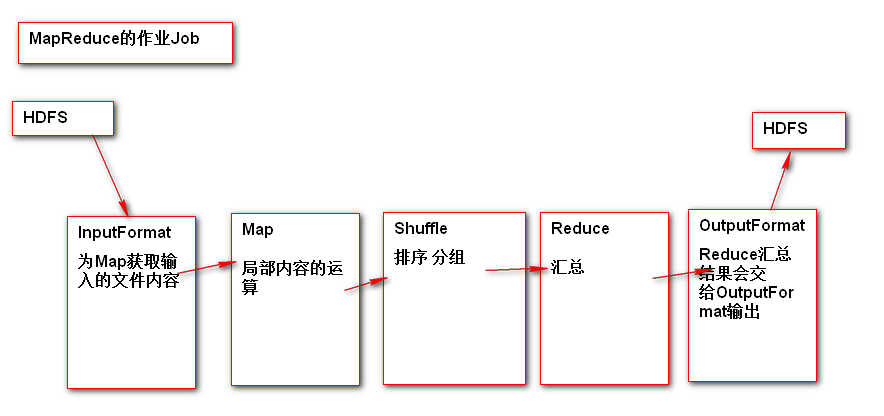
MapReduce编程
MapReduce基于HDFS之上一种计算平台,计算框架

-
MapReduce运行原理:
-
搭建yarn集群
NameNode不能和ResourceManager放置在同一台节点#保证resourcemanager和namenode不放置在同一个节点,修改yarn-site.xml
#启动yarn 一定要在resourcemanager所在的机器上执行启动命令
sbin/start-yarn.sh
布置作业: HAHDFS集群基础上 搭建HAYarn集群 -
MapReduce的核心5步骤
-
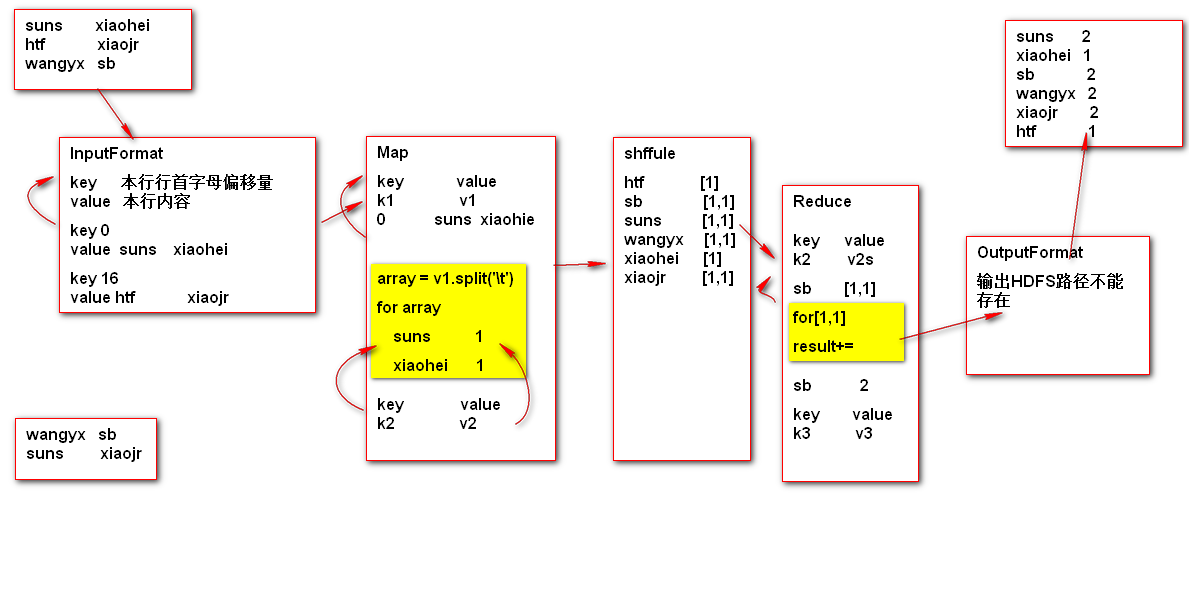
MR经典案例WordCount 思路分析
-
MapReduce编程代码
<dependency> <groupId>org.apache.hadoop</groupId> <artifactId>hadoop-common</artifactId> <version>2.5.2</version> </dependency> <!-- https://mvnrepository.com/artifact/org.apache.hadoop/hadoop-client --> <dependency> <groupId>org.apache.hadoop</groupId> <artifactId>hadoop-client</artifactId> <version>2.5.2</version> </dependency> <!-- https://mvnrepository.com/artifact/org.apache.hadoop/hadoop-hdfs --> <dependency> <groupId>org.apache.hadoop</groupId> <artifactId>hadoop-hdfs</artifactId> <version>2.5.2</version> </dependency> <!-- https://mvnrepository.com/artifact/org.apache.hadoop/hadoop-mapreduce-client-core --> <dependency> <groupId>org.apache.hadoop</groupId> <artifactId>hadoop-mapreduce-client-core</artifactId> <version>2.5.2</version> </dependency> <!-- https://mvnrepository.com/artifact/org.apache.hadoop/hadoop-yarn-common --> <dependency> <groupId>org.apache.hadoop</groupId> <artifactId>hadoop-yarn-common</artifactId> <version>2.5.2</version> </dependency>
public class TestMapReduce {

    /**
     *    k1   LongWritable
     *    v1   Text
     *
     *
     *    k2   Text
     *    v2   IntWritable
     */

    public static class MyMap extends Mapper<LongWritable,Text,Text, IntWritable> {
        Text k2 = new Text();
        IntWritable v2 = new IntWritable();
        @Override
        /**
         *  k1  key      0
         *  v1  value    suns   xiaohei
         */
        protected void map(LongWritable key, Text value, Context context) throws IOException, InterruptedException {
            String line = value.toString();
            String[] words = line.split("	");

            for (String word:words) {
                k2.set(word);
                v2.set(1);
                context.write(k2,v2);
            }
        }
    }

    public static class MyReduce extends Reducer<Text,IntWritable,Text,IntWritable>{
        Text k3 = new Text();
        IntWritable v3 = new IntWritable();

        @Override
        protected void reduce(Text key, Iterable<IntWritable> values, Context context) throws IOException, InterruptedException {
            int result = 0;
            for (IntWritable value:values) {
                result+=value.get();
            }

            k3.set(key);
            v3.set(result);

            context.write(k3,v3);
        }
    }

    public static void main(String[] args)throws Exception {
        Job job = Job.getInstance();
        job.setJarByClass(TestMapReduce.class);
        job.setJobName("first");

        //inputFormat
        TextInputFormat.addInputPath(job,new Path("/test"));

        //map
        job.setMapperClass(MyMap.class);
        job.setMapOutputKeyClass(Text.class);
        job.setMapOutputValueClass(IntWritable.class);

        //shuffle 自动完成

        //reduce
        job.setReducerClass(MyReduce.class);
        job.setOutputKeyClass(Text.class);
        job.setOutputValueClass(IntWritable.class);

        //outputFormat
        TextOutputFormat.setOutputPath(job,new Path("/dest1"));


        job.waitForCompletion(true);
    }
}
MapReduce的部署
注意:(yarn命令需要早hadoop安装的bin目录运行)
①最直接方法
直接maven打包,将jar包scp上传到到服务器即可
 bin/yarn jar hadoop-mapreduce.jar 运行
 bin/hdfs dfs -text /dest1/part-r-00000 查看结果
        Bytes Written=38
[root@hadoop hadoop-2.5.2]# bin/hdfs dfs -text /dest1/part-r-00000
19/01/24 09:40:19 WARN util.NativeCodeLoader: Unable to load native-hadoop library for your platform... using builtin-java classes where applicable
aaa 2(次)
bbb 2
jjj 1
kkkk    1
lhc 1
ssss    1
②maven的一键打包上传
IDEA-file-setting-plugins搜索Maven Helper 安装后重启IDEA
pom.xml如下配置:
<properties> <project.build.sourceEncoding>UTF-8</project.build.sourceEncoding> <maven.compiler.source>1.7</maven.compiler.source> <maven.compiler.target>1.7</maven.compiler.target> <lhc-mainClass>com.lhc.TestMapReduce</lhc-mainClass> <target-host>192.168.194.147</target-host><!--此处是resourceManager的ip--> <target-position>/opt/install/hadoop-2.5.2</target-position> </properties> <dependences>... <build> <!--引入wagon上传插件--> <extensions> <extension> <groupId>org.apache.maven.wagon</groupId> <artifactId>wagon-ssh</artifactId> <version>2.8</version> </extension> </extensions> <plugings> <!--jar包插件--> <plugin> <groupId>org.apache.maven.plugins</groupId> <artifactId>maven-jar-plugin</artifactId> <version>2.3.2</version> <configuration> <outputDirectory>${basedir}</outputDirectory> <archive> <manifest> <mainClass>${lhc-mainClass}</mainClass> </manifest> </archive> </configuration> </plugin> <!--wagon插件的配置--> <plugin> <groupId>org.codehaus.mojo</groupId> <artifactId>wagon-maven-plugin</artifactId> <version>1.0</version> <configuration> <fromFile>${project.build.finalName}.jar</fromFile> <url>scp://root:123456@${target-host}${target-position}</url> </configuration> </plugin> </plugings> </build>
以上配置好后就可以点击maven插件,先双击Jar:jar完成打包,在点击wagon:upload完成上传
但是怎么一键完成上诉两个步骤呢?
这时候就需要上面安装的插件maven helper了,pom.xml文件上右键点击:
Run Maven ->new Goal 输入内容:jar:jar wagon:upload 点击OK即可完成打包上传一键完成
③maven的一键打包上传及其运行
在②上面的基础上,给wagon添加commands运行命令,如下:
<plugin> <groupId>org.codehaus.mojo</groupId> <artifactId>wagon-maven-plugin</artifactId> <version>1.0</version> <configuration> <fromFile>${project.build.finalName}.jar</fromFile> <url>scp://root:123456@${target-host}${target-position}</url> <commands> <!-- 杀死原来的进程 --> <command>pkill -f ${project.build.finalName}.jar</command> <!-- 重新启动test.jar,程序的输出结果写到根目录下的nohup.out日志文件中 --> <command>nohup /opt/install/hadoop-2.5.2/bin/yarn jar /opt/install/hadoop-2.5.2/${project.build.finalName}.jar > /root/nohup.out 2>&1 &</command> </commands> <!-- 显示运行命令的输出结果 --> <displayCommandOutputs>true</displayCommandOutputs> </configuration> </plugin>
接着在mavenhelper 添加new Goal:
jar:jar wagon:upload-single wagon:sshexec
运行之前记得先complie一下,确保项目的target目录里已将编译好了
在resourcemanager节点上查看nohup.out文件,可见运行成功
ResourceManager的高可用(HA)
①.yarn-site.xml下配置如下内容
<configuration>
                    <property>
                         <name>yarn.nodemanager.aux-services</name>
                         <value>mapreduce_shuffle</value>
                     </property>
                    <property>
                         <name>yarn.resourcemanager.ha.enabled</name>
                         <value>true</value>
                      </property>
                      <!-- 指定RM的cluster id -->
                      <property>
                      <name>yarn.resourcemanager.cluster-id</name>
                        <value>lhc</value>
                     </property>
                     <!-- 指定RM的名字 -->
                     <property>
                        <name>yarn.resourcemanager.ha.rm-ids</name>
                        <value>rm1,rm2</value>
                     </property>
                     <!-- 分别指定RM的地址 -->
                     <property>
                        <name>yarn.resourcemanager.hostname.rm1</name>
                        <value>hadoop1</value>
                     </property>
                     <property>
                        <name>yarn.resourcemanager.hostname.rm2</name>
                        <value>hadoop2</value>
                     </property>
                     <!-- 指定zk集群地址 -->
                     <property>
                        <name>yarn.resourcemanager.zk-address</name>
                        <value>hadoop:2181,hadoop1:2181,hadoop2:2181</value>
                     </property>
</configuration>
②.分别在hadoop1,hadoop2的hadoop安装目录上运行: sbin/start-yarn.sh 启动ResourceManag
③.运行jps查看进程, ResourceManager正常启动
[root@hadoop1 hadoop-2.5.2]# jps
4552 NameNode
4762 DFSZKFailoverController
4610 DataNode
5822 ResourceManager
6251 Jps
4472 JournalNode
4426 QuorumPeerMain
④.分别运行:bin/yarn rmadmin -getServiceState rm2和bin/yarn rmadmin -getServiceState rm1
查看两节点的REsourceMananger的状态,一个为active,另一个为standby
[root@hadoop1 hadoop-2.5.2]# bin/yarn rmadmin -getServiceState rm1
19/01/24 11:56:07 WARN util.NativeCodeLoader: Unable to load native-hadoop library for your platform... using builtin-java classes where applicable
active
[root@hadoop1 hadoop-2.5.2]# bin/yarn rmadmin -getServiceState rm2
19/01/24 11:58:24 WARN util.NativeCodeLoader: Unable to load native-hadoop library for your platform... using builtin-java classes where applicable
standby
⑤将一台的rm1的ResourceManager关闭,再次执行:bin/yarn rmadmin -getServiceState rm2
发现:rm2状态为active,这就实现了ResManager的自动故障转移
详情见博客:https://blog.csdn.net/skywalker_only/article/details/41726189