记在前面:
@Cacheable@CachePut存入缓存里面的数据是方法执行的返回值
所以加了@CachePut的类的返回值要和加了@Cacheable的类的返回值一样
我的环境:
springboot2.x,idea
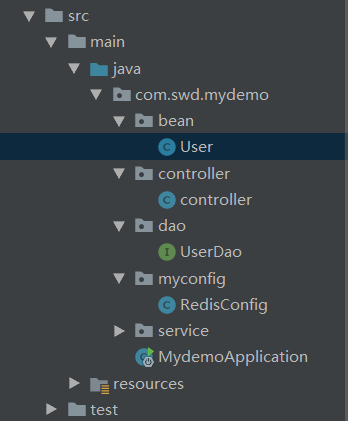
目录结构

mysql里面的表结构
CREATE TABLE `user` (
  `id` int(30) NOT NULL AUTO_INCREMENT,
  `username` varchar(30) DEFAULT NULL,
  `password` varchar(30) DEFAULT NULL,
  PRIMARY KEY (`id`)
)

配置文件application.properties

server.port=8181
spring.datasource.type=com.alibaba.druid.pool.DruidDataSource
spring.datasource.url=jdbc:mysql://127.0.0.1:3306/cache?useUnicode=true&characterEncoding=UTF-8&serverTimezone=UTC
spring.datasource.username=root
spring.datasource.password=123456
pom.xml

<?xml version="1.0" encoding="UTF-8"?>
<project xmlns="http://maven.apache.org/POM/4.0.0" xmlns:xsi="http://www.w3.org/2001/XMLSchema-instance"
         xsi:schemaLocation="http://maven.apache.org/POM/4.0.0 https://maven.apache.org/xsd/maven-4.0.0.xsd">
    <modelVersion>4.0.0</modelVersion>
    <parent>
        <groupId>org.springframework.boot</groupId>
        <artifactId>spring-boot-starter-parent</artifactId>
        <version>2.2.2.RELEASE</version>
        <relativePath/> <!-- lookup parent from repository -->
    </parent>
    <groupId>com.swd</groupId>
    <artifactId>mydemo</artifactId>
    <version>0.0.1-SNAPSHOT</version>
    <name>mydemo</name>
    <description>Demo project for Spring Boot</description>

    <properties>
        <java.version>1.8</java.version>
    </properties>

    <dependencies>
        <dependency>
            <groupId>org.springframework.boot</groupId>
            <artifactId>spring-boot-starter-web</artifactId>
        </dependency>
        <dependency>
            <groupId>org.mybatis.spring.boot</groupId>
            <artifactId>mybatis-spring-boot-starter</artifactId>
            <version>2.1.1</version>
        </dependency>

        <dependency>
            <groupId>mysql</groupId>
            <artifactId>mysql-connector-java</artifactId>
            <scope>runtime</scope>
        </dependency>
        <dependency>
            <groupId>org.projectlombok</groupId>
            <artifactId>lombok</artifactId>
            <optional>true</optional>
        </dependency>
        <dependency>
            <groupId>org.springframework.boot</groupId>
            <artifactId>spring-boot-starter-test</artifactId>
            <scope>test</scope>
            <exclusions>
                <exclusion>
                    <groupId>org.junit.vintage</groupId>
                    <artifactId>junit-vintage-engine</artifactId>
                </exclusion>
            </exclusions>
        </dependency>
        <dependency>
            <groupId>com.alibaba</groupId>
            <artifactId>druid</artifactId>
            <version>1.1.10</version>
        </dependency>

    </dependencies>

    <build>
        <plugins>
            <plugin>
                <groupId>org.springframework.boot</groupId>
                <artifactId>spring-boot-maven-plugin</artifactId>
            </plugin>
        </plugins>
    </build>

</project>
启动类

package com.swd.mydemo;

import org.apache.ibatis.annotations.Mapper;
import org.mybatis.spring.annotation.MapperScan;
import org.springframework.boot.SpringApplication;
import org.springframework.boot.autoconfigure.SpringBootApplication;
import org.springframework.cache.annotation.EnableCaching;

@SpringBootApplication
@EnableCaching
@MapperScan("com.swd.mydemo.dao")
public class MydemoApplication {
    public static void main(String[] args) {
        SpringApplication.run(MydemoApplication.class, args);
    }

}
controller层
package com.swd.mydemo.controller;

import com.swd.mydemo.bean.User;
import com.swd.mydemo.service.UserService;
import org.springframework.beans.factory.annotation.Autowired;
import org.springframework.web.bind.annotation.GetMapping;
import org.springframework.web.bind.annotation.PathVariable;
import org.springframework.web.bind.annotation.RestController;

/**
 * @program: mydemo
 * @Date: 2019/12/25 14:36
 * @Author: lhh
 * @Description:
 */
@RestController
public class controller {

    @Autowired
    UserService userService;

    @GetMapping("user/{id}")
    public User getUserById(@PathVariable("id") Integer id)
    {
        return userService.getUserById(id);
    }

    @GetMapping("user")
    public void updateUserById(User user)
    {
        userService.updateUserById(user);
    }

}
bean层
package com.swd.mydemo.bean;

import lombok.Data;

/**
 * @program: mydemo
 * @Date: 2019/12/25 14:30
 * @Author: lhh
 * @Description:
 */
@Data
public class User {
    private int id;
    private String username;
    private String password;
}
dao层
import com.swd.mydemo.bean.User;
import org.apache.ibatis.annotations.Mapper;
import org.apache.ibatis.annotations.Select;
import org.apache.ibatis.annotations.Update;

/**
 * @program: mydemo
 * @Date: 2019/12/25 14:32
 * @Author: lhh
 * @Description:
 */
@Mapper
public interface UserDao {

    @Select("select * from user where id = #{id}")
    User getById(Integer id);

    @Update("update user set username = #{username} , password = #{password} where id = #{id}")
    void updateById(User user);

}
service层
package com.swd.mydemo.service;

import com.swd.mydemo.bean.User;
import com.swd.mydemo.dao.UserDao;
import org.springframework.beans.factory.annotation.Autowired;
import org.springframework.cache.annotation.CachePut;
import org.springframework.cache.annotation.Cacheable;
import org.springframework.stereotype.Service;

/**
 * @program: mydemo
 * @Date: 2019/12/25 14:34
 * @Author: lhh
 * @Description:
 */
@Service
public class UserService {

    @Autowired
    UserDao userDao;

    @Cacheable(cacheNames = "userw",key = "#id")//key里面的id取得是参数id(url传过来的是1)
    public User getUserById(Integer id)
    {
        System.out.println("查询"+id+"员工");
        User user = userDao.getById(id);
        return user;
    }

    @CachePut(cacheNames = "userw",key = "#result.id")//result.id和user.id都可以(user.id是1)
    public User updateUserById(User user)
    {
        System.out.println("更新"+user.getId()+"员工"+user.getUsername());
        userDao.updateById(user);
        return user;
    }
}
在chrome中测试

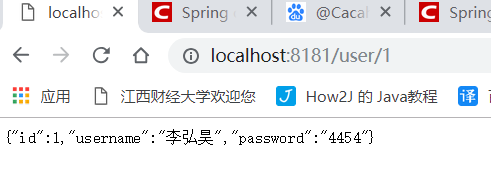
在chrome多点几次回车查询,在idea控制台里面,public User getUserById(Integer id)这个方法只执行了一次,其他都是从缓存里面取的结果到chrome界面里

更新

页面没报错,控制台显示更新成功

结果:
数据库表里面更新成功

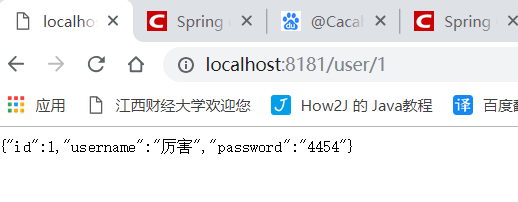
缓存更新成功,页面取的数据是从已经更新了的缓存里面取出来的

在来看idea控制台,可见从数据库里面查数据只查询了一次,其他都是从缓存里面查询出来的,牛皮!!

如果方便请点个赞呀,兄弟们。想要源码的可以留言评论哦。
记在后面:
@Cacheable标注的方法执行之前先来检查缓存中有没有这个数据,默认按照参数的值作为key去查询缓存,
如果没有就运行方法并将结果放入缓存;以后再来调用就可以直接使用缓存中的数据;
@CachePut:既调用方法,又更新缓存数据;
修改了数据库的某个数据,同时更新缓存;
@CacheEvict:缓存清除
key:指定要清除的数据
allEntries = true:指定清除这个缓存中所有的数据
二、上面已经完成了cache缓存,下面我们来整合redis
目录结构,新加了myconfig

在pom文件里面加上
<dependency>
            <groupId>org.springframework.boot</groupId>
            <artifactId>spring-boot-starter-data-redis</artifactId>
</dependency>
新建一个config路径,在此路径下面新建一个RedisConfig,这里的配置,可以让cache的缓存直接存在redis里面,key和value也已经序列化了,存在redis里面的也是json格式的,还有一个点就是你的实体类要
implements Serializable
import com.fasterxml.jackson.annotation.JsonAutoDetect;
import com.fasterxml.jackson.annotation.PropertyAccessor;
import com.fasterxml.jackson.databind.ObjectMapper;
import org.springframework.cache.annotation.CachingConfigurerSupport;
import org.springframework.cache.annotation.EnableCaching;
import org.springframework.context.annotation.Bean;
import org.springframework.context.annotation.Configuration;
import org.springframework.data.redis.cache.RedisCacheConfiguration;
import org.springframework.data.redis.cache.RedisCacheManager;
import org.springframework.data.redis.connection.RedisConnectionFactory;
import org.springframework.data.redis.core.RedisTemplate;
import org.springframework.data.redis.serializer.Jackson2JsonRedisSerializer;
import org.springframework.data.redis.serializer.RedisSerializationContext;
import org.springframework.data.redis.serializer.RedisSerializer;
import org.springframework.data.redis.serializer.StringRedisSerializer;

import java.text.SimpleDateFormat;
import java.time.Duration;

/**
 * @program: mydemo
 * @Date: 2019/12/26 16:48
 * @Author: lhh
 * @Description:
 */
@Configuration
@EnableCaching
public class RedisConfig extends CachingConfigurerSupport {

    @Bean
    public RedisTemplate<String,Object> redisTemplate(RedisConnectionFactory redisConnectionFactory){
        /**
         * 配置自己的redisTemplate
         * StringRedisTemplate 默认使用使用StringRedisSerializer来序列化
         * RedisTemplate 默认使用JdkSerializationRedisSerializer来序列化
         */
        RedisTemplate<String, Object> redisTemplate = new RedisTemplate<>();
        redisTemplate.setConnectionFactory(redisConnectionFactory);

        //开启默认类型
        ObjectMapper objectMapper = new ObjectMapper();
        objectMapper.setVisibility(PropertyAccessor.ALL, JsonAutoDetect.Visibility.ANY);
        objectMapper.enableDefaultTyping(ObjectMapper.DefaultTyping.NON_FINAL);
        objectMapper.setDateFormat(new SimpleDateFormat("yyyy/MM/dd HH:mm:ss"));

        // 使用Jackson2JsonRedisSerialize替换默认序列化
        Jackson2JsonRedisSerializer jackson2JsonRedisSerializer = new Jackson2JsonRedisSerializer(Object.class);
        jackson2JsonRedisSerializer.setObjectMapper(objectMapper);

        //设置key和value的序列化规则
        redisTemplate.setKeySerializer(new StringRedisSerializer());
        redisTemplate.setValueSerializer(jackson2JsonRedisSerializer);
        redisTemplate.setHashKeySerializer(new StringRedisSerializer());
        redisTemplate.setHashValueSerializer(jackson2JsonRedisSerializer);
        redisTemplate.afterPropertiesSet();
        return redisTemplate;
    }

    @Bean
    public RedisCacheManager cacheManager(RedisConnectionFactory factory) {

        RedisSerializer<String> redisSerializer = new StringRedisSerializer();
        Jackson2JsonRedisSerializer jackson2JsonRedisSerializer = new Jackson2JsonRedisSerializer(Object.class);

        //解决查询缓存转换异常的问题
        ObjectMapper om = new ObjectMapper();
        om.setVisibility(PropertyAccessor.ALL, JsonAutoDetect.Visibility.ANY);
        om.enableDefaultTyping(ObjectMapper.DefaultTyping.NON_FINAL);
        jackson2JsonRedisSerializer.setObjectMapper(om);
        //配置序列化(解决乱码的问题)
        RedisCacheConfiguration config = RedisCacheConfiguration.defaultCacheConfig()
                .entryTtl(Duration.ZERO)
                .serializeKeysWith(RedisSerializationContext.SerializationPair.fromSerializer(redisSerializer))
                .serializeValuesWith(RedisSerializationContext.SerializationPair.fromSerializer(jackson2JsonRedisSerializer))
                .disableCachingNullValues();

        RedisCacheManager cacheManager = RedisCacheManager.builder(factory)
                .cacheDefaults(config)
                .build();
        return cacheManager;
    }
}
