原贴:https://www.cnblogs.com/sggx/p/3836432.html
前言
这是我第一次写博客,心情还是有点小小的激动!这次主要分享的是用jsPlumb,做一个可以给用户自定义拖拉的流程图,并且可以序列化保存在服务器端。
我在这次的实现上面做得比较粗糙,还有分享我在做jsPlumb流程图遇到的一些问题。
准备工作
制作流程图用到的相关的脚本:
1 <script src="<%= ResolveUrl("~/resources/jquery/jquery-1.11.1.min.js")%>" type="text/javascript"></script>
2     <script src="<%= ResolveUrl("~/resources/jquery-ui-1.10.4/js/jquery-ui-1.10.4.min.js") %>" type="text/javascript"></script>
3     <script src="<%= ResolveUrl("~/resources/jquery-plugins/jquery.jsPlumb-1.6.2-min.js") %>" type="text/javascript"></script>
jsPlumb-1.6.2-min.js在官网上下载,这里用得是最新版本。jquery-1.11.1.min.js等脚本百度上都能找到,这里就不多说了。
css样式在官网里也可以搜到,这里我就贴出来。
.node {
            box-shadow: 2px 2px 19px #aaa;
            -o-box-shadow: 2px 2px 19px #aaa;
            -webkit-box-shadow: 2px 2px 19px #aaa;
            -moz-box-shadow: 2px 2px 19px #aaa;
            -moz-border-radius: 0.5em;
            border-radius: 0.5em;
            opacity: 0.8;
            filter: alpha(opacity=80);
            border: 1px solid #346789;
            width: 150px;
            /*line-height: 40px;*/
            text-align: center;
            z-index: 20;
            position: absolute;
            background-color: #eeeeef;
            color: black;
            padding: 10px;
            font-size: 9pt;
            cursor: pointer;
            height: 50px;
            line-height: 50px;
        }
        .radius {
            border-radius: 25em;
        }
        .node:hover {
            box-shadow: 2px 2px 19px #444;
            -o-box-shadow: 2px 2px 19px #444;
            -webkit-box-shadow: 2px 2px 19px #444;
            -moz-box-shadow: 2px 2px 19px #444;
            opacity: 0.8;
            filter: alpha(opacity=80);
        }
这里还有提到一点,jsPlumb官网上的api全是英文的,博主我从小英文就不好,所以看里面的doc非常费劲,一般都是一边开着金山翻译,
一边看着文档,英语好的略过这段。
正文
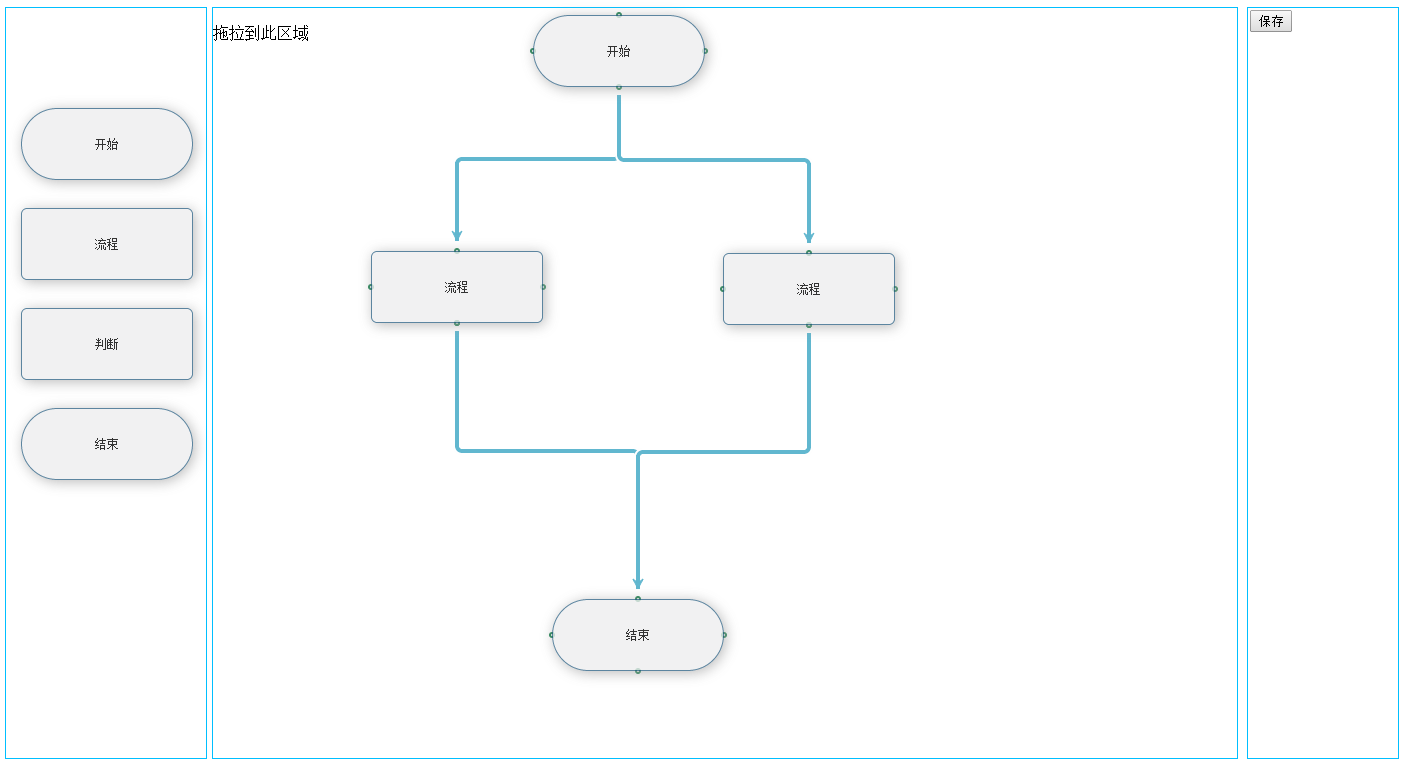
言归正传,现在开始我们的jsPlumb流程图制作,下面先附上流程图。
功能
根据客户的要求,我们要完成的功能点有以下几点:
1.支持将左边的div层复制拖拉到右边中间的层,并且左边同一个div拖拉没有次数限制,如果只能拖拉一次,做这个东西就没有什么意义了。
2.拖拉到中间的div层可以拖动,拖动不能超过中间div的边框。
3.拖动到中间的层,四周能有4个endpoint点,可供客户连线。
4.能支持删除多余的div的功能。
5.支持删除连接线。
6.能双击修改流程图的文字。
7.能序列化保存流程图。
操作
下面我们根据功能开始制作:
1.拖拉jsPlumb其实是提供draggable方法,和droppable方法官网里有介绍, 但是我这里用得是jquery里的draggable()和droppable()。
<div id="left">
            <div class="node radius" id="node1">开始</div>
            <div class="node" id="node2">流程</div>
            <div class="node" id="node3">判断</div>
            <div class="node radius" id="node4">结束</div>
        </div>

        <div id="right">
            <p>拖拉到此区域</p>
        </div>
        <div id="save">
            <input type="button" value="保存" onclick="save()" />
        </div>
1     $("#left").children().draggable({
2                 helper: "clone",
3                 scope: "ss",
4             });
helper:"clone"表示复制,scope:"ss"是一个标识为了判断是否可以放置,主要用于droppable方法里面也设置这个标识来判断拖放到的地方,
除非两个都不写scope,可以随便拖放,但是会有一个问题,每次我从左边拖东西到右边,我再拖到的时候就会有div拖到不了,所以最好设置
scope:"//里面的值随便,只是一个标识"。
下面是完整的拖放:


$("#left").children().draggable({
                helper: "clone",
                scope: "ss",
            });
            $("#right").droppable({
                scope: "ss",
                drop: function (event, ui) {
                    var left = parseInt(ui.offset.left - $(this).offset().left);
                    var top = parseInt(ui.offset.top - $(this).offset().top);
                    var name = ui.draggable[0].id;
                    switch (name) {
                    case "node1":
                        i++;
                        var id = "state_start" + i;
                        $(this).append('<div class="node" style="border-radius: 25em"  id="' + id + '" >' + $(ui.helper).html() + '</div>');
                        $("#" + id).css("left", left).css("top", top);
                        jsPlumb.addEndpoint(id, { anchors: "TopCenter" }, hollowCircle);
                        jsPlumb.addEndpoint(id, { anchors: "RightMiddle" }, hollowCircle);
                        jsPlumb.addEndpoint(id, { anchors: "BottomCenter" }, hollowCircle);
                        jsPlumb.addEndpoint(id, { anchors: "LeftMiddle" }, hollowCircle);
                        jsPlumb.draggable(id);
                        $("#" + id).draggable({ containment: "parent" });
                        doubleclick("#" + id);
                        break;
                    case "node2":
                        i++;
                        id = "state_flow" + i;
                        $(this).append("<div class='node' id='" + id + "'>" + $(ui.helper).html() + "</div>");
                        $("#" + id).css("left", left).css("top", top);
                        jsPlumb.addEndpoint(id, { anchors: "TopCenter" }, hollowCircle);
                        jsPlumb.addEndpoint(id, { anchors: "RightMiddle" }, hollowCircle);
                        jsPlumb.addEndpoint(id, { anchors: "BottomCenter" }, hollowCircle);
                        jsPlumb.addEndpoint(id, { anchors: "LeftMiddle" }, hollowCircle);
                        jsPlumb.addEndpoint(id, hollowCircle);
                        jsPlumb.draggable(id);
                        $("#" + id).draggable({ containment: "parent" });
                        doubleclick("#" + id);
                        break;
                    case "node3":
                        i++;
                        id = "state_decide" + i;
                        $(this).append("<div class='node' id='" + id + "'>" + $(ui.helper).html() + "</div>");
                        $("#" + id).css("left", left).css("top", top);
                        jsPlumb.addEndpoint(id, { anchors: "TopCenter" }, hollowCircle);
                        jsPlumb.addEndpoint(id, { anchors: "RightMiddle" }, hollowCircle);
                        jsPlumb.addEndpoint(id, { anchors: "BottomCenter" }, hollowCircle);
                        jsPlumb.addEndpoint(id, { anchors: "LeftMiddle" }, hollowCircle);
                        jsPlumb.addEndpoint(id, hollowCircle);
                        jsPlumb.draggable(id);
                        $("#" + id).draggable({ containment: "parent" });
                        doubleclick("#" + id);
                        break;
                    case "node4":
                        i++;
                        id = "state_end" + i;
                        $(this).append('<div class="node" style="border-radius: 25em"  id="' + id + '" >' + $(ui.helper).html() + '</div>');
                        $("#" + id).css("left", left).css("top", top);
                        jsPlumb.addEndpoint(id, { anchors: "TopCenter" }, hollowCircle);
                        jsPlumb.addEndpoint(id, { anchors: "RightMiddle" }, hollowCircle);
                        jsPlumb.addEndpoint(id, { anchors: "BottomCenter" }, hollowCircle);
                        jsPlumb.addEndpoint(id, { anchors: "LeftMiddle" }, hollowCircle);
                        jsPlumb.draggable(id);
                        $("#" + id).draggable({ containment: "parent" });
                        doubleclick("#" + id);
                        break;
                    }
                }
            });
 1 $("#left").children().draggable({
 2                 helper: "clone",
 3                 scope: "ss",
 4             });
 5             $("#right").droppable({
 6                 scope: "ss",
 7                 drop: function (event, ui) {
 8                     var left = parseInt(ui.offset.left - $(this).offset().left);
 9                     var top = parseInt(ui.offset.top - $(this).offset().top);
10                     var name = ui.draggable[0].id;
11                     switch (name) {
12                     case "node1":
13                         i++;
14                         var id = "state_start" + i;
15                         $(this).append('<div class="node" style="border-radius: 25em"  id="' + id + '" >' + $(ui.helper).html() + '</div>');
16                         $("#" + id).css("left", left).css("top", top);
17                         jsPlumb.addEndpoint(id, { anchors: "TopCenter" }, hollowCircle);
18                         jsPlumb.addEndpoint(id, { anchors: "RightMiddle" }, hollowCircle);
19                         jsPlumb.addEndpoint(id, { anchors: "BottomCenter" }, hollowCircle);
20                         jsPlumb.addEndpoint(id, { anchors: "LeftMiddle" }, hollowCircle);
21                         jsPlumb.draggable(id);
22                         $("#" + id).draggable({ containment: "parent" });
23                         doubleclick("#" + id);
24                         break;
25                     case "node2":
26                         i++;
27                         id = "state_flow" + i;
28                         $(this).append("<div class='node' id='" + id + "'>" + $(ui.helper).html() + "</div>");
29                         $("#" + id).css("left", left).css("top", top);
30                         jsPlumb.addEndpoint(id, { anchors: "TopCenter" }, hollowCircle);
31                         jsPlumb.addEndpoint(id, { anchors: "RightMiddle" }, hollowCircle);
32                         jsPlumb.addEndpoint(id, { anchors: "BottomCenter" }, hollowCircle);
33                         jsPlumb.addEndpoint(id, { anchors: "LeftMiddle" }, hollowCircle);
34                         jsPlumb.addEndpoint(id, hollowCircle);
35                         jsPlumb.draggable(id);
36                         $("#" + id).draggable({ containment: "parent" });
37                         doubleclick("#" + id);
38                         break;
39                     case "node3":
40                         i++;
41                         id = "state_decide" + i;
42                         $(this).append("<div class='node' id='" + id + "'>" + $(ui.helper).html() + "</div>");
43                         $("#" + id).css("left", left).css("top", top);
44                         jsPlumb.addEndpoint(id, { anchors: "TopCenter" }, hollowCircle);
45                         jsPlumb.addEndpoint(id, { anchors: "RightMiddle" }, hollowCircle);
46                         jsPlumb.addEndpoint(id, { anchors: "BottomCenter" }, hollowCircle);
47                         jsPlumb.addEndpoint(id, { anchors: "LeftMiddle" }, hollowCircle);
48                         jsPlumb.addEndpoint(id, hollowCircle);
49                         jsPlumb.draggable(id);
50                         $("#" + id).draggable({ containment: "parent" });
51                         doubleclick("#" + id);
52                         break;
53                     case "node4":
54                         i++;
55                         id = "state_end" + i;
56                         $(this).append('<div class="node" style="border-radius: 25em"  id="' + id + '" >' + $(ui.helper).html() + '</div>');
57                         $("#" + id).css("left", left).css("top", top);
58                         jsPlumb.addEndpoint(id, { anchors: "TopCenter" }, hollowCircle);
59                         jsPlumb.addEndpoint(id, { anchors: "RightMiddle" }, hollowCircle);
60                         jsPlumb.addEndpoint(id, { anchors: "BottomCenter" }, hollowCircle);
61                         jsPlumb.addEndpoint(id, { anchors: "LeftMiddle" }, hollowCircle);
62                         jsPlumb.draggable(id);
63                         $("#" + id).draggable({ containment: "parent" });
64                         doubleclick("#" + id);
65                         break;
66                     }
67                 }
68             });
怎么样把左边的层复制到右边的层,我的做法是这样的:
1 $(this).append('<div class="node" style="border-radius: 25em" id="' + id + '" >' + $(ui.helper).html() + '</div>');
做到这里会有人奇怪,怎么做到左边能拉无数次append到右边,id这样不会冲突吗?我就在外面var i=0; 当有元素拖放到右边的div时,i++;
然后var id="state_start"+i;拼接起来,这样你的id就不会一样了。
然后再设置div的left和top:

    drop: function (event, ui) {
                    var left = parseInt(ui.offset.left - $(this).offset().left);
                    var top = parseInt(ui.offset.top - $(this).offset().top);


    $("#" + id).css("left", left).css("top", top);
2.拖拉到中间的div层可以拖动,拖动不能超过中间div的边框:
jsPlumb.draggable(id);
$("#" + id).draggable({ containment: "parent" });
3.拖动到中间的层,四周能有4个endpoint点,可供客户连线:
这个功能是本文的重点,如何通过jsPlumb初始化端点和构造端点(endpoint)。
3.1 初始化端点样式设置:主要设置一些基本的端点,连接线的样式,里面的属性不设置,默认使用默认值
//基本连接线样式
            var connectorPaintStyle = {
                lineWidth: 4,
                strokeStyle: "#61B7CF",
                joinstyle: "round",
                outlineColor: "white",
                outlineWidth: 2
            };
            // 鼠标悬浮在连接线上的样式
            var connectorHoverStyle = {
                lineWidth: 4,
                strokeStyle: "#216477",
                outlineWidth: 2,
                outlineColor: "white"
            };
var hollowCircle = {
                endpoint: ["Dot", { radius: 8 }],  //端点的形状
                connectorStyle: connectorPaintStyle,//连接线的颜色,大小样式
                connectorHoverStyle: connectorHoverStyle,
                paintStyle: {
                    strokeStyle: "#1e8151",
                    fillStyle: "transparent",
                    radius: 2,
                    lineWidth: 2
                },        //端点的颜色样式
                //anchor: "AutoDefault",
                isSource: true,    //是否可以拖动(作为连线起点)
                connector: ["Flowchart", { stub: [40, 60], gap: 10, cornerRadius: 5, alwaysRespectStubs: true }],  //连接线的样式种类有[Bezier],[Flowchart],[StateMachine ],[Straight ]
                isTarget: true,    //是否可以放置(连线终点)
                maxConnections: -1,    // 设置连接点最多可以连接几条线
                connectorOverlays: [["Arrow", {  10, length: 10, location: 1 }]]
            };
3.2 构造端点(endpoint):怎样将端点添加到div的四周?
                         jsPlumb.addEndpoint(id, { anchors: "TopCenter" }, hollowCircle);
                        jsPlumb.addEndpoint(id, { anchors: "RightMiddle" }, hollowCircle);
                       jsPlumb.addEndpoint(id, { anchors: "BottomCenter" }, hollowCircle);
                        jsPlumb.addEndpoint(id, { anchors: "LeftMiddle" }, hollowCircle);
通过jsPlumb.addEndpoint(a,b,c)里面有三个参数,a:要添加端点的div的id;b:设置端点放置的位置("TopCenter","RightMiddle","BottomCenter","LeftMiddle")
四个初始位置;c:端点和连接线的样式。b,c(可选).
添加多个端点:jsPlumb.addEndpoints(a,b,c)三个参数 c(可选),a:要添加端点的div的id;b:含端点的构造函数参数的对象列表;
举个例子:
4.支持删除多余的div的功能:
有时候拖拉div经常会发生拖多了等问题,所有需要删除功能。我要做的删除效果是:鼠标放到div上面,div的右上角会出现一个红色的删除图标,鼠标移走就消失。如下图:
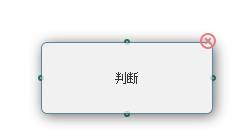
我是通过以下代码实现的:
$("#right").on("mouseenter", ".node", function () {
                $(this).append('<img src="../../resources/images/close2.png"  style="position: absolute;" />');
                if ($(this).text() == "开始" || $(this).text() == "结束") {
                    $("img").css("left", 158).css("top", 0);
                } else {
                    $("img").css("left", 158).css("top", -10);
                }
            });
            $("#right").on("mouseleave", ".node", function () {
                $("img").remove();
            });
我想在这里大家都有疑问吧,为什么用on()事件委托。因为<img />是后添加进来的元素,前面页面已经完成了初始化,所以你用$("img")根本找不到这个元素,
因为img是在页面初始化后,才添加的元素。这里就提到了live()为什么不用这个,jquery1.7.2才有这个方法,这里用的是jquery1.11.1 已经没有live()方法了,
取而代之的是on()方法。(live()有许多缺点,所以在新的版本被摒弃了)
后面删除比较简单:
1     $("#right").on("click", "img",function () {
2                 if (confirm("确定要删除吗?")) {
3                     jsPlumb.removeAllEndpoints($(this).parent().attr("id"));
4                     $(this).parent().remove();
5
6                 }
7             });
注明:这里我遇到一个问题,你删除了那个div,你还得把它周围的4个端点(endpoint)删除,这个问题刚开始我想了很多,一直没做出来,后来去jsPlumb官网查看相关的资料,
发现jsPlumb提供一个方法能删除div四周的端点。方法如下:
jsPlumb.removeAllEndpoints($(this).parent().attr("id"));//删除指定id的所有端点
5.支持删除连接线:
1     jsPlumb.bind("click", function (conn, originalEvent) {
2                 if (confirm("确定删除吗?    "))
3                     jsPlumb.detach(conn);
4             });
6. 能双击修改流程图的文字:
 1     function doubleclick(id) {
 2             $(id).dblclick(function () {
 3                 var text = $(this).text();
 4                 $(this).html("");
 5                 $(this).append("<input type='text' value='" + text + "' />");
 6                 $(this).mouseleave(function () {
 7                     $(this).html($("input[type='text']").val());
 8                 });
 9             });
10         }
7.能序列化保存流程图:
我的思路是这样的,将中间div里所有的"流程图div信息和连接线两端的信息"保存到数组里,然后序列化成json数据,通过ajax传到asp.net 后台,将json写入到txt文档里保存到服务器端。
(其实保存到数据库里是最好的,后面会考虑保存到数据库),下次展示页面的时候,只要读取txt文档里的json,然后再转成泛型集合。
将页面上的div信息,和连线信息转成json跳转到ajax.aspx页面:
function save() {
            var connects = [];
            $.each(jsPlumb.getAllConnections(), function (idx, connection) {
                connects.push({
                    ConnectionId: connection.id,
                    PageSourceId: connection.sourceId,
                    PageTargetId: connection.targetId,
                    SourceText: connection.source.innerText,
                    TargetText: connection.target.innerText,
                });
            });
            var blocks = [];
            $("#right .node").each(function (idx, elem) {
                var $elem = $(elem);
                blocks.push({
                    BlockId: $elem.attr('id'),
                    BlockContent: $elem.html(),
                    BlockX: parseInt($elem.css("left"), 10),
                    BlockY: parseInt($elem.css("top"), 10)
                });
            });

            var serliza = JSON.stringify(connects) + "&" + JSON.stringify(blocks);
            $.ajax({
                type: "post",
                url: "ajax.aspx",
                data: { id: serliza },
                success: function (filePath) {
                    window.open("show-flowChart.aspx?path=" + filePath);
                }
            });
        }
ajax.aspx页面将前台传过来的json保存到服务器端,并跳转至 show-flowChart.aspx:
protected void Page_Load(object sender, EventArgs e)
    {
        if (!IsPostBack)
        {
            string str = Request["id"];
            string filePath = Server.MapPath("~/prototype/project-reply")+"\json"+DateTime.Now.ToString("yyyyMMddhhmmss")+".txt";
              WriteToFile(filePath,str,false);
            //Response.Redirect("show-flowChart.aspx?path="+filePath);
            Response.Write(filePath);
        }
    }
    public static void WriteToFile(string name, string content, bool isCover)
    {
        FileStream fs = null;
        try
        {
            if (!isCover && File.Exists(name))
            {
                fs = new FileStream(name, FileMode.Append, FileAccess.Write);
                StreamWriter sw = new StreamWriter(fs, Encoding.UTF8);
                sw.WriteLine(content);
                sw.Flush();
                sw.Close();
            }
            else
            {
                File.WriteAllText(name, content, Encoding.UTF8);
            }
        }
        finally
        {
            if (fs != null)
            {
                fs.Close();
            }
        }

    }
show-flowChart.aspx页面:
protected void Page_Load(object sender, EventArgs e)
    {
        if (!IsPostBack)
        {
            string str = Request["path"];
            StreamReader sr = new StreamReader(str);
            string jsonText = sr.ReadToEnd();

            List<JsPlumbConnect> list = new JavaScriptSerializer().Deserialize<List<JsPlumbConnect>>(jsonText.Split('&')[0]);
            List<JsPlumbBlock> blocks = new JavaScriptSerializer().Deserialize<List<JsPlumbBlock>>(jsonText.Split('&')[1]);
            string htmlText = "";
            string conn = "";
            if (blocks.Count > 0)
            {
                foreach (JsPlumbBlock block in blocks)
                {
                    if(block.BlockContent=="开始"||block.BlockContent=="结束")
                        htmlText += "<div class='node radius' id='" + block.BlockId + "'style='left:"+block.BlockX+"px;top:"+block.BlockY+"px;' >" + block.BlockContent + "</div>";
                    else
                        htmlText += "<div class='node' id='" + block.BlockId + "'style='left:" + block.BlockX + "px;top:" + block.BlockY + "px;' >" + block.BlockContent + "</div>";
                }
                foreach (JsPlumbConnect jsplum in list)
                    conn += "jsPlumb.connect({ source: "" + jsplum.PageSourceId + "", target: "" + jsplum.PageTargetId + "" }, flowConnector);";
                Literal1.Text = htmlText;
                string script = "jsPlumb.ready(function () {" + conn + "});";
                ClientScript.RegisterStartupScript(this.GetType(), "myscript", script, true);
            }
        }
    }
以及两个用到的类JsPlumbConnect类和JsPlumbBlock类:
/// <summary>
    /// 连接线信息
    /// </summary>
    public class JsPlumbConnect
    {
        public string ConnectionId { get; set; }
        public string PageSourceId { get; set; }
        public string PageTargetId { get; set; }
        public string SourceText { get; set; }
        public string TargetText { get; set; }
    }
     /// <summary>
     /// 流程图的所有div
     /// </summary>
    public class JsPlumbBlock
    {
        /// <summary>
        /// div Id
        /// </summary>
         public string BlockId { get; set; }
        /// <summary>
        /// div里面的内容
        /// </summary>
         public string BlockContent { get; set; }
         public int BlockX { get; set; }
         public int BlockY { get; set; }
    }
结尾
附件下载地址:http://pan.baidu.com/s/1jGC8XM2
------------------------------------------------------------------------------------
jsPlumb之流程图项目总结及实例
在使用jsPlumb过程中,所遇到的问题,以及解决方案,文中引用了《数据结构与算法JavaScript描述》的相关图片和一部分代码.截图是有点多,有时比较懒,没有太多的时间去详细的编辑.
前言
首先是UML类图
然后是流程图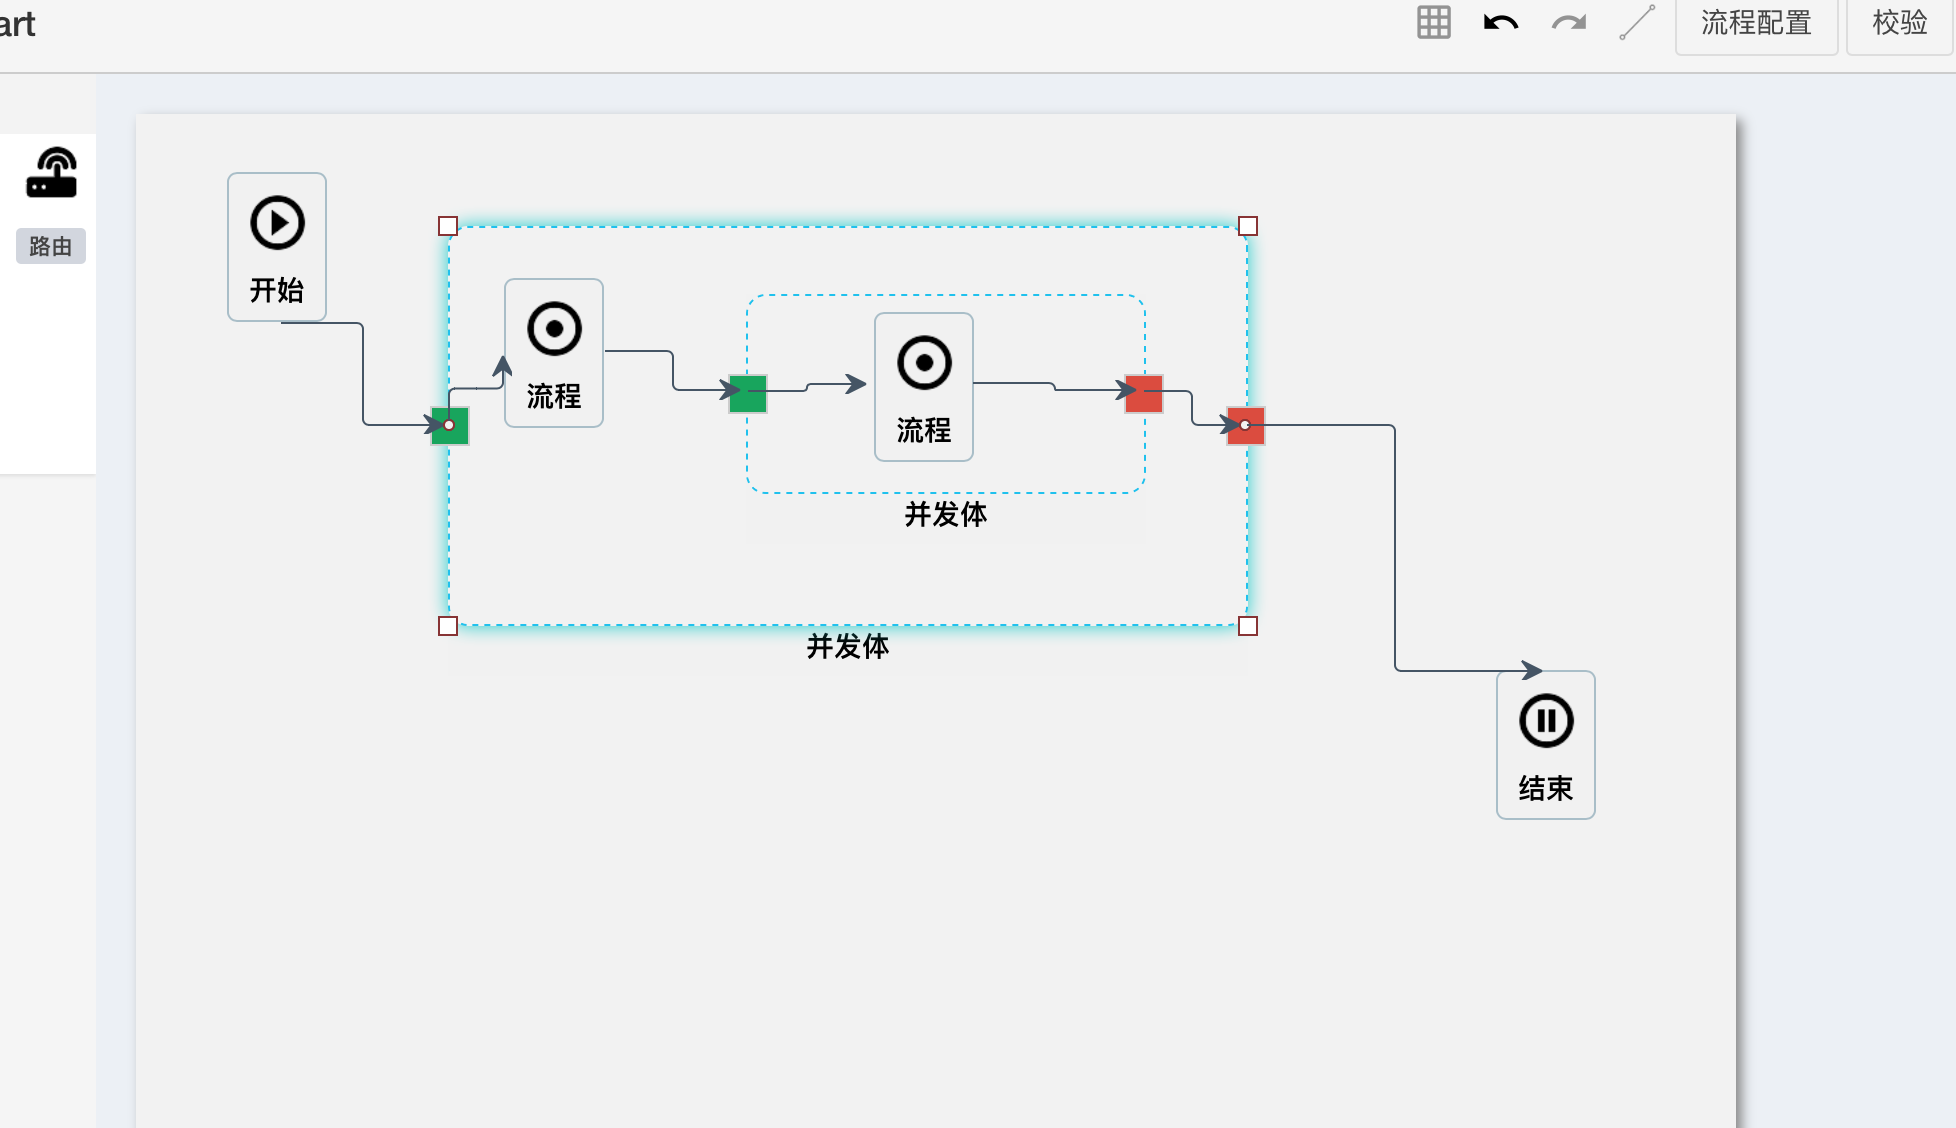
使用了jsPlumb的相关功能,初版是可以看到雏形了,差不多用了两个月的时间,中间断断续续的又有其它工作穿插,但还是把基本功能做出来了.
其实做完了之后,才发现jsPlumb的功能,只用到了很少的一部分,更多的是对于内部数据结构的理解和实现,只能说做到了数据同步更新,距离数据驱动仍然有一定的距离.
这里会总结和记录一下项目中遇到的问题,和解决的方法,如果有更好的方法,欢迎指出.
对于连线上的多个标签的处理
如上图所示,一开始是认为是否是要在连线时,配置两个overlays,
    var j = jsPlumb.getInstance();

    j.connect({
        source:source,
        target:target,
        overlays:[
            "Arrow",
            ["label",{label:"foo1",location:0.25,id:"m1"}],
            ["label",{label:"foo2",location:0.75,id:"m2"}]
        ]
    })
当然,这里也有坑,如果id重复,那么会使用最后一个,而不会重合,包括jsPlumb内部缓存的数据都只会剩下最后的那个.
后面发现,其实也可以通过importDefaults函数来动态修改配置项.
    j.importDefaults({
        ConnectionOverlays: [
            ["Arrow", { location: 1, id: "arrow", length: 10, foldback: 0,  10 }],
            ["Label", { label: "n", id: "label-n", location: 0.25, cssClass: "jspl-label" }],
            ["Label", { label: "1", id: "label-1", location: 0.75, cssClass: "jspl-label" }]
        ]
    })
只不过这样,只会在运行了函数之后的连线里,才能有两个标签显示,而之前的则无法一起变化.
所以为了方便,直接在初始化里将其给修改了.
Groups的使用
在做流程图时,Group确实是个问题,如上图的无限嵌套层级中,就无法使用jsPlumb提供的Groups功能.
按照文档中来说,如果标识一个元素为组,则该组中的元素则会跟随组的移动而移动,连线也是,但问题就是一旦一个元素成为组了,那就不能接受其它组元素了,换句话说,它所提供的的Groups方法只有一层,自然无法满足要求.
先把总结的组的用法贴出来:
    j.addGroup({
        el:el,
        id:"one"
        constrain:true, // 子元素仅限在元素内拖动
        droppable:true, // 子元素是否可以放置其他元素
        draggable:true, // 默认为true,组是否可以拖动
        dropOverride:true ,// 组中的元素是否可以拓展到其他组,为true时表示否,这里的拓展会对dom结构进行修改,而非单纯的位置移动
        ghost:true, // 是否创建一个子元素的副本元素
        revert:true, // 元素是否可以拖到只有边框可以重合
    })
后面采用了新的方式,在节点移动时,动态刷新连线
j.repaintEverything();而为了不阻塞页面,需要用到函数节流throttle()
    function throttle(fn,interval){
        var canRun = true;

        return function(){
            if(!canRun) return;
            canRun = false;
            setTimeout(function(){
                fn.apply(this,arguments);
                canRun = true;
            },interval ? interval : 300);
        };
    };
这是一个简单的实现方式,主要就是为了减少dom中事件移动时重复调用的事件,同时达到执行事件的目的(只允许一个函数在x毫秒内执行一次);
当然,也可以使用underscore.js中自带的_.throttle()函数,同样可以达到目的.
这里的html结构就使用了嵌套的层级,将父级和子级使用这种层级保存到内部的数据源里
多层or一层 数据结构解析
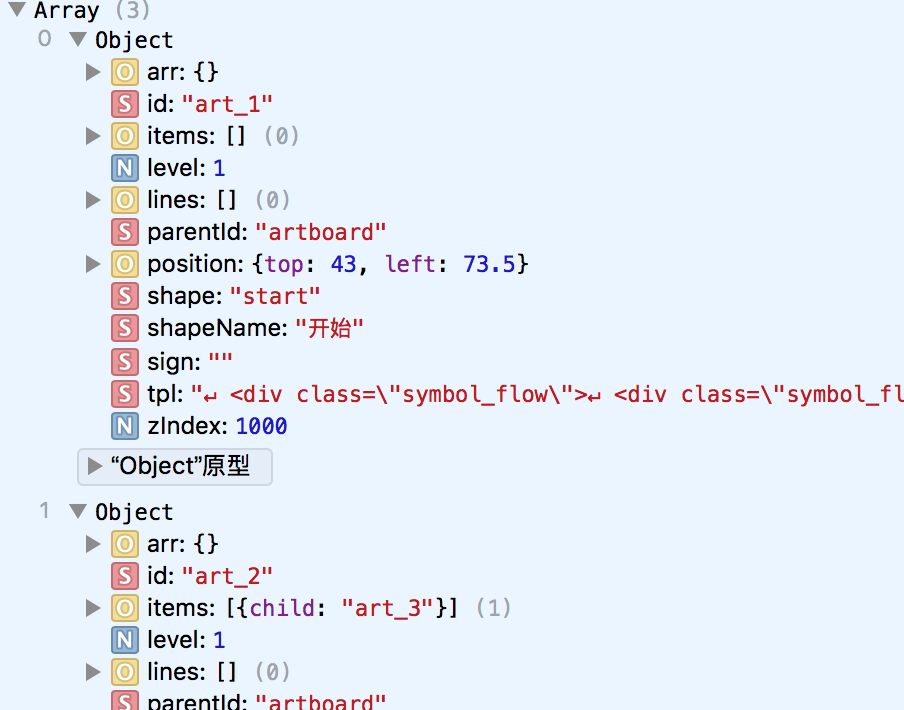
类似这种实际存在嵌套关系的数据体,有两种方式可以进行管理,
-
多层级嵌套:类似
    [
        {
            id:"1",
            child:{
                id:"2",
                child:{
                    id:"3",
                    child:{}
                }
            }
        }
    ]
用来进行管理的话,优点是直观,能根据层级就知道整体结构大概是多少,转换成xml或者html也很方便.
但缺点就是进行查找和修改,并不是那么方便. -
一层展示所有节点:类似
    [
        {
            id:"1",
            child:[{
                id:"2"
            }]
        },
        {
            id:"2",
            parentId:"1",
            child:[{
                id:"3"
            }]
        },
        {
            id:"3",
            parentId:"2",
            child:[]
        }
    ]
这种结构好处就是全部在一个层级中,查找起来和修改数据非常方便,而如果想要解析成多层级的结构,只需要运用递归,来生成新结构:
function mt(){
    var OBJ;
    this.root = null;
    this.Node = function(e) {
        this.id = e.id;
        this.name = e.name;
        this.parentId = e.parentId;
        this.children = [];
    };

    this.insert=function(e,key){
        function add(obj,e){
            if(obj.id == e.parentId){
                obj.children.push(e);
            } else {
                for (var i = 0; i < obj.children.length; i++) {
                    add(obj.children[i], e);
                }
            }
        }

        if (e != undefined) {
            e = new this.Node(e);
        } else {
            return;
        }

        if (this.root == null) {
            this.root = e;
        } else {
            OBJ = this.root;
            add(OBJ, e);
        }
    }

    this.init = function(data){
        var _this = this;
        for(var i = 0;i<data.length;i++){
            _this.insert(data[i]);
        }

        return OBJ;
    }
}
将一层的数组通过初始化函数
init,就可以转为多层级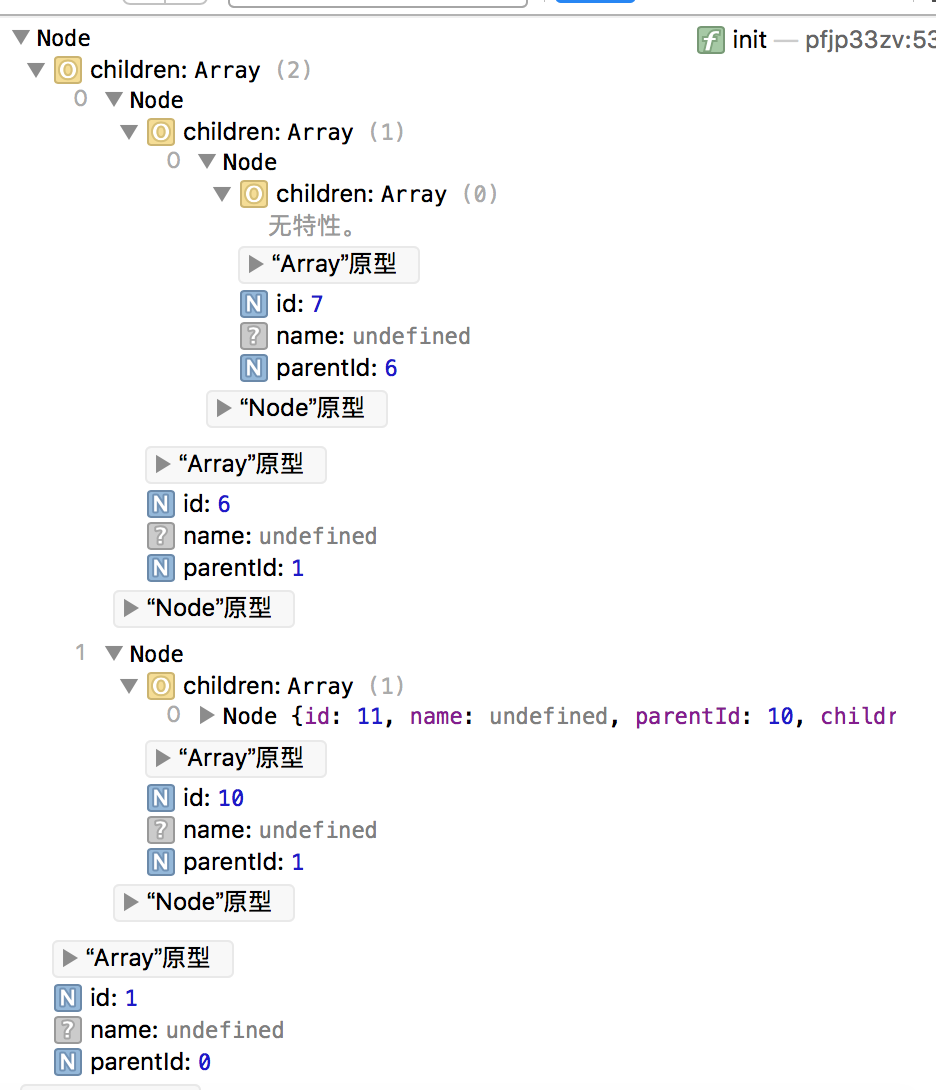
如果想转成html结构,只需要稍微改下函数,就可以实现了.
校验流程是否存在死路(是否存在不能到达图的终点的路径的点)
这个就完全得靠算法来实现了.首先,对于图的理解是重点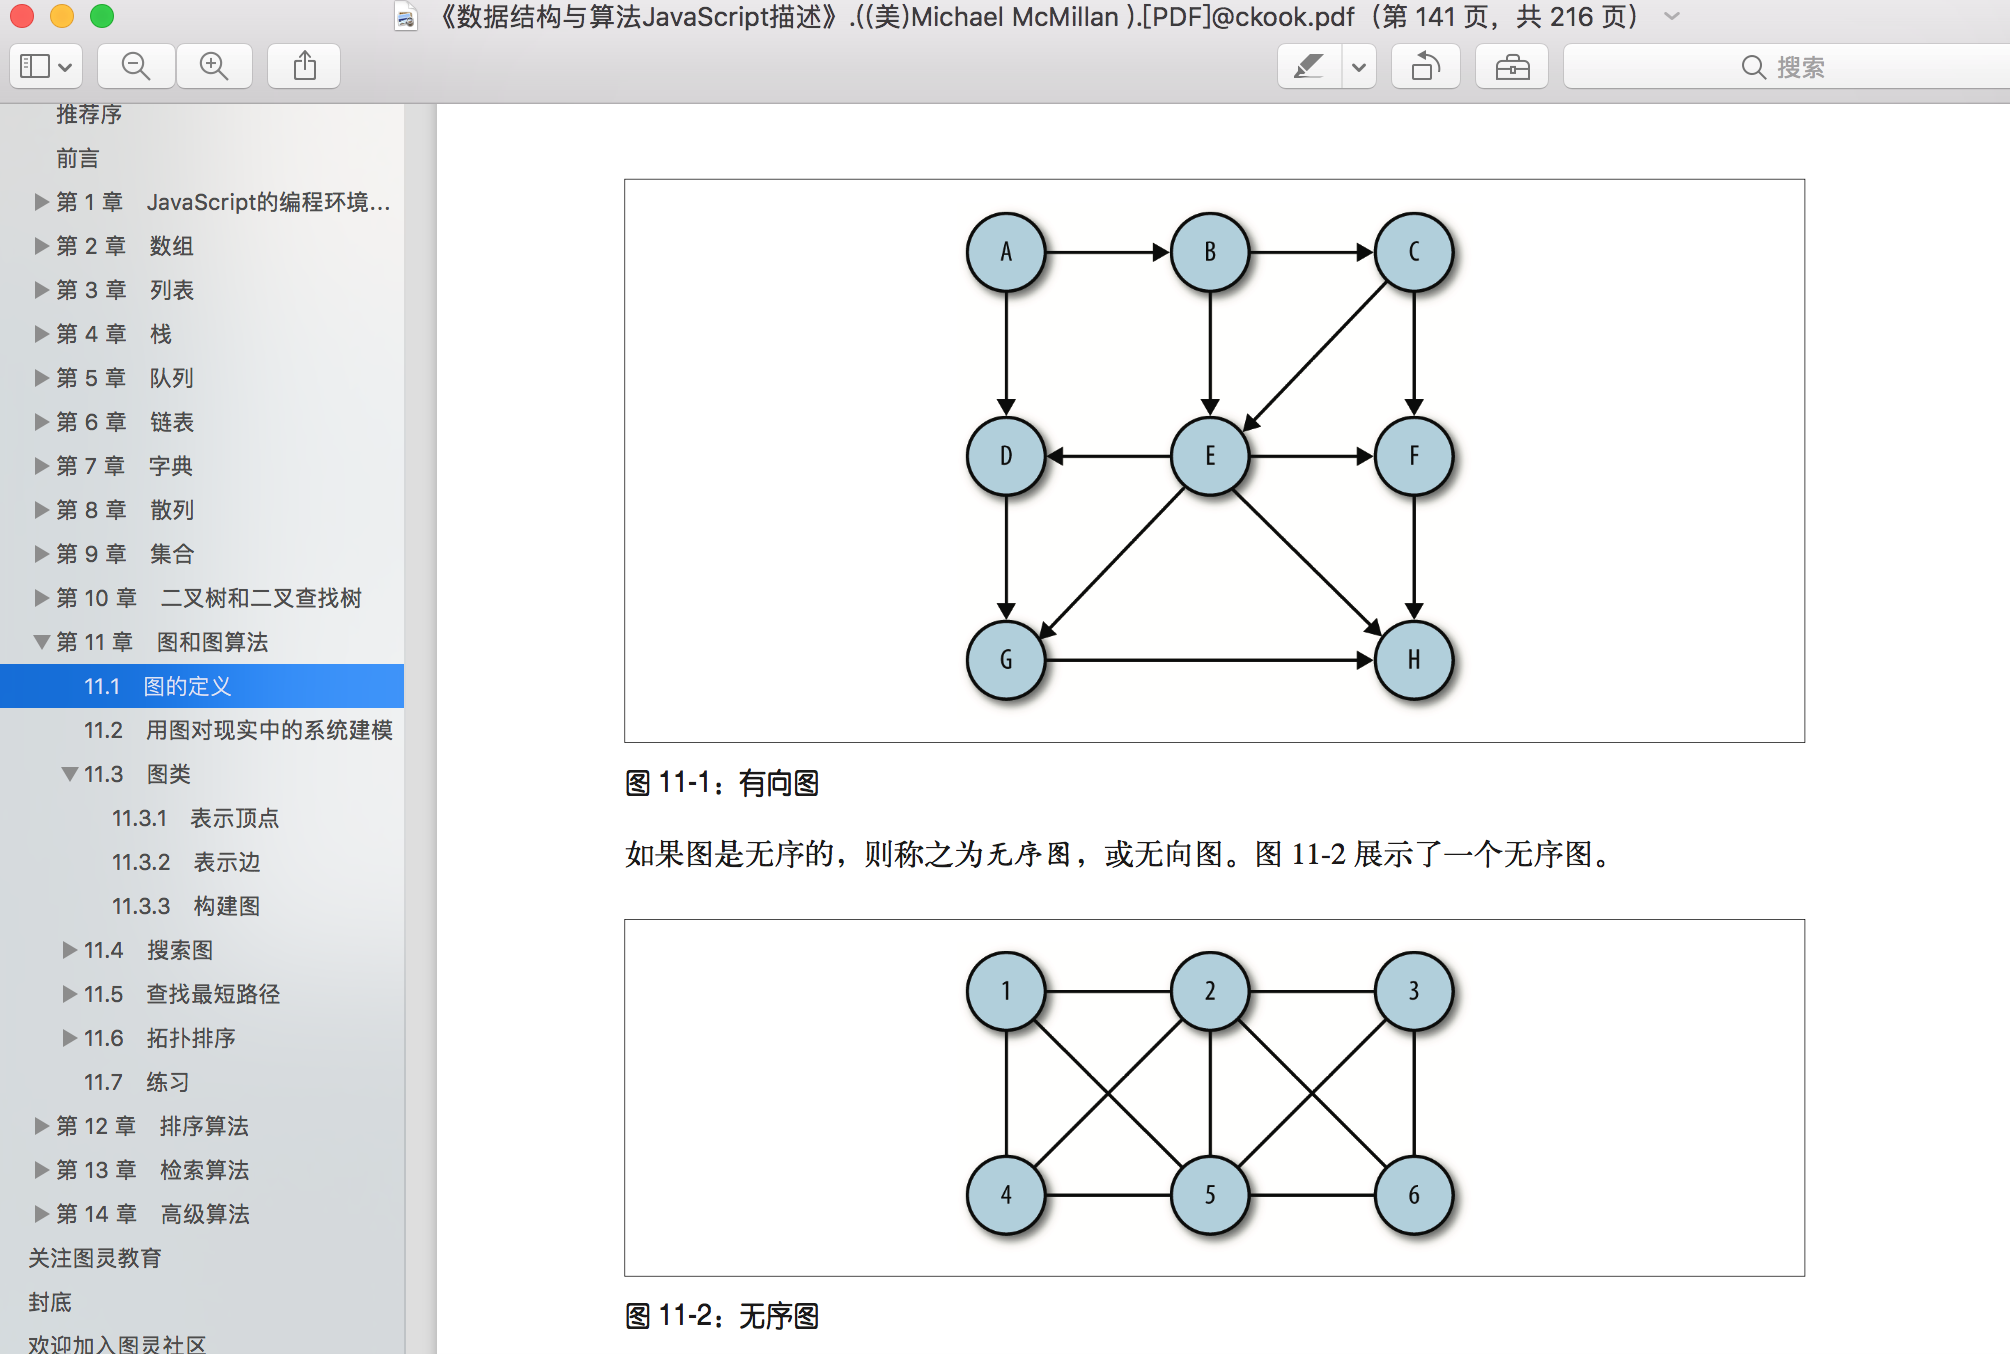
我也懒得打字了,直接用图表示一下,基本的图大致是这样,而具体的表现形式则是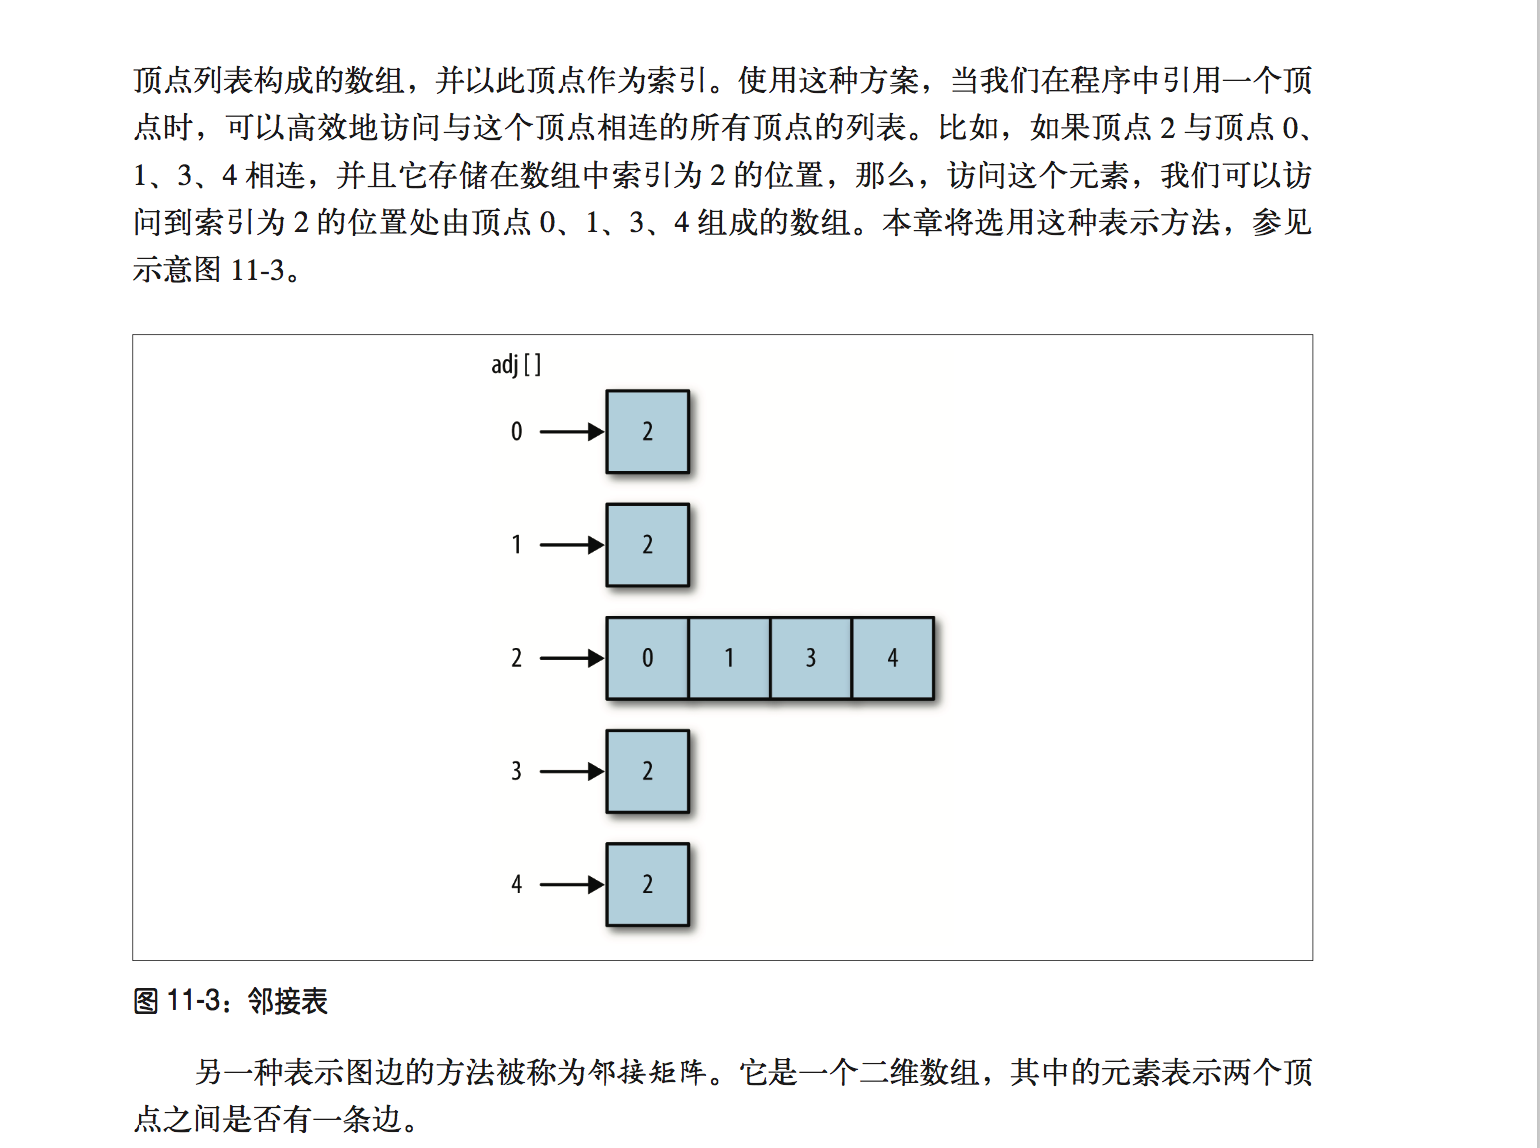
可以看到,基础的图的表现形式,可以用一个邻接表来表示;
而实现,则可以看到下列的代码:
function Graph1(v) {
  this.vertices = v; // 总顶点
  this.edges = 0; // 图的边数
  this.adj = [];

  // 通过 for 循环为数组中的每个元素添加一个子数组来存储所有的相邻顶点,[并将所有元素初始化为空字符串。]?
  for (var i = 0; i < this.vertices; ++i) {
    this.adj[i] = [];
  }

  /**
   * 当调用这个函数并传入顶点 v 和 w 时,函数会先查找顶点 v 的邻接表,将顶点 w 添加到列表中
   * 然后再查找顶点 w 的邻接表,将顶点 v 加入列表。最后,这个函数会将边数加 1。
   * @param {[type]} v [第一个顶点]
   * @param {[type]} w [第二个顶点]
   */
  this.addEdge = function(v, w) {
    this.adj[v].push(w);
    this.adj[w].push(v);
    this.edges++;
  }

  /**
   * 打印所有顶点的关系简单表现形式
   * @return {[type]} [description]
   */
  this.showGraph = function() {
    for (var i = 0; i < this.vertices; ++i) {
      var str = i + " ->";
      for (var j = 0; j < this.vertices; ++j) {
        if (this.adj[i][j] != undefined) {
          str += this.adj[i][j] + ' '
        }
      }

      console.log("表现形式为:" + str);
    }

    console.log(this.adj);
  }
}
而光构建是不够的,所以来看下基础的搜索方法:
深度优先搜索和广度优先搜索;
深度优先搜索
先从初始节点开始访问,并标记为已访问过的状态,再递归的去访问在初始节点的邻接表中其他没有访问过的节点,依次之后,就能访问过所有的节点了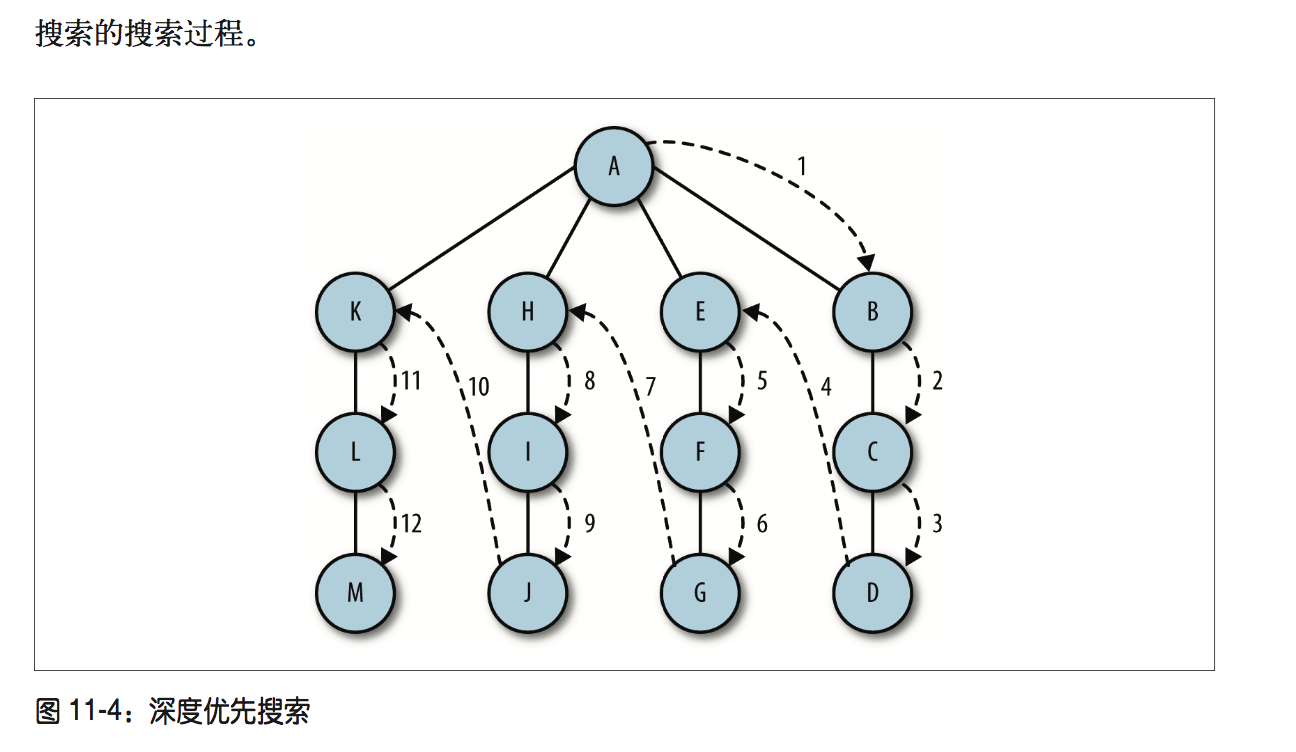
  /**
   * 深度优先搜索算法
   * 这里不需要顶点,也就是邻接表的初始点
   */
    this.dfs = (v) {
        this.marked[v] = true;
        for (var w of this.adj[v]) {
            if (!this.marked[w]) {
                this.dfs(w);
            }
        }
    }
根据图片和上述的代码,可以看出深度搜索其实可以做很多其他的扩展
广度优先搜索
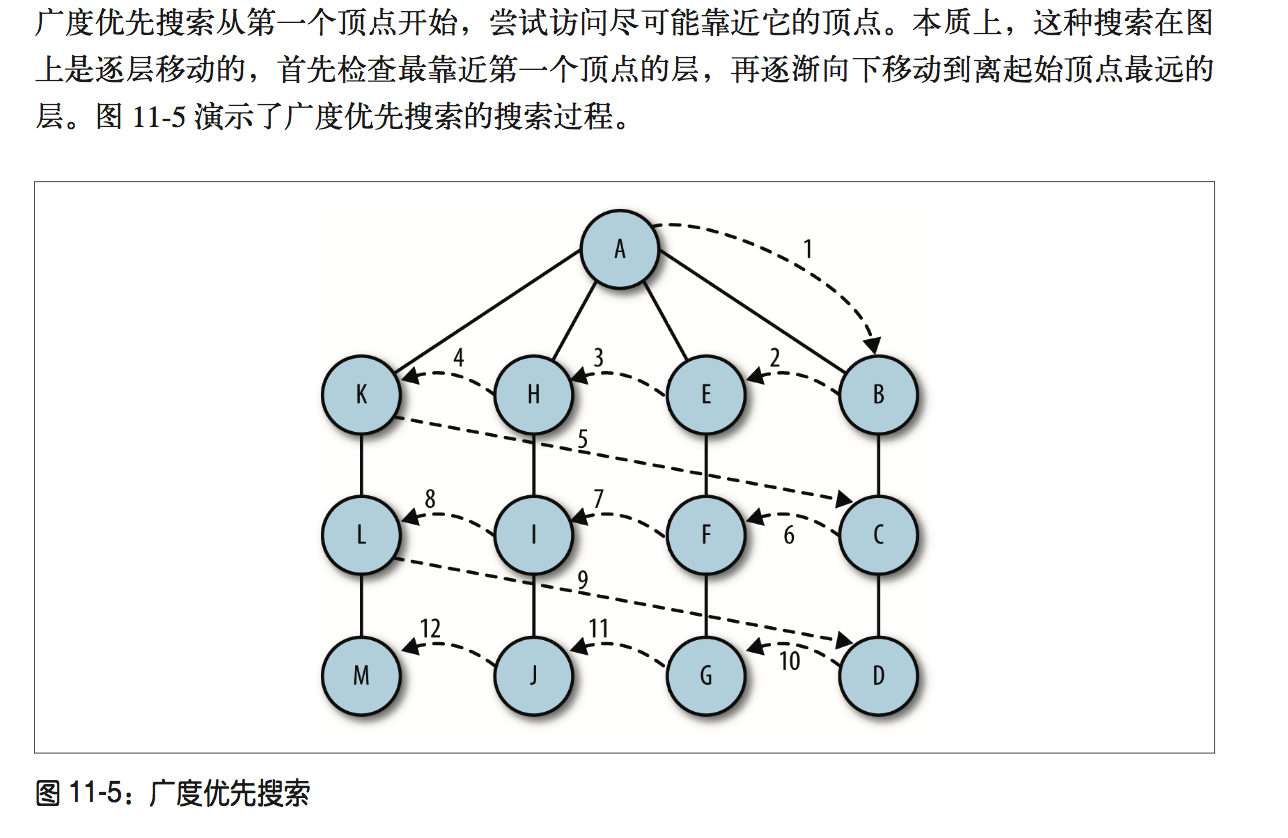
  /**
   * 广度优先搜索算法
   * @param  {[type]} s [description]
   */
  this.bfs = function(s) {
    var queue = [];
    this.marked[s] = true;
    queue.push(s); // 添加到队尾
    while (queue.length > 0) {
      var v = queue.shift(); // 从队首移除
      console.log("Visisted vertex: " + v);
      for (var w of this.adj[v]) {
        if (!this.marked[w]) {
          this.edgeTo[w] = v;
          this.marked[w] = true;
          queue.push(w);
        }
      }
    }
}而如果看了《数据结构与算法JavaScript描述》这本书,有兴趣的可以去实现下查找最短路径和拓扑排序;
两点之间所有路径
这算是找到的比较能理解的方式来计算
以上图为例,这是一个简单的流程图,可以很简单的看出,右边的流程实际上是未完成的,因为无法到达终点,所以是一个非法点,而通过上面的深度搜索,可以看出,只要对深度优先搜索算法进行一定的修改,那么就可以找到从开始到结束的所有的路径,再通过对比,就可以知道哪些点无法到达终点,从而确定非法点.
上代码:
    /**
     * 深度搜索,dfs,解两点之间所有路径
     * @param  {[type]} v [description]
     * @return {[type]}   [description]
     */
    function Graph2(v) {
        var _this = this;

        this.vertices = v; // 总顶点
        this.edges = 0; //图的起始边数
        this.adj = []; //内部邻接表表现形式
        this.marked = []; // 内部顶点访问状态,与邻接表对应
        this.path = []; // 路径表示
        this.lines = []; // 所有路径汇总

        for (var i = 0; i < this.vertices; ++i) {
            _this.adj[i] = [];
        }

        /**
         * 初始化访问状态
         * @return {[type]} [description]
         */
        this.initMarked = function() {
            for (var i = 0; i < _this.vertices; ++i) {
                _this.marked[i] = false;
            }
        };

        /**
         * 在邻接表中增加节点
         * @param {[type]} v [description]
         * @param {[type]} w [description]
         */
        this.addEdge = function(v, w) {
            this.adj[v].push(w);
            this.edges++;
        };

        /**
         * 返回生成的邻接表
         * @return {[type]} [description]
         */
        this.showGraph = function() {
            return this.adj;
        };

        /**
         * 深度搜索算法
         * @param  {[type]} v    [起点]
         * @param  {[type]} d    [终点]
         * @param  {[type]} path [路径]
         * @return {[type]}      [description]
         */
        this.dfs = function(v, d, path) {
            var _this = this;

            this.marked[v] = true;
            path.push(v);

            if (v == d) {
                var arr = [];
                for (var i = 0; i < path.length; i++) {
                    arr.push(path[i]);
                }

                _this.lines.push(arr);
            } else {
                for (var w of this.adj[v]) {
                    if (!this.marked[w]) {
                        this.dfs(w, d, path);
                    }
                }
            }

            path.pop();
            this.marked[v] = false;
        };

        this.verify = function(arr, start, end) {

            this.initMarked();

            for (var i = 0; i < arr.length; i++) {
                _this.addEdge(arr[i].from, arr[i].to);
            }

            this.dfs(start, end, this.path);
            return this.lines;
        };
}可以看出修改了addEdge()函数,将邻接表中的双向记录改为单向记录,可以有效避免下图的错误计算:
只计算起点到终点的所有连线有时并不客观,如果出现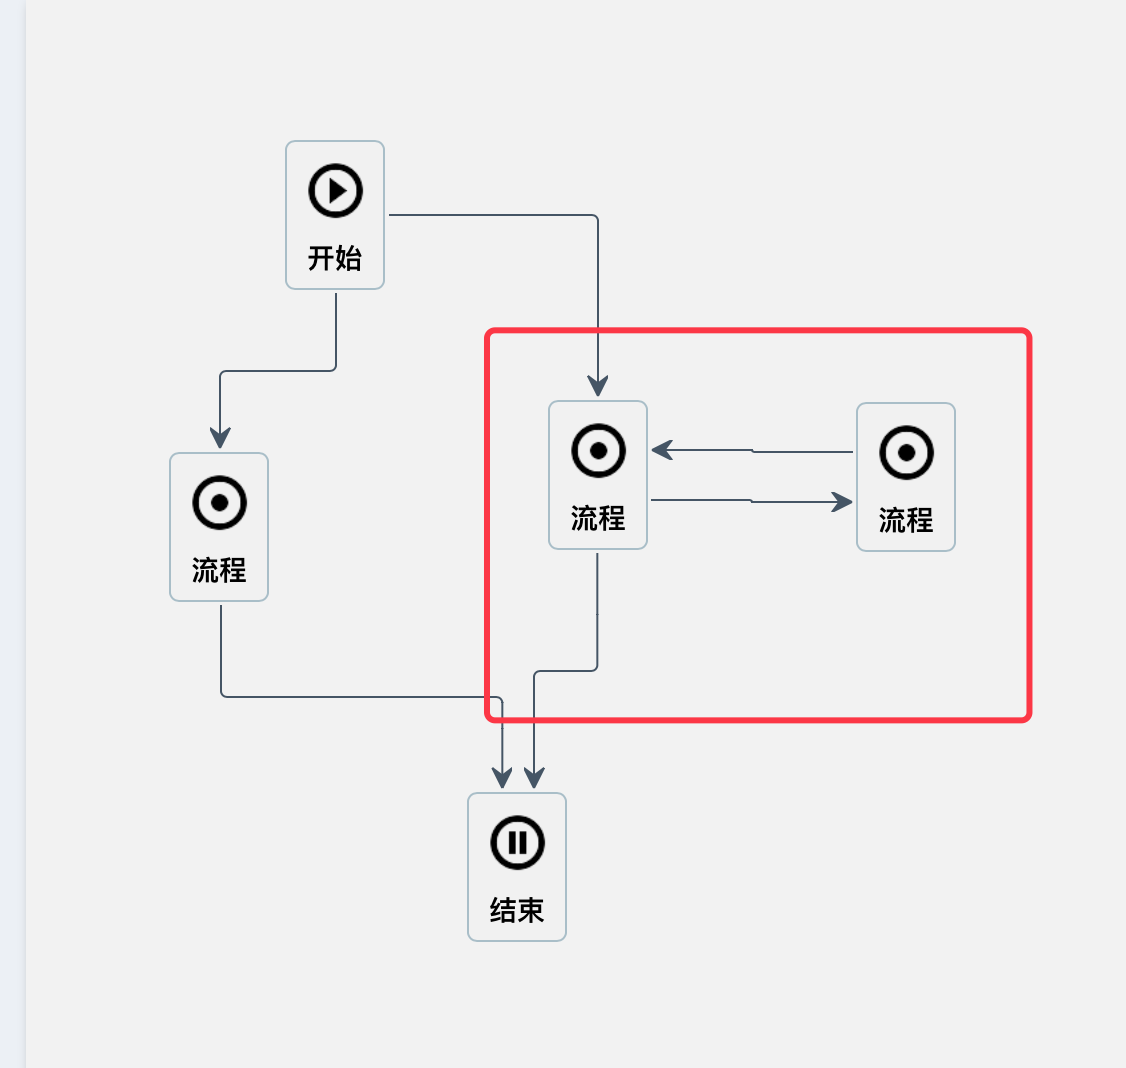
这种情况的话,实际上深度遍历并不能计算出最右边的节点是合法的,那么就需要重新修改起点和终点,来推导是否能够到达终点.从而判定该点是否合法.至于其他的,只是多了个返回值,存储了一下计算出来的所有路径.
而在dfs函数中,当满足能够从起点走到终点的,则记录下当前的path中的值,保存到lines中去,而每一次对于path的推入或者推出,保证了只有满足条件的点,才能被返回;
而this.marked[v] = false,则确保了,在每一次重新计算路径时,都会验证每个点是否存在不同的相对于终点能够到达的路径是否存在.
当然,一定会有更加简单的方法,我这里只是稍微修改了下基础的代码!
redo和undo
这是我觉得最简单却耗时最久的功能,思路都知道:创建一个队列,记录每一次创建一个流程节点,删除一个流程节点,建立一个新的关联关系,删除一个新的关联关系等,都需要记录下来,再通过统一的接口来访问队列,执行操作.
但在具体实现上,jsPlumb的remove确实需要注意一下:
首先,如果需要删除连线,那么使用jsPlumb提供的detach()方法,就可以删除连线,注意,传入的数据应该是connection对象.
当然,也可以使用remove()方法,参数为选择器或者element对象都可以,这个方法删除的是一个节点,包括节点上所有的线.
而jsPlumb中会内部缓存所有的数据,用于刷新,和重连.
那么当我移除一个多层级且内部有连线的情况时,如果只删除最外层的元素,那么内部的连线实际上并没有清除,所以当redo或者移动时,会出现连线的端点有一端会跑到坐标原点,也就是div上(0,0)的地方去.所以清除时,需要注意,要把内部的所有节点依次清除,才不会发生一些莫名其妙的bug.
而在删除和连接连线上,我使用了jsPlumb提供的事件bind('connection')和bind("connectionDetached"),用于判断一条连线被连接或者删除.而在记录这里的redo和undo事件时,尤其要注意,需要首先确定删除和连接时的连线的类型,否则会产生额外的队列事件.
因此,在使用连接事件时,就可以使用
jsPlumb.connect({
    source:"foo",
    target:"bar",
    parameters:{
        "p1":34,
        "p2":new Date(),
        "p3":function() { console.log("i am p3"); }
    }
});
来进行类型的传参,这样事件触发时就可以分类处理.
也可以使用connection.setData()事件,参数可以指定任意的值,通过connection.getData()方法,就可以拿到相应的数据了.
而redo和undo本身确实没有什么东西
    var defaults = {
        'name': "mutation",
        'afterAddServe':$.noop,
        'afterUndo':$.noop,
        'afterRedo':$.noop
    }

    var mutation = function(options){
        this.options = $.extend(true,{},defaults,options);

        this.list = [];
        this.index = 0;
    };

    mutation.prototype = {
        addServe:function(undo,redo){
            if(!_.isFunction(undo) || !_.isFunction(redo)) return false;

            // 说明是在有后续操作时,更新了队列
            if(this.canRedo){
                this.splice(this.index+1);
            };
            this.list.push({
                undo:undo,
                redo:redo
            });

            console.log(this.list);

            this.index = this.list.length - 1;

            _.isFunction(this.options.afterAddServe) && this.options.afterAddServe(this.canUndo(),this.canRedo());
        },
        /**
         * 相当于保存之后清空之前的所有保存的操作
         * @return {[type]} [description]
         */
        reset:function(){
            this.list = [];
            this.index = 0;
        },
        /**
         * 当破坏原来队列时,需要对队列进行修改,
         * index开始的所有存储值都没有用了
         * @param  {[type]} index [description]
         * @return {[type]}       [description]
         */
        splice:function(index){
            this.list.splice(index);
        },
        /**
         * 撤销操作
         * @return {[type]} [description]
         */
        undo:function(){
            if(this.canUndo()){
                this.list[this.index].undo();
                this.index--;

                _.isFunction(this.options.afterUndo) && this.options.afterUndo(this.canUndo(),this.canRedo());
            }
        },
        /**
         * 重做操作
         * @return {[type]} [description]
         */
        redo:function(){
            if(this.canRedo()){
                this.index++;
                this.list[this.index].redo();

                _.isFunction(this.options.afterRedo) && this.options.afterRedo(this.canUndo(),this.canRedo());
            }
        },
        canUndo:function(){
            return this.index !== -1;
        },
        canRedo:function(){
            return this.list.length - 1 !== this.index;
        }
    }

    return mutation;
每次在使用redo或者undo时,只需要判断当前是否是队列的尾端或者起始端,再确定是否redo或者undo就可以了.
调用时的undo()和redo()通过传参,将不同的函数封装进队列里,就可以减少耦合度.
放大缩小
这里想了想还是记录一下,方法采用了最简单的mousedown和mousemove,让元素在节流中动态的变化大小,就可以了,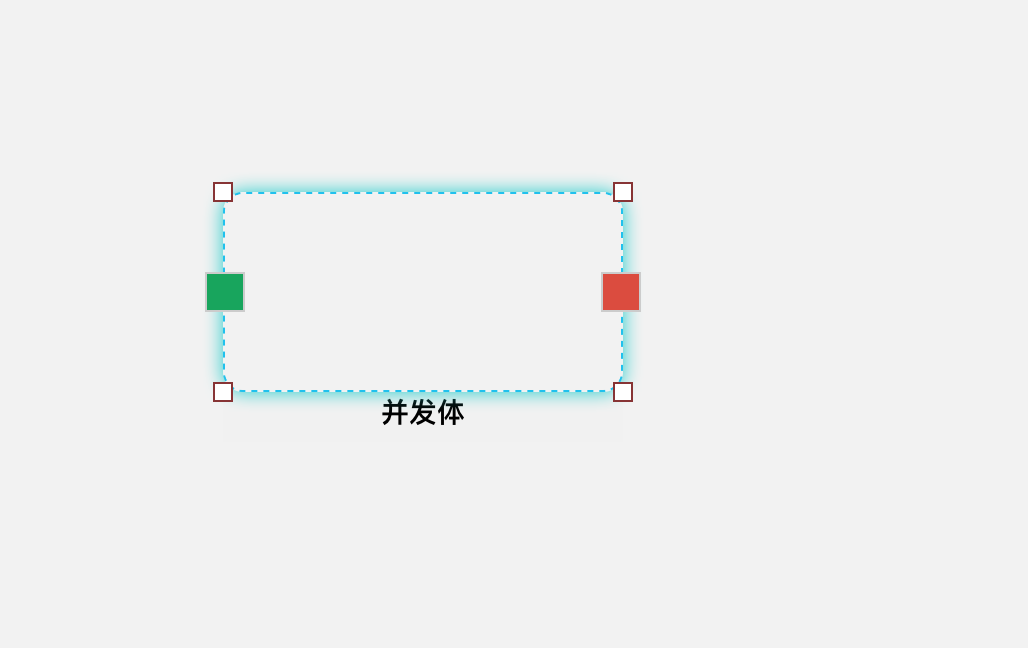
只需要用一个节点,在点击元素时,根据元素的大小来确定该辅助节点四个点的位置,就可以了,只要监听了这四个点的位置,再同步给该定位元素,就能实现这一效果
define([
    'text!textPath/tpl.flow.control.html',
], function(flowControl) {
    var defaults = {
        stage: document, //舞台
        root: null,
        refresh: null,
        dragStop: null
    }

    var resize = function(el, options) {
        this.options = $.extend(true, {}, defaults, options);
        this.target = el instanceof jQuery ? el : $(el);
        this.init();
    };

    resize.prototype = {
        init: function() {
            this.initResizeBox();
        },
        renderTpl: function(tpl, data) {
            if (!_.isFunction(tpl)) tpl = _.template(tpl);
            return tpl(data)
        },
        initResizeBox: function() {
            var _this = this;

            this.ox = 0; // 初始位置x
            this.oy = 0; // 初始位置y
            this.ow = 0; // 初始宽度
            this.oh = 0; // 初始高度

            this.oLeft = 0; // 初始元素left定位
            this.oTop = 0; // 初始元素top定位
            this.helperLeft = 0; // 初始助手left定位
            this.helperTop = 0; // 初始助手top定位
            this.org = null; // 映射元素
            this.parent = ''; // 父元素
            this.orgItem = null; // 映射子元素,用于计算范围
            this.minWidth = 0; // 映射元素最小宽度
            this.minHeight = 0; // 映射元素最小高度
            this.maxWidth = 0; // 映射元素最大宽度
            this.maxHeight = 0; // 映射元素最大高度

            this.helper = $(this.renderTpl(flowControl)).appendTo(this.target); // 缩放助手
            this.bindResizeEvent(this.helper);
        },
        offset: function(curEle) {
            var totalLeft = null,
                totalTop = null,
                par = curEle.offsetParent;
            //首先加自己本身的左偏移和上偏移
            totalLeft += curEle.offsetLeft;
            totalTop += curEle.offsetTop
            //只要没有找到body,我们就把父级参照物的边框和偏移也进行累加
            while (par) {
                if (navigator.userAgent.indexOf("MSIE 8.0") === -1) {
                    //累加父级参照物的边框
                    totalLeft += par.clientLeft;
                    totalTop += par.clientTop
                }

                //累加父级参照物本身的偏移
                totalLeft += par.offsetLeft;
                totalTop += par.offsetTop
                par = par.offsetParent;
            }

            return {
                left: totalLeft,
                top: totalTop
            }
        },
        scrollArtboard: function(pos, el) {
            var _this = this;

            var artboardWidth = $(".artboard.flow").outerWidth(),
                artboardHeight = parseFloat($(".artboard.flow").outerHeight()) - 42,
                elWidth = el.outerWidth(),
                elHeight = el.outerHeight(),
                isConcurrenceChild = el.parent('.symbol_flow-concurrence').length > 0 ? true : false;

            if (isConcurrenceChild) {
                if (_this.offset(el.get(0)).left + elWidth > artboardWidth) {
                    console.log("并发体越界");
                    $(".artboard.flow").scrollLeft(_this.offset(el.get(0)).left + elWidth);
                }

                if (_this.offset(el.get(0)).top + elHeight > artboardHeight) {
                    console.log("并发体越界");
                    $(".artboard.flow").scrollTop(_this.offset(el.get(0)).top + elHeight);
                }
            } else {
                // 长度长于画布
                if (pos.left + elWidth > artboardWidth) {
                    $(".artboard.flow").scrollLeft(pos.left + elWidth);
                }

                if (pos.top + elHeight > artboardHeight) {
                    $(".artboard.flow").scrollTop(pos.top + elHeight);
                }
            }
        },
        hasBeyond: function(el,master) {
            var _this = this;

            if (_this.isConcurrenceChild) {
                var parentOffset = _this.offset(_this.parent.get(0));
                parentOffset.height = parentOffset.top + _this.parent.outerHeight();
                parentOffset.width = parentOffset.left + _this.parent.outerWidth();
                var elOffset = _this.offset(el.get(0));
                elOffset.height = elOffset.top + el.outerHeight();
                elOffset.width = elOffset.left + el.outerWidth();

                if (master.left < 0 || master.top < 0) {
                    $(_this.options.stage).trigger('mouseup');
                }

                if (parentOffset.height < elOffset.height || parentOffset.width < elOffset.width) {
                    $(_this.options.stage).trigger('mouseup');
                }
            }
        },
        /**
         * 根据传入的操作节点进行定位
         * 新增根据parentId来判断并发体中的定位校准
         * @param  {[type]} target [description]
         * @return {[type]}        [description]
         */
        position: function(target, parentId) {
            var _this = this;

            this.org = target;
            this.parent = $("#" + parentId);
            this.orgItem = target.children('.symbol_flow-concurrence');
            this.oLeft = (this.org.offset().left - this.options.root.offset().left) < parseFloat(this.org.css('left')) ? parseFloat(this.org.css('left')) : (this.org.offset().left - this.options.root.offset().left);
            this.oTop = (this.org.offset().top - this.options.root.offset().top) < parseFloat(this.org.css('top')) ? parseFloat(this.org.css('top')) : (this.org.offset().top - this.options.root.offset().top);
            this.minWidth = parseFloat(this.orgItem.css('minWidth').replace('px', ''));
            this.minHeight = parseFloat(this.orgItem.css('minHeight').replace('px', ''));
            this.maxHeight = parseFloat(this.org.closest('.symbol_flow-concurrence').outerHeight());
            this.maxWidth = parseFloat(this.org.closest('.symbol_flow-concurrence').outerWidth());

            this.helperLeft = parseFloat(this.offset(target.get(0)).left);
            this.helperTop = parseFloat(this.offset(target.get(0)).top) - 42; // 顶部偏移

            this.isConcurrenceChild = parentId == "artboard" ? false : true;

            this.helper.css({
                 _this.orgItem.outerWidth(),
                height: _this.orgItem.outerHeight(),
                left: _this.helperLeft,
                top: _this.helperTop
            })
            _this.show();
        },
        show: function() {
            this.helper.css("display", "block");
        },
        hide: function() {
            this.helper.css("display", "none");
        },
        bindResizeEvent: function(el) {
            var _this = this;

            var nwMove = false;
            el.on('mousedown', '.nw', function(