一、介绍
1,UITableView一个Scrollable(可滑动的)列表,它展示的内容项可以被分到不同的sections中。
UITableView只有一列,只允许垂直滚动。
UITableView由sections组成。每个section可以有一个header和一个footer(显示文本或图像),然后包含不定数量的
row。很多表视图只有一个section和不可见的header和footer。UIKit
通过indexPath识别section和row的位置。Sections为0 to n-1;rows为 0 to n-1。
UITableView可以有它自己的header和footer【通过设置tableHeaderView等设置】,不同于每个section的
header和footer。表header显示于第一个section的第一行之前,表footer显示于最后一个section的最后一行之后。
UITableView至少要有一个data source,并可能有一个delegate。
2,UITableView的内容由UITableViewCell组成,默认情况下它可以显示单行标题、单行副标题和图像。
可以给Cell的普通状态和选中状态设置不同的background View【通过backgroundView 和selectedBackgroundView设置】。
3、
UIKit框架定义了四种标准的cell样式,每一种都对3个默认的内容元素进行其自己的布局,这3个默认元素为:main
Label(textLabel属性)、detail
Label(detailTextLabel属性)、image(imageView属性)。你也可以重载UITableViewCell类来创建自己的
样式风格。样式只能在初始化时定义。这四种样式如下:
UITableViewCellStyleDefault :默认值,只显示mainLabel和Image。
UITableViewCellStyleSubtitle :显示mainLabel、detail Label和Image。
UITableViewCellStyleValue1 :只显示mainLabel和detail Label,左对齐MainLabel,右对齐detailLabel。
UITableViewCellStyleValue2 :只显示mainLabel和detail Label,右对齐MainLabel于某点,左对齐detailLabel于某点。
cell的内容组成如下:
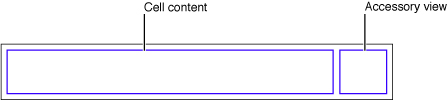
4、cells的accessory views属性:系统默认的有3种样式,使用accessoryType来设置:
UITableViewCellAccessoryDisclosureIndicator:
UITableViewCellAccessoryDetailDisclosureButton:
UITableViewCellAccessoryCheckmark:
同样的也可以设置cell的editingAccessoryType 和 editingAccessoryView。
4.1、cells的selectionStyle属性:控制row被选中时的底色是蓝色、灰色或没有任何显示。建议不要使用selection来指示状态【使用AccessoryView的Checkmark来指示】,如果用户选择了一个cell,你应该使用deselectRowAtIndexPath:animated:方法来取消选中状态。
你可以控制cell是否可以被选中,如设置Cell的allowSelectionDuraingEditing和allowsSelection属性。
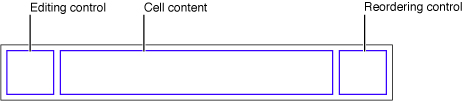
4.2、Cell的showsReorderControl属性 :确定在编辑模式下是否显示reordering control。
4.3、Cell的editingStyle属性是只读的,使用TableView的delegate的tableView:editingStyleForRowAtIndexPath: 方法设置。
4.4、Cell的indentionLevel 和 indentionWidth属性:设置缩放级别和缩放宽度。
4.5、通过cell.contentView添加子View。
4.6、加载IB中的UITableViewCell。
UITableViewCell *cell = [tableView dequeueReusableCellWithIdentifier:MyIdentifier];
if (cell == nil) {
[[NSBundle mainBundle] loadNibNamed:@"TVCell" owner:self options:nil];
cell = tvCell;
self.tvCell = nil;
}
4.7、加载IB中的静态UITableViewCell。在data source方法中直接返回IBOutLet链接的IB中的cell。
5、当UITableView处于编辑模式时,你可以添加、删除和重新排序Rows。
6、Table View样式:tablview有两种主要样式:plain和grouped。
plain样式背景为白色,section的header和footer会浮动到表视图的顶端和底部。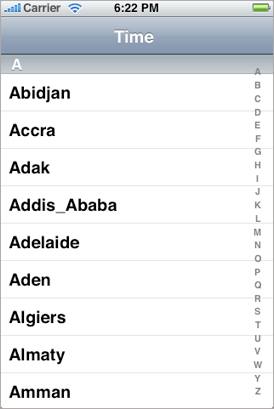
plain样式可以使用index来快速导航,如上图所示,显然 这时cell不应该再设置accessoryView。
grouped样式的tableview则分开显示section。
7,[tableview reloadData]:重载数据。
8、创建cell。
- (UITableViewCell *)tableView:(UITableView *)tableView cellForRowAtIndexPath:(NSIndexPath *)indexPath {
static NSString *MyIdentifier = @"MyIdentifier";
UITableViewCell *cell = [tableView dequeueReusableCellWithIdentifier:MyIdentifier];
if (cell == nil) {
cell = [[[UITableViewCell alloc] initWithStyle:UITableViewCellStyleDefault reuseIdentifier:MyIdentifier] autorelease];
}
Region *region = [regions objectAtIndex:indexPath.section];
TimeZoneWrapper *timeZoneWrapper = [region.timeZoneWrappers objectAtIndex:indexPath.row];
cell.textLabel.text = timeZoneWrapper.localeName;
return cell;
}
为
了性能原因,Datasource应尽可能地尝试重用(resuse)
cells。它首先通过发送dequeueReusableCellWithIdentifier:消息请求表视图提供一个特定的可重用的cell对象。
如果这个对象不存在,Datasource就创建一个指定reuse标志的cell。
9、使用UILocalizedIndexedCollation来创建多section表需要的数据。
10、添加和删除行
当TableView收到setEditing:animated:消息时,他发送相同的消息给每个可见的UITableviewCell 对象. 然后它发送一系列消息给其datasource和delegate,如下图所示: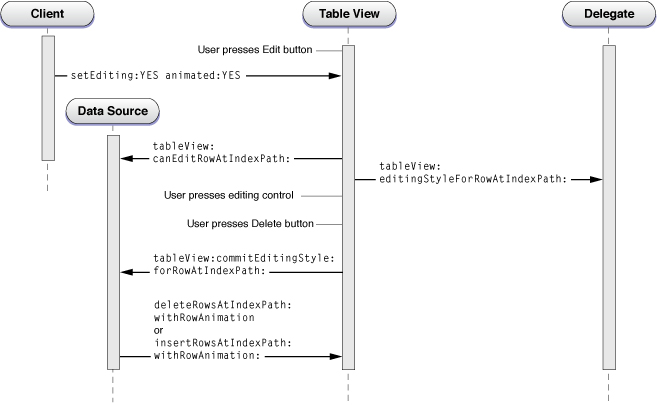
在重新给可见的rows中的cells发送setEditing:animated:之后,接下来的消息如下:
1)Tableview
调用datasource的 tableView:canEditRowAtIndexPath:方法【如果data
source实现了此方法才调用】。这个方法允许应用程序exclude(排除)
不能编辑的行【即使已经指定了cell的edtingStyle属性,也会调用此方法】。
2)Tableview 调用delegate的 tableView:editingStyleForRowAtIndexPath:方法。
此时,Tableview 已经完全进入到了编辑模式。它为符合条件的行显示添加或删除操作视图。
3)用户轻击editing control (或者是删除或者是添加),如果他轻击的是删除,一个删除按钮将显示在row上。用户然后轻击这个按钮来确认删除。
4)表视图 发送 tableView:commitEditingStyle:forRowAtIndexPath:消息给data source。它必须做下面两件事情:
a)发送 deleteRowsAtIndexPaths:withRowAnimation: 或 insertRowsAtIndexPath:withRowAnimation: 指示Tableview 调整其表现形式。
b)更新数据模型数组。
当
用户划过一行来显示删除按钮时,在调用顺序上有些变化。当用户划过一行来删除它时,Tableview 首先检查 它的data
source是否实现了tableView:commitEditingStyle:forRowAtIndexPath:方法,如果实现了,它则发送
setEditing:animated:消息 给自己并且进入编辑模式。在这个"swipe to delete"模式,Tableview
不显示编辑和重新排序操作视图.因为这是一个user-driven 事件,它还把另外2个消息也包括了进来:
tableView:willBeginEditingRowAtIndexPath: 和 tableView:didEndEditingRowAtIndexPath: .通过实现这些方法,delegate可以适当地更新Tableview 的外观。
注
意:data
source不应该在它实现tableView:commitEditingStyle:forRowAtIndexPath:方法中调用
setEditing:animated:。如果因为某些原因必须这么做,也应该使用
performSelector:withObject:afterDelay:来延迟调用。
虽然你可以使用一个插入操作视图来添加一个
新行到表视图,但一个合适的替代操作是在Navigation
Bar上添加一个按钮.轻击按钮发送一个动作消息给viewController,它modal出一个新的viewController,来编辑新项目。
一旦新项被创建,the controller 添加其到数据模型数组并重新加载表视图。
11、批量添加或删除
[tv beginUpdates];
[tv insertRowsAtIndexPaths:insertIndexPaths withRowAnimation:UITableViewRowAnimationRight];
[tv deleteRowsAtIndexPaths:deleteIndexPaths withRowAnimation:UITableViewRowAnimationFade];
[tv endUpdates];
12、
你可能已经注意到上面的代码中有一些事情好像有点奇特(peculiar)
。代码写的顺序是先调用insertRowsAtIndexPaths:之后才调用
deleteRowsAtIndexPaths:withAnimation:方法。然而,这不是表视图真正的执行顺序。它推迟任何的行或
Sections的添加操作直到其处理完行或sections的删除操作,然后再更新块内调用reloading方法,表视图的行为也一样,reload
操作在动画块被执行之前被执行。这些行为的发生顺序与添加、删除和reload方法调用的顺序无关。(也就是说,执行顺序是
reload>delete>insert)
动画块内的删除和刷新操作指定在原始表中哪些rows和sections应该被删除或刷
新;添加操作指定在删除操作后的表中哪些行或sections应该被添加。那些指定的section和行的indexPath遵守这个模型。在一个可变数
组中添加和移除一个item(这里的意思应该是在数组中添加和删除和表视图的添加和删除不一样,一定要注意实际的执行顺序)
这里有一个有用的例子,假设你有一个table view,有3个sections,每个section有3个rows。然后你实现下面的动画块:
1)Begin Updates
2)Delete row at index 1 of section 0.
3)Delete section 1.
4) Insert row at index 1 of section at index 1.
5)End updates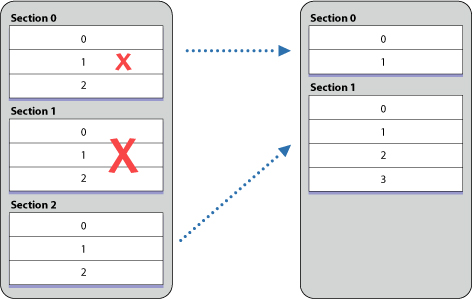
13、cell的showsReorderControl属性为YES时,在进入编辑模式后就会显示重新排序的操作视图。
当表视图 收到setEditing:animated:消息时,他重新发送这些消息给可见的row。然后
1)表视图 发送 tableview:canMoveRowAtIndexPath:消息给data source来排除一些不能移动的行(即不显示reordering control)
2)用户在表视图中向上或向下拖动一个行。
3)
每次被拖动的行到一个目的地,表视图 发送
tableView:targetIndexPathForMoveFromRowAtIndexPath:toProposedIndexPath:
给他的委托。在这个方法中,委托可能为被拖动的行拒绝当前目的地并指定一个替代的位置。
4)表视图发送 tableView:moveRowAtIndexPath:toIndexPath:给他的data source。在这个方法中,data source更新data-model array,移动项到array中的另一个位置。
二、解决ios7下tableview header总是占据一定高度的问题。
if ([[[UIDevice currentDevice] systemVersion] floatValue] >= 7) {
self.edgesForExtendedLayout = UIRectEdgeNone;
self.extendedLayoutIncludesOpaqueBars = NO;
self.automaticallyAdjustsScrollViewInsets = NO;
}
三、
ios7的cell包含了一个scrollView,要定制cell,不能通过继承UITableViewCell重写drawRect,添加自定义
View到cell中也要使用只能通过[cell.contentView addSubView...]不能直接使用[cell
addSubView...]。如下:
UIView * subview = [[[XXView alloc] init] autorelease];
subview.userInteractionEnabled = NO;// 不设为NO会屏蔽cell的点击事件
subview.backgroundColor = [UIColorclearColor];// 设为透明从而使得cell.backgroundColor有效.
subview.autoresizingMask = UIViewAutoresizingFlexibleWidth | UIViewAutoresizingFlexibleHeight;
[cell.contentView addSubview:subview];// cell.contentView是个readonly属性,所以别想着替换contentView了.