一个文档不仅仅包含它的数据 ,也包含元数据——有关文档的信息。
三个必须的元数据元素如下:
_index 文档在哪存放   --  库
_type 文档表示的对象类别  -- 表
_id 文档唯一标识   -- 唯一索引
#filter -- 字段

_index
一个索引应该是因共同的特性被分组到一起的文档集合。 例如,你可能存储所有的产品在索引 products 中,而存储所有销售的交易到索引 sales 中

_type
数据可能在索引中只是松散的组合在一起,但是通常明确定义一些数据中的子分区是很有用的。
例如,所 有的产品都放在一个索引中,但是你有许多不同的产品类别,比如 "electronics" 、 "kitchen" 和 "lawn- care"。
这些文档共享一种相同的(或非常相似)的模式:他们有一个标题、描述、产品代码和价格。他们只是正 好属于“产品”下的一些子类。
Elasticsearch 公开了一个称为 types (类型)的特性,它允许您在索引中对数据进行逻辑分区。不同 types 的文档可能有不同的字段,但最好能够非常相似。

_id
ID 是一个字符串, 当它和 _index 以及 _type 组合就可以唯一确定 Elasticsearch 中的一个文档。 当你创 建一个新的文档,要么提供自己的 _id ,要么让 Elasticsearch 帮你生成
vim 编辑模式时  小技巧
快捷删除
d + i + "
d + i + [
一、elastic简单的增删改查(插入数据不需要提前创建好数据库)
1、增
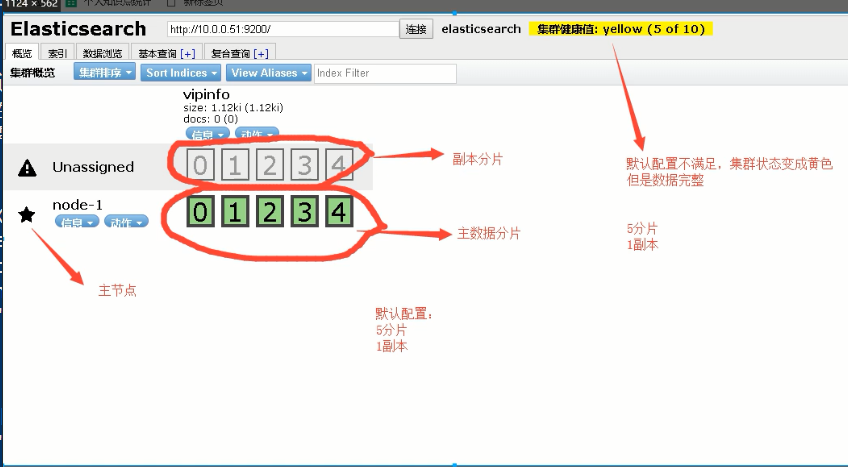
#创建索引(相当于数据库)
[root@master01 ~]# curl -XPUT '10.192.27.100:9200/vipinfo?pretty'
{
"acknowledged" : true,
"shards_acknowledged" : true,
"index" : "vipinfo"
}
[root@master01 ~]#
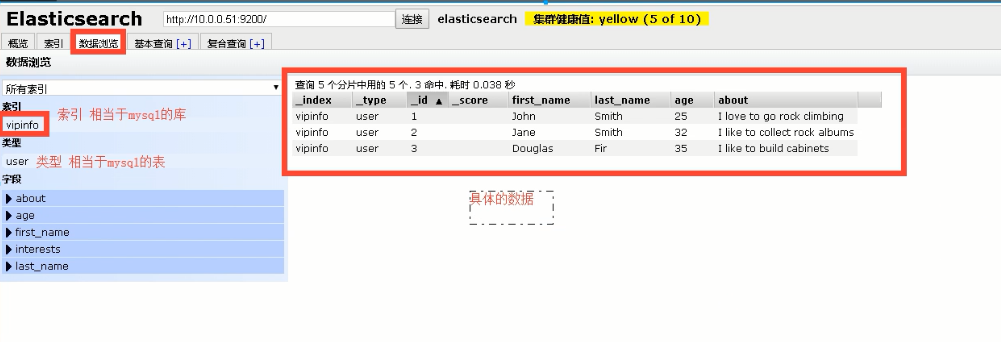
#插入文档数据 #user 相当于一个user表,1代表数据库的唯一索引 , -H 后面数据格式json格式 , -d后面接数据内容
curl -XPUT '10.192.27.100:9200/vipinfo/user/1?pretty' -H 'Content-Type: application/json' -d
'{
    "first_name" : "John",
    "last_name": "Smith",
    "age" : 25,
    "about" : "I love to go rock climbing",
    "interests": [ "sports", "music" ]
}'


#使用localhost 插入数据
curl -XPUT  'localhost:9200/vipinfo/user/2?pretty' -H 'Content-Type: application/json' -d
'{
"first_name": "Jane",
"last_name" : "Smith",
"age" : 32,
"about" : "I like to collect rock albums",
"interests": [ "music" ]
}'


curl -XPUT  'localhost:9200/vipinfo/user/3?pretty' -H 'Content-Type: application/json' -d
'{
"first_name": "Douglas", "last_name" : "Fir",
"age" : 35,
"about": "I like to build cabinets",
"interests": [ "forestry" ]
}'


[root@master01 elasticsearch]# cd /var/lib/elasticsearch
[root@master01 elasticsearch]# ls
nodes
[root@master01 elasticsearch]# cd nodes/
[root@master01 nodes]# tree
.
└── 0
    ├── indices
    │   └── ESfsSjILTGCRZ2uUtkkZOw
    │       ├── 0
    │       │   ├── index
    │       │   │   ├── segments_3
    │       │   │   └── write.lock
    │       │   ├── _state
    │       │   │   └── state-2.st
    │       │   └── translog
    │       │       ├── translog-1.ckp
    │       │       ├── translog-1.tlog
    │       │       ├── translog-2.ckp
    │       │       ├── translog-2.tlog
    │       │       ├── translog-3.ckp
    │       │       ├── translog-3.tlog
    │       │       ├── translog-4.tlog
    │       │       └── translog.ckp
    │       ├── 1
    │       │   ├── index
    │       │   │   ├── segments_3
    │       │   │   └── write.lock
    │       │   ├── _state
    │       │   │   └── state-2.st
    │       │   └── translog
    │       │       ├── translog-1.ckp
    │       │       ├── translog-1.tlog
    │       │       ├── translog-2.ckp
    │       │       ├── translog-2.tlog
    │       │       ├── translog-3.ckp
    │       │       ├── translog-3.tlog
    │       │       ├── translog-4.tlog
    │       │       └── translog.ckp
    │       ├── 2
    │       │   ├── index
    │       │   │   ├── _0.cfe
    │       │   │   ├── _0.cfs
    │       │   │   ├── _0.si
    │       │   │   ├── segments_5
    │       │   │   └── write.lock
    │       │   ├── _state
    │       │   │   └── state-2.st
    │       │   └── translog
    │       │       ├── translog-1.ckp
    │       │       ├── translog-1.tlog
    │       │       ├── translog-2.ckp
    │       │       ├── translog-2.tlog
    │       │       ├── translog-3.ckp
    │       │       ├── translog-3.tlog
    │       │       ├── translog-4.ckp
    │       │       ├── translog-4.tlog
    │       │       ├── translog-5.tlog
    │       │       └── translog.ckp
    │       ├── 3
    │       │   ├── index
    │       │   │   ├── _0.cfe
    │       │   │   ├── _0.cfs
    │       │   │   ├── _0.si
    │       │   │   ├── segments_5
    │       │   │   └── write.lock
    │       │   ├── _state
    │       │   │   └── state-2.st
    │       │   └── translog
    │       │       ├── translog-1.ckp
    │       │       ├── translog-1.tlog
    │       │       ├── translog-2.ckp
    │       │       ├── translog-2.tlog
    │       │       ├── translog-3.ckp
    │       │       ├── translog-3.tlog
    │       │       ├── translog-4.ckp
    │       │       ├── translog-4.tlog
    │       │       ├── translog-5.tlog
    │       │       └── translog.ckp
    │       ├── 4
    │       │   ├── index
    │       │   │   ├── _1.cfe
    │       │   │   ├── _1.cfs
    │       │   │   ├── _1.si
    │       │   │   ├── segments_5
    │       │   │   └── write.lock
    │       │   ├── _state
    │       │   │   └── state-2.st
    │       │   └── translog
    │       │       ├── translog-1.ckp
    │       │       ├── translog-1.tlog
    │       │       ├── translog-2.ckp
    │       │       ├── translog-2.tlog
    │       │       ├── translog-3.ckp
    │       │       ├── translog-3.tlog
    │       │       ├── translog-4.ckp
    │       │       ├── translog-4.tlog
    │       │       ├── translog-5.tlog
    │       │       └── translog.ckp
    │       └── _state
    │           └── state-14.st
    ├── node.lock
    └── _state
        ├── global-17.st
        └── node-6.st

25 directories, 74 files
[root@master01 nodes]#
2、查
查询索引中所有的
curl -XGET localhost:9200/vipinfo/user/_search?pretty

查询指定文档数据
curl -XGET 'localhost:9200/vipinfo/user/1?pretty'
curl -XGET 'localhost:9200/vipinfo/user/2?pretty’

按条件查询文档数据
查询索引中符合条件的数据:搜索姓氏为Smith的雇员
curl -XGET 'localhost:9200/vipinfo/user/_search?q=last_name:Smith&pretty’

使用Query-string查询
curl -XGET 'localhost:9200/vipinfo/user/_search?pretty' -H 'Content-Type: application/json' -d'
{
  "query" : {
    "match" : {
        "last_name" : "Smith"
     }
  }
}
'
使用过滤器查询
搜索姓氏为 Smith 的雇员,但这次我们只需要年龄大于 30 的。
查询需要稍作调整,使用过滤器 filter ,它支持高效地执行一个结构化查询
curl -XGET 'localhost:9200/vipinfo/user/_search?pretty' -H 'Content-Type: application/json' -d'{
  "query" : {
    "bool": {
      "must": {
        "match" : {
          "last_name" : "smith"
          }
     },
     "filter": {
        "range" : {"age" : { "gt" : 30 }
          }
        }
      }
    }
 }'
3、改(更新)
更新数据的两种方式
#PUT更新,需要填写完整的信息
curl -XPUT 'localhost:9200/vipinfo/user/1?pretty' -H 'Content-Type: application/json' -d'
{
    "first_name" : "John",
    "last_name": "Smith",
    "age" : 27,
    "about" : "I love to go rock climbing", "interests": [ "sports", "music" ]
}


#POST更新,只需要填写需要更改的信息
curl -XPOST 'localhost:9200/vipinfo/user/1?pretty' -H 'Content-Type: application/json' -d'
{
    "age" : 29
}
4、删
删除指定文档数据
curl -XDELETE 'localhost:9200/vipinfo/user/1?pretty’
{
  "_index" : "vipinfo",
  "_type" : "user",
  "_id" : "1",
  "_version" : 2,
  "result" : "deleted",
  "_shards" : {
    "total" : 2,
    "successful" : 1,
    "failed" : 0
  },
  "_seq_no" : 1,
  "_primary_term" : 2
}

删除索引
curl -XDELETE 'localhost:9200/vipinfo?pretty'
{
  "acknowledged" : true
}