使用容器安装Nexus3
1.下载nexus3的镜像:
docker pull sonatype/nexus3
2.使用镜像启动一个容器:
docker run -d -p 8081:8081 -p 5000:5000 --name nexus3 -v /nexus-data:/nexus-data/ --restart=always sonatype/nexus3:3.20.0
要是启动不起来有可能是/nexus-data目录没有权限,把目录权限改为757
注:5000端口是用于镜像仓库的服务端口 8081 端口是nexus的服务端口
3.启动之后我们就可以通过http://服务器IP:8081访问。
默认账号密码为admin/admin123
创建Docker私有仓库
通过浏览器访问Nexus:
http://服务器IP:8081
点击右上角进行登录,通过初始用户名和密码进行登录(admin/admin123):

点击设置界面,选择Repositories,点击Create repository,如下图所示:

选择仓库类型,这里Docker有三种类型,分别是group、hosted、proxy。这里只演示hosted类型,所以选择docker(hosted),如下图:
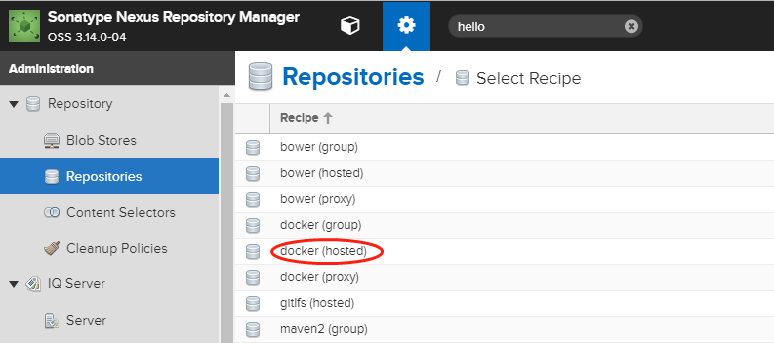
注:Docker镜像仓库类型含义解释如下:
hosted : 本地存储,即同docker官方仓库一样提供本地私服功能
proxy : 提供代理其他仓库的类型,如docker中央仓库
group : 组类型,实质作用是组合多个仓库为一个地址
指定docker仓库的名称、指定一个端口用来通过http的方式进行访问仓库、勾选是否支持docker API V1,然后create repository;
Force basic authentication:这里最好也勾选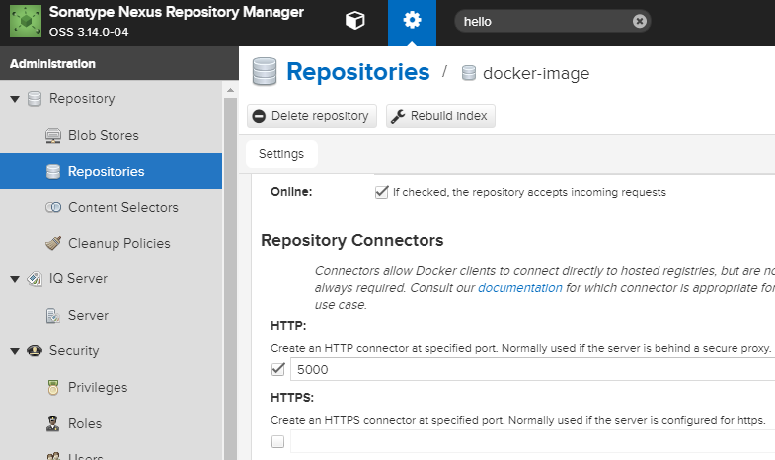
因为我们测试的时候不是使用加密的HTTPS进行访问,所以这里需要增加一个docker的启动参数,给他指定私库的地址,如下:
编辑/etc/docker/daemon.json 增加如下内容,当然也可通过启动参数增加,如果出现response https等错误,把http://去掉。
{
........,
"insecure-registries":["http://172.xx.xx.60:5000"]
}
重启docker进程: systemctl restart docker
查看docker信息: docker info ,有如下输出即正常
OSType: linux
Architecture: x86_64
Number of Docker Hooks: 3
CPUs: 32
Total Memory: 62.25 GiB
Name: 0006.novalocal
ID: I4YA:R77P:4MMX:V76S:NL4J:XP42:WZFR:5UFD:QRNT:N4GD:54UV:KFXS
Docker Root Dir: /var/lib/docker
Debug Mode (client): false
Debug Mode (server): false
Registry: https://index.docker.io/v1/
WARNING: bridge-nf-call-iptables is disabled
WARNING: bridge-nf-call-ip6tables is disabled
Experimental: false
Insecure Registries:
 172.xx.xx.60:5000
 127.0.0.0/8
Registry Mirrors:
 https://aj2rgad5.mirror.aliyuncs.com
Live Restore Enabled: false
Registries: docker.io (secure)
登录私库
要使用私库进行上传下载需要进行登录连接到Nexus(物理机重启推拉不了镜像要重新docker logiin)
docker login http://172.xx.xx.60:5000/
Docker上传镜像到私库
使用docker tag 对镜像进行管理(必须进行此项操作)
docker tag使用格式:
docker tag SOURCE_IMAGE[:TAG] TARGET_IMAGE[:TAG]
docker tag helolo-world 172.xx.xx.60:5000/hello:v1
docker push 172.xx.xx.60:5000/hello:v1
示例:使用tag进行打标,正常上传的结果
[root@0006 docker]# docker pull 172.xx.xx.60:5000/hello:v1
Trying to pull repository 172.xx.xx.60:5000/hello ...
v1: Pulling from 172.xx.xx.60:5000/hello
Digest: sha256:92c7f9c92844bbbb5d0a101b22f7c2a7949e40f8ea90c8b3bc396879d95e899a
Status: Image is up to date for 172.xx.xx.60:5000/hello:v1
不进行tag打标,会出现denied: requested access to the resource is denied报错
查看镜像
[root@0006 docker]# curl http://172.xx.xx.60:5000/v2/_catalog
{"repositories":["hello"]}
[root@0006 docker]#
[root@0006 ~]# curl http://172.xx.xx.60:5000/v2/hello/tags/list
{"name":"hello","tags":["v1"]}
[root@0006 ~]#
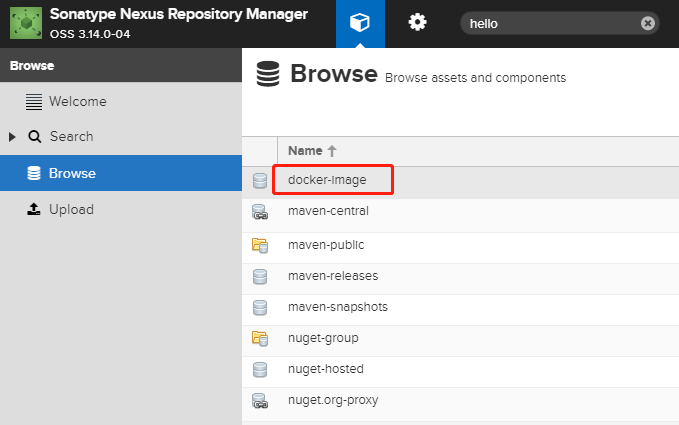
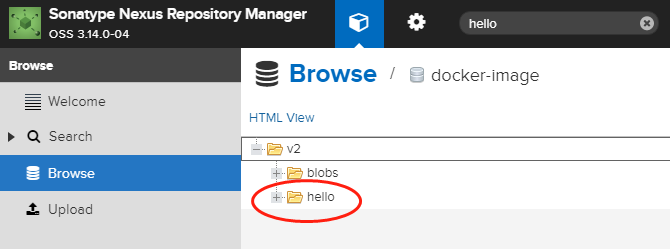
上传完成后,在nexus中对应的docker库中,即可看到此镜像
下载私库中的镜像
1、删除本地上例实验中的镜像(docker rmi 172.xx.xx.60:5000/hello:v1)
[root@0006 ~]# docker rmi 172.xx.xx.60:5000/hello:v1
Untagged: 172.xx.xx.60:5000/hello:v1
Untagged: 172.xx.xx.60:5000/hello@sha256:92c7f9c92844bbbb5d0a101b22f7c2a7949e40f8ea90c8b3bc396879d95e899a
[root@0006 ~]#
2、docker pull 172.xx.xx.60:5000/hello:v1
[root@0006 ~]# docker pull 172.xx.xx.60:5000/hello:v1
Trying to pull repository 172.xx.xx.60:5000/hello ...
v1: Pulling from 172.xx.xx.60:5000/hello
Digest: sha256:92c7f9c92844bbbb5d0a101b22f7c2a7949e40f8ea90c8b3bc396879d95e899a
Status: Downloaded newer image for 172.xx.xx.60:5000/hello:v1
[root@0006 ~]#
删除私库中的镜像
命令有时候不灵通curl -I -X DELETE http://172.xx.xx.60:5000/v2/hello/manifests/sha256:92c7f9c92844bbbb5d0a101b22f7c2a7949e40f8ea90c8b3bc396879d95e899a
可以回到浏览器Browse server里面删除
转摘:https://www.cnblogs.com/jihongjun/p/8968901.html