最近,公司采购了帆软的系统,领导安排要与公司的SpringBoot框架进行整合。费了一番牛劲,终于整合成功,下面分享一下我的经验。
首先,我的开发环境是Intellij IDEA,使用的SpringBoot版本是2.1.1,整合的finereport版本是10.0。
一、根据帆软官方教程 http://help.finereport.com/ 高级教程->部署集成->服务器部署->报表部署流程->嵌入式部署的介绍,
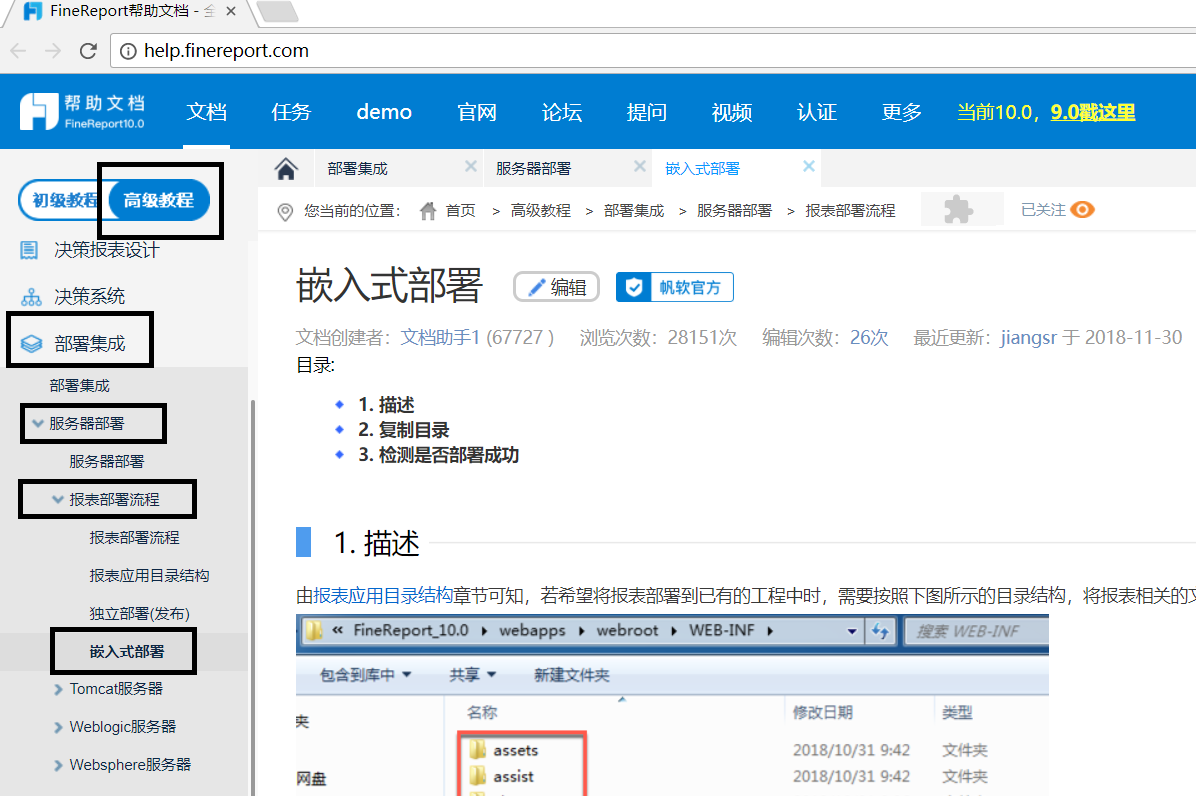
将%FineReport_HOME%webappswebrootWEB-INF目录下面的assets、assist、classes、embed、lib、plugins、reportlets七个文件夹复制到你的项目的webapp的WEB-INF文件夹下,再将%JAVA_HOME%/jdk/lib下的tools.jar拷贝到你的项目的webapp的WEB-INF的lib文件夹下,如图所示:
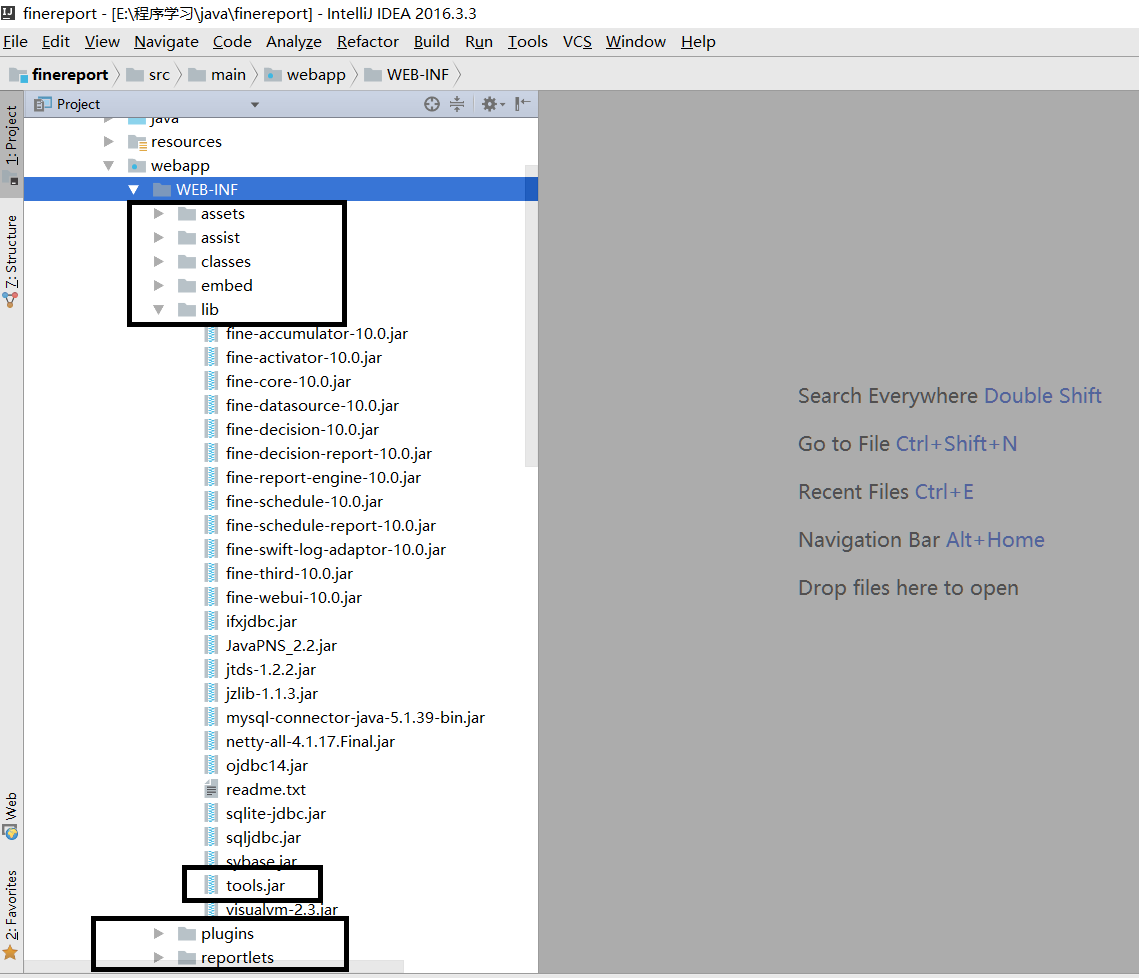
注意,springboot框架默认是不带webapp文件夹以及其子文件夹WEB-INF的,此时需要自己创建这两个文件夹,并将webapp文件夹设置为Web Resource Directory。(通过Project Structure设置)
二、更改SpringBoot的配置(打包方式/启动方式)
1.修改pom文件
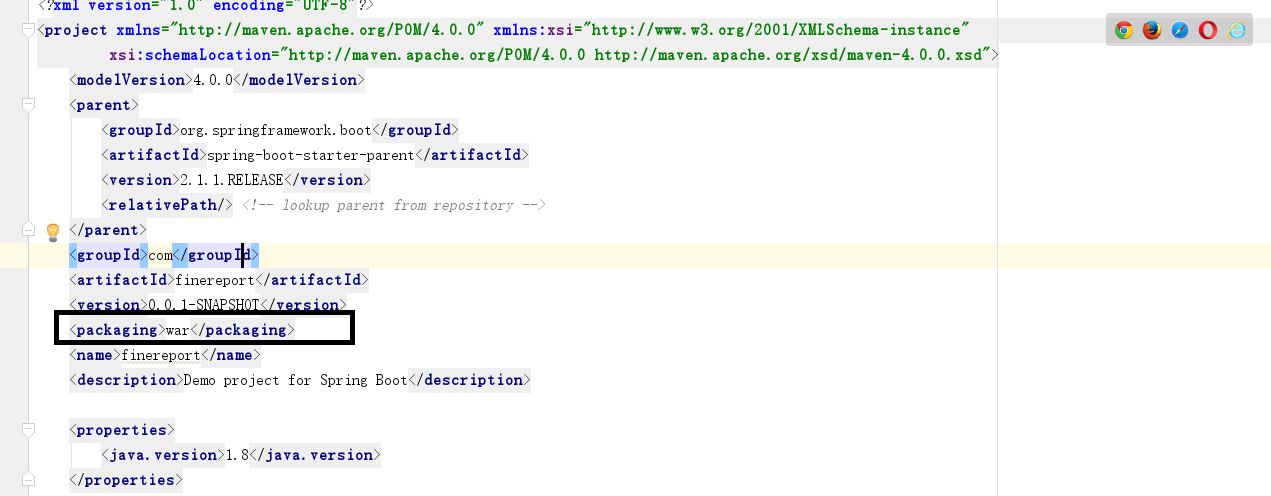
(1)修改打包方式为war
(2)修改pom依赖的包,添加servlet依赖,去掉内嵌Tomcat依赖,添加servlet-api依赖:
 1     <dependencies>
 2         <dependency>
 3             <groupId>org.springframework.boot</groupId>
 4             <artifactId>spring-boot-starter-web</artifactId>
 5             <exclusions>
 6                 <exclusion>
 7                     <groupId>org.springframework.boot</groupId>
 8                     <artifactId>spring-boot-starter-tomcat</artifactId>
 9                 </exclusion>
10             </exclusions>
11         </dependency>
12         <dependency>
13             <groupId>javax.servlet</groupId>
14             <artifactId>javax.servlet-api</artifactId>
15             <version>3.1.0</version>
16             <scope>provided</scope>
17         </dependency>
18     </dependencies>
2.修改启动文件

3.在idea中设置项目以tomcat方式启动
(1)
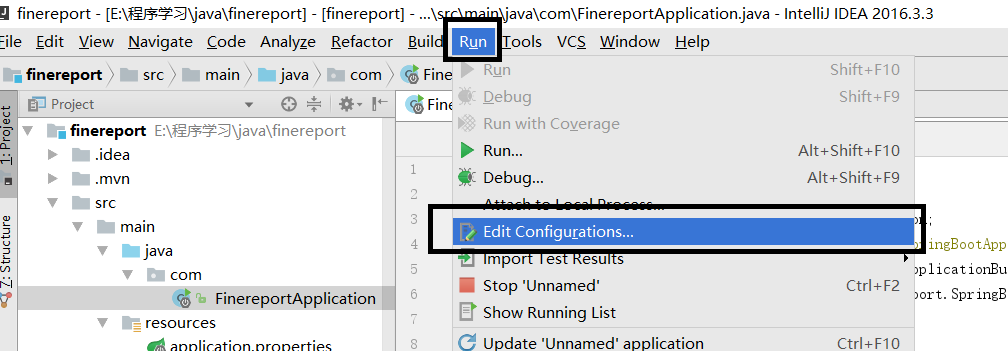
(2)
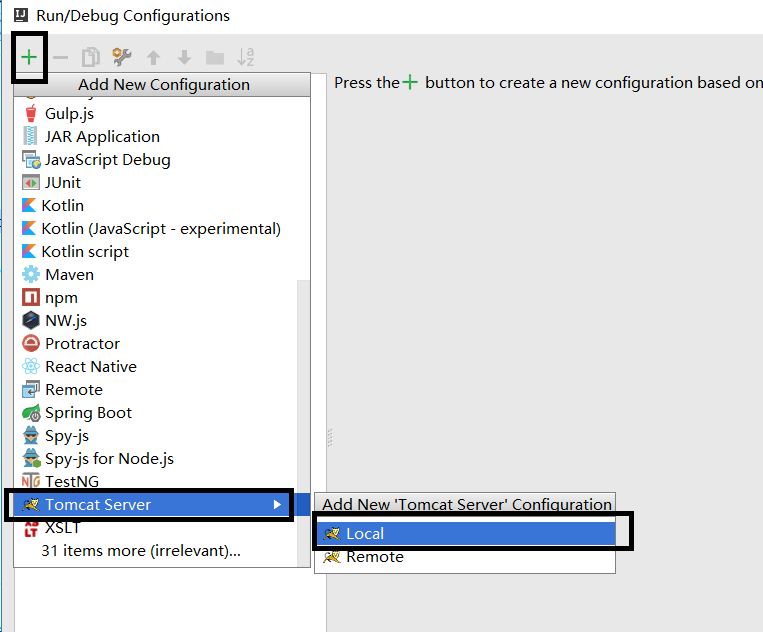
(3)
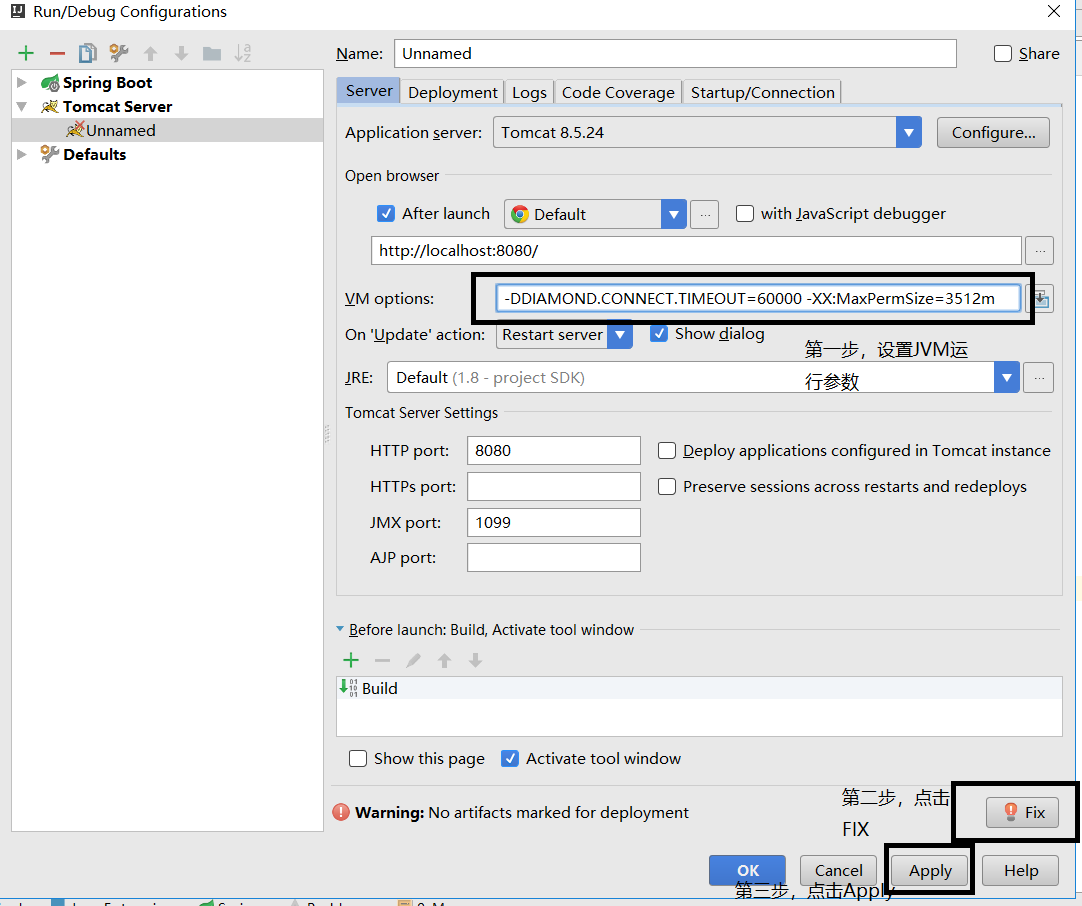
点击Fix时,选择第一个即可。
附一张最后的项目结构图:

三、启动程序
在地址栏中输入http://ip:端口号/项目目录/decision,能成功显示下图页面,则表明SpringBoot集成FineReport成功。
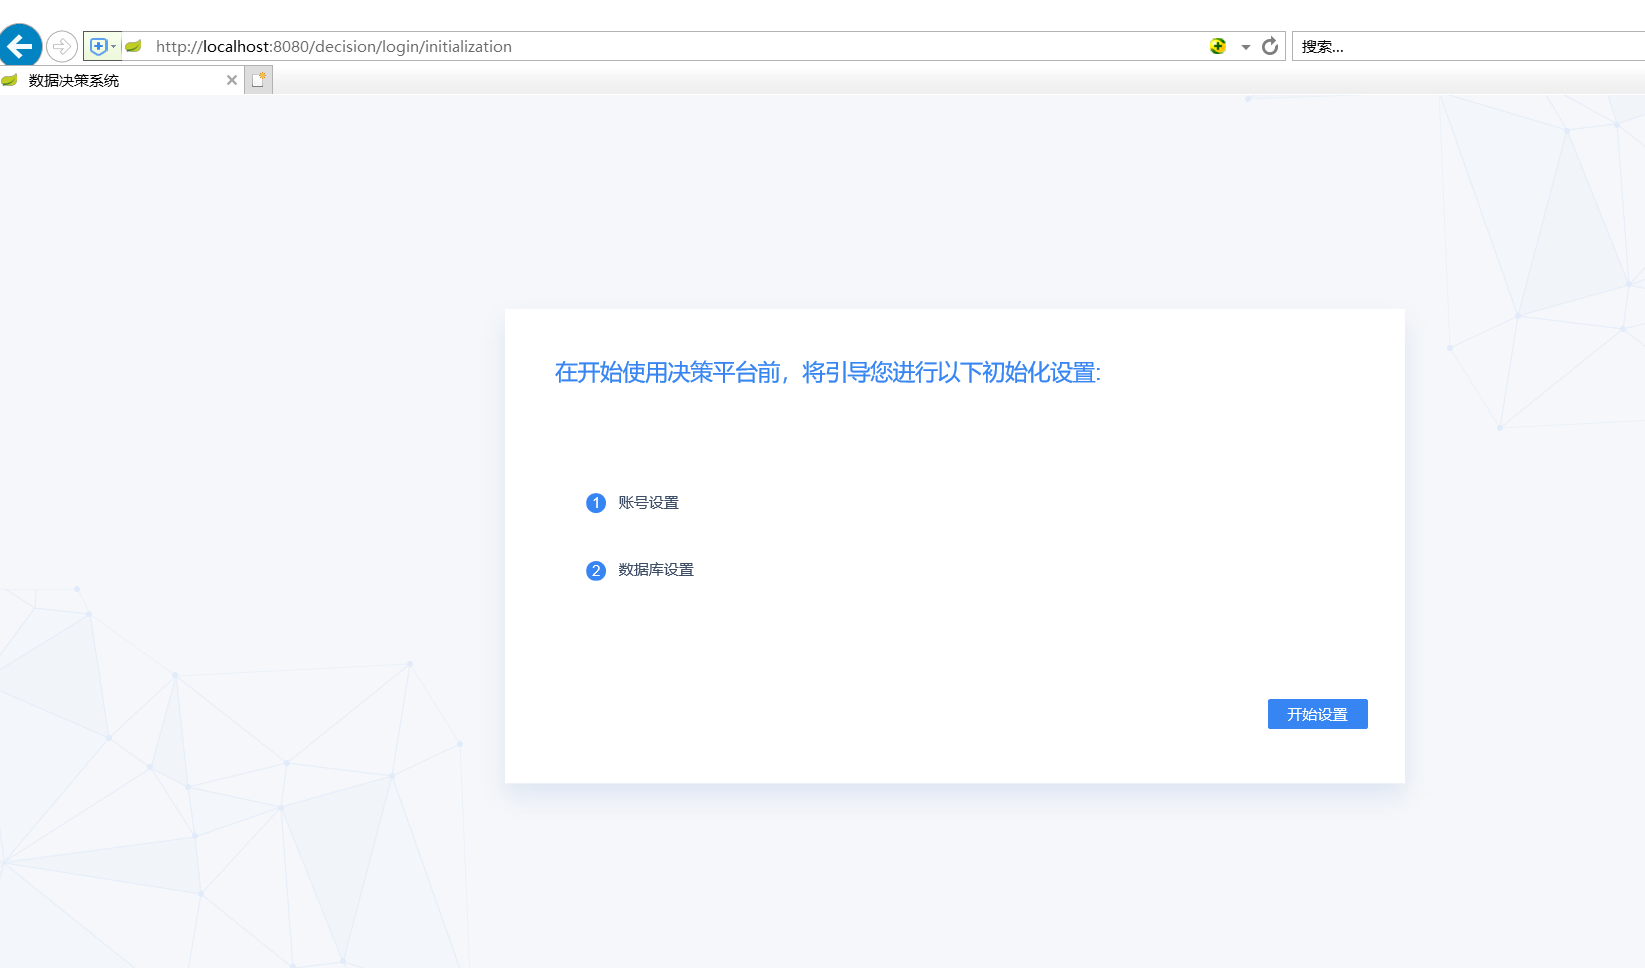
项目源代码链接:
第一部分:https://download.csdn.net/download/weixin_44299969/10894741
第二部分:https://download.csdn.net/download/weixin_44299969/10894769
第三部分:https://download.csdn.net/download/weixin_44299969/10894786
第四部分:https://download.csdn.net/download/weixin_44299969/10894809
四、补充
1.网上的教程中,有很多介绍将finereport的lib文件做成maven repository的,本人试了试,也可以操作成功,具体操作方法为:
(1)新建一个bat文件,并将下列的语句复制进去,注意根据你的实际情况修改finereport的jar包的路径,运行这个bat文件,finereport的jar包就会加载到maven的仓库中
 1 call mvn install:install-file -Dfile=E:programfilesFineReport_10.0webappswebrootWEB-INFlibfine-accumulator-10.0.jar -DgroupId=com.fine -DartifactId=fine-accumulator -Dversion=10.0 -Dpackaging=jar
 2
 3
 4 call mvn install:install-file -Dfile=E:programfilesFineReport_10.0webappswebrootWEB-INFlibfine-activator-10.0.jar -DgroupId=com.fine -DartifactId=fine-activator -Dversion=10.0 -Dpackaging=jar
 5
 6
 7 call mvn install:install-file -Dfile=E:programfilesFineReport_10.0webappswebrootWEB-INFlibfine-core-10.0.jar -DgroupId=com.fine -DartifactId=fine-core -Dversion=10.0 -Dpackaging=jar
 8
 9
10 call mvn install:install-file -Dfile=E:programfilesFineReport_10.0webappswebrootWEB-INFlibfine-datasource-10.0.jar -DgroupId=com.fine -DartifactId=fine-datasource -Dversion=10.0 -Dpackaging=jar
11
12
13 call mvn install:install-file -Dfile=E:programfilesFineReport_10.0webappswebrootWEB-INFlibfine-decision-10.0.jar -DgroupId=com.fine -DartifactId=fine-decision -Dversion=10.0 -Dpackaging=jar
14
15
16 call mvn install:install-file -Dfile=E:programfilesFineReport_10.0webappswebrootWEB-INFlibfine-decision-report-10.0.jar -DgroupId=com.fine -DartifactId=fine-decision-report -Dversion=10.0 -Dpackaging=jar
17
18
19 call mvn install:install-file -Dfile=E:programfilesFineReport_10.0webappswebrootWEB-INFlibfine-report-engine-10.0.jar -DgroupId=com.fine -DartifactId=fine-report-engine -Dversion=10.0 -Dpackaging=jar
20
21
22 call mvn install:install-file -Dfile=E:programfilesFineReport_10.0webappswebrootWEB-INFlibfine-schedule-10.0.jar -DgroupId=com.fine -DartifactId=fine-schedule -Dversion=10.0 -Dpackaging=jar
23
24
25 call mvn install:install-file -Dfile=E:programfilesFineReport_10.0webappswebrootWEB-INFlibfine-schedule-report-10.0.jar -DgroupId=com.fine -DartifactId=fine-schedule-report -Dversion=10.0 -Dpackaging=jar
26
27
28 call mvn install:install-file -Dfile=E:programfilesFineReport_10.0webappswebrootWEB-INFlibfine-swift-log-adaptor-10.0.jar -DgroupId=com.fine -DartifactId=fine-swift-log-adaptor -Dversion=10.0 -Dpackaging=jar
29
30
31 call mvn install:install-file -Dfile=E:programfilesFineReport_10.0webappswebrootWEB-INFlibfine-third-10.0.jar -DgroupId=com.fine -DartifactId=fine-third -Dversion=10.0 -Dpackaging=jar
32
33
34 call mvn install:install-file -Dfile=E:programfilesFineReport_10.0webappswebrootWEB-INFlibfine-webui-10.0.jar -DgroupId=com.fine -DartifactId=fine-webui -Dversion=10.0 -Dpackaging=jar
(2)在pom文件中,添加以下依赖(正文中的依赖不变)
 1 <dependency>
 2             <groupId>com.fine</groupId>
 3             <artifactId>fine-core</artifactId>
 4             <version>10.0</version>
 5         </dependency>
 6         <dependency>
 7             <groupId>com.fine</groupId>
 8             <artifactId>fine-activator</artifactId>
 9             <version>10.0</version>
10         </dependency>
11         <dependency>
12             <groupId>com.fine</groupId>
13             <artifactId>fine-core</artifactId>
14             <version>10.0</version>
15         </dependency>
16         <dependency>
17             <groupId>com.fine</groupId>
18             <artifactId>fine-datasource</artifactId>
19             <version>10.0</version>
20         </dependency>
21         <dependency>
22             <groupId>com.fine</groupId>
23             <artifactId>fine-decision</artifactId>
24             <version>10.0</version>
25         </dependency>
26         <dependency>
27             <groupId>com.fine</groupId>
28             <artifactId>fine-decision-report</artifactId>
29             <version>10.0</version>
30         </dependency>
31         <dependency>
32             <groupId>com.fine</groupId>
33             <artifactId>fine-report-engine</artifactId>
34             <version>10.0</version>
35         </dependency>
36         <dependency>
37             <groupId>com.fine</groupId>
38             <artifactId>fine-schedule</artifactId>
39             <version>10.0</version>
40         </dependency>
41         <dependency>
42             <groupId>com.fine</groupId>
43             <artifactId>fine-schedule-report</artifactId>
44             <version>10.0</version>
45         </dependency>
46         <dependency>
47             <groupId>com.fine</groupId>
48             <artifactId>fine-swift-log-adaptor</artifactId>
49             <version>10.0</version>
50         </dependency>
51         <dependency>
52             <groupId>com.fine</groupId>
53             <artifactId>fine-third</artifactId>
54             <version>10.0</version>
55         </dependency>
56         <dependency>
57             <groupId>com.fine</groupId>
58             <artifactId>fine-webui</artifactId>
59             <version>10.0</version>
60         </dependency>
(3)此时,正文中第一步的过程中,可以把帆软提供的lib文件中以fine打头的jar包不拷贝到你的项目的webapp中