一、Spring Cloud Sleuth 是Spring Cloud 的一个组件,它的主要功能是在分布式系统中提供服务链路追踪的解决方案。
二、为什么需要Spring Cloud Sleuth?
微服务架构是一个分布式架构,微服务系统按业务划分服务单元,一个微服务系统往往有很多个服务单元。由于服务单元数量众多 ,业务的复杂性较高,如果出现了错误和异常,很难去定位。主要体现在一个请求可能需要调用很多个服务,而内部服务的调用复杂性决定了问题难以定位。所以在微服务架构中,必须实现分布式链路追踪去跟进一个请求到底有哪些服务参与,参与的顺序又是怎样的 ,从而达到每个请求的步骤清晰可见,出了问题能够快速定位的目的。
目前,常见的链路追踪组件有 Google Dapper、Twitter、Zipkin以及阿里的 Eagleeye(鹰眼)等,它们都是非常优秀的链路追踪开源组件。
三、Spring Cloud Sleuth采用了 Google 开源项目 Dapper 专业术语。
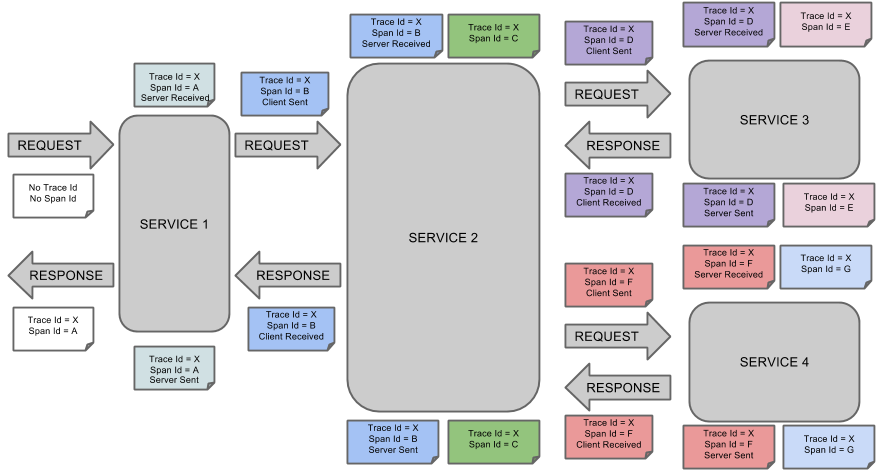
(1)Span基本工作单元,发送一个远程调度任务就会产生一个Span, Span 是用 64ID唯一标识的,Trace是用另一个64ID唯一标识的。Span还包含了其他的信息,例如摘要、时间戳事件、Span的ID以及进程 ID。
(2)Trace :由一系列 Span组成的,呈树状结构。请求一个微服务系统的 API接口,这个API 接口需要调用多个微服务单元,调用 个微服务单元都会产生一个新的Span,所有由这个请求产生 Span组成了这个Trace。
(3)Annotation:用于记录一个事件, 一些核心注解用于定义一个请求的开始和结束,这些注解如下。
a、cs:客户端已发送。客户提出了要求。此注释指示跨度的开始。
b、sr:接收到服务器:服务器端收到了请求并开始处理它。cs从该时间戳中减去该时间戳可揭示网络延迟。
c、ss:服务器已发送。在请求处理完成时进行注释(当响应被发送回客户端时)。sr从该时间戳中减去该时间戳将显示服务器端处理该请求所需的时间。
d、cr:收到客户。表示跨度结束。客户端已成功收到服务器端的响应。cs从该时间戳中减去该时间戳将显示客户端从服务器接收响应所需的整个时间
下图显示了Span和Trace以及Zipkin批注在系统中的亲子关系:
四、Zipkin实际案例:
1)首先构建链路追踪sluth-server(zipkin):
a、第一种构建方式:编程式构建。
(1)加入依赖
   <dependencies>
        <dependency>
            <groupId>org.springframework.cloud</groupId>
            <artifactId>spring-cloud-starter-netflix-eureka-client</artifactId>
        </dependency>
        <dependency>
            <groupId>org.springframework.boot</groupId>
            <artifactId>spring-boot-starter-web</artifactId>
        </dependency>
        <dependency>
            <groupId>io.zipkin.java</groupId>
            <artifactId>zipkin-server</artifactId>
            <version>2.11.8</version>
        </dependency>
        <dependency>
            <groupId>io.zipkin.java</groupId>
            <artifactId>zipkin-autoconfigure-ui</artifactId>
            <version>2.11.8</version>
        </dependency>
    </dependencies>
注意:这里的zipkin版本要慎重选择,我在这里消磨了很长时间,主要就是参考官方文档,查看合适的版本。结果官方也没有一个好点说明,这里最好选择2.11.8的版本。
(2)编写启动类
package com.cetc;

import org.springframework.boot.SpringApplication;
import org.springframework.boot.autoconfigure.SpringBootApplication;
import org.springframework.cloud.netflix.eureka.EnableEurekaClient;
import zipkin2.server.internal.EnableZipkinServer;

@SpringBootApplication
@EnableEurekaClient
@EnableZipkinServer
public class ZipkinApplication {

    public static void main(String[] args) {
        SpringApplication.run(ZipkinApplication.class, args);
    }
}
(3)编写配置文件application.yaml
server:
  port: 8687
spring:
  application:
    name: sleuth-zipkin
eureka:
  client:
    service-url:
      defaultZone: http://127.0.0.1:8670/eureka/ # 实际开发中建议使用域名的方式
management:
  metrics:
    web:
      server:
        auto-time-requests: false # 关闭自动配置检测,不然会报错
说明:关闭自动检测的目的是避免报错。
b、第二种方式直接使用zipkin-server-exec.jar的执行包。
通过java -jar zipkin-server-exec.jar的方式执行
默认端口:9411。
下载地址:https://maven.aliyun.com/mvn/search 搜索zipkin-server,选择最新版的zip-server-<version>-exec.jar下载。
2)构建声明式调用服务(sleuth-feign):
a、加入依赖
       <dependency>
            <groupId>org.springframework.cloud</groupId>
            <artifactId>spring-cloud-starter-netflix-eureka-client</artifactId>
        </dependency>
        <dependency>
            <groupId>org.springframework.cloud</groupId>
            <artifactId>spring-cloud-starter-openfeign</artifactId>
        </dependency>
        <dependency>
            <groupId>org.springframework.boot</groupId>
            <artifactId>spring-boot-starter-web</artifactId>
        </dependency>
        <dependency>
            <groupId>org.springframework.cloud</groupId>
            <artifactId>spring-cloud-starter-zipkin</artifactId>
        </dependency>
b、编写启动类
package com.cetc;

import org.springframework.boot.SpringApplication;
import org.springframework.boot.autoconfigure.SpringBootApplication;
import org.springframework.cloud.netflix.eureka.EnableEurekaClient;
import org.springframework.cloud.openfeign.EnableFeignClients;

@SpringBootApplication
@EnableEurekaClient
@EnableFeignClients
public class SleuthFeignApplication {

    public static void main(String[] args) {
        SpringApplication.run(SleuthFeignApplication.class, args);
    }
}
c、其他的feign相关类
package com.cetc.config;

import feign.Retryer;
import org.springframework.context.annotation.Bean;
import org.springframework.context.annotation.Configuration;

@Configuration
public class FeignConfiguration {

    @Bean
    public Retryer retryer() {
        return new Retryer.Default();
    }
}
package com.cetc.feign.client;

import com.cetc.config.FeignConfiguration;
import org.springframework.cloud.openfeign.FeignClient;
import org.springframework.stereotype.Component;
import org.springframework.web.bind.annotation.GetMapping;

@Component
@FeignClient(value = "client", configuration = {FeignConfiguration.class})
public interface TestFeign {

    @GetMapping("/api/test/getPort")
    Integer getPort();
}
package com.cetc.service.impl;

import com.cetc.feign.client.TestFeign;
import com.cetc.service.ISleuthFeignService;
import org.springframework.beans.factory.annotation.Autowired;
import org.springframework.stereotype.Service;

@Service
public class SleuthFeignServiceImpl implements ISleuthFeignService {

    @Autowired
    private TestFeign testFeign;

    @Override
    public Integer getPort() {
        return testFeign.getPort();
    }
}
基本上按照Spring-Cloud之Feign声明式调用-4的方式进行编写的,只是做了一下名称修改。
package com.cetc.web.rest;

import com.cetc.service.ISleuthFeignService;
import org.springframework.beans.factory.annotation.Autowired;
import org.springframework.web.bind.annotation.GetMapping;
import org.springframework.web.bind.annotation.RequestMapping;
import org.springframework.web.bind.annotation.RestController;

@RestController
@RequestMapping("/api/sleuthFeign")
public class SleuthFeignResource {

    @Autowired
    private ISleuthFeignService feignService;

    @GetMapping("/getPort")
    public Integer getPort() {
        return feignService.getPort();
    }
}
d、配置文件application.yaml
server:
  port: 8688
spring:
  application:
    name: sleuth-feign
  zipkin:
    base-url: http://127.0.0.1:8687/
  sleuth:
    sampler:
      probability: 1.0
eureka:
  client:
    service-url:
      defaultZone:
        http://127.0.0.1:8670/eureka/ # 实际开发中建议使用域名的方式
说明:这里我是使用的自己编写zipkin-server所以配置也是自己的。
3)编写网关服务sleuth-zuul:
a、加入依赖
        <dependency>
            <groupId>org.springframework.cloud</groupId>
            <artifactId>spring-cloud-starter-netflix-eureka-client</artifactId>
        </dependency>
        <dependency>
            <groupId>org.springframework.boot</groupId>
            <artifactId>spring-boot-starter-web</artifactId>
        </dependency>
        <dependency>
            <groupId>org.springframework.cloud</groupId>
            <artifactId>spring-cloud-starter-netflix-zuul</artifactId>
        </dependency>
        <dependency>
            <groupId>org.springframework.cloud</groupId>
            <artifactId>spring-cloud-starter-zipkin</artifactId>
        </dependency>
b、编写启动类
package com.cetc;

import org.springframework.boot.SpringApplication;
import org.springframework.boot.autoconfigure.SpringBootApplication;
import org.springframework.cloud.netflix.eureka.EnableEurekaClient;
import org.springframework.cloud.netflix.zuul.EnableZuulProxy;

@SpringBootApplication
@EnableEurekaClient
@EnableZuulProxy
public class SleuthZuulApplication {

    public static void main(String[] args) {

        SpringApplication.run(SleuthZuulApplication.class, args);
    }
}
c、编写配置文件application.yaml
server:
  port: 8689
spring:
  application:
    name: sleuth-zuul
  zipkin:
    base-url: http://127.0.0.1:8687/
  sleuth:
    sampler:
      probability: 1.0
zuul:
  routes:
    sleuth-zuul:
      path: /sleuthZuul/**
      serviceId: sleuth-feign
eureka:
  client:
    service-url:
      defaultZone: http://127.0.0.1:8670/eureka/ # 实际开发中建议使用域名的方式
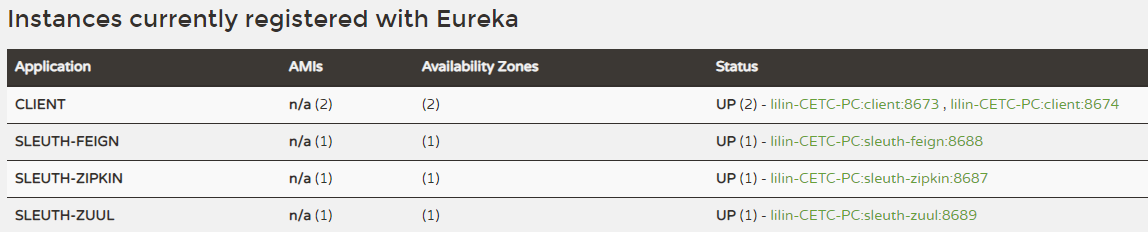
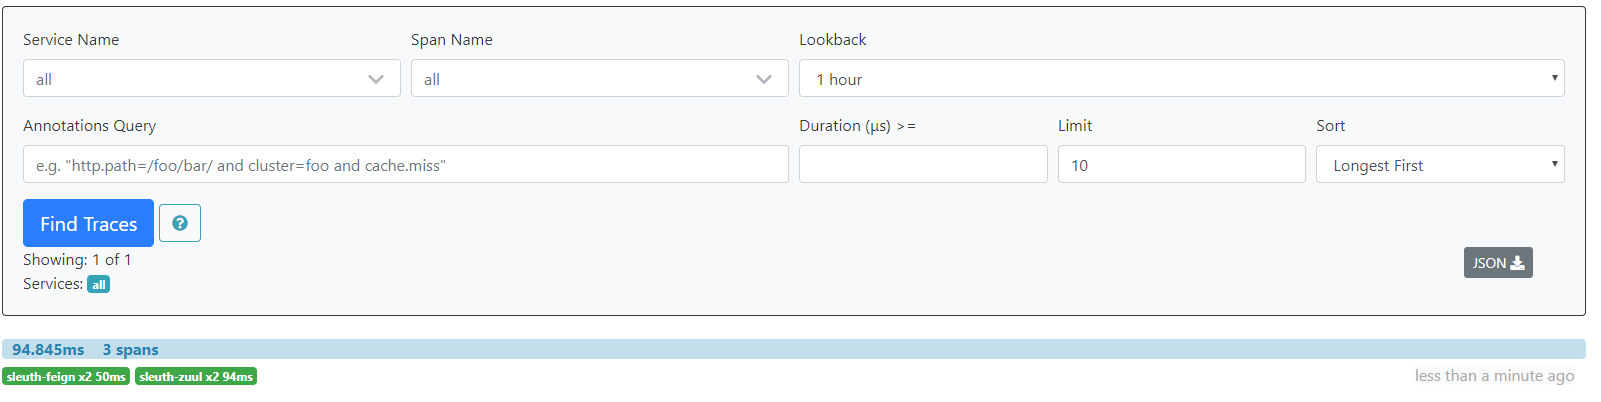
4)测试:启动Eureka-Server、2个Eureka-Client、Sleuth-Server(Zipkin)、Sleuth-Feign、Sleuth-Zuul。端口分别为8670、8673/8674、8687、8688、8689。
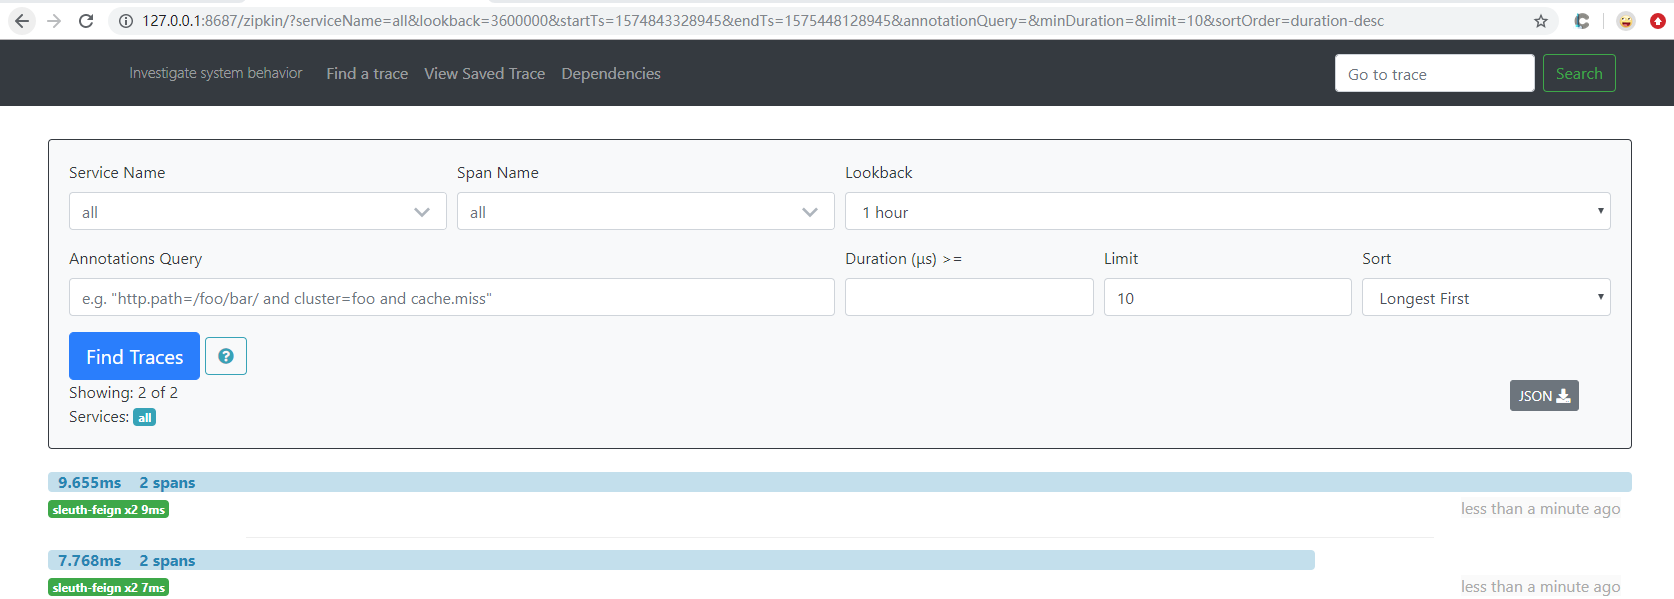
先访问一下网关暴露的服务:

访问:http://127.0.0.1:8687/zipkin/点击Find Traces

五、在链路中添加自定义数据
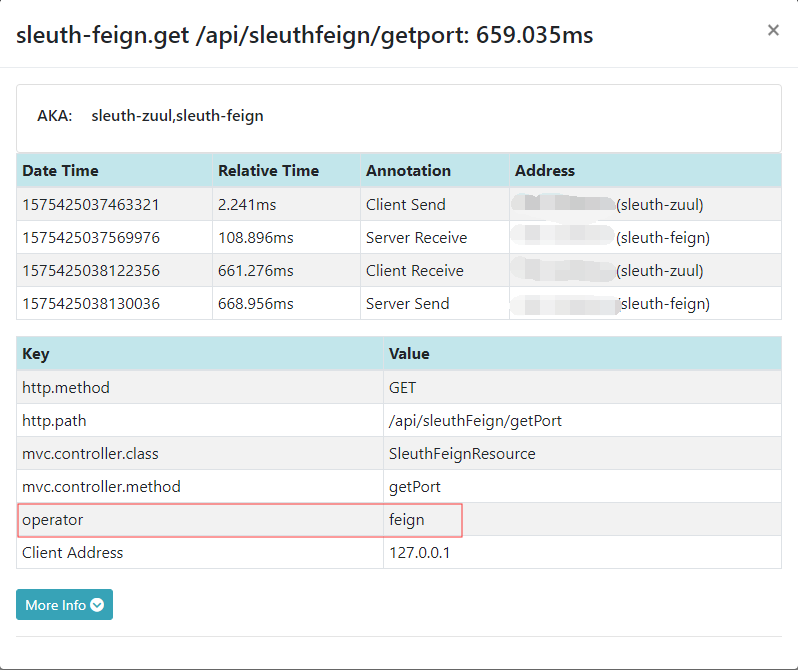
在任何可以过滤的地方加入一下代码即可。这里是直接在Rest接口中添加。
    @Autowired
    private Tracer tracer;

    tracer.currentSpan().tag("operator", "feign");
    System.out.println(tracer.currentSpan().context().traceId());
    ...
实例:
package com.cetc.web.rest;

import brave.Tracer;
import com.cetc.service.ISleuthFeignService;
import org.springframework.beans.factory.annotation.Autowired;
import org.springframework.web.bind.annotation.GetMapping;
import org.springframework.web.bind.annotation.RequestMapping;
import org.springframework.web.bind.annotation.RestController;

@RestController
@RequestMapping("/api/sleuthFeign")
public class SleuthFeignResource {

    @Autowired
    private ISleuthFeignService feignService;

    @Autowired
    private Tracer tracer;

    @GetMapping("/getPort")
    public Integer getPort() {
        tracer.currentSpan().tag("operator", "feign");
        System.out.println(tracer.currentSpan().context().traceId());
        return feignService.getPort();
    }
}
说明:这里主要是测试,实际引用可以直接做请求拦截。这里只是展示一个访问的过程。
注意:这里的节点是可以添加新的数据,或者获取其他节点数据,用于日志记录等。这样方便查看!
测试结果:
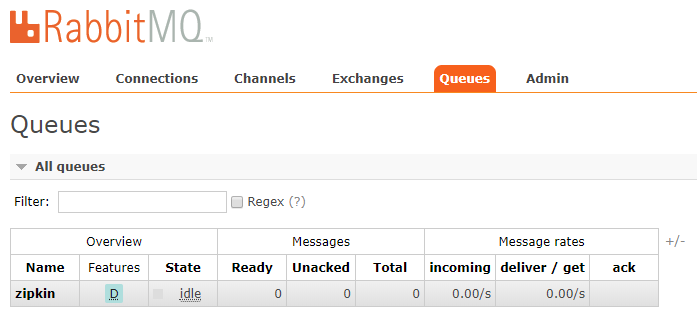
六、使用RabbitMQ传输链路数据:
1)说明:Spring Cloud 2.0以后就废弃了RabbitMQ在Sleuth中的使用了,官方说明如何需要使用,请添加如下依赖。

大概意思就是spring-cloud-sleuth-stream被废弃,如果想在Sleuth中使用RabbitMQ,请添加spring-cloud-starter-zipkin和spring-rabbit。实测这种方式只针对于Sleuth-Client有用,代码形式的Sleuth-Server没啥用。
2)为了更好的展示代码和jar包2种效果,我们需要做一些修改这里做了一些修改。
a、修改Sleuth-Server(zipkin)代码的方式
(1)加入rabbitmq的依赖
        <dependency>
            <groupId>io.zipkin.java</groupId>
            <artifactId>zipkin-autoconfigure-collector-rabbitmq</artifactId>
            <version>2.11.8</version>
        </dependency>
(2)加入报错的配置
package com.cetc.config;

import org.springframework.context.annotation.Bean;
import org.springframework.context.annotation.Configuration;
import zipkin2.collector.CollectorMetrics;
import zipkin2.collector.CollectorSampler;
import zipkin2.collector.InMemoryCollectorMetrics;
import zipkin2.storage.InMemoryStorage;
import zipkin2.storage.StorageComponent;

@Configuration
public class ZipkinConfiguration {

    @Bean
    public CollectorSampler collectorSampler() {
        return CollectorSampler.ALWAYS_SAMPLE;
    }

    @Bean
    public CollectorMetrics collectorMetrics() {
        return InMemoryCollectorMetrics.NOOP_METRICS;
    }

    @Bean
    public StorageComponent storageComponent() {
        InMemoryStorage.Builder builder = new InMemoryStorage.Builder();
        return builder.build();
    }

}
(3)添加rabbitmq的配置(application.yaml)
zipkin:
  collector:
    rabbitmq:
      addresses: 127.0.0.1:5672
      username: guest
      password: guest
b、通过jar包启动
java -jar zipkin-server-2.19.2-exec.jar --zipkin.collector.rabbitmq.addresses=127.0.0.1:5672 --zipkin.collector.rabbitmq.username=guest --zipkin.collector.rabbitmq.password=guest
3)Sleuth-Client的修改
(1)在Sleuth-Zuul和Sleuth-Feign中加入rabbitmq依赖
        <dependency>
            <groupId>org.springframework.cloud</groupId>
            <artifactId>spring-cloud-starter-stream-rabbit</artifactId>
        </dependency>
(2)修改application.yaml配置
spring:
  application:
    name: sleuth-zuul
  zipkin:
#    base-url: http://127.0.0.1:8687/
    sender:
      type: rabbit
  rabbitmq:
    host: 127.0.0.1
    port: 5672
    username: guest
    password: guest
spring:
  application:
    name: sleuth-feign
  zipkin:
#    base-url: http://127.0.0.1:8687/
    sender:
      type: rabbit
  rabbitmq:
    host: 127.0.0.1
    port: 5672
    username: guest
    password: guest
4)到此上面基本上配置完成。下面进行代码的Sleuth-Server测试。启动项目包含:Eureka-Server、2个Eureka-Client、Sleuth-Server(zipkin)、Sleuth-Feign、Sleuth-Zuul端口分别为8670、8673/8674、8687、8688、8689

上面是通过代码去启动的,下面进行jar测试:
七、将链路数据存入数据库,这里只讲服务端的,客户端的大同小异。
1)加入依赖
        <dependency>
            <groupId>io.zipkin.java</groupId>
            <artifactId>zipkin-autoconfigure-storage-mysql</artifactId>
            <version>2.11.8</version>
        </dependency>
        <!--解决spring自带的版本不一致问题-->
        <dependency>
            <groupId>org.jooq</groupId>
            <artifactId>jooq</artifactId>
            <version>3.12.3</version>
        </dependency>
        <!--解决spring自带的版本不一致问题-->
说明:jooq在springboot2.0中是3.10.5的版本,此版本与zipkin的版本调用不一致,需要使用3.11.x以上版本
2)修改ZipkinConfiguration配置,主要是屏蔽内存的配置。
package com.cetc.config;

import org.springframework.context.annotation.Bean;
import org.springframework.context.annotation.Configuration;
import zipkin2.collector.CollectorMetrics;
import zipkin2.collector.CollectorSampler;
import zipkin2.collector.InMemoryCollectorMetrics;
import zipkin2.storage.InMemoryStorage;
import zipkin2.storage.StorageComponent;


@Configuration
public class ZipkinConfiguration {

    @Bean
    public CollectorSampler collectorSampler() {
        return CollectorSampler.ALWAYS_SAMPLE;
    }

//    @Bean
//    public CollectorMetrics collectorMetrics() {
//        return InMemoryCollectorMetrics.NOOP_METRICS;
//    }
//
//    @Bean
//    public StorageComponent storageComponent() {
//        InMemoryStorage.Builder builder = new InMemoryStorage.Builder();
//        return builder.build();
//    }

}
3)在application.yaml加入以下配置
zipkin:
  storage:
    type: mysql
    mysql:
      host: 127.0.0.1
      port: 3306
      username: root
      password: root
      db: spring-cloud-sleuth
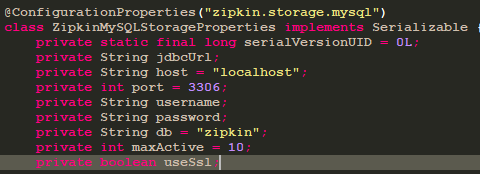
说明:这里不采用spring的jdbc配置,目的是zipkin本身提供了自动注入功能,所以只需要加入即可。数据库的配置可以在ZipkinMySQLStorageProperties找到,这里不过解释
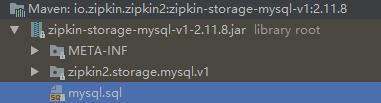
4)在指定的数据库中加入对应表,mysql.sql在zipkin-storage-mysql-v1-2.11.8.jar中,此依赖在zipkin-autoconfigure-storage-mysql中加入
在对应数据库中执行mysql.sql。


CREATE TABLE IF NOT EXISTS zipkin_spans (
  `trace_id_high` BIGINT NOT NULL DEFAULT 0 COMMENT 'If non zero, this means the trace uses 128 bit traceIds instead of 64 bit',
  `trace_id` BIGINT NOT NULL,
  `id` BIGINT NOT NULL,
  `name` VARCHAR(255) NOT NULL,
  `parent_id` BIGINT,
  `debug` BIT(1),
  `start_ts` BIGINT COMMENT 'Span.timestamp(): epoch micros used for endTs query and to implement TTL',
  `duration` BIGINT COMMENT 'Span.duration(): micros used for minDuration and maxDuration query'
) ENGINE=InnoDB ROW_FORMAT=COMPRESSED CHARACTER SET=utf8 COLLATE utf8_general_ci;

ALTER TABLE zipkin_spans ADD UNIQUE KEY(`trace_id_high`, `trace_id`, `id`) COMMENT 'ignore insert on duplicate';
ALTER TABLE zipkin_spans ADD INDEX(`trace_id_high`, `trace_id`, `id`) COMMENT 'for joining with zipkin_annotations';
ALTER TABLE zipkin_spans ADD INDEX(`trace_id_high`, `trace_id`) COMMENT 'for getTracesByIds';
ALTER TABLE zipkin_spans ADD INDEX(`name`) COMMENT 'for getTraces and getSpanNames';
ALTER TABLE zipkin_spans ADD INDEX(`start_ts`) COMMENT 'for getTraces ordering and range';

CREATE TABLE IF NOT EXISTS zipkin_annotations (
  `trace_id_high` BIGINT NOT NULL DEFAULT 0 COMMENT 'If non zero, this means the trace uses 128 bit traceIds instead of 64 bit',
  `trace_id` BIGINT NOT NULL COMMENT 'coincides with zipkin_spans.trace_id',
  `span_id` BIGINT NOT NULL COMMENT 'coincides with zipkin_spans.id',
  `a_key` VARCHAR(255) NOT NULL COMMENT 'BinaryAnnotation.key or Annotation.value if type == -1',
  `a_value` BLOB COMMENT 'BinaryAnnotation.value(), which must be smaller than 64KB',
  `a_type` INT NOT NULL COMMENT 'BinaryAnnotation.type() or -1 if Annotation',
  `a_timestamp` BIGINT COMMENT 'Used to implement TTL; Annotation.timestamp or zipkin_spans.timestamp',
  `endpoint_ipv4` INT COMMENT 'Null when Binary/Annotation.endpoint is null',
  `endpoint_ipv6` BINARY(16) COMMENT 'Null when Binary/Annotation.endpoint is null, or no IPv6 address',
  `endpoint_port` SMALLINT COMMENT 'Null when Binary/Annotation.endpoint is null',
  `endpoint_service_name` VARCHAR(255) COMMENT 'Null when Binary/Annotation.endpoint is null'
) ENGINE=InnoDB ROW_FORMAT=COMPRESSED CHARACTER SET=utf8 COLLATE utf8_general_ci;

ALTER TABLE zipkin_annotations ADD UNIQUE KEY(`trace_id_high`, `trace_id`, `span_id`, `a_key`, `a_timestamp`) COMMENT 'Ignore insert on duplicate';
ALTER TABLE zipkin_annotations ADD INDEX(`trace_id_high`, `trace_id`, `span_id`) COMMENT 'for joining with zipkin_spans';
ALTER TABLE zipkin_annotations ADD INDEX(`trace_id_high`, `trace_id`) COMMENT 'for getTraces/ByIds';
ALTER TABLE zipkin_annotations ADD INDEX(`endpoint_service_name`) COMMENT 'for getTraces and getServiceNames';
ALTER TABLE zipkin_annotations ADD INDEX(`a_type`) COMMENT 'for getTraces';
ALTER TABLE zipkin_annotations ADD INDEX(`a_key`) COMMENT 'for getTraces';
ALTER TABLE zipkin_annotations ADD INDEX(`trace_id`, `span_id`, `a_key`) COMMENT 'for dependencies job';

CREATE TABLE IF NOT EXISTS zipkin_dependencies (
  `day` DATE NOT NULL,
  `parent` VARCHAR(255) NOT NULL,
  `child` VARCHAR(255) NOT NULL,
  `call_count` BIGINT,
  `error_count` BIGINT
) ENGINE=InnoDB ROW_FORMAT=COMPRESSED CHARACTER SET=utf8 COLLATE utf8_general_ci;

ALTER TABLE zipkin_dependencies ADD UNIQUE KEY(`day`, `parent`, `child`);
5)测试:

八、在elasticsearch中存储链路数据。为什么不是用msyql存放链路数据吗?因为在高并发的情况下mysql的存储肯定会存在问题的,虽然使用了rabbitmq来减轻压力,但是应用效果不理想。
1)elasticsearch下载安装地址,因为目前使用的springcloud2.0建议使用6.8.5版本:
elasticsearch:https://www.elastic.co/cn/downloads/elasticsearch
kibana(elasticsearch的视图展示)下载地址:https://www.elastic.co/cn/downloads/kibana
中文下载网:https://elasticsearch.cn/download/
百度网盘6.8.5:https://pan.baidu.com/s/1aNTF9ELva4GJ91Zm4jZ-9A
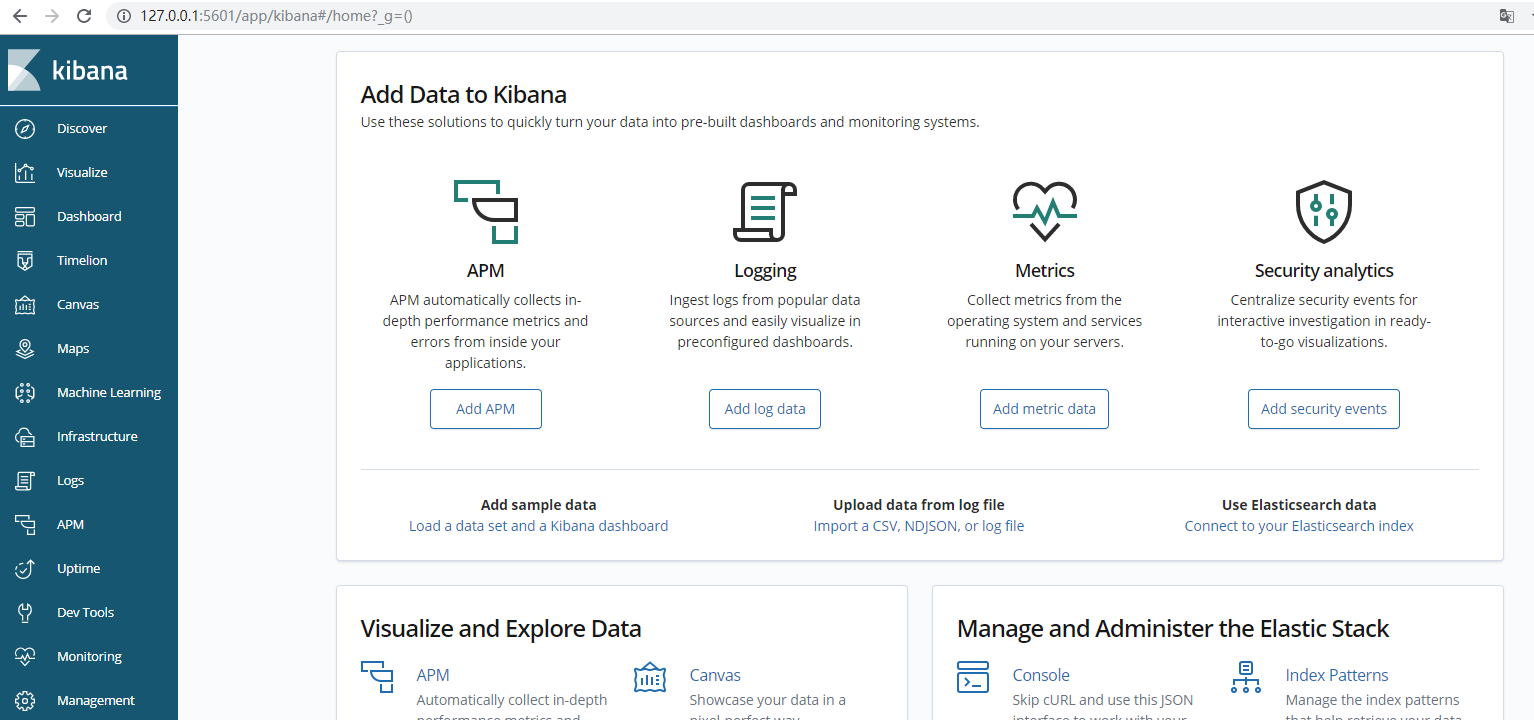
2)运行elasticsearch和kibana
 .inelasticsearch.bat
 .inkibana.bat
elasticsearch:默认端口9200
kibana:默认端口5601
elasticsearch成功标志:
kibana成功标志:
3)在Sleuth-Server中配置elasticsearch:
a、加入依赖
        <dependency>
            <groupId>io.zipkin.java</groupId>
            <artifactId>zipkin-autoconfigure-storage-elasticsearch-http</artifactId>
            <version>2.8.4</version>
        </dependency>
b、ZipkinConfiguration的配置和mysql配置一样
package com.cetc.config;

import org.springframework.context.annotation.Bean;
import org.springframework.context.annotation.Configuration;
import zipkin2.collector.CollectorSampler;


@Configuration
public class ZipkinConfiguration {

    @Bean
    public CollectorSampler collectorSampler() {
        return CollectorSampler.ALWAYS_SAMPLE;
    }

//    @Bean
//    public CollectorMetrics collectorMetrics() {
//        return InMemoryCollectorMetrics.NOOP_METRICS;
//    }
//
//    @Bean
//    public StorageComponent storageComponent() {
//        InMemoryStorage.Builder builder = new InMemoryStorage.Builder();
//        return builder.build();
//    }

}
c、修改配置文件application.yaml
zipkin:
storage:
type: elasticsearch
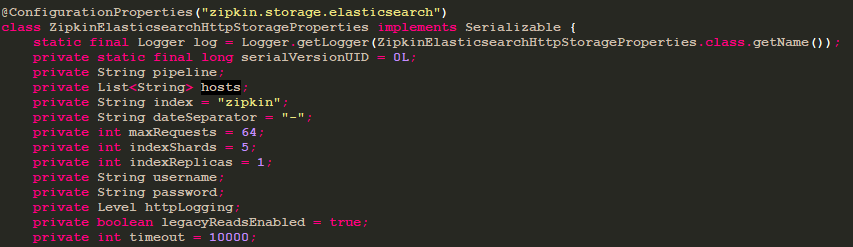
elasticsearch:
hosts: ["127.0.0.1:9200"]
具体可配置的如下:
4)测试。启动Eureka-Server、2个Eureka-Client、Sleuth-Server(elasticSearch)、Sleuth-Feign、Sleuth-Zuul端口分别为8670、8673/8674、8690、8688、8689


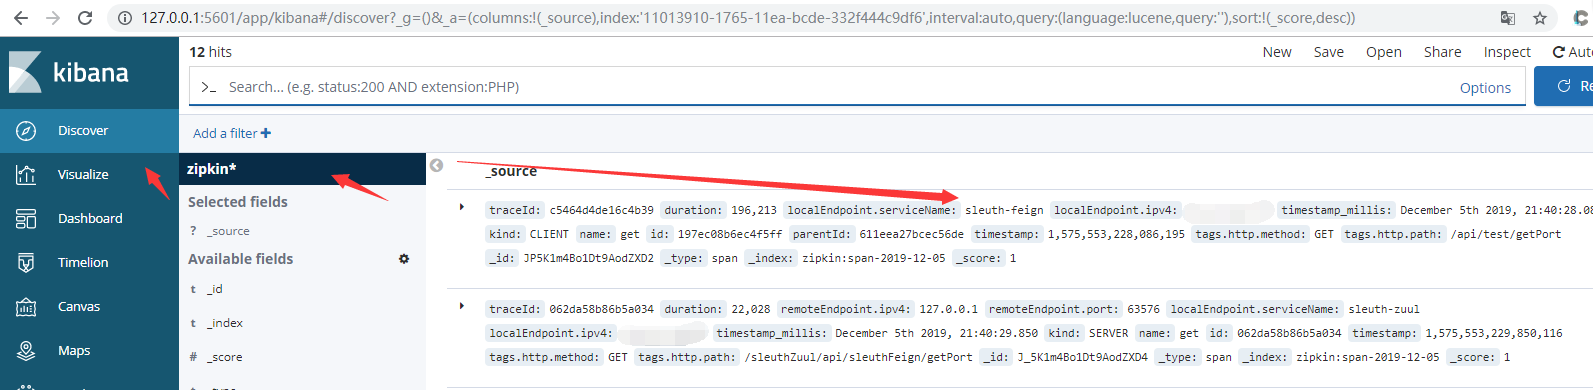
通过kibana查看
九、源码地址:https://github.com/lilin409546297/spring-cloud/tree/master/sleuth