一、OAuth(开放授权)是一个开放标准,允许用户授权第三方移动应用访问他们存储在另外的服务提供者上的信息,而不需要将用户名和密码提供给第三方移动应用或分享他们数据的所有内容,OAuth2.0是OAuth协议的延续版本,但不向后兼容OAuth 1.0即完全废止了OAuth1.0。
二、认证和授权过程。
1)主要包含3中角色:
(1)服务提供方:Authorization Server
(2)资源拥有者:Resource Server
(3)客户端:Client
2)授权过程
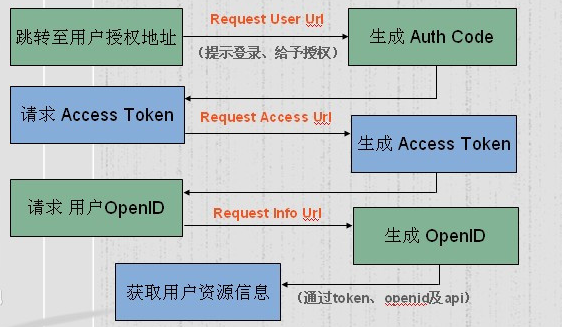
(1)用户打开授权页面,询问用户授权
(2)用户同意授权
(3)客户端向授权服务器进行授权申请
(4)授权服务器进行认证,认证通过后,返回令牌(包含用户信息)
(5)客户端得到令牌后,通过携带令牌访问资源服务器资源
(6)资源服务器向授权/认证服务确认后,方可向客户端开发资源
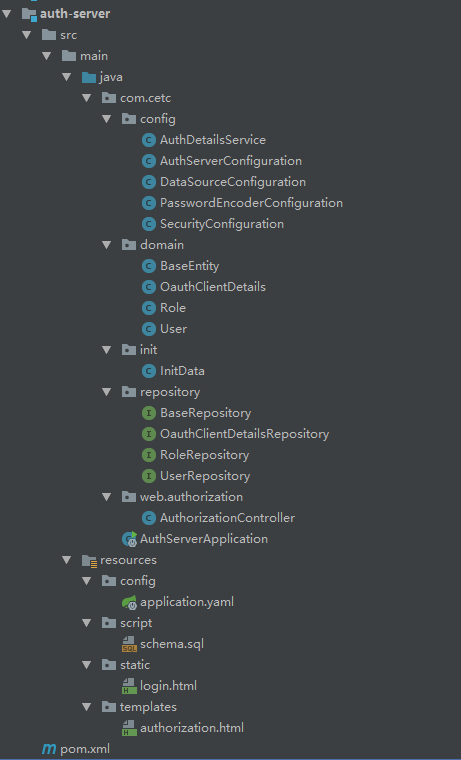
三、授权服务器(Authorization Server),为了更加接近生产环境,我这里采用的都是数据库或者自定义配置,请注意注释部分。
1、目录结构:
2、依赖部分
        <dependency>
            <groupId>org.springframework.cloud</groupId>
            <artifactId>spring-cloud-starter-netflix-eureka-client</artifactId>
        </dependency>
        <dependency>
            <groupId>org.springframework.boot</groupId>
            <artifactId>spring-boot-starter-web</artifactId>
        </dependency>
        <dependency>
            <groupId>org.springframework.cloud</groupId>
            <artifactId>spring-cloud-starter-oauth2</artifactId>
        </dependency>
        <dependency>
            <groupId>org.springframework.boot</groupId>
            <artifactId>spring-boot-starter-data-jpa</artifactId>
        </dependency>
        <dependency>
            <groupId>mysql</groupId>
            <artifactId>mysql-connector-java</artifactId>
        </dependency>
        <dependency>
            <groupId>org.springframework.boot</groupId>
            <artifactId>spring-boot-starter-thymeleaf</artifactId>
        </dependency>
3、启动项
package com.cetc;

import org.springframework.boot.SpringApplication;
import org.springframework.boot.autoconfigure.SpringBootApplication;
import org.springframework.cloud.netflix.eureka.EnableEurekaClient;

@SpringBootApplication
@EnableEurekaClient
public class AuthServerApplication {

    public static void main(String[] args) {
        SpringApplication.run(AuthServerApplication.class, args);
    }
}
4、基础配置application.yaml
server:
  port: 8694
  servlet:
    context-path: /auth
    session:
      cookie:
        name: SESSION_AUTH_SERVER #因为我这里都是本地,所以需要修改会话名称
spring:
  application:
    name: auth-server
  thymeleaf:
    encoding: UTF-8
    mode: HTML5
    cache: false
  datasource:
    driver-class-name: com.mysql.jdbc.Driver
    url: jdbc:mysql://127.0.0.1/auth-server?useUnicode=true&characterEncoding=utf-8
    username: root
    password: root
    type: com.zaxxer.hikari.HikariDataSource
  jpa:
    show-sql: true
    hibernate:
      ddl-auto: update
      naming:
        physical-strategy: org.springframework.boot.orm.jpa.hibernate.SpringPhysicalNamingStrategy
        implicit-strategy: org.springframework.boot.orm.jpa.hibernate.SpringImplicitNamingStrategy
    database: mysql
    database-platform: org.hibernate.dialect.MySQL5InnoDBDialect
eureka:
  client:
    service-url:
      defaultZone: http://127.0.0.1:8670/eureka/ # 实际开发中建议使用域名的方式
5、下面我们重点来看配置部分(为了节约篇幅,我这里就省略了AuthDetailsService、DataSourceConfiguration、PasswordEncoderConfiguration具体的可以参考:Spring-Boot之Security安全管理-10)
(1)security配置
package com.cetc.config;

import org.springframework.beans.factory.annotation.Autowired;
import org.springframework.context.annotation.Bean;
import org.springframework.context.annotation.Configuration;
import org.springframework.security.authentication.AuthenticationManager;
import org.springframework.security.config.annotation.authentication.builders.AuthenticationManagerBuilder;
import org.springframework.security.config.annotation.method.configuration.EnableGlobalMethodSecurity;
import org.springframework.security.config.annotation.web.builders.HttpSecurity;
import org.springframework.security.config.annotation.web.configuration.EnableWebSecurity;
import org.springframework.security.config.annotation.web.configuration.WebSecurityConfigurerAdapter;
import org.springframework.security.crypto.password.PasswordEncoder;

@Configuration
@EnableWebSecurity
//开启注解的使用
@EnableGlobalMethodSecurity(prePostEnabled = true, securedEnabled = true)
public class SecurityConfiguration extends WebSecurityConfigurerAdapter {

    //认证过程
    @Autowired
    private AuthDetailsService authDetailsService;

    //加密方式
    @Autowired
    private PasswordEncoder passwordEncoder;

    @Override
    protected void configure(AuthenticationManagerBuilder auth) throws Exception {
        auth.userDetailsService(authDetailsService).passwordEncoder(passwordEncoder);
    }

    //基本没有什么太大的变化
    @Override
    protected void configure(HttpSecurity http) throws Exception {
        http
            .csrf().disable()
            .exceptionHandling()
        .and()
            .authorizeRequests()
            .antMatchers("/login.html").permitAll()
            .anyRequest().authenticated()
        .and()
            .formLogin()
            //注意我这里使用的是自定义的登录页面
            .loginPage("/login.html")
            .loginProcessingUrl("/login")
        .and()
            .logout()
            .deleteCookies("SESSION_AUTH_SERVER");
    }

    //注意加入bean主要是在authentication server的配置需要使用
    @Bean
    @Override
    public AuthenticationManager authenticationManagerBean() throws Exception {
        return super.authenticationManagerBean();
    }
}
(2)Authorization配置
package com.cetc.config;

import com.zaxxer.hikari.HikariDataSource;
import org.springframework.beans.factory.annotation.Autowired;
import org.springframework.context.annotation.Bean;
import org.springframework.context.annotation.Configuration;
import org.springframework.http.HttpMethod;
import org.springframework.security.authentication.AuthenticationManager;
import org.springframework.security.oauth2.config.annotation.configurers.ClientDetailsServiceConfigurer;
import org.springframework.security.oauth2.config.annotation.web.configuration.AuthorizationServerConfigurerAdapter;
import org.springframework.security.oauth2.config.annotation.web.configuration.EnableAuthorizationServer;
import org.springframework.security.oauth2.config.annotation.web.configurers.AuthorizationServerEndpointsConfigurer;
import org.springframework.security.oauth2.config.annotation.web.configurers.AuthorizationServerSecurityConfigurer;
import org.springframework.security.oauth2.provider.ClientDetailsService;
import org.springframework.security.oauth2.provider.client.JdbcClientDetailsService;
import org.springframework.security.oauth2.provider.token.TokenStore;
import org.springframework.security.oauth2.provider.token.store.JdbcTokenStore;

@Configuration
@EnableAuthorizationServer
public class AuthServerConfiguration extends AuthorizationServerConfigurerAdapter{

    @Autowired
    private AuthDetailsService authDetailsService;

    @Autowired
    private AuthenticationManager authenticationManager;

    @Autowired
    private ClientDetailsService clientDetailsService;

    @Autowired
    private TokenStore tokenStore;

    @Bean
    public ClientDetailsService clientDetailsService(HikariDataSource dataSource) {
        //使用数据库的配置方式
        return new JdbcClientDetailsService(dataSource);
    }

    @Bean
    public TokenStore tokenStore(HikariDataSource dataSource) {
        //token也使用数据的方式,后面会将JWT的使用方式
        return new JdbcTokenStore(dataSource);
    }

    @Override
    public void configure(AuthorizationServerSecurityConfigurer security) throws Exception {
        security
                //token获取方式
                .tokenKeyAccess("permitAll()")
                //检测加入权限
                .checkTokenAccess("isAuthenticated()")
                //允许表单认证
                .allowFormAuthenticationForClients();

    }

    @Override
    public void configure(ClientDetailsServiceConfigurer clients) throws Exception {
        //这里就是具体的授权管理过程了
        clients.withClientDetails(clientDetailsService);
    }

    @Override
    public void configure(AuthorizationServerEndpointsConfigurer endpoints) throws Exception {
        endpoints
                //这里使用的认证方式为security配置方式
                .authenticationManager(authenticationManager)
                //提供get和post的认证方式
                .allowedTokenEndpointRequestMethods(HttpMethod.POST, HttpMethod.GET)
                //这里一定要配置userDetailsService,不然刷新token会出错,refresh_token
                .userDetailsService(authDetailsService)
                .tokenStore(tokenStore)
                //自定义认证页面
                .pathMapping("/oauth/confirm_access", "/oauth/confirm_access");
    }

}
其一:认证过程因为使用的是数据库,那么需要数据库的表格支持,这里也提供了为schema.sql,官网:https://github.com/spring-projects/spring-security-oauth/blob/2.0.x/spring-security-oauth2/src/test/resources/schema.sql
说明:由于官方的脚本适用于HSQL,所以我MYSQL这里脚本进行了修改,主要是主键改成255的长度,LONGVARBINARY改为BLOB
schema.sql:


-- used in tests that use HSQL
create table oauth_client_details (
  client_id VARCHAR(255) PRIMARY KEY,
  resource_ids VARCHAR(256),
  client_secret VARCHAR(256),
  scope VARCHAR(256),
  authorized_grant_types VARCHAR(256),
  web_server_redirect_uri VARCHAR(256),
  authorities VARCHAR(256),
  access_token_validity INTEGER,
  refresh_token_validity INTEGER,
  additional_information VARCHAR(4096),
  autoapprove VARCHAR(256)
);

create table oauth_client_token (
  token_id VARCHAR(256),
  token BLOB,
  authentication_id VARCHAR(255) PRIMARY KEY,
  user_name VARCHAR(256),
  client_id VARCHAR(256)
);

create table oauth_access_token (
  token_id VARCHAR(256),
  token BLOB,
  authentication_id VARCHAR(255) PRIMARY KEY,
  user_name VARCHAR(256),
  client_id VARCHAR(256),
  authentication BLOB,
  refresh_token VARCHAR(256)
);

create table oauth_refresh_token (
  token_id VARCHAR(256),
  token BLOB,
  authentication BLOB
);

create table oauth_code (
  code VARCHAR(256), authentication BLOB
);

create table oauth_approvals (
    userId VARCHAR(256),
    clientId VARCHAR(256),
    scope VARCHAR(256),
    status VARCHAR(10),
    expiresAt TIMESTAMP,
    lastModifiedAt TIMESTAMP
);


-- customized oauth_client_details table
create table ClientDetails (
  appId VARCHAR(255) PRIMARY KEY,
  resourceIds VARCHAR(256),
  appSecret VARCHAR(256),
  scope VARCHAR(256),
  grantTypes VARCHAR(256),
  redirectUrl VARCHAR(256),
  authorities VARCHAR(256),
  access_token_validity INTEGER,
  refresh_token_validity INTEGER,
  additionalInformation VARCHAR(4096),
  autoApproveScopes VARCHAR(256)
);
其二:自定义认知页面编写AuthorizationController。
package com.cetc.web.authorization;

import org.springframework.security.oauth2.provider.AuthorizationRequest;
import org.springframework.stereotype.Controller;
import org.springframework.web.bind.annotation.RequestMapping;
import org.springframework.web.bind.annotation.SessionAttributes;

import javax.servlet.http.HttpServletRequest;
import java.util.Map;

@Controller
//注意一定要加@SessionAttributes("authorizationRequest")代表这是认证请求
@SessionAttributes("authorizationRequest")
public class AuthorizationController {

    @RequestMapping("/oauth/confirm_access")
    public String authorization(Map<String, ?> map, HttpServletRequest request) {
        AuthorizationRequest authorizationRequest = (AuthorizationRequest) map.get("authorizationRequest");
        request.setAttribute("clientId", authorizationRequest.getClientId());
        //这里的scope是一定要的,主要是认证需要传递的数据类型,需要scope
        request.setAttribute("scope", authorizationRequest.getScope());
        return "authorization";
    }
}
authorization.html
<!DOCTYPE html>
<html xmlns:th="http://www.thymeleaf.org">
<head>
    <meta charset="UTF-8">
    <title>授权</title>
</head>
<body>
    <form th:action="${#servletContext.getContextPath()} + '/oauth/authorize'" method="post">
        <p th:text="${clientId}"></p>
        <input type="hidden" name="user_oauth_approval" value="true">
        <input type="hidden" name="authorize" value="Authorize">
        <div th:each="item : ${scope}">
            <input type="hidden" th:name="'scope.' + ${item}" value="true">
        </div>
        <button type="submit">同意授权</button>
    </form>
</body>
</html>
说明:这里的数据传输主要格式为:
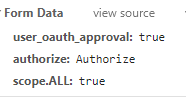
注意:这里的socpe.ALL中的ALL为配置的范围。
(3)为了更好的结合jpa,我这里封装了OauthClientDetails,主要目的就是,方便操作。
package com.cetc.domain;

import javax.persistence.Entity;
import javax.persistence.Id;
import javax.persistence.Table;

@Entity
@Table(name = "oauth_client_details")
public class OauthClientDetails {

    @Id
    private String clientId;

    private String resourceIds;

    private String clientSecret;

    private String scope;

    private String authorizedGrantTypes;

    private String webServerRedirectUri;

    private String authorities;

    private Integer accessTokenValidity;

    private Integer refreshTokenValidity;

    private String additionalInformation;

    private String autoapprove;

    public String getClientId() {
        return clientId;
    }

    public void setClientId(String clientId) {
        this.clientId = clientId;
    }

    public String getResourceIds() {
        return resourceIds;
    }

    public void setResourceIds(String resourceIds) {
        this.resourceIds = resourceIds;
    }

    public String getClientSecret() {
        return clientSecret;
    }

    public void setClientSecret(String clientSecret) {
        this.clientSecret = clientSecret;
    }

    public String getScope() {
        return scope;
    }

    public void setScope(String scope) {
        this.scope = scope;
    }

    public String getAuthorizedGrantTypes() {
        return authorizedGrantTypes;
    }

    public void setAuthorizedGrantTypes(String authorizedGrantTypes) {
        this.authorizedGrantTypes = authorizedGrantTypes;
    }

    public String getWebServerRedirectUri() {
        return webServerRedirectUri;
    }

    public void setWebServerRedirectUri(String webServerRedirectUri) {
        this.webServerRedirectUri = webServerRedirectUri;
    }

    public String getAuthorities() {
        return authorities;
    }

    public void setAuthorities(String authorities) {
        this.authorities = authorities;
    }

    public Integer getAccessTokenValidity() {
        return accessTokenValidity;
    }

    public void setAccessTokenValidity(Integer accessTokenValidity) {
        this.accessTokenValidity = accessTokenValidity;
    }

    public Integer getRefreshTokenValidity() {
        return refreshTokenValidity;
    }

    public void setRefreshTokenValidity(Integer refreshTokenValidity) {
        this.refreshTokenValidity = refreshTokenValidity;
    }

    public String getAdditionalInformation() {
        return additionalInformation;
    }

    public void setAdditionalInformation(String additionalInformation) {
        this.additionalInformation = additionalInformation;
    }

    public String getAutoapprove() {
        return autoapprove;
    }

    public void setAutoapprove(String autoapprove) {
        this.autoapprove = autoapprove;
    }
}
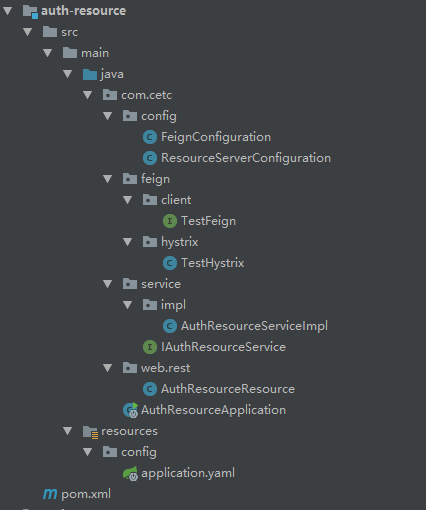
四、资源服务器Resource Server
1、目录结构:从结构上面来看,基本和Spring-Cloud之Feign声明式调用-4没有什么异同,所以我这里只讲核心点(ResourceServerConfiguration、application.yaml)。
2、先看需要的依赖
        <dependency>
            <groupId>org.springframework.cloud</groupId>
            <artifactId>spring-cloud-starter-netflix-eureka-client</artifactId>
        </dependency>
        <dependency>
            <groupId>org.springframework.boot</groupId>
            <artifactId>spring-boot-starter-web</artifactId>
        </dependency>
        <dependency>
            <groupId>org.springframework.cloud</groupId>
            <artifactId>spring-cloud-starter-oauth2</artifactId>
        </dependency>
        <dependency>
            <groupId>org.springframework.cloud</groupId>
            <artifactId>spring-cloud-starter-openfeign</artifactId>
        </dependency>
3、ResourceServerConfiguration。资源服务器配置
package com.cetc.config;

import org.springframework.context.annotation.Configuration;
import org.springframework.security.config.annotation.web.builders.HttpSecurity;
import org.springframework.security.oauth2.config.annotation.web.configuration.EnableResourceServer;
import org.springframework.security.oauth2.config.annotation.web.configuration.ResourceServerConfigurerAdapter;

@Configuration
@EnableResourceServer
public class ResourceServerConfiguration extends ResourceServerConfigurerAdapter{

    @Override
    public void configure(HttpSecurity http) throws Exception {
        http
            .csrf().disable()
            .authorizeRequests()
            .anyRequest().authenticated();
    }
}
说明:这里的认证在认证中心完成,所以这里只需要,配置拦截即可
4、application.yaml
server:
  port: 8695
spring:
  application:
    name: auth-resource
eureka:
  client:
    service-url:
      defaultZone: http://127.0.0.1:8670/eureka/ # 实际开发中建议使用域名的方式
security:
  oauth2:
    client:
      client-id: client
      client-secret: secret
      grant-type: authorization_code
      scope: ALL
      access-token-uri: http://127.0.0.1:8694/auth/oauth/token
      user-authorization-uri: http://127.0.0.1:8694/auth/oauth/authorize
    resource:
      id: auth-resource
      token-info-uri: http://127.0.0.1:8694/auth/oauth/check_token
说明:这里就仅仅加入了oauth2的认证配置。这里的参数主要是在授权服务器提供的授权,这里主要在数据里。我在授权的服务器的init中有加入初始化数据。

5、其他部分不再具体讲解了,如果存在不懂的地方可以参考:Spring-Cloud之Feign声明式调用-4
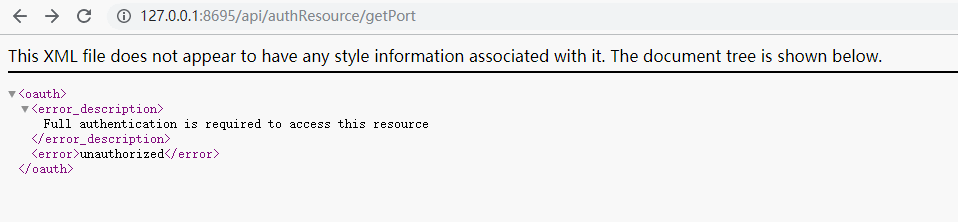
五、验证第三方客户端获取资源服务器提供的接口。(这里提供的接口为:/api/authResource/getPort)
1)启动项目:Eureka Server、Eureka Client、Auth Server、Auth Resource端口分别为8670、8673、8694、8695。

2)访问资源服务器的接口/api/authResource/getPort

说明:可以看出,直接访问时没有权限的。
3)前面测试访问时没有权限,主要是没有令牌。那我们接下来就是来获取令牌。前面也提到认证方式,这里有四种
(1)授权码模式(authorization_code)
(2)简化模式(implicit)
(3)密码模式(password)
(4)客户端模式(client_credentials)
为了方便我在数据库,这几种方式都进行了配置

4)获取令牌
(1)授权码模式(authorization_code)
a、获取授权码
oauth/authorize?response_type=code&client_id=&redirect_uri=
本文:
http://127.0.0.1:8694/auth/oauth/authorize?response_type=code&client_id=client&redirect_uri=http://127.0.0.1:8695
说明:从上面的操作来看,我们最后获得了一个授权码code=code=hkJfzA,这个授权码只能使用一次。
b、获取令牌
oauth/token?client_id=&client_secret=&grant_type=authorization_code&redirect_uri=&code=
本文:
http://127.0.0.1:8694/auth/oauth/token?client_id=client&client_secret=secret&grant_type=authorization_code&redirect_uri=http://127.0.0.1:8695&code=hkJfzA

说明:这里我们通过授权码获取到了令牌和其他参数
{
    "access_token": "a2a8069e-2423-4ae9-9ea0-27efdb688d0f",
    "token_type": "bearer",
    "refresh_token": "89cfeab9-5bb1-45d1-8258-68919d2f4da1",
    "expires_in": 43199,
    "scope": "ALL"
}
- access_token:表示访问令牌,必选项。
- token_type:表示令牌类型,该值大小写不敏感,必选项,可以是bearer类型或mac类型。
- expires_in:表示过期时间,单位为秒。如果省略该参数,必须其他方式设置过期时间。
- refresh_token:表示更新令牌,用来获取下一次的访问令牌,可选项。
- scope:表示权限范围,如果与客户端申请的范围一致,此项可省略。
(2)简化模式(implicit)
/oauth/authorize?response_type=token&client_id=&redirect_uri=
本文:
http://127.0.0.1:8694/auth/oauth/authorize?response_type=token&client_id=client&redirect_uri=http://127.0.0.1:8695

可以看出最后得出的重定向加了一下数据
#access_token=a2a8069e-2423-4ae9-9ea0-27efdb688d0f&token_type=bearer&expires_in=42537&scope=ALL
是不是和授权码模式的一样,这里不做详情解释。
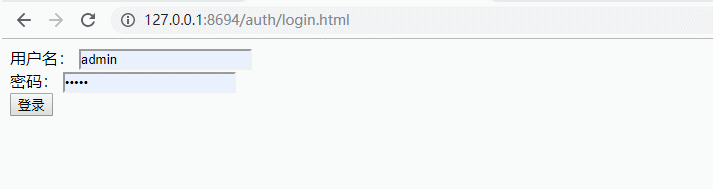
(3)密码模式(password)
/oauth/token?grant_type=password&client_id=&client_secret=&username=&password=
本文:
http://127.0.0.1:8694/auth/oauth/token?grant_type=password&client_id=client&client_secret=secret&username=admin&password=admin

返回数据和授权码模式一样
(4)客户端模式(client_credentials)
/oauth/token?grant_type=client_credentials&client_id=&client_secret=
本文:
http://127.0.0.1:8694/auth/oauth/token?grant_type=client_credentials&client_id=client&client_secret=secret

5)携带令牌(access_token)访问资源服务器,以授权码模式得出的结果为准。

6)刷新令牌,通过上面的解释我们知道,令牌是会过期的,所以我们需要刷新令牌refresh_token为refresh_token的值
/oauth/token?grant_type=refresh_token&client_id=&client_secret=&refresh_token=
本文:
http://127.0.0.1:8694/auth/oauth/token?grant_type=refresh_token&client_id=client&client_secret=secret&refresh_token=89cfeab9-5bb1-45d1-8258-68919d2f4da1

刷新后老的令牌就没有用了。
六、客户端,这里的客户端也是通过该授权服务器进行授权然后访问的资源服务器。
1、目录结构:基础结构和Spring-Cloud之Feign声明式调用-4类似

2、依赖
        <dependency>
            <groupId>org.springframework.cloud</groupId>
            <artifactId>spring-cloud-starter-netflix-eureka-client</artifactId>
        </dependency>
        <dependency>
            <groupId>org.springframework.boot</groupId>
            <artifactId>spring-boot-starter-web</artifactId>
        </dependency>
        <dependency>
            <groupId>org.springframework.cloud</groupId>
            <artifactId>spring-cloud-starter-oauth2</artifactId>
        </dependency>
        <dependency>
            <groupId>org.springframework.cloud</groupId>
            <artifactId>spring-cloud-starter-openfeign</artifactId>
        </dependency>
3、application.yaml配置
server:
  port: 8696
  servlet:
    session:
      cookie:
        name: SESSION_AUTH_SSO #本地避免session冲突
spring:
  application:
    name: auth-soo
eureka:
  client:
    service-url:
      defaultZone: http://127.0.0.1:8670/eureka/ # 实际开发中建议使用域名的方式
security:
  oauth2:
    client:
      client-id: client_sso
      client-secret: secret_sso
      grant-type: authorization_code
      scope: ALL
      access-token-uri: http://127.0.0.1:8694/auth/oauth/token
      user-authorization-uri: http://127.0.0.1:8694/auth/oauth/authorize
    resource:
      token-info-uri: http://127.0.0.1:8694/auth/oauth/check_token
为了方便我这里重新加入了一套认证数据

4、security配置
package com.cetc.config;

import org.springframework.boot.autoconfigure.security.oauth2.client.EnableOAuth2Sso;
import org.springframework.context.annotation.Configuration;
import org.springframework.security.config.annotation.web.builders.HttpSecurity;
import org.springframework.security.config.annotation.web.configuration.WebSecurityConfigurerAdapter;

@Configuration
@EnableOAuth2Sso
public class SecurityConfiguration extends WebSecurityConfigurerAdapter{

    @Override
    protected void configure(HttpSecurity http) throws Exception {
        http
            .csrf().disable()
            .authorizeRequests()
            .anyRequest().authenticated();
    }
}
5、因为我们是通过feign做的代理访问,那么直接访问受保护的资源肯定不行,那么就需要加入feign的拦截配置AuthSSOConfiguration
package com.cetc.config;

import feign.RequestInterceptor;
import org.springframework.beans.factory.annotation.Autowired;
import org.springframework.beans.factory.annotation.Qualifier;
import org.springframework.boot.context.properties.ConfigurationProperties;
import org.springframework.cloud.security.oauth2.client.feign.OAuth2FeignRequestInterceptor;
import org.springframework.context.annotation.Bean;
import org.springframework.context.annotation.Configuration;
import org.springframework.security.oauth2.client.OAuth2ClientContext;
import org.springframework.security.oauth2.client.OAuth2RestTemplate;
import org.springframework.security.oauth2.client.token.grant.code.AuthorizationCodeResourceDetails;

@Configuration
public class AuthSSOConfiguration {

    //获取认证的配置数据
    @Bean
    @ConfigurationProperties(prefix = "security.oauth2.client")
    public AuthorizationCodeResourceDetails authorizationCodeResourceDetails() {
        return new AuthorizationCodeResourceDetails();
    }

    @Autowired
    private AuthorizationCodeResourceDetails authorizationCodeResourceDetails;

    //这里使用他配置好的OAuth2ClientContext,这里有坑自己体会
    @Autowired
    @Qualifier("oauth2ClientContext")
    private OAuth2ClientContext oAuth2ClientContext;

    //配置请求拦截
    @Bean
    public RequestInterceptor requestInterceptor() {
        return new OAuth2FeignRequestInterceptor(oAuth2ClientContext, authorizationCodeResourceDetails);
    }

    //oauth2认证配置
    @Bean
    public OAuth2RestTemplate oAuth2RestTemplate() {
        return new OAuth2RestTemplate(authorizationCodeResourceDetails);
    }
}
6、提供接口/api/authSSO/getPort测试,启动auth-sso端口8696

测试:
是不是感觉很简单,那我们来看一下实际的请求过程

所以这个认证过程是通过上面那张图来实现的,这是spring提供了很多配置而已。通过程序去实现了这个过程。
八、总结:上面的过程我就不再说了,这里总结一下过程。简单一点,就是在分布式开发过程中,我们提供统一的认证/授权平台,把需要保护的资源加入认证中,当然也可以通过SSO(@EnableOAuth2Sso)的方式直接登录访问。资源服务器的目的在于可以提供第三方的访问需求比如现在的QQ授权、微信授权等。SSO的目的在于单点登录,做到登录一次,可以访问所有资源的目的。
九、本文源码地址:https://github.com/lilin409546297/spring-cloud/tree/master/oauth2
十、授权码模式详情编写可以参考:https://www.cnblogs.com/ll409546297/p/10396837.html