具体到一个公司的网络环境中,不可能只有一个VLAN,更不可能对每个VLAN都架设一个DHCP服务器,这时就要做一个DHCP的中继,使得DHCP的广播可以通过VLAN。
实验拓扑
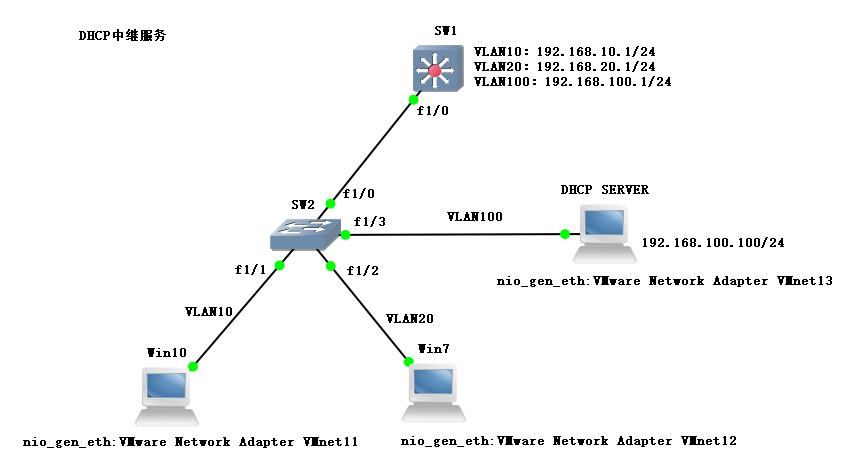
三层交换机下面连接一台二层交换机,二层交换机下面连接一台DHCP SERVER、两台客户机Win10和Win7。地址规划如下:
| 名称 | IP地址 |
|---|---|
| DHCP SERVER | 192.168.100.100/24 |
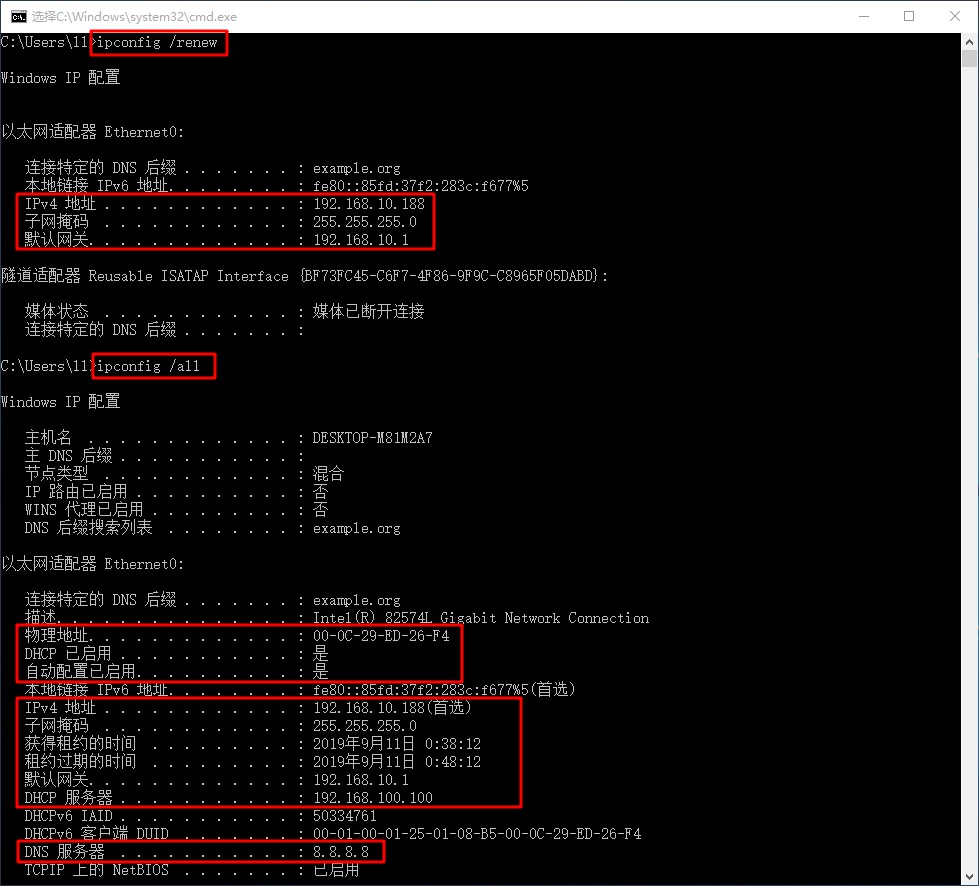
| Win10 | DHCP(192.168.10.188/24) |
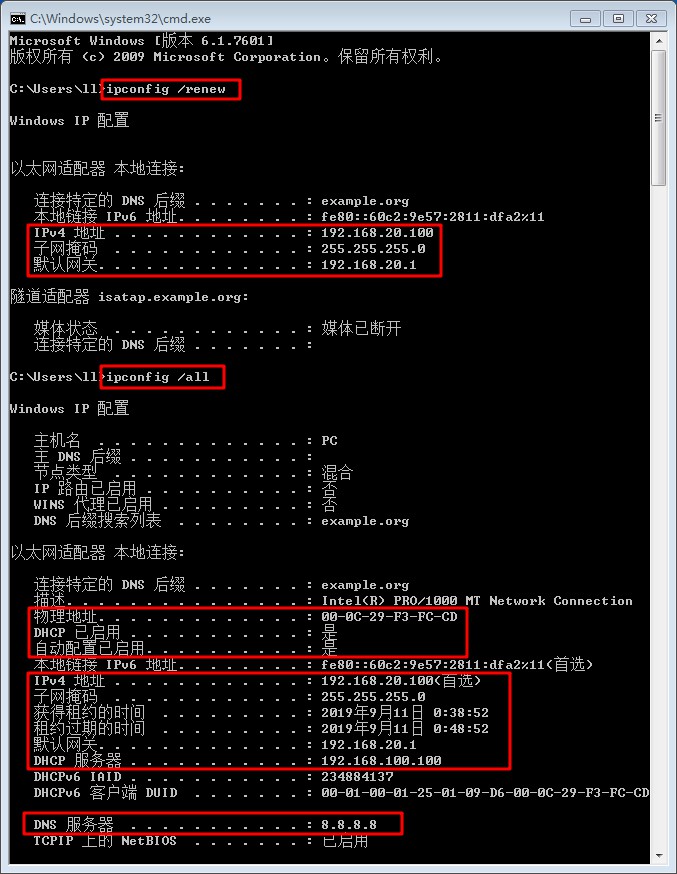
| Win7 | DHCP(192.168.20.100/24) |
配置方法
网关上配置
ip helper-address。
SW1(config)#int vlan 10
SW1(config-if)#ip add 192.168.10.1 255.255.255.0
SW1(config-if)#ip helper-address 192.168.100.100
SW1(config-if)#no sh
SW1(config-if)#ex
NETWORK 配置过程
SW2
- 添加
VLAN10、VLAN20、VLAN100。
SW2#configure terminal
Enter configuration commands, one per line.  End with CNTL/Z.
SW2(config)#vlan 10,20,100
SW2(config-vlan)#ex
SW2(config)#do show vlan-sw b

VLAN Name                             Status    Ports
---- -------------------------------- --------- -------------------------------
1    default                          active    Fa1/0, Fa1/1, Fa1/2, Fa1/3
                                                Fa1/4, Fa1/5, Fa1/6, Fa1/7
                                                Fa1/8, Fa1/9, Fa1/10, Fa1/11
                                                Fa1/12, Fa1/13, Fa1/14, Fa1/15
10   VLAN0010                         active
20   VLAN0020                         active
100  VLAN0100                         active
1002 fddi-default                     act/unsup
1003 token-ring-default               act/unsup
1004 fddinet-default                  act/unsup
1005 trnet-default                    act/unsup
- 端口添加到
VLAN。
SW2(config)#int f1/1
SW2(config-if)#sw m a
SW2(config-if)#sw a vlan 10
SW2(config-if)#ex
SW2(config)#int f1/2
SW2(config-if)#sw m a
SW2(config-if)#sw a vlan 20
SW2(config-if)#ex
SW2(config)#int f1/3
SW2(config-if)#sw m a
SW2(config-if)#sw a vlan 100
SW2(config-if)#ex
SW2(config)#do show vlan-sw b

VLAN Name                             Status    Ports
---- -------------------------------- --------- -------------------------------
1    default                          active    Fa1/0, Fa1/4, Fa1/5, Fa1/6
                                                Fa1/7, Fa1/8, Fa1/9, Fa1/10
                                                Fa1/11, Fa1/12, Fa1/13, Fa1/14
                                                Fa1/15
10   VLAN0010                         active    Fa1/1
20   VLAN0020                         active    Fa1/2
100  VLAN0100                         active    Fa1/3
1002 fddi-default                     act/unsup
1003 token-ring-default               act/unsup
1004 fddinet-default                  act/unsup
1005 trnet-default                    act/unsup
- 配置
Trunk。
SW2(config)#int f1/0
SW2(config-if)#sw m t
SW2(config-if)#sw t e d
SW2(config-if)#ex
SW2(config)#do show int f1/0 switchport
Name: Fa1/0
Switchport: Enabled
Administrative Mode: trunk
Operational Mode: trunk
Administrative Trunking Encapsulation: dot1q
Operational Trunking Encapsulation: dot1q
Negotiation of Trunking: Disabled
Access Mode VLAN: 0 ((Inactive))
Trunking Native Mode VLAN: 1 (default)
Trunking VLANs Enabled: ALL
Trunking VLANs Active: 1,10,20,100
Protected: false
Priority for untagged frames: 0
Override vlan tag priority: FALSE
Voice VLAN: none
Appliance trust: none
- 关闭路由功能。
SW2(config)#no ip routing
SW1
- 配置
Trunk。
SW1#configure terminal
Enter configuration commands, one per line.  End with CNTL/Z.
SW1(config)#int f1/0
SW1(config-if)#sw m t
SW1(config-if)#sw t e d
SW1(config-if)#ex
SW1(config)#do show int f1/0 switchport
Name: Fa1/0
Switchport: Enabled
Administrative Mode: trunk
Operational Mode: trunk
Administrative Trunking Encapsulation: dot1q
Operational Trunking Encapsulation: dot1q
Negotiation of Trunking: Disabled
Access Mode VLAN: 0 ((Inactive))
Trunking Native Mode VLAN: 1 (default)
Trunking VLANs Enabled: ALL
Trunking VLANs Active: 1,10,20,100
Protected: false
Priority for untagged frames: 0
Override vlan tag priority: FALSE
Voice VLAN: none
Appliance trust: none
- 添加
VLAN10、VLAN20、VLAN100。
SW1(config)#vlan 10,20,100
SW1(config-vlan)#ex
SW1(config)#do show vlan-sw b

VLAN Name                             Status    Ports
---- -------------------------------- --------- -------------------------------
1    default                          active    Fa1/0, Fa1/1, Fa1/2, Fa1/3
                                                Fa1/4, Fa1/5, Fa1/6, Fa1/7
                                                Fa1/8, Fa1/9, Fa1/10, Fa1/11
                                                Fa1/12, Fa1/13, Fa1/14, Fa1/15
10   VLAN0010                         active
20   VLAN0020                         active
100  VLAN0100                         active
1002 fddi-default                     act/unsup
1003 token-ring-default               act/unsup
1004 fddinet-default                  act/unsup
1005 trnet-default                    act/unsup
- 配置网关地址、
ip helper-address。
SW1(config)#int vlan 10
SW1(config-if)#ip add 192.168.10.1 255.255.255.0
SW1(config-if)#ip helper-address 192.168.100.100
SW1(config-if)#no sh
SW1(config-if)#ex
SW1(config)#int vlan 20
SW1(config-if)#ip add 192.168.20.1 255.255.255.0
SW1(config-if)#ip helper-address 192.168.100.100
SW1(config-if)#no sh
SW1(config-if)#ex
SW1(config)#int vlan 100
SW1(config-if)#ip add 192.168.100.1 255.255.255.0
SW1(config-if)#ip helper-address 192.168.100.100
SW1(config-if)#no sh
SW1(config-if)#ex
SW1(config)#do show ip int b
Interface                  IP-Address      OK? Method Status                Protocol
FastEthernet0/0            unassigned      YES unset  administratively down down
FastEthernet0/1            unassigned      YES unset  administratively down down
FastEthernet1/0            unassigned      YES unset  up                    up
FastEthernet1/1            unassigned      YES unset  up                    down
FastEthernet1/2            unassigned      YES unset  up                    down
FastEthernet1/3            unassigned      YES unset  up                    down
FastEthernet1/4            unassigned      YES unset  up                    down
FastEthernet1/5            unassigned      YES unset  up                    down
FastEthernet1/6            unassigned      YES unset  up                    down
FastEthernet1/7            unassigned      YES unset  up                    down
FastEthernet1/8            unassigned      YES unset  up                    down
FastEthernet1/9            unassigned      YES unset  up                    down
FastEthernet1/10           unassigned      YES unset  up                    down
FastEthernet1/11           unassigned      YES unset  up                    down
FastEthernet1/12           unassigned      YES unset  up                    down
FastEthernet1/13           unassigned      YES unset  up                    down
FastEthernet1/14           unassigned      YES unset  up                    down
FastEthernet1/15           unassigned      YES unset  up                    down
Vlan1                      unassigned      YES unset  up                    up
Vlan10                     192.168.10.1    YES manual up                    up
Vlan20                     192.168.20.1    YES manual up                    up
Vlan100                    192.168.100.1   YES manual up                    up
DHCP 配置过程
安装 DHCP 服务
[root@localhost ~]# yum install dhcp -y
配置网卡静态 IP
[root@localhost ~]# cat > /etc/sysconfig/network-scripts/ifcfg-ens33 << EOF
> TYPE=Ethernet
> BOOTPROTO=static
> DEVICE=ens33
> ONBOOT=yes
> IPADDR=192.168.100.100
> NETMASK=255.255.255.0
> GATEWAY=192.168.100.1
> EOF
[root@localhost ~]# service network restart
Restarting network (via systemctl):                        [  OK  ]
[root@localhost ~]# ifconfig ens33
ens33: flags=4163<UP,BROADCAST,RUNNING,MULTICAST>  mtu 1500
        inet 192.168.100.100  netmask 255.255.255.0  broadcast 192.168.100.255
        inet6 fe80::20c:29ff:febc:ab96  prefixlen 64  scopeid 0x20<link>
        ether 00:0c:29:bc:ab:96  txqueuelen 1000  (Ethernet)
        RX packets 2142  bytes 1951874 (1.8 MiB)
        RX errors 0  dropped 0  overruns 0  frame 0
        TX packets 691  bytes 64359 (62.8 KiB)
        TX errors 0  dropped 0 overruns 0  carrier 0  collisions 0
编辑 DHCP 配置文件
[root@localhost ~]# cp /usr/share/doc/dhcp-4.2.5/dhcpd.conf.example /etc/dhcp/dhcpd.conf
cp: overwrite ‘/etc/dhcp/dhcpd.conf’? y
[root@localhost ~]# vim /etc/dhcp/dhcpd.conf
- 在
7-8行可以配置DNS服务器名称、地址。
option domain-name "example.org";
option domain-name-servers 8.8.8.8;
- 在
10-11行可以配置DHCP租约时间。
default-lease-time 600;
max-lease-time 7200;
- 在
22行可以配置日志信息。
log-facility local7;
- 在
27-40行配置网段信息。
subnet 192.168.10.0 netmask 255.255.255.0 {
  range 192.168.10.100 192.168.10.200;
  option routers 192.168.10.1;
}

subnet 192.168.20.0 netmask 255.255.255.0 {
  range 192.168.20.100 192.168.20.200;
  option routers 192.168.20.1;
}

subnet 192.168.100.0 netmask 255.255.255.0 {
  range 192.168.100.100 192.168.100.200;
  option routers 192.168.100.1;
}
- 在
87-90配置指定IP地址分配。
host win10 {
  hardware ethernet 00:0C:29:ED:26:F4;
  fixed-address 192.168.10.188;
}
启动 DHCP 服务
[root@localhost ~]# systemctl start dhcpd
[root@localhost ~]# systemctl enable dhcpd
Created symlink from /etc/systemd/system/multi-user.target.wants/dhcpd.service to /usr/lib/systemd/system/dhcpd.service.
[root@localhost ~]# netstat -nuap | grep dhcpd
udp        0      0 0.0.0.0:67              0.0.0.0:*                           42901/dhcpd
- 关闭防火墙、
SELinux。
[root@localhost ~]# systemctl stop firewalld
[root@localhost ~]# setenforce 0
结果测试
Win10
Win7