软件开发
-
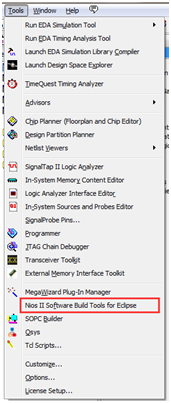
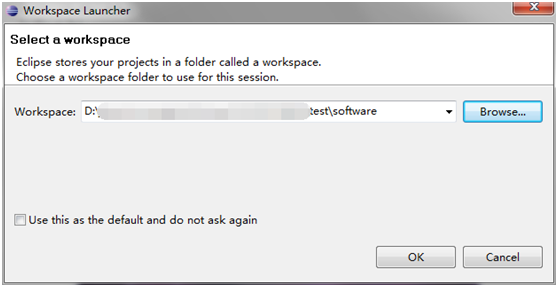
首先,在硬件工程文件夹里面新建一个software的文件夹用于放置软件部分;打开toolsàNios II 11.0 Software Build Tools for Eclipse,需要进行Workspace Launcher(工作空间)路径的设置,需要注意的是路径中不要含有空格等,然后单击OK即可。
-
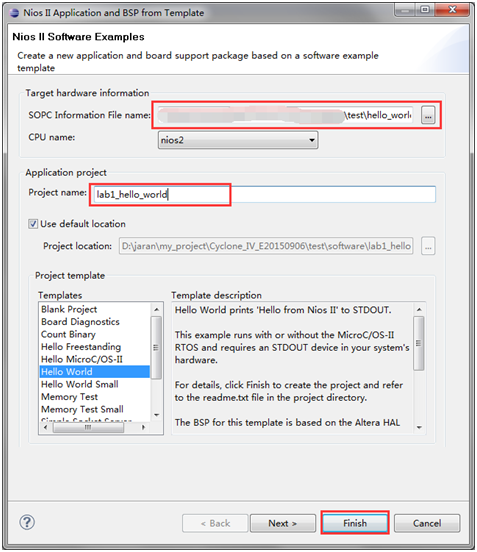
新建工程。单击File -> New -> Nios II Application and BSP from Template,弹出Nios II Application and BSP from Template对话框。先选择对应的SOPC系统,单击SOPC Information File name后面的浏览按钮,选择之前硬件部分做好的软核文件,后缀名为.sopcinfo,这里一定要注意,选择的文件一定要对应起来,否则会因为软硬不匹配导致系统失败。这里选择的lab3_bnt.sopcinfo,然后系统会自动读取CPU name,不用再进行设置,下面填写Project name,这里填写为lab3_bnt,工程模板(Project template)使用默认的即可。然后单击Finish完成即可。这时候会在左侧的Project Explorer中生成两个工程文件。
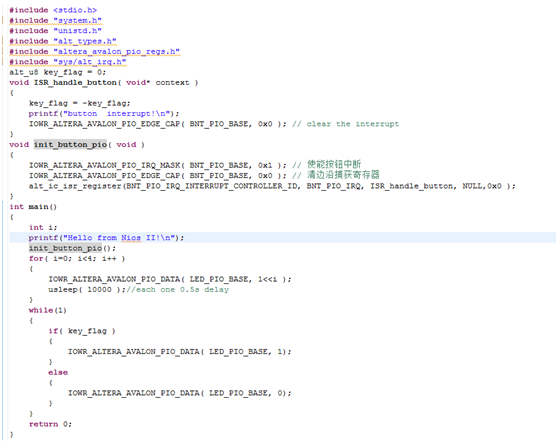
代码设计如下,具体看源工程
-
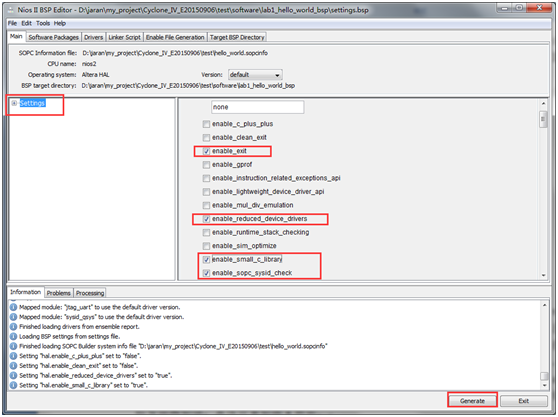
右击工程,选择Nios II -> BSP Editor,进入Nios II BSP Editor配置界面。主要在main选项卡下hall中进行配置。然后单击Generate,生成BSP库。生成完成后,单击Exit退出即可。

-
编译工程。右击选择Build Project。第一次编译的话,时间也会比较常,耐心等待一下。
-
编译完成后,先将.sof文件下载到FPGA;
-
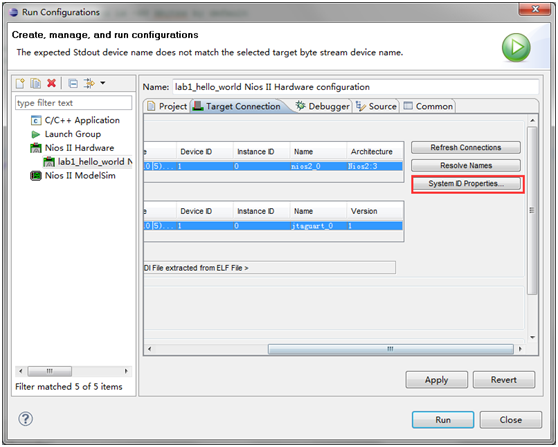
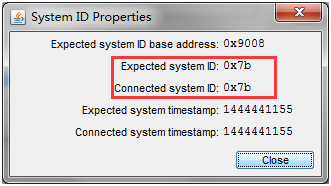
右击工程,选择Run As -> Nios II Hardware,弹出Run Configurations对话框,默认Project选项卡中Project name和Project ELF file name应该都是有内容的,没有的选一下。然后进入Target Connection选项卡,Connections中如果没有东西的话,单击右侧的Refresh Connection来查找下载器,查找后单击System ID Prroperties…,进行系统ID检测,检查是否是之前设置的ID号,无误后点击Apply,然后再点击Run,这是程序会被自动下载,最终在Nios II Console选项卡中会显示下载完成后程序运行的结果。
-
运行结果,在调试窗口输出Hello from Nios II!,按下板上的key1按键,调试窗口输出 button interrupt!表明测试成功!

实验代码
|
/* * "Hello World" example. * * This example prints 'Hello from Nios II' to the STDOUT stream. It runs on * the Nios II 'standard', 'full_featured', 'fast', and 'low_cost' example * designs. It runs with or without the MicroC/OS-II RTOS and requires a STDOUT * device in your system's hardware. * The memory footprint of this hosted application is ~69 kbytes by default * using the standard reference design. * * For a reduced footprint version of this template, and an explanation of how * to reduce the memory footprint for a given application, see the * "small_hello_world" template. * */ #include <stdio.h> #include "system.h" #include "unistd.h" #include "alt_types.h" #include "altera_avalon_pio_regs.h" #include "sys/alt_irq.h" alt_u8 key_flag =0; void ISR_handle_button(void* context ) { key_flag =~key_flag; printf("button interrupt! "); IOWR_ALTERA_AVALON_PIO_EDGE_CAP( BNT_PIO_BASE,0x0);// clear the interrupt } void init_button_pio(void) { IOWR_ALTERA_AVALON_PIO_IRQ_MASK( BNT_PIO_BASE,0x1);// 使能按钮中断 IOWR_ALTERA_AVALON_PIO_EDGE_CAP( BNT_PIO_BASE,0x0);// 清边沿捕获寄存器 alt_ic_isr_register(BNT_PIO_IRQ_INTERRUPT_CONTROLLER_ID, BNT_PIO_IRQ, ISR_handle_button,NULL,0x0); } int main() { int i; printf("Hello from Nios II! "); init_button_pio(); for( i=0; i<4; i++) { IOWR_ALTERA_AVALON_PIO_DATA( LED_PIO_BASE,1<<i ); usleep(10000);//each one 0.5s delay } while(1) { if( key_flag ) { IOWR_ALTERA_AVALON_PIO_DATA( LED_PIO_BASE,1); } else { IOWR_ALTERA_AVALON_PIO_DATA( LED_PIO_BASE,0); } } return0; } |
大西瓜FPGA-->https://daxiguafpga.taobao.com
博客资料、代码、图片、文字等属大西瓜FPGA所有,切勿用于商业! 若引用资料、代码、图片、文字等等请注明出处,谢谢!
每日推送不同科技解读,原创深耕解读当下科技,敬请关注微信公众号“科乎”。
