这里接着上一章继续讲解一下应用程序外观设计。
我们知道,如果要改变某个控件外观,那么直接改变其类下的对应的元素属性就好了,如背景颜色: Control.Background ,举例改变按键背景颜色:
       <Button
            Grid.Row="2" Grid.Column="2" Name="Clear" Margin="2">
            <Button.Background>
                <LinearGradientBrush StartPoint="0,0.5" EndPoint="1,0.5">
                    <GradientStop Color="Green" Offset=" 0.0"/>
                    <GradientStop Color="LightBlue" Offset=" 0.5"/>
                </LinearGradientBrush>
            </Button.Background>
            Clear Name
        </Button>
其中:
<Button.Background> 为按键类下背景元素对象; LinearGradientBrush 代表背景元素对象的主要属性; StartPoint 为获取或设置线性渐变的二维起始坐标; EndPoint 为获取或设置线性渐变的二维终止坐标。 GradientStop Color 描述渐变中过渡点的颜色; GradientStop Offset 描述渐变中过渡点的位置。
显而易见,那么对于整个对话框来说,其背景元素对象就是Grid类下的Background。所以对于整个对话框的背景的外观设置应该是基于Grid类下的元素对象:
       <Grid.Background>
            <LinearGradientBrush StartPoint="0,1.5" EndPoint="0.5,0.1">
                <LinearGradientBrush.GradientStops>
                    <GradientStop Color="Green" Offset="0.0"/>
                    <GradientStop Color="LightBlue" Offset="0.75"/>
                    <GradientStop Color="LightCoral" Offset="1.2"/>
                </LinearGradientBrush.GradientStops>
            </LinearGradientBrush>
        </Grid.Background>
这里我们加入 LinearGradientBrush 类对象元素申明是因为让我们的代码更易于外观的完整性,当然不添加也是一样的,即其等效于:
       <Grid.Background>
            <LinearGradientBrush StartPoint="0,1.5" EndPoint="0.5,0.1">
                <GradientStop Color="Green" Offset="0.0"/>
                <GradientStop Color="LightBlue" Offset="0.75"/>
                <GradientStop Color="LightCoral" Offset="1.2"/>
            </LinearGradientBrush>
        </Grid.Background>
当然,我们也可以对线性阶梯式笔刷设置其颜色重轻度(透明度)
<LinearGradientBrush StartPoint="0,0.5" EndPoint="1,0.5" Opacity="0.5"> 其中 Opacity="0.5" 表示透明度为0.5.
至此,我们的对于外观背景设置整体设计完成如下:
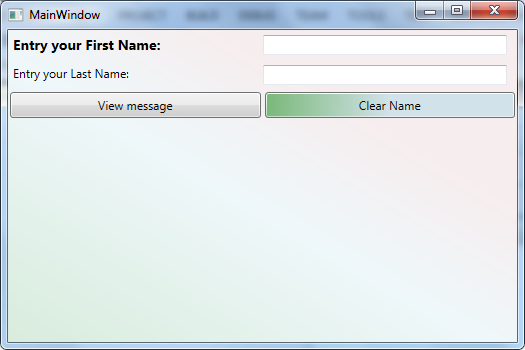
<Window x:Class="WpfControls.MainWindow"
        xmlns="http://schemas.microsoft.com/winfx/2006/xaml/presentation"
        xmlns:x="http://schemas.microsoft.com/winfx/2006/xaml"
        Title="MainWindow" Height="350" Width="525">

    <Grid>
        <Grid.Background>
            <LinearGradientBrush StartPoint="0,1.5" EndPoint="0.5,0.1" Opacity="0.2">
                <LinearGradientBrush.GradientStops>
                    <GradientStop Color="Green" Offset="0.0"/>
                    <GradientStop Color="LightBlue" Offset="0.75"/>
                    <GradientStop Color="LightCoral" Offset="1.2"/>
                </LinearGradientBrush.GradientStops>
            </LinearGradientBrush>
        </Grid.Background>
        <Grid.RowDefinitions>
            <RowDefinition Height="30"/>
            <RowDefinition Height="30"/>
            <RowDefinition Height="30"/>
        </Grid.RowDefinitions>
        <Grid.ColumnDefinitions>
            <ColumnDefinition/>
            <ColumnDefinition/>
        </Grid.ColumnDefinitions>
        <Label Grid.Column="0" FontSize="14" FontWeight="Bold">Entry your First Name:</Label>
        <TextBox Grid.Row="0" Grid.Column="1" Name="firstName" Margin="0,5,10,5"/>
        <Label Grid.Row="1">Entry your Last Name:</Label>
        <TextBox Grid.Column="1" Grid.Row="1" Name="lastName" Margin="0,5,10,5"/>
        <Button Grid.Row="2" Grid.Column="0" Name="submit" Margin="2">View message</Button>
        <Button
            Grid.Row="2" Grid.Column="2" Name="Clear" Margin="2">
            <Button.Background>
                <LinearGradientBrush StartPoint="0,0.5" EndPoint="1,0.5" Opacity="0.5">
                    <GradientStop Color="Green" Offset=" 0.0"/>
                    <GradientStop Color="LightBlue" Offset=" 0.5"/>
                </LinearGradientBrush>
            </Button.Background>
            Clear Name
        </Button>

    </Grid>

</Window>
编译运行效果:
至此,我们所有控件外观都是单独设置的。那么如果我们想让相同的控件类具有相同的外观,这样做无疑是让我们的代码变得更加的繁琐。接下来,我们会在下一章讲解一下通过样式来解决这一问题。
End.
谢谢.