JAVA 8
Spring Boot 2.5.3
Elasticsearch-7.14.0(Windows)
---
授人以渔:
1、Spring Boot Reference Documentation
This document is also available as Multi-page HTML, Single page HTML and PDF.
有PDF版本哦,下载下来!
无PDF,网页上可以搜索。
目录
3.1、检查elasticsearchRestHighLevelClient Bean并检查
3.2、生成ElasticsearchRestTemplate Bean并检查
3.3、使用Spring Data Elasticsearch Repositories存取数据
Elasticsearch是一个 开源、分布式、支持RESTful访问的搜索和分析引擎。
ES是一个基于Lucene的搜索服务器,用Java语言开发,并作为Apache许可条款下的开放源码发布,是一种流行的企业级搜索引擎。
最大的特点是——搜索速度很快,近实时(NRT);它能很方便的使大量数据(PB级)具有搜索、分析和探索的能力。
ES的实现原理主要分为以下几个步骤,1)首先用户将数据提交到ES数据库中,2)再通过分词控制器去将对应的语句分词,将其权重和分词结果一并存入数据,3)当用户搜索数据时候,再根据权重将结果排名,打分,4)再将返回结果呈现给用户。
ES是与名为Logstash的数据收集和日志解析引擎以及名为Kibana的分析和可视化平台一起开发的。这三个产品被设计成一个集成解决方案,称为“Elastic Stack”(以前称为“ELK stack”)。
Shay Banon在2004年创造了Elasticsearch的前身,称为Compass。Shay Banon在2010年2月发布了ES的第一个版本。
2015年3月,Elasticsearch公司更名为Elastic,公司于2018年10月5日在纽约证券交易所挂牌上市。
关键功能:大数据、近实时搜索
ES中的关键概念:
| Cluster | 集群,由多个节点组成 |
| Node | 节点 |
| Index | 索引,相当于数据库中的 库 |
| Type | 类型,相当于数据库中的 表;一个索引下有1~N个类型 |
| Document | 文档,记录,相当于数据库中的 行,可用一个JSON对象格式表示 |
| Field | 文档中的一个字段,相当于数据库中的 行中的 列的数据 |
| Shards |
切片,索引中的数据切片,以便存储数据量巨大的索引。 也称为Primary Shard。 |
| Replicas |
Shard的副本,复制品,避免某个节点宕机导致数据丢失。 也称为Replica Shard。 |
| recovery | 数据恢复,节点加入、退出集群,节点重启后执行数据恢复 |
| river | ES的一个数据源,插件,不同插件可以将不同的数据添加到ES数据库中。 |
| gateway | 索引快照的存储方式,支持多种类型的gateway,有本地文件系统(默认),分布式文件系统,Hadoop的HDFS 和 amazon的s3云存储服务。 |
| discovery.zen | 自动发现节点机制 |
| Transport | 内部节点或集群与客户端的交互方式 |
参考:百度百科-elasticsearch、Elasticsearch核心概念
elastic:n. 松紧带; 橡皮筋; adj. 有弹性的; 灵活的;
本文介绍Windows 10上的安装,至于 Ubuntu、CentOS、Mac上的安装,Docker容器化的ES,本文不涉及。
步骤:
打开官网:https://www.elastic.co/;
进入下载页:https://www.elastic.co/start;
下载其中Windows版本的Elasticsearch、Kibana——最新的适合自己主机的版本,也可以点击页面的 Visit our downloads page 链接进去下载:
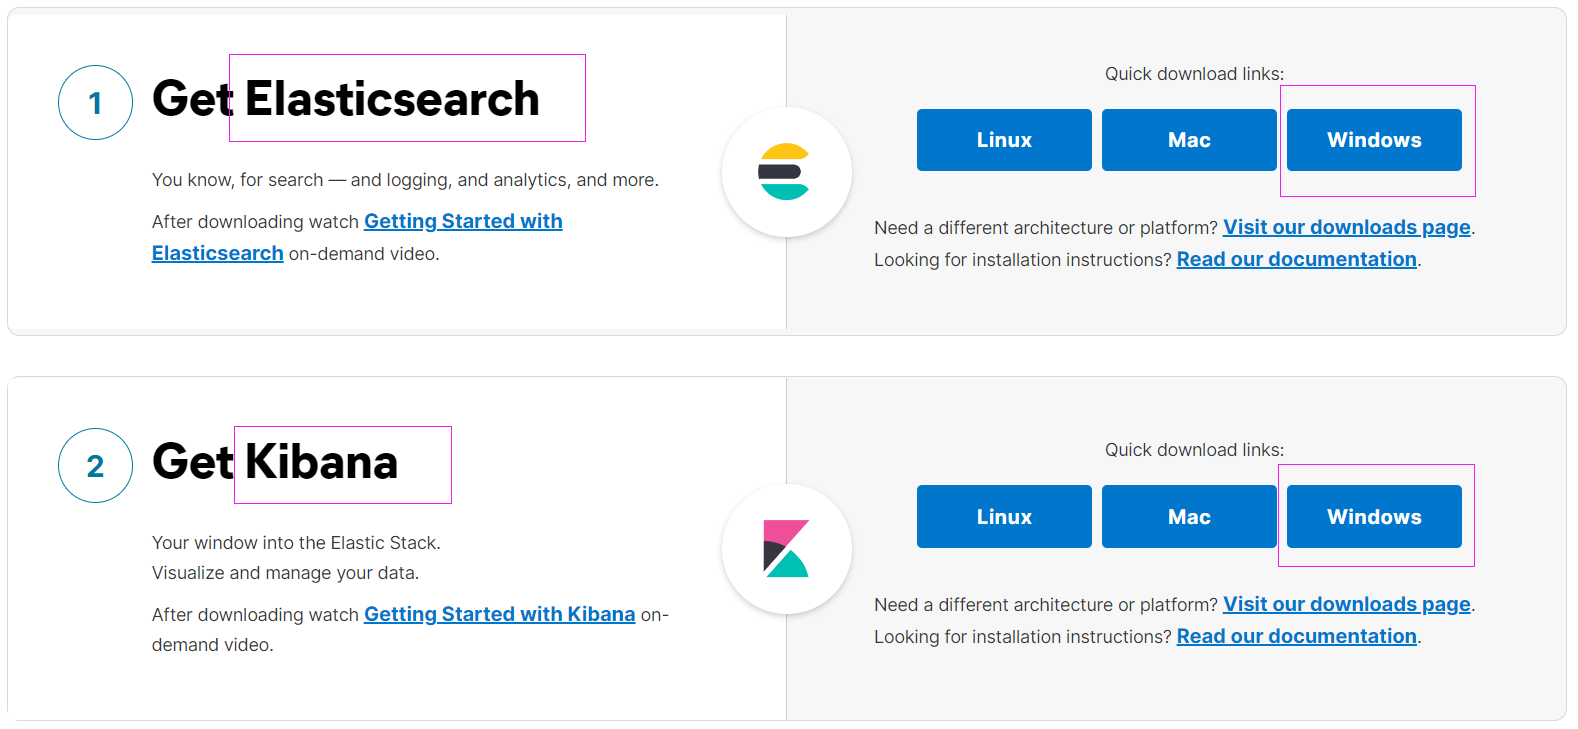
官方文档:Read our documentation 链接进入:
下载得到:
elasticsearch-7.14.0-windows-x86_64.zip
kibana-7.14.0-windows-x86_64.zip
解压,得到文件夹。
进入各自目录的bin目录,执行 elasticsearch.bat 启动ES、执行 kibana.bat 启动 Kibana。
ES默认端口:9200(还有一个 9300端口,集群使用)
Kibana默认端口:5601
访问ES:
http://localhost:9200/
得到:
{
  "name" : "---主机名---",
  "cluster_name" : "elasticsearch",
  "cluster_uuid" : "mACMicetS3-YnNTGbiDLXA",
  "version" : {
    "number" : "7.14.0",
    "build_flavor" : "default",
    "build_type" : "zip",
    "build_hash" : "dd5a0a2acaa2045ff9624f3729fc8a6f40835aa1",
    "build_date" : "2021-07-29T20:49:32.864135063Z",
    "build_snapshot" : false,
    "lucene_version" : "8.9.0",
    "minimum_wire_compatibility_version" : "6.8.0",
    "minimum_index_compatibility_version" : "6.0.0-beta1"
  },
  "tagline" : "You Know, for Search"
}
其它一些链接:
/_cat
可以查看到不少有用的信息,比如,ES中有多少Index(复数:indices,非规则变化)。下图现实了 自己的不久前安装的ES中已经有不少Index了,其中,不少是Kibana的。

/_search
返回一大推东西,暂不清楚是干啥的。Kibana中发现。
...还有更多待探索...
访问Kibana:
http://localhost:5601/
得到Kibana的主页。
注,作者还不太熟悉Kibana的使用,仅展示几张简单的使用图。


Kibina还可以实现 添加数据 的功能(待探索):数据来源很多,MySQL、kafka、RabbitMQ、MongoDB……好多,好像很简单的样子。为什么没找到HADOOP/HDFS?

ES目录结构:
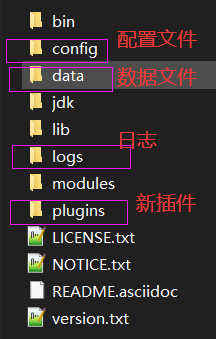
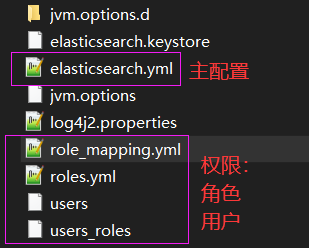
权限不配置,默认无需用户、密码登录:
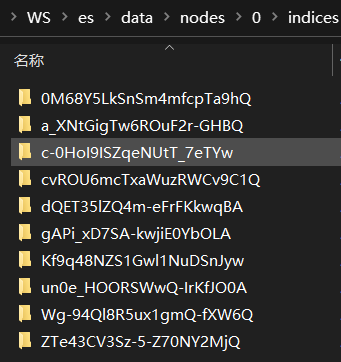
/data/nodes 节点目录,单机,只有一个节点0(目录),其下结构:indices存储索引(数据)

注,默认情况下,ES是无需用户密码登录的。
Kibana目录结构:

在其配置config中,和ES有关的 部分配置 整理如下:
# 部分配置
#elasticsearch.hosts: ["http://localhost:9200"]
#kibana.index: ".kibana"
#elasticsearch.username: "kibana_system"
#elasticsearch.password: "pass"

#elasticsearch.pingTimeout: 1500
#elasticsearch.requestTimeout: 30000
#elasticsearch.shardTimeout: 30000
...接下来,可以在 Kibana的 Management->Dev Tools 下简单使用 ES(参考文档6)了——增删改查数据。
注,也可以使用Postman、curl命令等工具。
1)添加
添加一个 Document:POST请求,/object/animal,其中 的 object为 Index,animal为 Type,有一个默认的Type为 _doc。
添加时,没有Index,会自动建立Index等数据信息。
添加语句及结果
POST /object/animal
{
  "name": "cat",
  "number": 100
}

结果:返回了index、type、id,,id是每个字段必须的
{
  "_index" : "object",
  "_type" : "animal",
  "_id" : "5gKP6HsBU7Hs6OzNeM4G",
  "_version" : 1,
  "result" : "created",
  "_shards" : {
    "total" : 2,
    "successful" : 1,
    "failed" : 0
  },
  "_seq_no" : 0,
  "_primary_term" : 1
}
http://localhost:9200/_cat/indices 可以看到新增了 Index,名为 object:
yellow open object lEBGDTG-TGOuNCv0_j2Fvw 1 1 1 0 4kb 4kb还可以访问 /_cat/indices?v ,可以看到更多信息。
2)查找
查找1:使用id
GET /object/animal/5gKP6HsBU7Hs6OzNeM4G
返回:一个完整的Document,包含 元数据
{
  "_index" : "object",
  "_type" : "animal",
  "_id" : "5gKP6HsBU7Hs6OzNeM4G",
  "_version" : 1,
  "_seq_no" : 0,
  "_primary_term" : 1,
  "found" : true,
  "_source" : {
    "name" : "cat",
    "number" : 100
  }
}
查找2:使用/id/_source,,只是Document的数据了,
GET /object/animal/5gKP6HsBU7Hs6OzNeM4G/_source
{
  "name" : "cat",
  "number" : 100
}
3)更改
POST请求,使用 _update。
根据ID更新一条文档
POST /object/animal/5gKP6HsBU7Hs6OzNeM4G/_update
{
  "doc": {
    "name": "cat2"
  }
}

响应:
{
  "_index" : "object",
  "_type" : "animal",
  "_id" : "5gKP6HsBU7Hs6OzNeM4G",
  "_version" : 2,
  "result" : "updated",
  "_shards" : {
    "total" : 2,
    "successful" : 1,
    "failed" : 0
  },
  "_seq_no" : 1,
  "_primary_term" : 1
}

检查是否更新成功:成功
{
  "name" : "cat2",
  "number" : 100
}
4)删除一条文档
DELETE请求,下面演示根据 ID删除。
删除及结果
DELETE /object/animal/5gKP6HsBU7Hs6OzNeM4G

响应:
{
  "_index" : "object",
  "_type" : "animal",
  "_id" : "5gKP6HsBU7Hs6OzNeM4G",
  "_version" : 3,
  "result" : "deleted",
  "_shards" : {
    "total" : 2,
    "successful" : 1,
    "failed" : 0
  },
  "_seq_no" : 2,
  "_primary_term" : 1
}

检查:删除后,数据没有了
{
  "_index" : "object",
  "_type" : "animal",
  "_id" : "5gKP6HsBU7Hs6OzNeM4G",
  "found" : false
}
删除了 索引object 下唯一的Document,但是,索引object 没有被删除。
5)根据条件查找
注,执行前,先添加3条数据。
GET /object/animal/_search
没有参数,搜索到所有。来自博客园
POST请求,根据name搜索dog:
根据name搜索dog
POST /object/animal/_search
{
  "query": {
    "match": {
      "name": "dog"
    }
  }
}

响应:
{
  "took" : 0,
  "timed_out" : false,
  "_shards" : {
    "total" : 1,
    "successful" : 1,
    "skipped" : 0,
    "failed" : 0
  },
  "hits" : {
    "total" : {
      "value" : 1,
      "relation" : "eq"
    },
    "max_score" : 0.9808291,
    "hits" : [
      {
        "_index" : "object",
        "_type" : "animal",
        "_id" : "6AKe6HsBU7Hs6OzN5M6U",
        "_score" : 0.9808291,
        "_source" : {
          "name" : "dog",
          "number" : 90
        }
      }
    ]
  }
}
但使用参考文档6中的搜索条件 from、size 时失败了:版本问题造成的吗?TODO
失败结果
POST /object/animal/_search
{
  "query": {
    "match": {
      "name": "dog"
    },
    "from":1,
    "size":4
  }
}

响应:
{
  "error" : {
    "root_cause" : [
      {
        "type" : "parsing_exception",
        "reason" : "[match] malformed query, expected [END_OBJECT] but found [FIELD_NAME]",
        "line" : 6,
        "col" : 5
      }
    ],
    "type" : "parsing_exception",
    "reason" : "[match] malformed query, expected [END_OBJECT] but found [FIELD_NAME]",
    "line" : 6,
    "col" : 5
  },
  "status" : 400
}
6)删除类型、删除索引
删除类型:失败
DELETE /object/animal
删除索引:成功
DELETE /object
返回:
{
  "acknowledged" : true
}
奇怪的是,删除了 索引object,但是, http://localhost:9200/_cat/indices/ 中多了一个 索引animal——类型animal升级了吗?:
green  open .geoip_databases                un0e_HOORSWwQ-IrKfJO0A 1 0 42   72  77.6mb  77.6mb
yellow open pp                              c-0HoI9ISZqeNUtT_7eTYw 1 1  2    1   8.9kb   8.9kb
green  open .kibana-event-log-7.14.0-000001 gAPi_xD7SA-kwjiE0YbOLA 1 0  5    0  27.2kb  27.2kb
yellow open news                            dQET35lZQ4m-eFrFKkwqBA 1 1  8    0  85.4kb  85.4kb
green  open .kibana_7.14.0_001              cvROU6mcTxaWuzRWCv9C1Q 1 0 90   57   4.5mb   4.5mb
green  open .apm-custom-link                ZTe43CV3Sz-5-Z70NY2MjQ 1 0  0    0    208b    208b
green  open .apm-agent-configuration        a_XNtGigTw6ROuF2r-GHBQ 1 0  0    0    208b    208b
green  open .kibana_task_manager_7.14.0_001 Kf9q48NZS1Gwl1NuDSnJyw 1 0 14 3939 668.1kb 668.1kb
yellow open animal                          gRdOhMXbQ5OszQRxS51Jkg 1 1  0    0    208b    208b
green  open .tasks                          Wg-94Ql8R5ux1gmQ-fXW6Q 1 0  4    0  27.3kb  27.3kb
GET /animal:存在数据,但这个有什么用呢?
访问结果
{
  "animal" : {
    "aliases" : { },
    "mappings" : { },
    "settings" : {
      "index" : {
        "routing" : {
          "allocation" : {
            "include" : {
              "_tier_preference" : "data_content"
            }
          }
        },
        "number_of_shards" : "1",
        "provided_name" : "animal",
        "creation_date" : "1631694292667",
        "number_of_replicas" : "1",
        "uuid" : "gRdOhMXbQ5OszQRxS51Jkg",
        "version" : {
          "created" : "7140099"
        }
      }
    }
  }
}
执行:DELETE /animal
删除成功。
# 响应
{
  "acknowledged" : true
}
以上都是在Kibana中操作,这个工具真是好啊!还可以把这么多执行记录保存下来,还有提示信息!来自博客园
应该还有更加强大、便捷的功能 待解锁。

S.B.为ES提供了基本的自动配置功能。
S.B.提供了3种客户端(clients):
- 官方的Java底层REST客户端(Transport Client)
- 官方的Java高级REST客户端(High Level REST Client)
- ReactiveElasticsearchClient
虽然有这3种客户端,应用程序一般使用 Spring Data Elasticsearch 中更高级的抽象——Elasticsearch Operations 和 Elasticsearch Repositories。
添加依赖包:spring-boot-starter-data-elasticsearch
	org.springframework.boot
	spring-boot-starter-data-elasticsearch
其结构展示如下:

添加依赖包后,应用程序会生产一个RestHighLevelClient Bean到Spring容器。
如果想要任意数量的、更多高级定制的Bean,去实现 函数式接口RestClientBuilderCustomizer。
如果想要完全控制 注册过程,需要实现一个 RestClientBuilder Bean。
如果想要访问 底层REST客户端,可以使用自动注册的Bean的getLowLevelClient()获取。
上面的客户端对应的配置:
# 默认本机9200端口
spring.elasticsearch.rest.uris=https://search.example.com:9200
spring.elasticsearch.rest.read-timeout=10s
spring.elasticsearch.rest.username=user
spring.elasticsearch.rest.password=secret
如果想要使用 Reactive REST clients,还需要引入 spring-boot-starter-webflux
ReactiveElasticsearchClient 的配置和前面不同,部分展示如下:spring.data开头的。
spring.data.elasticsearch.client.reactive.endpoints=search.example.com:9200
spring.data.elasticsearch.client.reactive.use-ssl=true
spring.data.elasticsearch.client.reactive.socket-timeout=10s
spring.data.elasticsearch.client.reactive.username=user
spring.data.elasticsearch.client.reactive.password=secret
注,本文不涉及Reactive REST clients更多使用介绍。
使用Spring Data
在RestHighLevelClient Bean已经注册的情况下,
@Component
public class MyBean {

  private final ElasticsearchRestTemplate template;

  public MyBean(ElasticsearchRestTemplate template) {
    this.template = template;
  }
  // ...
}
下面的方式也可以:
@Configuration
public class AppConfig {

    // 注意,方法名中么有Rest!!
	@Bean
	public ElasticsearchRestTemplate elasticsearchTemplate(RestHighLevelClient client) {
		return new ElasticsearchRestTemplate(client);
	}

}
疑问:两种方式有什么区别呢?
使用Spring Data Elasticsearch Repositories
类似Spring Data JPA,不同的是,定义数据(索引等)使用的是 @Document(org.springframework.data.elasticsearch.annotations.Document) 加上 org.springframework.data.elasticsearch.annotations.Setting 注解(设置、配置等)。来自博客园
还要使用 ElasticsearchRepository接口(org.springframework.data.elasticsearch.repository.ElasticsearchRepository)。
这种方式可以通过下面的配置禁止(默认是 使能的——true):
spring.data.elasticsearch.repositories.enabled=falseES已启动、应用程序的依赖包和配置已添加好,启动应用程序,检查Spring容器中和ES相关的Bean:
果然有一个 elasticsearchRestHighLevelClient,检查发现 其类型为 org.elasticsearch.client.RestHighLevelClient——类名前面没有 Elasticsearch。
name=org.springframework.boot.autoconfigure.elasticsearch.ElasticsearchRestClientConfigurations$RestClientBuilderConfiguration
name=defaultRestClientBuilderCustomizer
name=elasticsearchRestClientBuilder
name=org.springframework.boot.autoconfigure.elasticsearch.ElasticsearchRestClientConfigurations$RestHighLevelClientConfiguration
name=elasticsearchRestHighLevelClient
name=org.springframework.boot.autoconfigure.elasticsearch.ElasticsearchRestClientAutoConfiguration
name=spring.elasticsearch.rest-org.springframework.boot.autoconfigure.elasticsearch.ElasticsearchRestClientPropertiesES默认配置下,启动应用程序时有一条WARN日志:安全验证未开启,TODO
org.elasticsearch.client.RestClient      : request [GET http://localhost:9200/] returned 1 warnings:
[299 Elasticsearch-7.14.0-dd5a0a2acaa2045ff9624f3729fc8a6f40835aa1 "Elasticsearch built-in security
features are not enabled. Without authentication, your cluster could be accessible to anyone.
See https://www.elastic.co/guide/en/elasticsearch/reference/7.14/security-minimal-setup.html
to enable security."]
小结:
本节对S.B.中的ES使用做了一个简单梳理,接下来,就是要怎么使用的问题了。
3.1、检查elasticsearchRestHighLevelClient Bean并检查
检查源码:
EsController.java
@RestController
@RequestMapping(value="/es")
@Slf4j
public class EsController {

	static Consumer cs = System.out::println;

	@Autowired
	private RestHighLevelClient client;

	@Autowired
	private ElasticsearchRestClientProperties properties;

	/**
	 * 检查RestHighLevelClient Bean
	 * @author ben
	 * @date 2021-09-16 10:28:59 CST
	 * @return
	 */
	@GetMapping(value="/check/client")
	public Boolean checkClient() {
		cs.accept("client=" + client);
		RestClient llrc = client.getLowLevelClient();
		if (Objects.nonNull(llrc)) {
			cs.accept("LowLevelClient=" + llrc);
			cs.accept("isRunning=" + llrc.isRunning());

			List list = llrc.getNodes();
			cs.accept("list.size=" + list.size());
			Node node = list.get(0);
			cs.accept("node[0]=" + node);
			cs.accept("n=" + node.getName());
			cs.accept("v=" + node.getVersion());
			cs.accept("h=" + node.getHost());
			cs.accept("rs=" + node.getRoles());
			cs.accept("as=" + node.getAttributes());
		}
		cs.accept("cluster=" + client.cluster());
		cs.accept("indices=" + client.indices());
		cs.accept("ingest=" + client.ingest());
		cs.accept("machineLearning=" + client.machineLearning());
		return true;
	}

	/**
	 * 检查ElasticsearchRestClientProperties Bean
	 * @author ben
	 * @date 2021-09-16 10:28:59 CST
	 * @return
	 */
	@GetMapping(value="/check/client/properties")
	public Boolean checkClientProperties() {
		cs.accept("---properties=" + properties);
		cs.accept("uris=" + properties.getUris());
		cs.accept("username=" + properties.getUsername());
		cs.accept("password=" + properties.getPassword());
		cs.accept("connectionTimeout=" + properties.getConnectionTimeout().getSeconds());
		cs.accept("readTimeout=" + properties.getReadTimeout().getSeconds());

		Sniffer sn = properties.getSniffer();
		if (Objects.nonNull(sn)) {
			cs.accept("---Sniffer=" + sn);
			cs.accept("DelayAfterFailure=" + sn.getDelayAfterFailure().getSeconds());
			cs.accept("Interval=" + sn.getInterval().getSeconds());
		} else {
			cs.accept("Sniffer is null");
		}
		return true;
	}

}
访问接口:/es/check/client
client=org.elasticsearch.client.RestHighLevelClient@218af644
LowLevelClient=org.elasticsearch.client.RestClient@3fbc4863
isRunning=true
list.size=1
node[0]=[host=http://localhost:9200]
n=null
v=null
h=http://localhost:9200
rs=null
as=null
cluster=org.elasticsearch.client.ClusterClient@61284417
indices=org.elasticsearch.client.IndicesClient@260f8abb
ingest=org.elasticsearch.client.IngestClient@504160e8
machineLearning=org.elasticsearch.client.MachineLearningClient@d63c5d3
访问接口:/es/check/client/properties
---properties=org.springframework.boot.autoconfigure.elasticsearch.ElasticsearchRestClientProperties@29b4560c
uris=[http://localhost:9200]
username=null
password=null
connectionTimeout=1
readTimeout=15
---Sniffer=org.springframework.boot.autoconfigure.elasticsearch.ElasticsearchRestClientProperties$Sniffer@2773bd4a
DelayAfterFailure=60
Interval=300
在S.B.中,提供了下面的配置,但没有找到Sniffer的配置:

3.2、生成ElasticsearchRestTemplate Bean并检查
默认就生产了一个 elasticsearchTemplate Bean——注意没有Rest。
检查代码:
	// 文件EsController.java
	@Autowired
	private ElasticsearchRestTemplate esTemplate;

    @GetMapping(value="/check/template")
	public Boolean checkEsTemplate() {
		cs.accept("esTemplate=" + esTemplate);
		cs.accept("esTemplate=" + esTemplate.getElasticsearchConverter());
		cs.accept("esTemplate=" + esTemplate.getRefreshPolicy());
		cs.accept("esTemplate=" + esTemplate.getRequestFactory());

		return true;
	}
测试结果:
esTemplate=org.springframework.data.elasticsearch.core.ElasticsearchRestTemplate@12437e95
esTemplate=org.springframework.data.elasticsearch.core.convert.MappingElasticsearchConverter@7d7d58c8
esTemplate=null
esTemplate=org.springframework.data.elasticsearch.core.RequestFactory@2ecd00d5
其中的getRefreshPolicy() 返回 null。
org.springframework.data.elasticsearch.core.RefreshPolicy默认有 3个:
public enum RefreshPolicy {
	NONE, IMMEDIATE, WAIT_UNTIL;
}
默认为null,此时可以注册一个自己的ElasticsearchRestTemplate Bean来替代默认的——并做更多的设置:来自博客园

疑问:设置了有什么好处呢?TODO
设置后检查:

ElasticsearchRestTemplate 是组合了 RestHighLevelClient client 实现的,是一种更高级的抽象。
而 ElasticsearchRestTemplate 又被 更高级的抽象 Spring Data Elasticsearch 等使用。
其自身的public函数展示:

其继承的抽象类AbstractElasticsearchTemplate 中有更多的public函数——比如前面图片中展示的几个 set函数 就来自抽象类。
3.3、使用Spring Data Elasticsearch Repositories存取数据
S.B.通过了更高级的抽象来操作ES,本文介绍使用ElasticsearchRepository来管理数据。
先来看看类型的关系:
package org.springframework.data.elasticsearch.repository;
@NoRepositoryBean
public interface ElasticsearchRepository extends PagingAndSortingRepository {
}

package org.springframework.data.repository;
@NoRepositoryBean
public interface PagingAndSortingRepository extends CrudRepository {
}

package org.springframework.data.repository;
@NoRepositoryBean
public interface CrudRepository extends Repository {
}
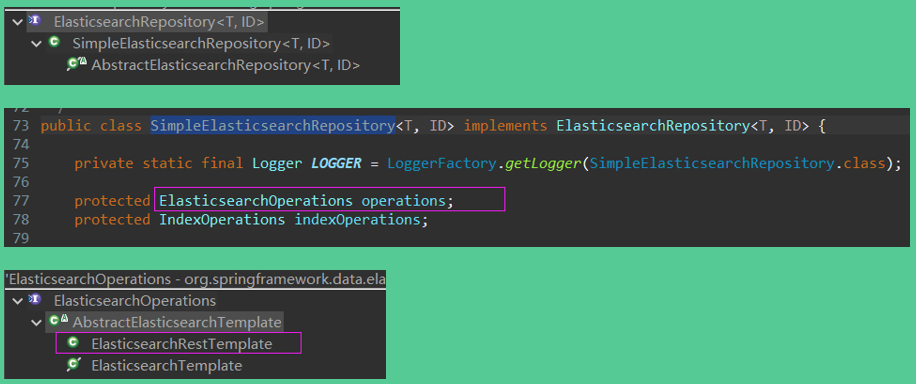
ElasticsearchRepository的实现类:
![]()
本节演示在ES中保存新闻数据,以及根据关键词查询新闻等功能。
使用步骤:
1)定义实体类News
org.springframework.data.elasticsearch.annotations.Document注解,即可。
如要更多配置,还要使用 org.springframework.data.elasticsearch.annotations.Setting注解。
建立实体类,启动项目,此时,ES中不会建立索引。
@Document(indexName = "news")
@Data
public class News {

	protected News() {
	}

	/**
	 * 构造函数
	 * @param title
	 * @param url
	 * @param postTime
	 * @param source
	 * @param contentText
	 * @param contentHtml
	 */
	public News(String title, String url, Date postTime, String source, String contentText, String contentHtml) {
		this.title = title;
		this.url = url;
		this.postTime = postTime;
		this.source = source;
		this.contentText = contentText;
		this.contentHtml = contentHtml;
	}

	@Id
	private String id;

	/**
	 * 标题
	 */
	private String title;
	/**
	 * url
	 */
	private String url;
	/**
	 * 发布时间
	 */
	private Date postTime;

	/**
	 * 新闻来源
	 */
	private String source;

	/**
	 * 内容:文本
	 */
	private String contentText;

	/**
	 * 内容:HTML
	 */
	private String contentHtml;

}
2)添加接口NewsDAO
继承 ElasticsearchRepository接口,并添加一些方法。
此时启动项目,ES中会建立好索引。
public interface NewsDAO extends ElasticsearchRepository {

	List findByTitle(String title);

	// 没有数据返回
//	List findByTitleContaining(String title);
	// 没有数据返回
	Streamable findByTitleContaining(String title);

	/**
	 * 根据 title、contentText 分页查找
	 * @author ben
	 * @date 2021-09-01 16:02:10 CST
	 * @param title
	 * @param contentText
	 * @param page
	 * @return
	 */
	Page findByTitleOrContentText(String title, String contentText, Pageable page);

	/**
	 * findByTitleContainingOrContentTextContaining
	 * @author ben
	 * @date 2021-09-01 19:26:53 CST
	 * @param title
	 * @param contentText
	 * @param page
	 * @return
	 */
	Page findByTitleContainingOrContentTextContaining(String title, String contentText, Pageable page);

}
此时已建立好索引,可以使用NewsDAO Bean操作ES了。
启动日志-建立索引部分:一个HEAD、一个PUT请求。再次启动项目,因为索引news已经建立,此时只会发送HEAD请求。
org.elasticsearch.client.RestClient      : request [HEAD http://localhost:9200/news?ignore_throttled=false&ignore_unavailable=false&expand_wildcards=open%2Cclosed&allow_no_indices=false] returned 1
    warnings: [299 Elasticsearch-7.14.0-dd5a0a2acaa2045ff9624f3729fc8a6f40835aa1 "Elasticsearch built-in security features are not enabled. Without authentication, your cluster could be accessible to anyone. See https://www.elastic.co/guide/en/elasticsearch/reference/7.14/security-minimal-setup.html to enable security."]
org.elasticsearch.client.RestClient      : request [PUT http://localhost:9200/news?master_timeout=30s&timeout=30s] returned 1
    warnings: [299 Elasticsearch-7.14.0-dd5a0a2acaa2045ff9624f3729fc8a6f40835aa1 "Elasticsearch built-in security ...]
/_cat/indices 得到:
yellow open news MuAdniZvTCiURzDKHUEhHA 1 1 0 0 208b 208b/_cat/indices?v 得到:第一行有标题
health status index                           uuid                   pri rep docs.count docs.deleted store.size pri.store.size
yellow open   news                            MuAdniZvTCiURzDKHUEhHA   1   1          0            0       208b           208b
试着访问 /news、/news/_search 接口,检查响应。
3)编写Web接口操作ES
编写服务层、Controller层等代码。来自博客园
3.1)添加
接口 /news/add:
	// NewsServiceImpl.java中
    @Autowired
	private NewsDAO newsDao;

	@Override
	public String addNews(AddNewsDTO dto) {
		News news = dto.convertToNews();
		News savedNews = newsDao.save(news);
		log.info("添加新闻:id={}", savedNews.getId());
		return savedNews.getId();
	}
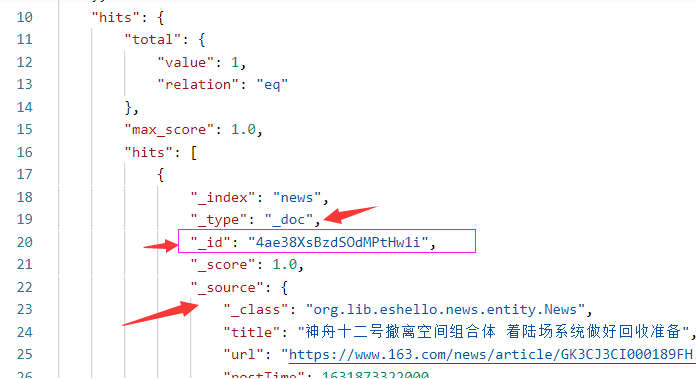
添加成功,返回ID:
4ae38XsBzdSOdMPtHw1i此时,ES的 http://localhost:9200/news/_search 接口可以看到新增数据了:由于前面的实体类没有使用 Setting注解,因此,这里的文档的type为默认的 _doc。
添加时,应用程序发送了两个POST请求:
![]()
3.2)查询(1)
	// 文件NewsServiceImpl.java

    // 查询所有
    @Override
	public List getAll() {
		List ret = new ArrayList(20);

		Iterable iter = newsDao.findAll();
		iter.forEach(item -> {
			ret.add(item);
		});

		return ret;
	}

	// 根据ID查找
	@Override
	public News getById(String id) {
		return newsDao.findById(id).orElse(null);
	}
3.3)查询(2)
测试数据:
{
"id": "4ae38XsBzdSOdMPtHw1i",
"title": "神舟十二号撤离空间组合体 着陆场系统做好回收准备",
"url": "https://www.163.com/news/article/GK3CJ3CI000189FH.html",
"postTime": "2021-09-17 10:08:42",
"source": "网易",
"contentText": "央视网消息(新闻联播):今天(9月16日),神舟十二号载人飞船与空间站天和核心舱成功实施分离并进行了绕飞及径向交会试验。与此同时,着陆场系统各项工作准备就绪,全力迎接航天员平安返回。",
"contentHtml": ""
}
/news/findByTitle:
本以为是 根据标题精确匹配查询,查询结果显示,不会这样的。
输入完整标题、不完整标题,都可以找到这条记录。
/news/findByTitleContaining:
- 输入完整标题,查询发生异常
2021-09-17 11:32:33.137 ERROR 19460 --- [io-30005-exec-7] o.a.c.c.C.[.[.[/].[dispatcherServlet]    : Servlet.service() for servlet [dispatcherServlet] in context with path [] threw exception [Request processing failed; nested exception is org.springframework.dao.InvalidDataAccessApiUsageException: Cannot constructQuery '*"神舟十二号撤离空间组合体 着陆场系统做好回收准备"*'. Use expression or multiple clauses instead.] with root cause

org.springframework.dao.InvalidDataAccessApiUsageException: Cannot constructQuery '*"神舟十二号撤离空间组合体 着陆场系统做好回收准备"*'. Use expression or multiple clauses instead.
- 只输入 “神舟十二号”,返回空字符串
- 输入 “神”,可以查到记录
其它单个字 也行。
- 执行下面的语句,输出了所有记录
http://localhost:30005/news/findByTitleContaining?title=
title后没有数据。
……
这个要怎么用呢?还需要看看文档才是,TODO
注,此问题和使用的 分词器 有关系。
3.4)查询(3)
查询 标题title和内容contentText 中都有文档。来自博客园
测试关键代码:
分别对 方式1)newsDao.findByTitleOrContentText 和 方式2)newsDao.findByTitleContainingOrContentTextContaining 进行测试。
FindByPageDTO.java
@Data
public class FindByPageDTO {

	/**
	 * 页数:从0开始
	 */
	private int pageNo;

	/**
	 * 每页记录数:默认10
	 */
	private int pageSize;

	/**
	 * 关键词:标题 或 内容
	 */
	private String keyword;

}


NewsDAO.java
	/**
	 * 根据 title、contentText 分页查找
	 * @author ben
	 * @date 2021-09-01 16:02:10 CST
	 * @param title
	 * @param contentText
	 * @param page
	 * @return
	 */
	Page findByTitleOrContentText(String title, String contentText, Pageable page);

	/**
	 * findByTitleContainingOrContentTextContaining
	 * @author ben
	 * @date 2021-09-01 19:26:53 CST
	 * @param title
	 * @param contentText
	 * @param page
	 * @return
	 */
	Page findByTitleContainingOrContentTextContaining(String title, String contentText, Pageable page);


NewsServiceImpl.java
	@Override
	public PageVO findByTitleOrContentText(FindByPageDTO dto) {
		PageVO page = new PageVO();
		page.setPageNo(dto.getPageNo());
		page.setPageSize(dto.getPageSize());

//		Pageable pageable = PageRequest.of(dto.getPageNo(), dto.getPageSize());
		// 排序:按照 postTime 倒序返回
		Pageable pageable = PageRequest.of(dto.getPageNo(), dto.getPageSize(), Sort.by(Direction.DESC, "postTime"));
		// 方式1:单个汉字,查询结果不全
//		Page daoPage = newsDao.findByTitleOrContentText(dto.getKeyword(), dto.getKeyword(), pageable);
		// 方式2:单个汉字,可以查到符合要求的所有
		Page daoPage = newsDao.findByTitleContainingOrContentTextContaining(dto.getKeyword(), dto.getKeyword(), pageable);

		log.info("daoPage={}", daoPage);
		page.setTotalPage(daoPage.getTotalPages());
		page.setTotalSize(daoPage.getTotalElements());
		// 内容
		page.setData(daoPage.getContent());

		return page;
	}
方式1:
方式2:
"keyword": "" 返回所有数据
"keyword": "单个汉字" 可以找到记录
"keyword": "一段文档中较长的文字" 找不到记录
"keyword": "标题" 找不到记录
……
更多区别,请大家自行试验。
我自己还要去好好看看文档才是——Spring Data Elasticsearch - Reference Documentation。
本小结只是试验了ES的基本用法,实际上还有更多高级的操作可以使用的,比如,聚合查询,还需继续探索。
在序章中提到了,要使用 分词器 对用户输入的数据进行处理,然后存库或搜索使用。
中文等象形文字 和 英文等字符组合型文字 的分词方法是不同的。比如,英文中分词使用空格(书写的时候),但是中文呢?没有空格,需要根据使用经验来做分词。
因此,在ES中,中文需要使用特别的分词器类做分词,否则,操作结果会严重不符合预期。
参考文档中的 一些博文讲的很好了,本小结就介绍ES中分词器的基本使用。
ES官方文档:Text analysis
4.1、默认分词器
ES官方文档 Tokenizer reference 展示了所有的分词器(好多)。
其中,Standard Analyzer 是默认的。
下图来自参考文档,中文介绍了一些默认分词器的作用:

验证默认分词器的分词效果:英文部分按照 空格分开了,而中文部分则被拆分成一个一个字。
standard分词器测试
POST http://localhost:9200/_analyze
参数:
{
    "analyzer": "standard",
    "text": "this is a 横断山脉"
}
响应:
{
    "tokens": [
        {
            "token": "this",
            "start_offset": 0,
            "end_offset": 4,
            "type": "",
            "position": 0
        },
        {
            "token": "is",
            "start_offset": 5,
            "end_offset": 7,
            "type": "",
            "position": 1
        },
        {
            "token": "a",
            "start_offset": 8,
            "end_offset": 9,
            "type": "",
            "position": 2
        },
        {
            "token": "横",
            "start_offset": 10,
            "end_offset": 11,
            "type": "",
            "position": 3
        },
        {
            "token": "断",
            "start_offset": 11,
            "end_offset": 12,
            "type": "",
            "position": 4
        },
        {
            "token": "山",
            "start_offset": 12,
            "end_offset": 13,
            "type": "",
            "position": 5
        },
        {
            "token": "脉",
            "start_offset": 13,
            "end_offset": 14,
            "type": "",
            "position": 6
        }
    ]
}
更多试验,不同类型的分词器的分词效果,请自行试验。
4.2、安装使用中文分词器
对于中文分词器,除了留下的 IK分词器,还有 smartCN、HanLP 等。
本节介绍 IK分词器的安装,很简单:
elasticsearch-plugin install https://github.com/medcl/elasticsearch-analysis-ik/releases/download/v7.14.0/elasticsearch-analysis-ik-7.14.0.zip
唯一要注意的就是:版本号!其中的 v.7.14.0!否则会安装失败。
安装好后,可以看到ES的plugins下多了一个 analysis-ik 目录,ES的/_cat/plugins接口 可以看到安装成功了。
IK分词器有两种分词方法:
ik_smart: 会做最粗粒度的拆分
ik_max_word: 会将文本做最细粒度的拆分
下面分别使用它们来做试验:
下面试验中,中文没有被拆分为一个一个字了,可是,英文跑哪里去了呢——两种分词方法都把英文搞丢了?中英文混合分词怎么弄呢?TODO
IK初体验
http://localhost:9200/_analyze
试验1:
参数:
{
    "analyzer": "ik_smart",
    "text": "this is a 横断山脉"
}
响应:
{
    "tokens": [
        {
            "token": "横断",
            "start_offset": 10,
            "end_offset": 12,
            "type": "CN_WORD",
            "position": 0
        },
        {
            "token": "山脉",
            "start_offset": 12,
            "end_offset": 14,
            "type": "CN_WORD",
            "position": 1
        }
    ]
}

试验2:
参数:
{
    "analyzer": "ik_max_word",
    "text": "this is a 横断山脉"
}
响应:
{
    "tokens": [
        {
            "token": "横断山",
            "start_offset": 10,
            "end_offset": 13,
            "type": "CN_WORD",
            "position": 0
        },
        {
            "token": "横断",
            "start_offset": 10,
            "end_offset": 12,
            "type": "CN_WORD",
            "position": 1
        },
        {
            "token": "山脉",
            "start_offset": 12,
            "end_offset": 14,
            "type": "CN_WORD",
            "position": 2
        }
    ]
}
4.3、安装使用拼音(Pinyin)分词器
安装方式同上面的中文分词器:
./bin/elasticsearch-plugin install https://github.com/medcl/elasticsearch-analysis-pinyin/releases/download/v7.14.0/elasticsearch-analysis-pinyin-7.14.0.zip同样也要注意版本号!否则失败。
同样在ES的plugins下会多一个 analysis-pinyin目录,ES的/_cat/plugins接口 可以看到安装成功了。
拼音分词器的Github介绍:
The plugin includes analyzer: pinyin , tokenizer: pinyin and token-filter: pinyin.只有一个分词方法:pinyin。
拼音分词器试验:
试验结果
POST http://localhost:9200/_analyze
参数:
{
    "analyzer": "pinyin",
    "text": "this is a 横断山脉"
}
响应:
{
    "tokens": [
        {
            "token": "t",
            "start_offset": 0,
            "end_offset": 0,
            "type": "word",
            "position": 0
        },
        {
            "token": "thisisahdsm",
            "start_offset": 0,
            "end_offset": 0,
            "type": "word",
            "position": 0
        },
        {
            "token": "h",
            "start_offset": 0,
            "end_offset": 0,
            "type": "word",
            "position": 1
        },
        {
            "token": "i",
            "start_offset": 0,
            "end_offset": 0,
            "type": "word",
            "position": 2
        },
        {
            "token": "si",
            "start_offset": 0,
            "end_offset": 0,
            "type": "word",
            "position": 3
        },
        {
            "token": "sa",
            "start_offset": 0,
            "end_offset": 0,
            "type": "word",
            "position": 4
        },
        {
            "token": "heng",
            "start_offset": 0,
            "end_offset": 0,
            "type": "word",
            "position": 5
        },
        {
            "token": "duan",
            "start_offset": 0,
            "end_offset": 0,
            "type": "word",
            "position": 6
        },
        {
            "token": "shan",
            "start_offset": 0,
            "end_offset": 0,
            "type": "word",
            "position": 7
        },
        {
            "token": "mai",
            "start_offset": 0,
            "end_offset": 0,
            "type": "word",
            "position": 8
        }
    ]
}
分的好细啊!中文也被拆分为了拼音!
4.4、给索引配置中文分词器后验证前面的查询结果
前面建立了索引news,没有指定的情况下,肯定是用的默认standard分词器了。
本节介绍更改其分词器为 ik_smart(其实,还可以更进一步设置分词器,本文不介绍——还不熟悉啊)。
开始操作:
操作去的 GET /news/_settings 结果:
结果1
{
  "news" : {
    "settings" : {
      "index" : {
        "routing" : {
          "allocation" : {
            "include" : {
              "_tier_preference" : "data_content"
            }
          }
        },
        "refresh_interval" : "1s",
        "number_of_shards" : "1",
        "provided_name" : "news",
        "creation_date" : "1631846293902",
        "store" : {
          "type" : "fs"
        },
        "number_of_replicas" : "1",
        "uuid" : "MuAdniZvTCiURzDKHUEhHA",
        "version" : {
          "created" : "7140099"
        }
      }
    }
  }
}更改分词器为ik_smart(最简配置):更改失败,删除索引后,重新建立并设置分词器为ik_smart
新建索引设置分词器
注,执行时,索引已经存在。

PUT /news
{
    "settings": {
		"analysis": {
			"analyzer": {
				"default": {
					"type":"ik_smart"
				}
			}
		}
	}
}
结果:
{
  "error" : {
    "root_cause" : [
      {
        "type" : "resource_already_exists_exception",
        "reason" : "index [news/MuAdniZvTCiURzDKHUEhHA] already exists",
        "index_uuid" : "MuAdniZvTCiURzDKHUEhHA",
        "index" : "news"
      }
    ],
    "type" : "resource_already_exists_exception",
    "reason" : "index [news/MuAdniZvTCiURzDKHUEhHA] already exists",
    "index_uuid" : "MuAdniZvTCiURzDKHUEhHA",
    "index" : "news"
  },
  "status" : 400
}

错误原因:
索引已经存在。

删除索引,重新执行:
PUT /news
{
    "settings": {
		"analysis": {
			"analyzer": {
				"default": {
					"type":"ik_smart"
				}
			}
		}
	}
}


检查新建索引配置:
GET /news/_settings
响应:
{
  "news" : {
    "settings" : {
      "index" : {
        "routing" : {
          "allocation" : {
            "include" : {
              "_tier_preference" : "data_content"
            }
          }
        },
        "number_of_shards" : "1",
        "provided_name" : "news",
        "creation_date" : "1631860976432",
        "analysis" : {
          "analyzer" : {
            "default" : {
              "type" : "ik_smart"
            }
          }
        },
        "number_of_replicas" : "1",
        "uuid" : "f3rDAwgLRNuL4wMmFh6Xaw",
        "version" : {
          "created" : "7140099"
        }
      }
    }
  }
}
启动应用程序,检查是否可以使用 上面新建的索引:
启动未报错。
添加之前的数据(3条):添加成功。
测试之前试验用的接口:
/news/getAll
/news/getById
/news/findByTitle
/news/findByTitleContaining 变化:输入 神舟、十二号、空间 等词的时候可以找到记录了
/news/findByTitleOrContentText 变化:输入单个字可能找不到了,但是,输入一些 有意义的汉语词语 或 内容中语句 是可以找到记录的,
……
初步测试完毕,结果不是非常符合预期,比如,输入“同时”,找不到记录,但输入相连的“与此同时”,却能找到记录。
虽然用上了分词器,但是,分词器的优化,调整,配置,才是ES使用的重点之一吧。
小结:
本章介绍了分词器的基本使用,中文、拼音分词器的安装及基本使用。来自博客园
分词器,需要继续学习才是。
》》》全文完《《《
第一篇ES的文章,写了好几天,不懂的还挺多,还需继续研究才是。
去看看博文、ES官文、Spring Data ES官文,相信会有更全面、深入的了解。来自博客园
还有一些问题也待研究:数据存(同步)到ES、集群部署、动态扩容、原理……真多。
还有Kibana也要熟练使用才是,挺强大的。
2、Elasticsearch拼音分词和IK分词的安装及使用
3、elasticsearch系列三:索引详解(分词器、文档管理、路由详解(集群))
4、Elasticsearch(10) --- 内置分词器、中文分词器
8、