概述
FTP,即:文件传输协议(File Transfer Protocol),基于客户端/服务器模式,默认使用20、21端口号,其中端口20(数据端口)用于进行数据传输,端口21(命令端口)用于接受客户端发出的相关FTP命令与参数。
FTP服务器普遍部署于局域网中,具有容易搭建、方便管理的特点。而且有些FTP客户端工具还可以支持文件的多点下载以及断点续传技术,因此FTP服务得到了广大用户的青睐。
FTP协议有以下两种工作模式:
- 主动模式(PORT):FTP服务器主动向客户端发起连接请求。
- 被动模式(PASV):FTP服务器等待客户端发起连接请求(FTP的默认工作模式)。
Linux下FTP Server评估(vsftpd、pure-ftpd、proftpd)
vsftpd是一款运行在Linux操作系统上的FTP服务程序,具有很高的安全性和传输速度。
vsftpd
vsftpd有以下三种认证模式:
- 匿名开放模式:
- 是一种最不安全的认证模式,任何人都可以无需密码验证而直接登陆。
- 本地用户模式:
- 是通过Linux系统本地的账户密码信息进行认证的模式,相较于匿名开放模式更安全,而且配置起来简单。
- 虚拟用户模式:
- 是这三种模式中最安全的一种认证模式,它需要为FTP服务单独建立用户数据库文件,虚拟出用来进行口令验证的账户信息,而这些账户信息在服务器系统中实际上是不存在的,仅供FTP服务程序进行认证使用。
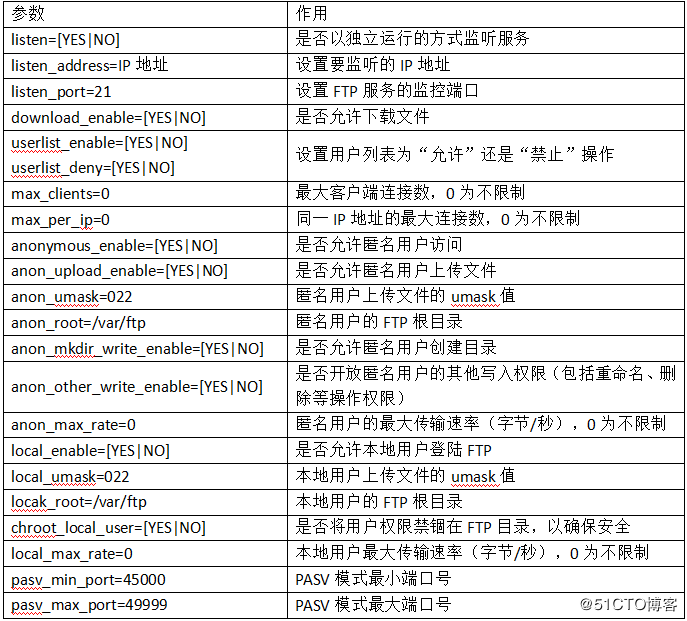
常用参数
安装
yum -y install vsftpd
去掉配置里的注释行
mv /etc/vsftpd/vsftpd.conf vsftpd.conf.bak
grep -v "#" /etc/vsftpd/vsftpd.conf.bak > /etc/vsftpd/vsftpd.conf
实战
为了方便测试,可以关闭防火墙和selinux
匿名模式
配置文件
# FTP监听端口
listen_port=2231
# 最大客户端连接数
max_clients=10
# 同一IP最大连接数
max_per_ip=4
# 用户会话的空闲中断时间(秒)
idle_session_timeout=300
# 启用匿名访问模式
anonymous_enable=YES
# 匿名用户上传文件的umask值
anon_umask=022
# 允许匿名用户上传文件
anon_upload_enable=YES
# 允许匿名用户下载文件
download_enable=YES
# 允许匿名用户创建目录
anon_mkdir_write_enable=NO
# 允许匿名用户重命名、删除等操作
anon_other_write_enable=YES
# 匿名用户的FTP根目录
anon_root=/var/ftp
local_enable=YES
write_enable=YES
local_umask=022
dirmessage_enable=YES
xferlog_enable=YES
connect_from_port_20=YES
xferlog_std_format=YES
listen=NO
listen_ipv6=YES
pam_service_name=vsftpd
userlist_enable=YES
tcp_wrappers=YES
创建匿名用户根目录并开启服务
mkdir -p /var/ftp/pub
chmod 777 /var/ftp/pub
systemctl start vsftpd
分享目录
因为要分享的目录不一定在根目录下,所以通过mount --bind来实现类似软链接的功能
mount --bind /mnt/xfs1/share1/ xfs1-share1/
mount --bind /mnt/xfs1/share2/ xfs1-share2/
mount --bind /mnt/xfs2/share1/ xfs2-share1/
测试
linux端
[root@N131 ~]# ftp 192.168.1.130 2231
Connected to 192.168.1.130 (192.168.1.130).
220 (vsFTPd 3.0.2)
Name (192.168.1.130:root): anonymous
331 Please specify the password.
Password:
230 Login successful.
Remote system type is UNIX.
Using binary mode to transfer files.
ftp> ls
227 Entering Passive Mode (192,168,1,130,33,20).
150 Here comes the directory listing.
drwxrwxrwx    5 0        0              63 Oct 13 01:33 pub
226 Directory send OK.
ftp> cd pub
250 Directory successfully changed.
ftp> ls
227 Entering Passive Mode (192,168,1,130,103,94).
150 Here comes the directory listing.
drwxrwxrwx    2 0        0               6 Oct 13 01:49 xfs1-share1
drwxrwxrwx    2 0        0               6 Oct 13 01:46 xfs1-share2
drwxrwxrwx    2 0        0               6 Oct 13 01:11 xfs2-share1
226 Directory send OK.
ftp> cd xfs1-share1
250 Directory successfully changed.
ftp> mkdir files
257 "/pub/xfs1-share1/files" created
ftp> dir
227 Entering Passive Mode (192,168,1,130,40,191).
150 Here comes the directory listing.
drwxr-xr-x    2 14       50              6 Oct 13 01:55 files
226 Directory send OK.
ftp> rmdir files
250 Remove directory operation successful.
ftp> exit
221 Goodbye.
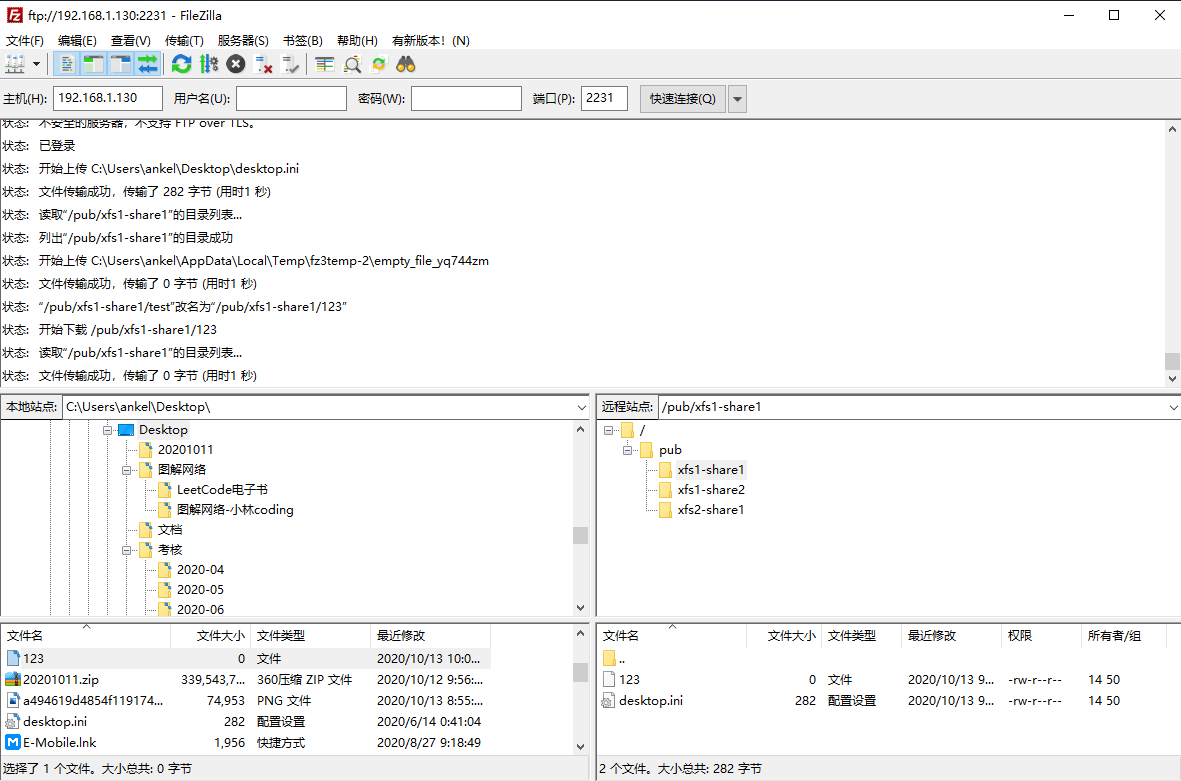
windows端使用FileZilla测试,输入主机和端口后快速连接
本地用户模式
配置
listen_port=2231
max_clients=10
max_per_ip=4
idle_session_timeout=300

# 关闭匿名访问模式
anonymous_enable=NO
# 指定本地用户的FTP根目录
local_root=/var/ftp
# 将用户权限禁锢在FTP目录
chroot_local_user=YES

local_enable=YES
write_enable=YES
local_umask=022
dirmessage_enable=YES
xferlog_enable=YES
connect_from_port_20=YES
xferlog_std_format=YES
listen=NO
listen_ipv6=YES

pam_service_name=vsftpd
userlist_enable=YES
tcp_wrappers=YES
创建本地用户
略
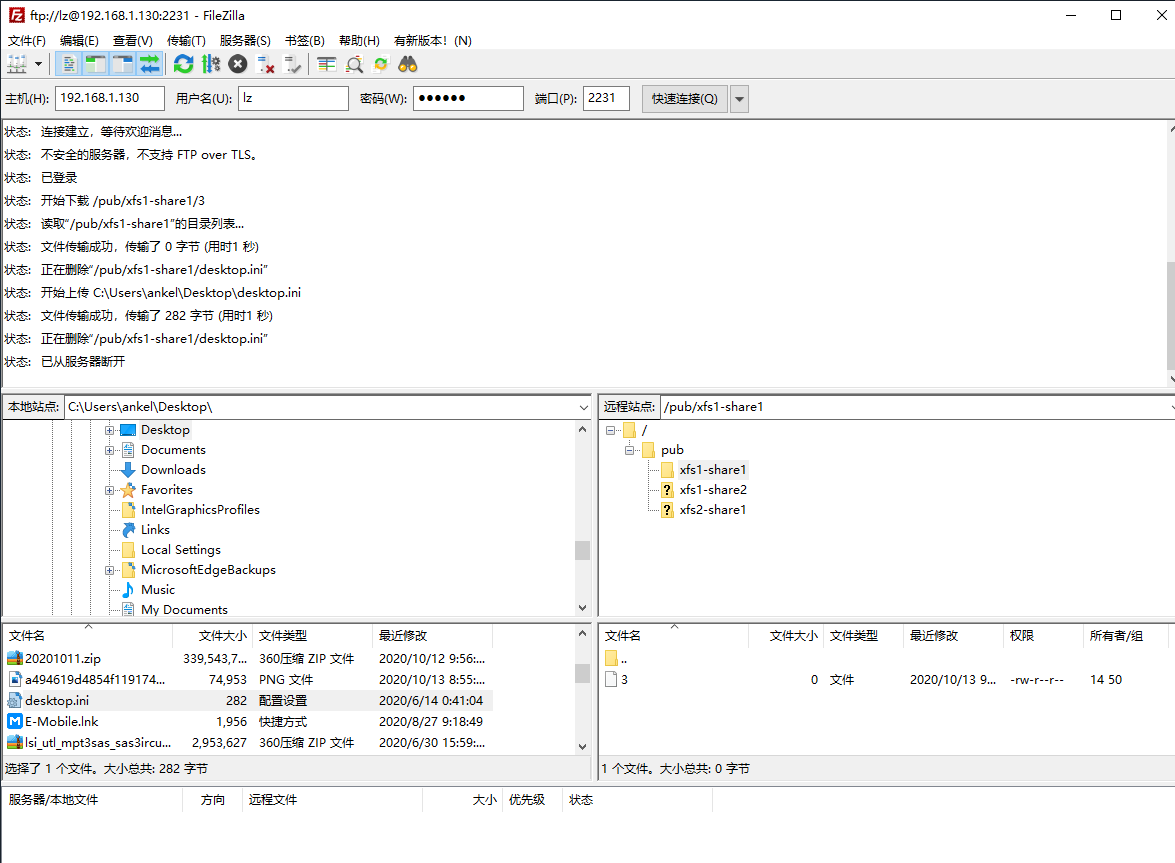
测试
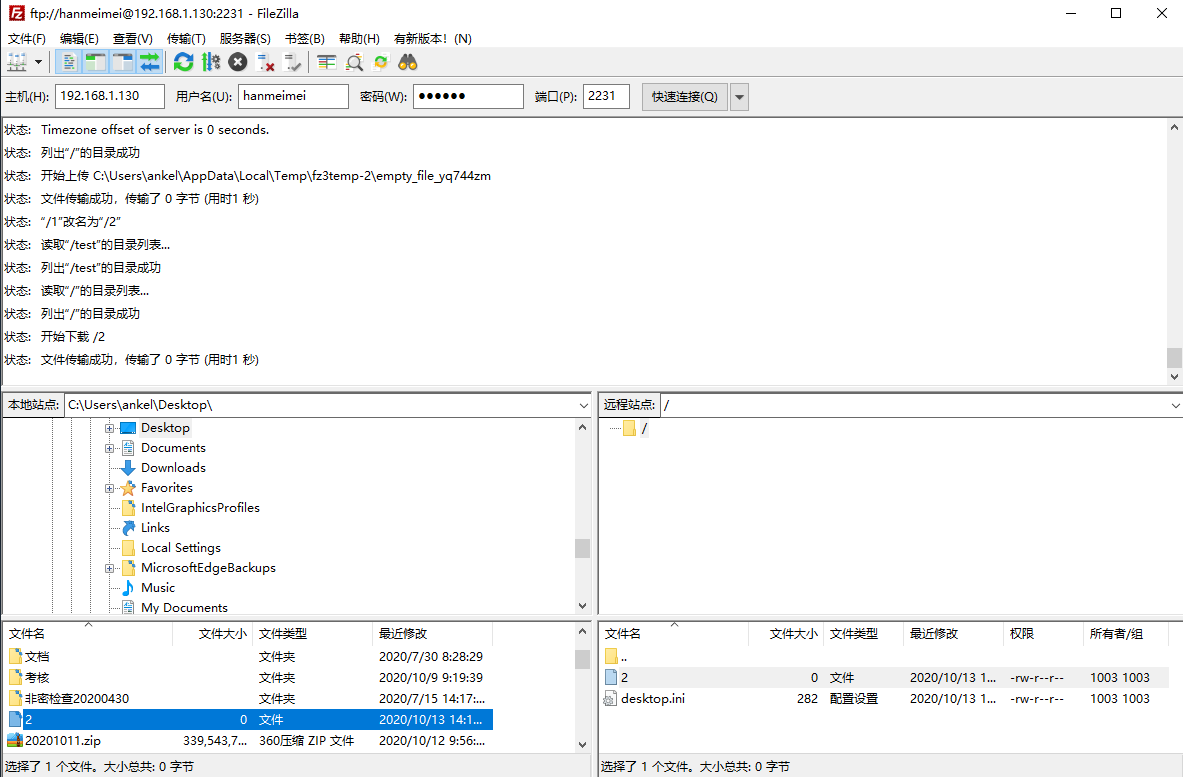
虚拟用户模式
创建用于FTP认证的用户数据库文件
第一行用户名,第二行密码,以此类推
明文信息不安全,需要使用db_load命令用哈希(hash)算法将明文信息转换成数据文件,然后将明文信息文件删除
[root@localhost vsftpd]# vi /etc/vsftpd/vuser.txt
[root@localhost vsftpd]# cat /etc/vsftpd/vuser.txt
lilei
123456
hanmeimei
654321
[root@localhost vsftpd]# db_load -T -t hash -f /etc/vsftpd/vuser.txt /etc/vsftpd/vuser.db
[root@localhost vsftpd]# chmod 600 /etc/vsftpd/vuser.db
[root@localhost vsftpd]# rm -f /etc/vsftpd/vuser.txt
创建虚拟用户映射的系统本地用户
useradd -s /sbin/nologin virftp
建立用于支持虚拟用户的PAM文件
PAM(可插拔认证模块)是一种认证机制,通过一些动态链接库和统一的API把系统提供的服务与认证方式分开,使得系统管理员可以根据需求灵活调整服务程序的不同认证方式。
[root@localhost vsftpd]# vi /etc/pam.d/vsftpd.vu
[root@localhost vsftpd]# cat /etc/pam.d/vsftpd.vu
auth     required     pam_userdb.so  db=/etc/vsftpd/vuser
account  required     pam_userdb.so  db=/etc/vsftpd/vuser
配置文件
listen_port=2231
max_clients=10
max_per_ip=4
idle_session_timeout=300

anonymous_enable=NO
anon_umask=022
anon_upload_enable=YES
anon_world_readable_only=YES
anon_mkdir_write_enable=YES
anon_other_write_enable=YES
anon_root=/var/ftp

local_enable=YES
write_enable=YES
local_umask=022
dirmessage_enable=YES
xferlog_enable=YES
connect_from_port_20=YES
xferlog_std_format=YES
listen=NO
listen_ipv6=YES

# 开启虚拟用户模式
guest_enable=YES
# 指定虚拟用户对应的系统用户
guest_username=virftp
# 指定PAM文件
pam_service_name=vsftpd.vu
# 指定虚拟用户配置文件目录
user_config_dir=/etc/vsftpd/vusers_dir
# 允许对FTP根目录执行写入操作
allow_writeable_chroot=YES
userlist_enable=YES
tcp_wrappers=YES
为虚拟用户设置不同的权限
[root@localhost vsftpd]# cd vusers_dir/
[root@localhost vusers_dir]# vi lilei
[root@localhost vusers_dir]# vi hanmeimei
[root@localhost vusers_dir]# cat lilei
anon_upload_enable=YES
anon_mkdir_write_enable=YES
anon_other_write_enable=NO
download_enable=NO
local_root=/var/ftp/pub/xfs1-share1
[root@localhost vusers_dir]# cat hanmeimei
anon_upload_enable=YES
anon_mkdir_write_enable=YES
anon_other_write_enable=YES
download_enable=YES
local_root=/var/ftp/pub/xfs1-share2
测试
lilei根目录为/var/ftp/pub/xfs1-share1,拥有上传和创建目录权限,不能删除和下载
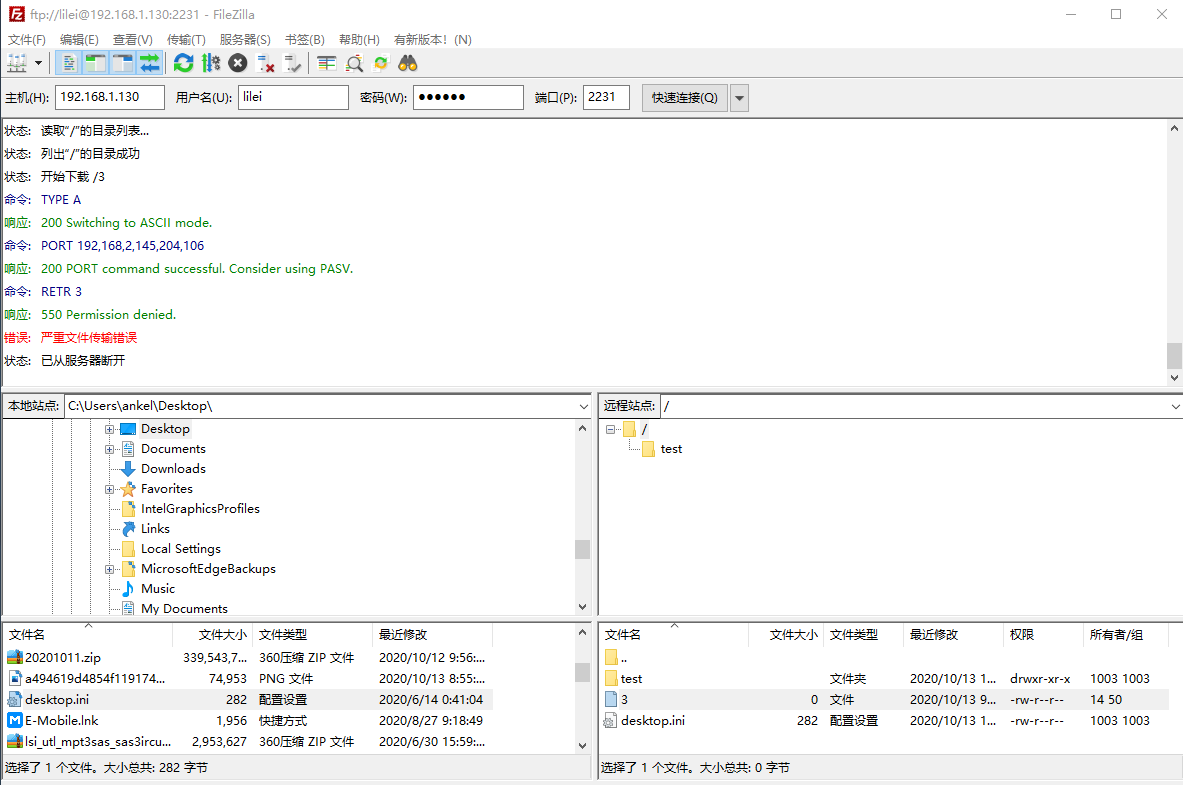
hanmeimei拥有所有权限
