EfficientDet训练模型学习总结
1.Introduction简介
pytorch用SOTA实时重新实现官方EfficientDet,原文链接:https : //arxiv.org/abs/1911.09070
关于 EfficientNetV2:
EfficientNetV2 是一个新的卷积网络家族,与之前的模型相比,具有更快的训练速度和更好的参数效率。为了开发这一系列模型,我们结合使用训练感知神经架构搜索和缩放,共同优化训练速度和参数效率。这些模型是从富含新操作(例如 Fused-MBConv)的搜索空间中搜索的。
这里是一个比较:

- 结果表现:
 |
 |
 |
 |
 |
 |
1.1 Requirements
- python 3.6
- pytorch 1.2
- opencv (cv2)
- tensorboard
- tensorboardX (This library could be skipped if you do not use SummaryWriter)
- pycocotools
- efficientnet_pytorch
1.2 预训练权重和基准
性能非常接近论文,仍然是SOTA。
速度/FPS 测试包括没有jit/数据精度技巧的后处理时间。
| coefficient | pth_download | GPU Mem(MB) | FPS | Extreme FPS (Batchsize 32) | mAP 0.5:0.95(this repo) | mAP 0.5:0.95(official) |
|---|---|---|---|---|---|---|
| D0 | efficientdet-d0.pth | 1049 | 36.20 | 163.14 | 33.1 | 33.8 |
| D1 | efficientdet-d1.pth | 1159 | 29.69 | 63.08 | 38.8 | 39.6 |
| D2 | efficientdet-d2.pth | 1321 | 26.50 | 40.99 | 42.1 | 43.0 |
| D3 | efficientdet-d3.pth | 1647 | 22.73 | - | 45.6 | 45.8 |
| D4 | efficientdet-d4.pth | 1903 | 14.75 | - | 48.8 | 49.4 |
| D5 | efficientdet-d5.pth | 2255 | 7.11 | - | 50.2 | 50.7 |
| D6 | efficientdet-d6.pth | 2985 | 5.30 | - | 50.7 | 51.7 |
| D7 | efficientdet-d7.pth | 3819 | 3.73 | - | 52.7 | 53.7 |
| D7X | efficientdet-d8.pth | 3983 | 2.39 | - | 53.9 | 55.1 |
1.3 数据集(COCO格式)
| 数据集 | 类别数量 | #训练图像 | #验证图片 |
|---|---|---|---|
| COCO2017 | 80 | 118k | 5k |
在存储库下创建一个数据文件夹,
cd {repo_root}
mkdir data
-
COCO:从coco网站下载coco图片和注释。确保将文件按以下结构放置:
COCO
├── annotations
│   ├── instances_train2017.json
│   └── instances_val2017.json
│── images
    ├── train2017
    └── val2017
2. Demo演示测试
# 安装需求
pip install pycocotools numpy opencv-python tqdm tensorboard tensorboardX pyyaml webcolors
pip install torch==1.4.0
pip install torchvision==0.5.0
# 运行简单的推理脚本
python Effectivedet_test.py
3. Training训练
3.1 准备数据集
# 你的数据集结构应该是这样的
datasets/
    -your_project_name/
        -train_set_name/
            -*.jpg
        -val_set_name/
            -*.jpg
        -annotations
            -instances_{train_set_name}
            .json -instances_{val_set_name}.json

#例如,coco2017
数据集/
    -coco2017 /
        -train2017 /
            -000000000001.jpg
            -000000000002.jpg
            -000000000003.jpg
        -val2017 /
            -000000000004.jpg
            -000000000005.jpg
            -000000000006.jpg
        -annotations
            -instances_train2017.json
            -instances_val2017.json
3.2 手动设置项目的具体参数
# 在'projects'文件夹下创建一个yml文件{your_project_name}.yml
# 修改为'coco.yml'
# 例如
project_name: coco
train_set: train2017
val_set: val2017
num_gpus: 4 # 0 表示使用cpu,1-N 表示使用显卡

# RGB顺序的mean和std,实际上这部分应该保持不变,只要你的数据集类似于coco。
mean:[0.485, 0.456, 0.406]
std:[0.229, 0.224, 0.225]

# 这是coco anchors,如有必要,请更改,一般不建议修改
anchors_scales: '[2 ** 0, 2 ** (1.0 / 3.0), 2 ** (2.0 / 3.0)]'
anchors_ratios: '[(1.0, 1.0), (1.4) , 0.7), (0.7, 1.4)]'

# 来自数据集中所有标签的对象,其顺序来自您的注释。
# 它的索引必须与您的数据集的 category_id 匹配。
# category_id 是one_indexed,
# 比如这里'car'的index是2,category_id是3
obj_list: ['person', 'bicycle', 'car', ...]
3.3 开始训练
3.3.a 从头开始训练(不建议)
从头开始在 coco 上训练高效 det-d0
若批量大小batch_size为 12,这将需要大量时间并且需要每隔几个小时更改一次超参数。
如果你有几个月的时间要花费,那就去做吧。
这不像有人会获得比论文中的分数更好的分数。
前几个 epoch 会比较不稳定,这在从头开始训练是很正常的。
python train.py -c 0 --batch_size 64 --optim sgd --lr 8e-2
3.3.b 从头开始训练自定义数据集
在自定义数据集上训练efficientdet-d1
批量大小batch_size为 8,学习率lr为 1e-5
python train.py -c 1 -p your_project_name --batch_size 8 --lr 1e-5
3.3.c 使用预训练权重训练自定义数据集(强烈推荐)
# 在具有预训练权重的自定义数据集上训练高效 det-d2
# 批量大小batch_size为 8,学习率lr为 1e-3,用于 10 个epoch时期
python train.py -c 2 -p your_project_name --batch_size 8 --lr 1e-3 --num_epochs 10
--load_weights /path/to/your/weights/efficientdet-d2.pth
# 使用 coco-pretrained,您甚至可以冻结主干和仅训练头部
# 以加快训练并帮助收敛。
python train.py -c 2 -p your_project_name --batch_size 8 --lr 1e-3 --num_epochs 10
--load_weights /path/to/your/weights/efficientdet-d2.pth
--head_only True
3.4 提前停止训练
# 训练时,按Ctrl+c,程序会捕获KeyboardInterrupt
# 并停止训练,保存当前检查点。
3.5 恢复训练
#如果说你开始了下面这样的训练任务。
python train.py -c 2 -p your_project_name --batch_size 8 --lr 1e-3
--load_weights /path/to/your/weights/efficientdet-d2.pth
--head_only True
# 然后你用Ctrl+c,它以检查点退出

# 现在你想从最后一个检查点恢复训练
# 只需将 load_weights 设置为 'last'
python train.py -c 2 -p your_project_name --batch_size 8 --lr 1e-3
--load_weights last
--head_only True
3.6 评估模型性能
# 在 your_project 上进行评估,高效 det-d5

python coco_eval.py -p your_project_name -c 5
-w /path/to/your/weights
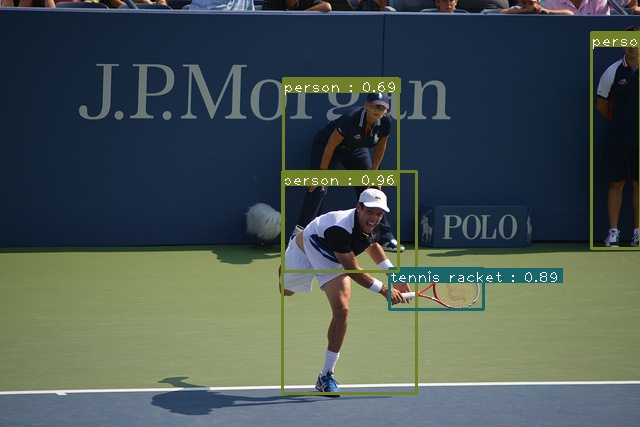
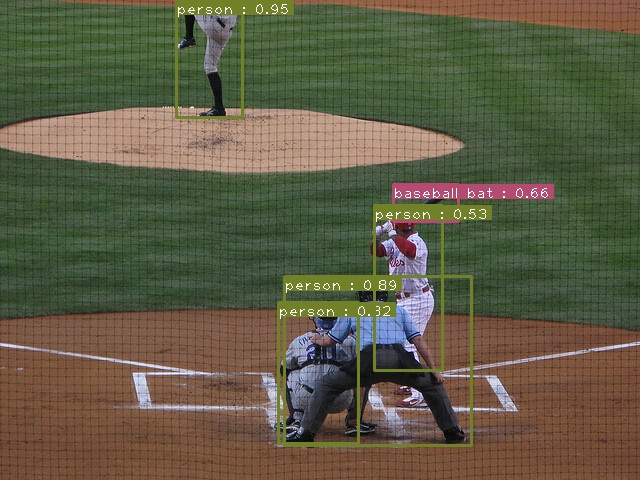
3.7 调试训练(可选)
# 当你得到不好的结果时,你需要调试训练结果。
python train.py -c 2 -p your_project_name --batch_size 8 --lr 1e-3 --debug True

# 然后检查 test/ 文件夹,在那里你可以在训练期间可视化预测的框
# 如果你看到无数的错误框,不要惊慌,它发生在训练的早期阶段。
# 但是,如果您在几次 epoch 之后仍然看不到一个正常的框,甚至在所有图像中都看不到一个,
# 那么可能是锚点配置不合适或地面实况已损坏。
4.自定义数据集的训练教程
4.1 安装环境要求
pip install pycocotools numpy==1.16.0 opencv-python tqdm tensorboard tensorboardX pyyaml webcolors matplotlib
4.2 准备自定义数据集/预训练权重
这里以官方提供的自定义数据集为例,目录结构如下图:

├── annotations
│ ├── instances_train.json
│ └── instances_val.json
├── train
│ ├── 0.jpg
│ ├── 1000.jpg
│ ├── 1001.jpg
......
└── val
├── 1111.jpg
├── 1112.jpg
└── 1359.jpg
其中,annatations是存放coco格式json数据的路径,train为训练集的图片路径,val为测试集的图片路径。
这里的文件夹与路径名称是与对应项目的.yml配置文件相匹配的,否则会出现读取不到数据的错误。
4.3 训练模型
简单数据集,直接训练头部即可。
# 考虑到这是一个简单的数据集,训练头部就足够支持拟合了。
python train.py -c 0 -p birdview_vehicles --head_only True --lr 5e-3 --batch_size 32 --load_weights weights/efficientdet-d0.pth  --num_epochs 10 --save_interval 100
#训练一开始损失会很大,不要惊慌,要有耐心,再等一会儿

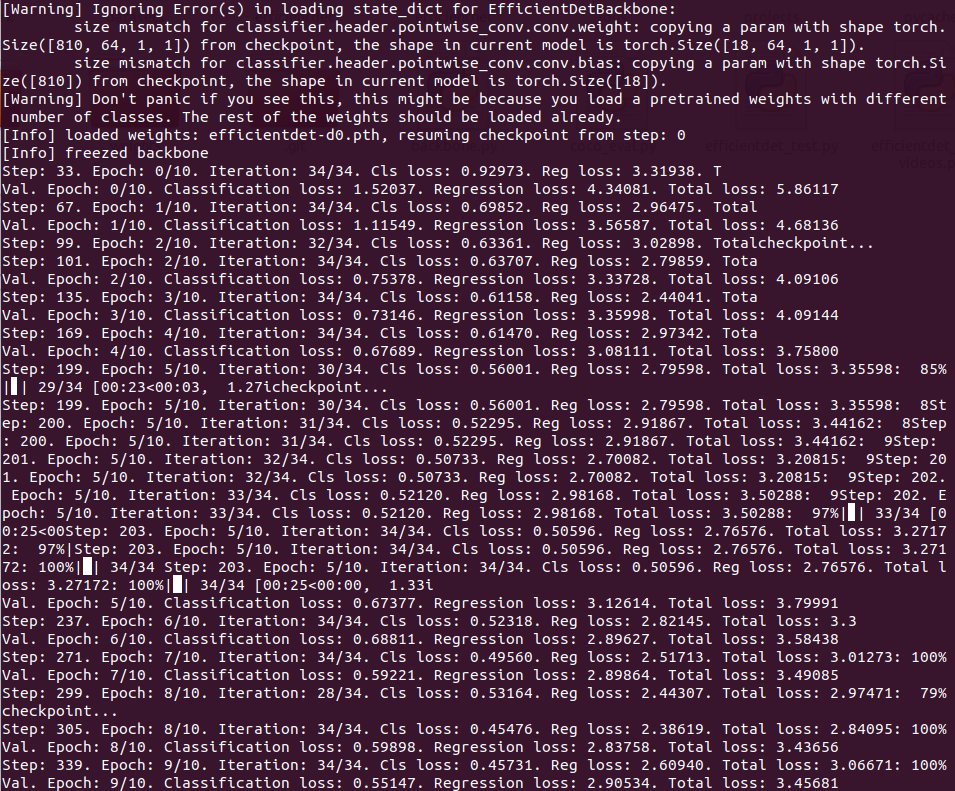
从最后的一次保存的模型文件开始训练,并且不只训练头部,还训练骨干与其他部分。
python train.py -c 0 -p birdview_vehicles --head_only False --lr 1e-3 --batch_size 16 --load_weights last --num_epochs 16 --save_interval 100
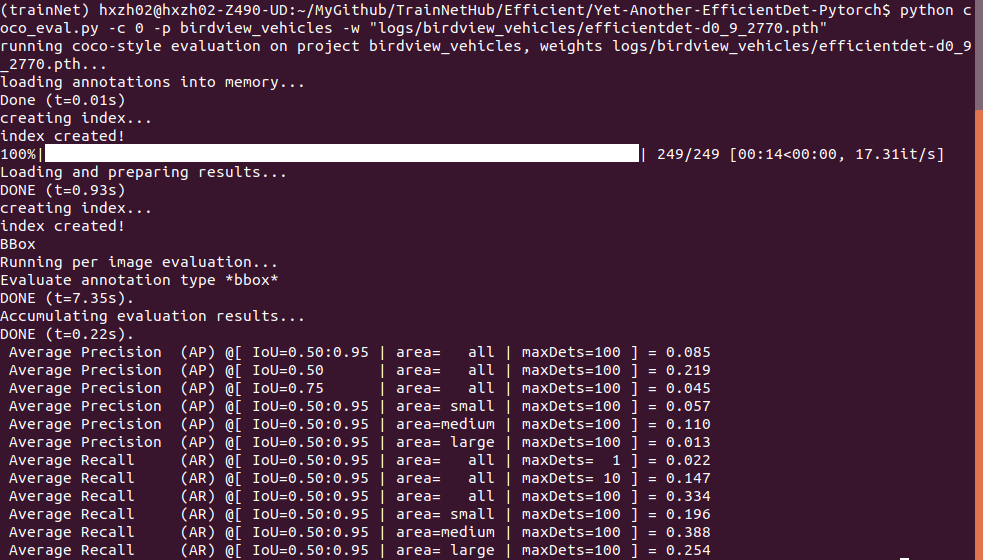
4.4 评估训练结果
训练产生的模型与日志结果,存储在log文件目录下,由于模型是随着Loss下降,精度提高,递进式的产生,因此只需要评估最后一个模型文件即可。
weight_file[-1] = 'efficientdet-d0_9_2770.pth'
python coco_eval.py -c 0 -p birdview_vehicles -w "logs/birdview_vehicles/{weight_file[-1]}"
python coco_eval.py -c 0 -p birdview_vehicles -w "logs/birdview_vehicles/efficientdet-d0_9_2770.pth"
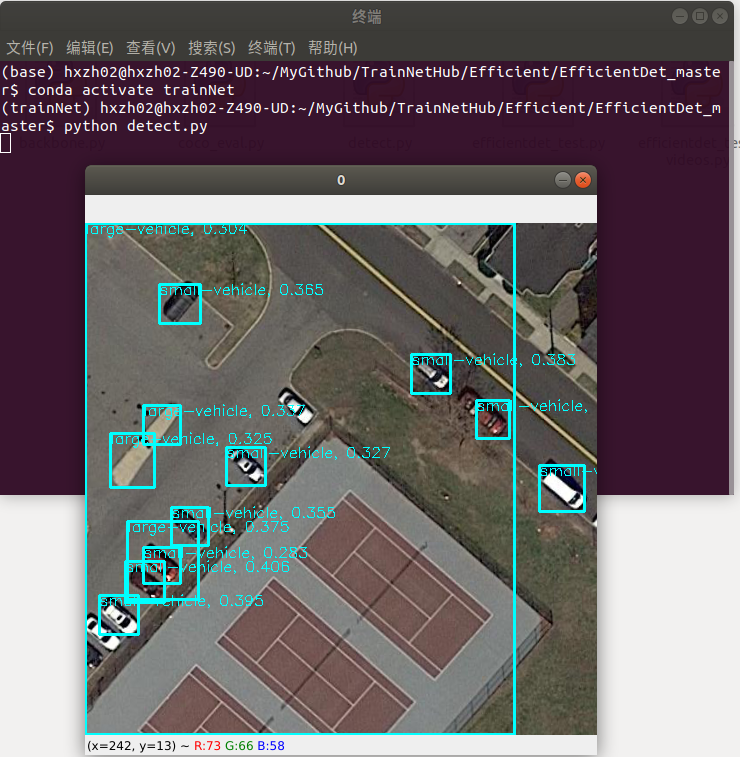
4.5 可视化预测
put images here datasets/your_project_name/val_set_name/*.jpg
put annotations here datasets/your_project_name/annotations/instances_{val_set_name}.json
put weights here /path/to/your/weights/*.pth
python detect.py