不知不觉养成了一个习惯:完成一个工作或学习新知识后,要及时整理,否则过一段时间就忘记了。
下面是用scrapy 爬虫框架读取行政区划的记录
1. SelectorGadget 是个好东西,下载和安装可以网上查
安装后,会在crome浏览器右上角有个图标。


点击 右上角这个图标后,进入css选取模式, (1)点击网页内容,被选取内容显示黄色,同时css选择器会显示在控制面板上。(2)再点击黄色内容,会变红色,表示排除这一项标签。
如图: 表示选取了各省,同时,排除了“京icp备...”
2. 利用scrapy框架爬虫
# -*- coding: utf-8 -*-
import scrapy
from scrapy import Request
from ..items import *
from scrapy import  Request
from scrapy.http import  Request
class JgSpider(scrapy.Spider):
    name = 'jgspider'
    allowed_domains = ['stats.gov.cn']
    start_urls = ['http://www.stats.gov.cn/tjsj/tjbz/tjyqhdmhcxhfdm/2019/index.html']

    def parse(self, response):

        print('begin-----------')
        # 省级
        for node in response.css('.provincetr a'):
            item = Class1_Item()
            item['name']= node.css('a::text').get()
            next_page=node.css('a::attr(href)').get()
            item['code']=next_page.split('.')[0]
            yield item

            if next_page:

                next_page = response.urljoin(next_page)
                yield scrapy.Request(next_page, callback=self.parse2)


    def parse2(self, response):
        # 市级
        for node in response.css('.citytr'):
            item = Class1_Item()
            item['code'] = node.css('a::text').getall()[0]
            item['name'] = node.css('a::text').getall()[1]
            next_page=node.css('a::attr(href)')[0].get()

            yield item
            if next_page:
                next_page = response.urljoin(next_page)
                yield scrapy.Request(next_page, callback=self.parse3)

    def parse3(self, response):
        # 县级
        for node in response.css('tr.countytr'):
            item = Class1_Item()
            if node.css('td::text').get() !=None:
                item['code'] = node.css('td ::text').getall()[0]  # 要提取text,html tag必须探底
                item['name'] = node.css('td ::text').getall()[1]
            else:
                item['code'] = node.css('td a::text').getall()[0]#要提取text,html tag必须探底
                item['name'] = node.css('td a::text').getall()[1]
            yield item

            next_page = node.css('a::attr(href)').get()
            if next_page:
                pass
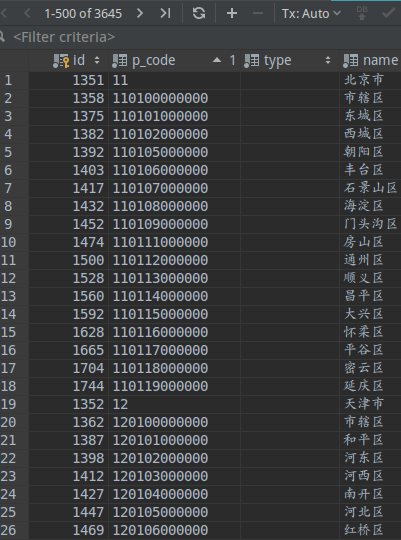
我只爬到区县一级,没再读取乡村镇社区。重要的内容都下载备注。数据如下:
3. 认清本质,快速理解,才能快速上手
参考:https://djangoadventures.com/crawling-pages-with-scrapy/
1.Request & Response
import scrapy

def parse(response):
    # do something with the response
    pass

# making a request with a callback that we've defined above
scrapy.Request('http://example.com', callback=parse)
(1)向 Request 传入url 并发起请求
(2)收到 Response object ,Response作为参数,传入callback函数
(3) A callback is a function which will be invoked by the Request object once the request has finished its job. The result of the request’s job is a Response object which is passed to the callback function. A callback is sometimes called a handler.
Response is basically a string with the HTML code of the page we’ve requeste
Response其实就是html字符串,重点内容是parse这个字符串,提取我们需要的内容
2.Selectors
这是重点内容,我单独开篇:css选择器 https://www.cnblogs.com/lxgbky/p/12697801.html
3.Spider
爬虫主体逻辑,在这里,发起requests、解析 responses. The main method in a Spider class is start_requests.
(1)是爬虫的入口 — when it is invoked, it launches the start_requests function. This function usually contains your initial Request invocations.
(2)callback functions中,可以解析出url,进一步request.
like a tree with a root at start_requests
start_requests
sub requests
requests
requests
sub requests
requests
requests
class ExampleSpider(scrapy.Spider):

    def start_requests(self):
        # invoking initial request
        yield scrapy.Request('http://example.com', self.parse)

    def parse(self, response):
        # parsing response from the initial request
        # collecting links
        links = response.css('a.title::attr(href)').extract()
        for link in links:
            # make a request for each link we've collected
            # the handler is different from the one we had
            # in initial request
            yield scrapy.Request(link, self.parse_page)

    def parse_page(self, response):
        # parsing response from each link
        title = response.css('h1.title::text').extract()
        content = response.css('div.content p').extract()

        # returning structured data for further processing
        yield {'title': title, 'content': content}
框架流程非常共通化,所以可以框架提供了简化写法,如下:
This simple parser scenario is so common that there is a shortcut to reduce the boilerplate. Here’s a reduced example:
class SimpleSpider(scrapy.Spider):
    # those are the initial urls that you used to write
    # in a start_requests method. A request will be invoked
    # for each url in this list
    start_urls = ['http://example.com']

    # this method will be called automatically for each
    # finished request from the start_urls.
    def parse(self, response):
        # you can either parse the response and return the data
        # or you can collect further urls and create additional
        # handlers for them, like we did with parse_page previously
省略了start_requests, 默认的start_requests自动调用start_urls,并回调传参给parse
4. Pipeline
pipeline是最后清理垃圾,保存数据的地方。有3个函数
(1) process_item method which is invoked for each piece of data returned from the spider.
In this function we usually clean the data or save it to a database.
(2) open_spider and close_spider.
方法的使用说明看代码注释
from markparser.storage import get_session, Place
class MarkparserPipeline(object):

def open_spider(self, spider):
    # this method is invoked once the spider
    # is initialized. No requests have been
    # made at this point yet
    self.session = get_session()

def close_spider(self, spider):
    # this method is invoked when the spider
    # is about to exit. All requests have been
    # made already.
    self.session.close()

def process_item(self, item, spider):
    # here we place our item processing logic
    # we can either modify our data and pass it on
    # for further processing or we can save this
    # item to a database and finish the execution
    record = Place(**item)
    self.session.add(record)
    self.session.commit()
    return item
下面是下载行政区划的pipline, 与django结合,使用django的model保存生成的item.
from jgapp.models import Jg

class ScrapyProjectPipeline(object):
    def process_item(self, item, spider):
        try:
            jg = Jg.objects.get(p_code=item['code'])
            print("jg already exist")
            return item
        except Jg.DoesNotExist:
            pass

        jg = Jg()
        jg.p_code = item["code"]
        jg.name = item["name"]
        jg.save()
        return item
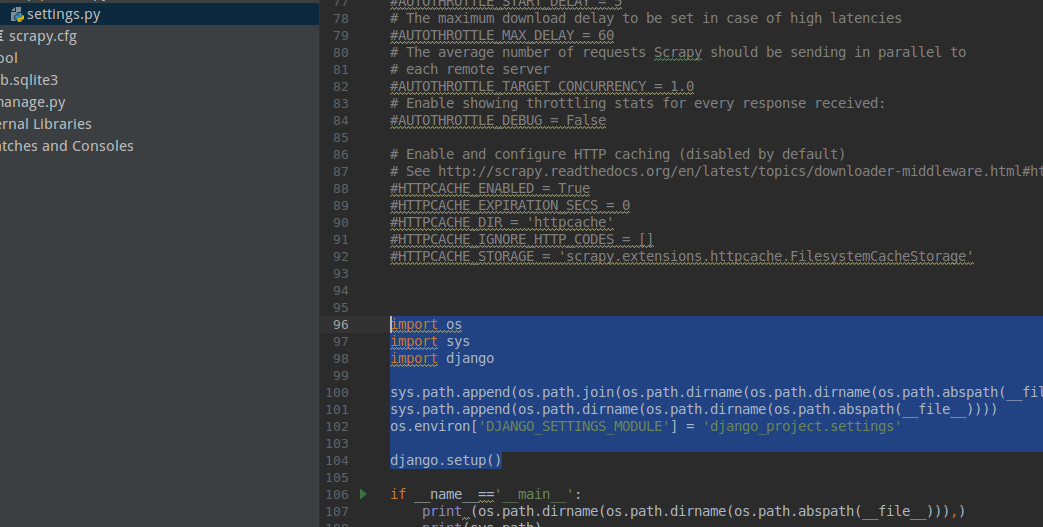
scrapy和django结合的关键是,在scrapy的setting.py中,加入启动django的代码
import os
import sys
import django

sys.path.append(os.path.join(os.path.dirname(os.path.dirname(os.path.abspath(__file__))), ".."))
sys.path.append(os.path.dirname(os.path.dirname(os.path.abspath(__file__))))
os.environ['DJANGO_SETTINGS_MODULE'] = 'django_project.settings'

django.setup()
完!