Silverlight 2 (beta1)数据操作(4)——调用WCF进行数据CRUD操作
目录
- 导言
- 软件需求
- 在SQL 2005中创建数据库
- 在Visual Studio 2008创建Silverlight工程和WCF Service
- 编写WCF Service
- 在Silverlight 2 (beta1)工程中引用WCF
- 在Silverlight中调用WCF进行CRUD操作
- 结语
导言
Silverlight 2支持JSON、Web Service、WCF以及Sockets等新特性对数据CRUD操作,这个系列用实例结合数据库一步一步的图文描述来学习一下Silverlight 2 beta 1中进行数据库的CRUD操作方面的实战能力。
这篇文章介绍如何在Silverlight 2 beta 1中调用WCF进行数据CRUD操作。
软件需求
- Silverlight 2 (beta1)
- Visual Studio 2008
- SQL 2005 Express with Management Studio
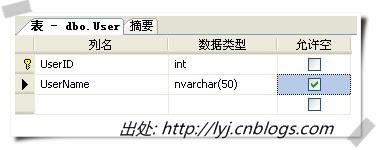
在SQL 2005中创建数据库
创建一个名为User的表,如下图所示。我在第一篇文章中详细介绍了,这一篇我们还需要这张表。
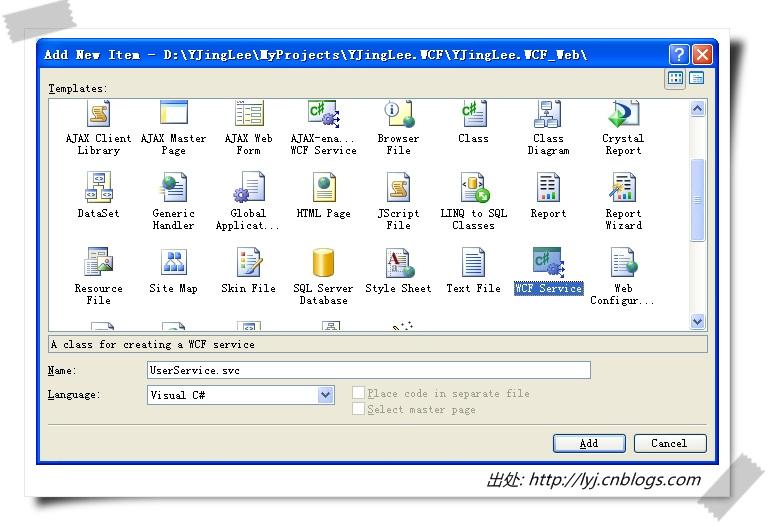
在Visual Studio 2008创建Silverlight工程和WCF Service
第一步:在VS2008中创建一个新的Silverlight工程,命名为:YJingLee.WCF。并选择ASP.NET Web Site用来托管Silverlight应用程序。

第二步:在Web项目中添加一个WCF Service文件,我命名为UserService.svc
编写WCF Service
第一步:定义服务契约。我们为WCF Service提供的增删查改方法定义服务契约。
[ServiceContract]
public interface IUserService
{
    [OperationContract]
    string RetrieveUser();
    [OperationContract]
    bool CreateUser(string userName);
    [OperationContract]
    bool UpdateUser(int userID, string userName);
    [OperationContract]
    bool DeleteUser(int userID);
}
第二步:在UserService中实现服务:为增删查改四个方法具体实现。这里使用SQL语句了,同第一篇类似。
public class UserService : IUserService
{
    //查询用户
    public string RetrieveUser()
    {
        try
        {
            SqlConnection _sqlConnection =
               new SqlConnection( ConfigurationManager.
                ConnectionStrings["sqlConnectionString"].
                ConnectionString);
            _sqlConnection.Open();
            SqlDataAdapter da = new SqlDataAdapter();
            da.SelectCommand = new SqlCommand("SELECT * FROM [User]",
                 _sqlConnection);
            DataSet ds = new DataSet();
            da.Fill(ds);
            StringBuilder sb = new StringBuilder();
            sb.Append("<?xml version=\"1.0\" encoding=\"utf-8\" ?>");
            sb.Append("<Users>");
            foreach (DataRow dr in ds.Tables[0].Rows)
            {
                sb.Append("<User>");
                sb.Append("<UserID>");
                sb.Append(dr[0].ToString());
                sb.Append("</UserID>");
                sb.Append("<UserName>");
                sb.Append(dr[1].ToString());
                sb.Append("</UserName>");
                sb.Append("</User>");
            }
            sb.Append("</Users>");
            _sqlConnection.Close();
            return sb.ToString();
        }
        catch (Exception ex)
        {
            return string.Empty;
        }
    }
    //创建用户
    public bool CreateUser(string userName)
    {
        try
        {
            SqlConnection _sqlConnection =
                new SqlConnection(ConfigurationManager.
                ConnectionStrings["sqlConnectionString"]
                .ConnectionString);
            _sqlConnection.Open();
            SqlCommand command = new SqlCommand();
            command.Connection = _sqlConnection;
            command.CommandType = CommandType.Text;
            command.CommandText = "INSERT INTO [User]
               ([UserName]) VALUES ('" +
                userName.ToString().Replace("'", "''") + "')";
            command.ExecuteNonQuery();
            _sqlConnection.Close();
            return true;
        }
        catch (Exception ex)
        {
            return false;
        }
    }
    //更新用户
    public bool UpdateUser(int userID, string userName)
    {
        try
        {
            SqlConnection _sqlConnection =
                new SqlConnection(ConfigurationManager.
                ConnectionStrings["sqlConnectionString"]
                .ConnectionString);
            _sqlConnection.Open();
            SqlCommand command = new SqlCommand();
            command.Connection = _sqlConnection;
            command.CommandType = CommandType.Text;
            command.CommandText = "UPDATE [User] " +
                "SET [UserName] = '" +
                 userName.ToString().Replace("'", "''") + "'" +
                "WHERE [UserID] = " + userID.ToString();
            command.ExecuteNonQuery();
            _sqlConnection.Close();
            return true;
        }
        catch (Exception ex)
        {
            return false;
        }
    }
    //删除用户
    public bool DeleteUser(int userID)
    {
        try
        {
            SqlConnection _sqlConnection =
                new SqlConnection(ConfigurationManager.
                ConnectionStrings["sqlConnectionString"]
                .ConnectionString);
            _sqlConnection.Open();
            SqlCommand command = new SqlCommand();
            command.Connection = _sqlConnection;
            command.CommandType = CommandType.Text;
            command.CommandText = "DELETE [User] WHERE [UserID] = "
                                  + userID.ToString();
            command.ExecuteNonQuery();
            _sqlConnection.Close();
            return true;
        }
        catch (Exception ex)
        {
            return false;
        }
    }
}
第三步:修改Web.config中的服务配置。
这里使用basicHttpBinding绑定,并且开启httpGetEnabled,以便后面我们可以在浏览器中查看服务。
<system.serviceModel>
    <behaviors>
        <serviceBehaviors>
            <behavior name="UserServiceBehavior">
                <serviceMetadata httpGetEnabled="true"/>
                <serviceDebug includeExceptionDetailInFaults="false"/>
            </behavior>
        </serviceBehaviors>
    </behaviors>
    <services>
        <service behaviorConfiguration="UserServiceBehavior"
                 name="UserService">
            <endpoint address="" binding="basicHttpBinding"
                      contract="IUserService">
            </endpoint>
        </service>
    </services>
</system.serviceModel>
第四步:设置Web应用程序的端口号。
把器端口号设置为固定端口52600,在浏览器中查看服务是否正常:
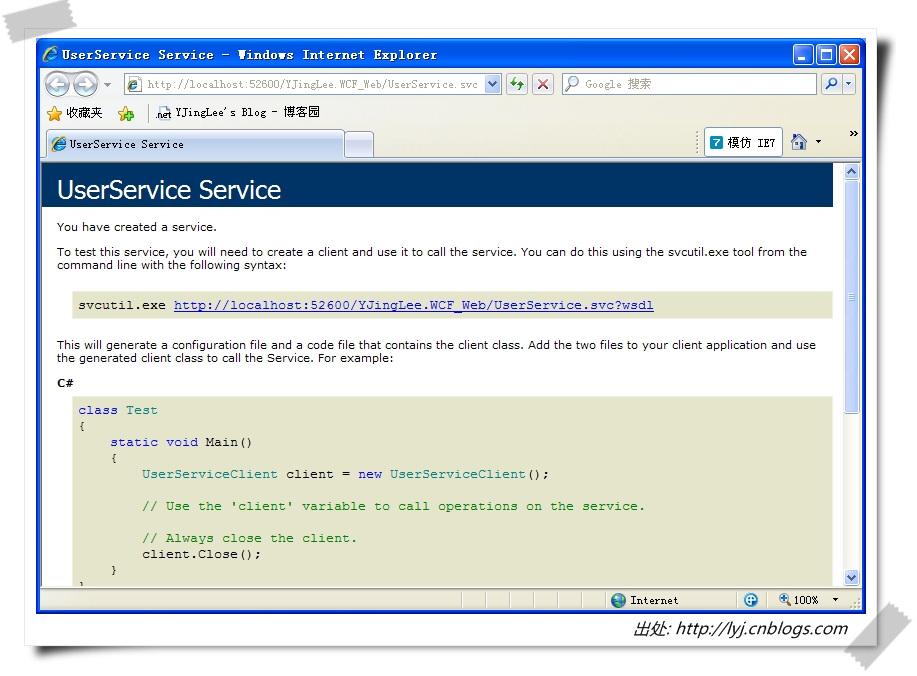
好了,现在服务端我们就实现完成了。
在Silverlight 2 (beta1)工程中引用WCF Service
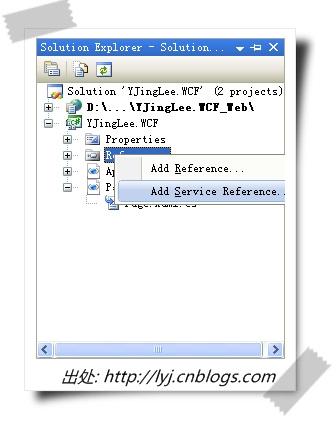
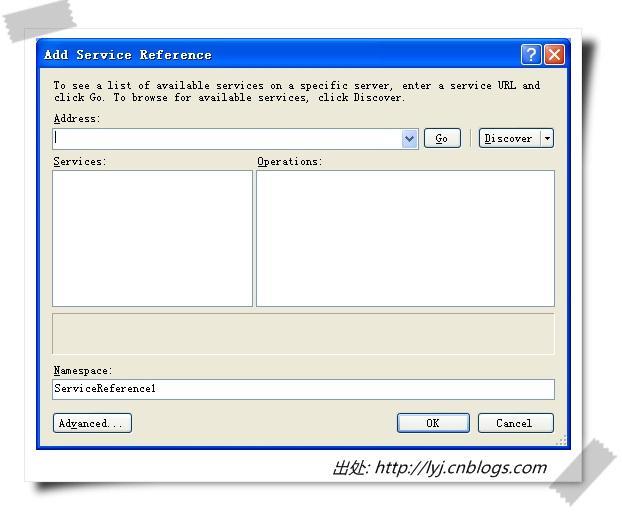
第一步:在Silverlight工程的引用节点上右击选择“Add Service Reference...”。
第二步:在下面的对话框中点击“Discover”按钮
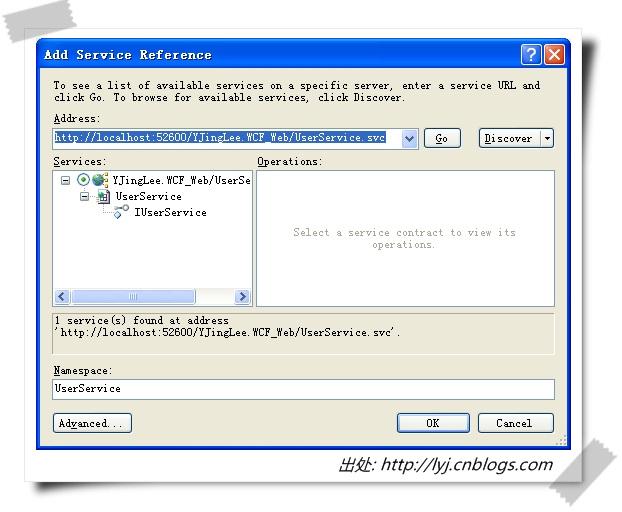
第三步:在点击Discover按钮之后,地址栏里显示了UserService.svc。在Service面板出现一个WCF Service,双击这个服务。修改Namespace为UserService,单击OK。
第四步:添加完成后,在Silverlight工程的ServiceReferences.ClientConfig文件中,我们查看一下,他自动生成了WCF客户端的配置。
<configuration>
    <system.serviceModel>
        <bindings>
            <basicHttpBinding>
                <binding name="BasicHttpBinding_IUserService"
                    maxBufferSize="65536"
                    maxReceivedMessageSize="65536">
                    <security mode="None" />
                </binding>
            </basicHttpBinding>
        </bindings>
        <client>
            <endpoint
                address="http://localhost:52600/YJingLee.WCF_Web/
                                            UserService.svc"
                binding="basicHttpBinding"
                bindingConfiguration="BasicHttpBinding_IUserService"
                contract="YJingLee.WCF.UserService.IUserService"
                name="BasicHttpBinding_IUserService" />
        </client>
    </system.serviceModel>
</configuration>
现在,我们可以在Silverlight工程中调用WCF Service了。
在Silverlight中调用WCF进行CRUD操作
由于在WCF服务的配置中我们采取了BasicHttpBinding,客户端也要采用BasicHttpBinding。所以我们先定义一个全局变量:
UserService.UserServiceClient userSvcClient;
然后在Page()方法中,我们调用这个服务,免得每次在各个方法中调用。
userSvcClient = new YJingLee.WCF.UserService.UserServiceClient();
这里,我直接这样写了,没有添加任何参数,原因很简单,在ServiceReferences.ClientConfig文件中,VS自动生成了WCF客户端的配置。当然你也可以这样写,两者选其一:
BasicHttpBinding binding = new BasicHttpBinding();
EndpointAddress endPoint = new EndpointAddress(
    "http://localhost:52600/YJingLee.WCF_Web/UserService.svc");
userClient =
  new YJingLee.WCF.UserService.UserServiceClient(binding, endPoint);
1.创建数据
编写调用服务并创建数据,这里采用异步模式,我们需要注册CreateUserCompleted事件处理方法,以便完成后回调,同时调用CreateUserAsync()方法创建用户。
void createButton_Click(object sender, RoutedEventArgs e)
{
    //模拟一个用户
    string userName = "YJingLee";
    //注册CreateUserCompleted事件
    userSvcClient.CreateUserCompleted +=
        new EventHandler<YJingLee.WCF.UserService.
        CreateUserCompletedEventArgs>
        (userSvcClient_CreateUserCompleted);
    //调用CreateUserAsync()方法创建用户
    userSvcClient.CreateUserAsync(userName);
}
void userSvcClient_CreateUserCompleted(object sender,
    YJingLee.WCF.UserService.CreateUserCompletedEventArgs e)
{
    //完成CreateUserAsync()方法后回调,这里象征性的提示是否完成
    if (e.Error == null)
    {
        errMessage.Text = "创建用户成功!";
        errMessage.Visibility = Visibility.Visible;
    }
    else
    {
        errMessage.Text = e.Error.ToString();
        errMessage.Visibility = Visibility.Visible;
    }
}
2.读取数据
同创建数据类似,调用服务并读取数据。
void retrieveButton_Click(object sender, RoutedEventArgs e)
{
    //注册RetrieveUserCompleted事件
    userSvcClient.RetrieveUserCompleted +=
        new EventHandler<YJingLee.WCF.UserService.
        RetrieveUserCompletedEventArgs>
        (userSvcClient_RetrieveUserCompleted);
    //调用RetrieveUserAsync()方法查询用户
    userSvcClient.RetrieveUserAsync();
}
void userSvcClient_RetrieveUserCompleted(object sender,
    YJingLee.WCF.UserService.RetrieveUserCompletedEventArgs e)
{
    //调用成功,显示数据
    if (e.Error == null)
        displayData(e.Result);
}
显示数据方法:
private void displayData(string xmlContent)
{
    try
    {
        if (xmlContent != string.Empty)
        {
            XDocument xmlUsers = XDocument.Parse(xmlContent);
            var users = from user in xmlUsers.Descendants("User")
                        select new
                        {
                          UserID = Convert.ToInt32(
                              user.Element("UserID").Value),
                          UserName =
                          (string)user.Element("UserName").Value
                        };
            List<User> usersList = new List<User>();
            foreach (var u in users)
            {
                User use = new User
                   { UserID = u.UserID, UserName = u.UserName };
                usersList.Add(use);
            }
            UserList.ItemsSource = usersList;
        }
        else
        {
            UserList.ItemsSource = null;
        }
    }
    catch (Exception ex)
    {

        Console.Write(ex.Message);
    }
}
3.更新数据
这里,我们模拟更新UserID为7的用户,修改这个用户的UserName为YJingLee。
void updateButton_Click(object sender, RoutedEventArgs e)
{
    //模拟更新userID为7的用户
    int userID = 7;
    string userName = "YJingLee";
    userSvcClient.UpdateUserCompleted +=
       new EventHandler<YJingLee.WCF.UserService.
       UpdateUserCompletedEventArgs>
       (userSvcClient_UpdateUserCompleted);
    userSvcClient.UpdateUserAsync(userID, userName);
}
void userSvcClient_UpdateUserCompleted(object sender,
    YJingLee.WCF.UserService.UpdateUserCompletedEventArgs e)
{
    if (e.Error == null)
    {
        errMessage.Text = "更新用户成功!";
        errMessage.Visibility = Visibility.Visible;
    }
    else
    {
        errMessage.Text = e.Error.ToString();
        errMessage.Visibility = Visibility.Visible;
    }
}
4.删除数据
我在这里指定UserID为7的用户。
void deleteButton_Click(object sender, RoutedEventArgs e)
{
    //模拟删除userID为7的用户
    int userID = 7;
    userSvcClient.DeleteUserCompleted +=
       new EventHandler<YJingLee.WCF.UserService.
       DeleteUserCompletedEventArgs>
       (userSvcClient_DeleteUserCompleted);
    userSvcClient.DeleteUserAsync(userID);
}
void userSvcClient_DeleteUserCompleted(object sender,
    YJingLee.WCF.UserService.DeleteUserCompletedEventArgs e)
{
    if (e.Error == null)
    {
        errMessage.Text = "删除用户成功!";
        errMessage.Visibility = Visibility.Visible;
    }
    else
    {
        errMessage.Text = e.Error.ToString();
        errMessage.Visibility = Visibility.Visible;
    }
}
结语
Silverlight应用程序的后端数据库操作有很多技术可以实现,像LINQ to SQL、Entity Framework、ADO.NET Data Services(Astoria )、ASP.NET Web Service(ASMX)。 这一篇使用基本的SQL语句,然后在服务层调用WCF技术实现,本来打算不写的,但是在InfoQ看到Silverlight 2中文学习资源集萃的推荐,我发现在数据库这块就手把这些知识掌握一下。
这篇就介绍到这里。从这篇我们知道了如何在Silverlight 2 beta 1中调用WCF进行数据CRUD操作。