---恢复内容开始---
一、介绍
企业自用, 到证书机构签发证书的费用和时间等都可以省下.....
SSl证书的背景功用.......(省略万字,不废话)
可以参考:
开源的可视化管理工具 :)
https://github.com/chris2511/xca
二、创建CA根
1.创建 Root CA
创建 root 文件夹, 在root文件夹上级建立配置文件 openssl.cnf
a.创建 root 密钥
命令:
openssl genrsa -des3 -out root/private.pem 4096
然后要输入 密码, 用以保护 私钥.

b.创建自签名证书
命令:
openssl req -x509 -new -key root/private.pem -out root/root.crt -days 36500 -config ../openssl.cnf
输入上一步密钥的密码 , 然后填写要签名的各个项目 (直接回车使用默认信息, 输入`.`(英文句号)此项留空不填信息)
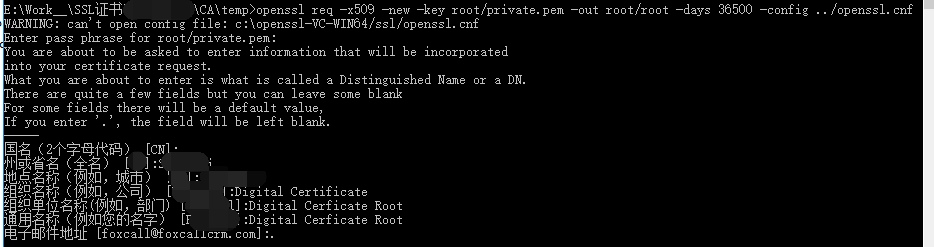
至此,自签名证书就生成好了.
c.创建要颁发证书时要用到的文件和文件夹 (这些 都在 openssl.cnf 里配置的)
index.txt OpenSSL在创建自签证书时会向该文件里写下索引
database.txt OpenSSL会模拟数据库将一些敏感信息写在该文件里
serial.txt 创建该文件后,请编辑在第一行写下 01
new_certs 文件夹,openssl 自动备份签发的证书的文件夹
三、创建中间CA证书
创建 ca 文件夹, 重复上面的操作.
这里仍然需要将创建root CA用的配置文件拷贝到中间CA证书目录下,该配置文件在生成CSR文件和以后签发client文件时都要用到
1.创建私钥
openssl genrsa -des3 -out ca/private.pem 2048
输入保护密钥的密码

2.创建自签名证书
openssl req -new -x509 -key ca/private.pem -out ca/cert.crt -config openssl.cnf
密钥的密码 , 填写要签名的各个项目 (直接回车使用默认信息, 输入`.`(英文句号)此项留空不填信息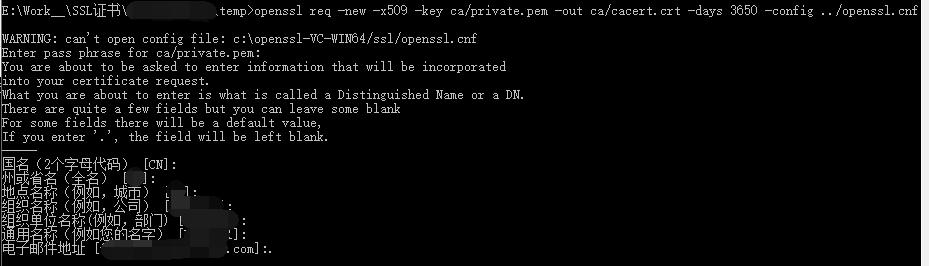
"A challenge password" 不用填,
"An optional company name" 可以填一下.
要注意的是, 这些字段要与root证书一样,不然不能通过:
stateOrProvinceName 州或省名
organizationName 组织单位名称
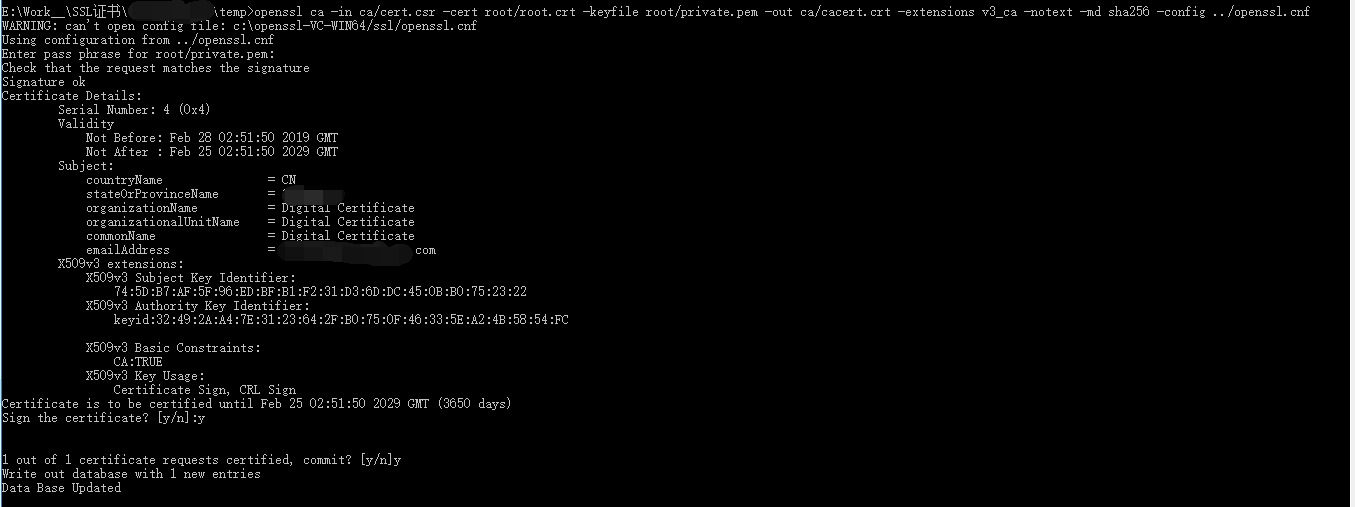
3.用 root 证书对证书请求文件签名
openssl ca -ss_cert ca/cert.crt -cert root/root.crt -keyfile root/private.pem -out ca/cacert.crt -config openssl.cnf
openssl x509 -req -in ca/cert.csr -CA root/root.crt -CAkey root/private.pem -out ca/cacert.crt -days 3650 -set_serial 03 -extfile v3.ext
openssl ca -in ca/cert.csr -cert root/root.crt -keyfile root/private.pem -out ca/cacert.crt -extensions v3_ca -notext -md sha256 -config openssl.cnf
最后把 root CA 的证书 和 中间CA证书 合并, (就是 简单的放到一个文件中就行了)
copy cacacert.crt + root
oot.crt ca_chain.crt
https 握手, 服务器会先验证证书中的第一个, 无法验证信任就会验证其上一级(就是证书里面的第二个)第二个无法验证就继续验证第三个...直到root证书,如果root证书可信任, 这个证书链就是可信任的了
四、颁发证书
颁发证书之前, 被颁发的证书需要 生成自己的私钥和证书请求文件
1.生成域名的私钥
openssl genrsa -out mydomain.key 2048
2.用此私钥生成证书请求文件
openssl req -new -key mydomain.pem -out mydomain.csr -days 365 -config openssl.cnf
填写请求签名的信息
Common Name 可以填写域名('xxx.com' 或'*.xxx.com'等), 就是颁发域名证书了
3.也可以用一条命令同时生成私钥和证书请求文件
openssl req -new -keyout mydomain.pem -out mydomain.csr -config openssl.cnf
同样需要填写信息
3.查看证书请求内容
openssl req -in client.req -noout -text -subject
4.使用CA证书对证书请求文件签名,生成颁发的证书
openssl ca -in mydomain.csr -cert ca/cacert.pem -keyfile ca/cakey.pem -out mydomain.crt -config openssl.cnf
将私钥和证书转换成 .pfx 格式(iis等使用)
openssl pkcs12 -export -inkey server.key -in server.crt -out server.pfx
五、附配置


################################################################
# openssl example configuration file.
# This is mostly used for generation of certificate requests.
#################################################################

[default]          # The default ca section
name = root        # 自定义变量(可以放在开头也可以放在中间), 使用方式: $name , ${name}
default_ca = CA_default
name_opt = CA_default
cert_opt = CA_default

#################################################################

[ CA_default ]
dir=.                            # 自定义变量(可以放在开头也可以放在中间), 使用方式: $dir , ${dir}
                                 # 这是第一个openssl目录结构中的目录
certs=$dir                       # Where the issued certs are kept(已颁发的证书路径,即CA或自签的)
                                 # 这是第二个openssl目录结构中的目录,但非必须
crl_dir= $dir/crl                # Where the issued crl are kept(已颁发的crl存放目录)
                                 # 这是第三个openssl目录结构中的目录
database= $dir/index.txt         # database index file
#unique_subject = no             # 设置为yes则database文件中的subject列不能出现重复值
                                 # 即不能为subject相同的证书或证书请求签名
                                 # 建议设置为no,但为了保持老版本的兼容性默认是yes
new_certs_dir= $dir/new_certs    # default place for new certs(将来颁发的证书存放路径)
                                 # 这是第四个openssl目录结构中的目录
serial= $dir/serial.txt          # The current serial number(提供序列号的文件,如:创建收输入`01`)
crl= $dir/crl.pem                # The current CRL当前crl序列号)
private_key= $dir/CA/private.key # The private key(签名时需要的私钥,即CA自己的私钥)
certificate=$dir/CA/$name        # The CA certificate(CA自己的证书文件)
RANDFILE= $dir/.rand             # private random number file(提供随机数种子的文件)
x509_extensions = usr_cert       # The extentions to add to the cert(添加到证书中的扩展项)
## 以下两行是关于证书展示格式的,虽非必须项,但推荐设置。一般就如下格式不用修改
name_opt    = ca_default         # Subject Name options
cert_opt    = ca_default         # Certificate field options
## 以下是copy_extensions扩展项,需谨慎使用
# copy_extensions = copy         # 生成证书时扩展项的copy行为,可设置为none/copy/copyall
                                 # 不设置该name时默认为none
                                 # 建议简单使用时设置为none或不设置,且强烈建议不要设置为copyall
# crl_extensions    = crl_ext
default_days= 3650               # how long to certify for(默认的证书有效期)
default_crl_days= 30             # how long before next CRL(CRL的有效期)
default_md= sha256               # which message digest to use(默认摘要算法)
preserve= no                     # keep passed DN ordering(Distinguished Name顺序,一般设置为no
                                 # 设置为yes仅为了和老版本的IE兼容

# A few different ways of specifying how closely the request should
# conform to the details of the CA

policy= policy_match             # For the CA policy(证书匹配策略,此处表示引用[ policy_match ]的策略)

[ policy_match ]
countryName= match               # match 表示请求中填写的该字段信息要和CA证书中的匹配
stateOrProvinceName= optional
organizationName= optional
organizationalUnitName= optional # optional表示该字段信息可提供可不提供
commonName= supplied             # supplied表示该字段信息必须提供
emailAddress= optional

# For the `anything' policy
# At this point in time, you must list all acceptable `object'
# types
# 以下是没被引用的策略扩展,只要是没被引用的都是被忽略的
[ policy_anything ]
countryName = optional
stateOrProvinceName= optional
localityName= optional
organizationName = optional
organizationalUnitName = optional
commonName= supplied
emailAddress= optional

# 以下是添加的扩展项usr_cert的内容*/
[ usr_cert ]
basicConstraints=critical,CA:TRUE,pathlen:2         # 基本约束,CA:FALSE表示颁发的证书不能作为CA证书,即不能给其他人颁发证书
keyUsage = critical,keyCertSign,cRLSign,digitalSignature,nonRepudiation,keyEncipherment,dataEncipherment  # 指定证书的目的,也就是限制证书的用法用途
#subjectAltName=email:copy,email:my@other.address  #这个参数很重要,现在被很多地方用来签署多域名证书,但它除了DNS,还可指定email, IP,DN等
## 除了上面两个扩展项可能会修改下,其余的扩展项别管了,如下面的
nsComment  = "OpenSSL Generated Certificate"
subjectKeyIdentifier=hash
authorityKeyIdentifier=keyid,issuer

##  req相关的段
[ req ]
default_bits = 2048                             # 生成证书请求时用到的私钥的密钥长度
default_md = sha256                             # 证书请求签名时的单向加密算法
default_keyfile= privkey.pem                    # 默认新创建的私钥存放位置,
                                                # 如-new选项没指定-key时会自动创建私钥
                                                # -newkey选项也会自动创建私钥
distinguished_name  = req_distinguished_name    # 可识别的字段名(常被简称为DN)
                                                # 引用req_distinguished_name段的设置
x509_extensions = v3_ca                         # 加入到自签证书中的扩展项
#req_extensions = v3_req                        # 加入到证书请求中的扩展项
attributes  = req_attributes                    # 证书请求的属性,引用req_attributes段的设置,可以不设置它
encrypt_key = no                                # 自动生成的私钥文件要加密否?一般设置no,和-nodes选项等价
## 输入和输出私钥文件的密码,如果该私钥文件有密码,不写该设置则会提示输入
#input_password = secret
#output_password = secret
#prompt = yes | no              # 设置为no将不提示输入DN field,而是直接从配置文件中读取,需要同时设置DN默认值,否则创建证书请求时将出错
utf8 = yes
string_mask = utf8only

[ req_distinguished_name ]
## 以下项均可指定可不指定,但ca段的policy中指定为match和supplied一定要指定
## 以下选项都可以自定义,如countryName = C,commonName = CN
countryName= 国名(C)(2个字母代码)            # 国家名(C)
countryName_default = "CN"                   # 默认的国家名
countryName_min= 2                           # 填写的国家名的最小字符长度
countryName_max = 2                          # 填写的国家名的最大字符长度
stateOrProvinceName= 省/州名(S)(全名)       # 省份(S)
stateOrProvinceName_default = "SH"
localityName = 城市/地点名称(LT)              # 城市(LT)
localityName_default = "SH"
organizationName = 公司/组织名称(ON)          # 公司(ON)
organizationName_default = "Foxcall"
organizationalUnitName  = 部门/单位名称(OU)   # 部门(OU)
organizationalUnitName_default = "Foxcall"
## 以下的commonName(CN)一般必须给,如果作为CA,那么需要在ca的policy中定义CN = supplied
## CN定义的是将要申请SSL证书的域名或子域名或主机名。
## 例如要为zhonghua.com申请ssl证书则填写zhonghua.com,而不能填写www.zhonghua.com
## 要为www.zhonghua.com申请SSL则填写www.zhonghua.com
## CN必须和将要访问的网站地址一样,否则访问时就会给出警告
## 该项要填写正确,否则该请求被签名后证书中的CN与实际环境中的CN不对应,将无法提供证书服务
commonName = 域名/主机名称(CN)                # 主机名(CN)
commonName_max = 64
commonName_default = "Foxcall"
emailAddress = 电子邮件地址(E)                # Email地址,很多时候不需要该项
emailAddress_max = 40
emailAddress_default = "foxcall@foxcallcrm.com"

[ req_attributes ]   # 该段是为了某些特定软件的运行需要而设定的
                     # 现在一般都不需要提供challengepassword
                     # 所以该段几乎用不上
                     # 所以不用管这段
challengePassword = A challenge password
challengePassword_min = 4
challengePassword_max = 20
unstructuredName = An optional company name
[ v3_req ]
## Extensions to add to a certificate request
basicConstraints = critical,CA:true
keyUsage = critical,keyCertSign,cRLSign  # nonRepudiation, digitalSignature, keyEncipherment
subjectKeyIdentifier=hash
[ v3_ca ]
## Extensions for a typical CA
subjectKeyIdentifier=hash
authorityKeyIdentifier=keyid:always,issuer
basicConstraints = CA:true
keyUsage = cRLSign, keyCertSign  # 典型的CA证书的使用方法设置,由于测试使用所以注释了
                                   # 如果真的需要申请为CA, 么该设置可以如此配置
好了, 做个记录
---恢复内容开始---
一、介绍
企业自用, 到证书机构签发证书的费用和时间等都可以省下.....
SSl证书的背景功用.......(省略万字,不废话)
可以参考:
二、创建CA根
1.创建 Root CA
创建 root 文件夹, 在root文件夹上级建立配置文件 openssl.cnf
a.创建 root 密钥
命令:
openssl genrsa -des3 -out root/private.pem 4096
然后要输入 密码, 用以保护 私钥.
b.创建自签名证书
命令:
openssl req -x509 -new -key root/private.pem -out root/root.crt -days 36500 -config ../openssl.cnf
输入上一步密钥的密码 , 然后填写要签名的各个项目 (直接回车使用默认信息, 输入`.`(英文句号)此项留空不填信息)
至此,自签名证书就生成好了.
c.创建要颁发证书时要用到的文件和文件夹 (这些 都在 openssl.cnf 里配置的)
index.txt OpenSSL在创建自签证书时会向该文件里写下索引
database.txt OpenSSL会模拟数据库将一些敏感信息写在该文件里
serial.txt 创建该文件后,请编辑在第一行写下 01
new_certs 文件夹,openssl 自动备份签发的证书的文件夹
三、创建中间CA证书
创建 ca 文件夹, 重复上面的操作.
这里仍然需要将创建root CA用的配置文件拷贝到中间CA证书目录下,该配置文件在生成CSR文件和以后签发client文件时都要用到
1.创建私钥
openssl genrsa -des3 -out ca/private.pem 2048
输入保护密钥的密码
2.创建自签名证书
openssl req -new -x509 -key ca/private.pem -out ca/cert.crt -config openssl.cnf
密钥的密码 , 填写要签名的各个项目 (直接回车使用默认信息, 输入`.`(英文句号)此项留空不填信息
"A challenge password" 不用填,
"An optional company name" 可以填一下.
要注意的是, 这些字段要与root证书一样,不然不能通过:
stateOrProvinceName 州或省名
organizationName 组织单位名称
3.用 root 证书对证书请求文件签名
openssl ca -ss_cert ca/cert.crt -cert root/root.crt -keyfile root/private.pem -out ca/cacert.crt -config openssl.cnf
openssl x509 -req -in ca/cert.csr -CA root/root.crt -CAkey root/private.pem -out ca/cacert.crt -days 3650 -set_serial 03 -extfile v3.ext
openssl ca -in ca/cert.csr -cert root/root.crt -keyfile root/private.pem -out ca/cacert.crt -extensions v3_ca -notext -md sha256 -config openssl.cnf
最后把 root CA 的证书 和 中间CA证书 合并, (就是 简单的放到一个文件中就行了)
copy cacacert.crt + root
oot.crt ca_chain.crt
https 握手, 服务器会先验证证书中的第一个, 无法验证信任就会验证其上一级(就是证书里面的第二个)第二个无法验证就继续验证第三个...直到root证书,如果root证书可信任, 这个证书链就是可信任的了
四、颁发证书
颁发证书之前, 被颁发的证书需要 生成自己的私钥和证书请求文件
1.生成域名的私钥
openssl genrsa -out mydomain.key 2048
2.用此私钥生成证书请求文件
openssl req -new -key mydomain.pem -out mydomain.csr -days 365 -config openssl.cnf
填写请求签名的信息
Common Name 可以填写域名('xxx.com' 或'*.xxx.com'等), 就是颁发域名证书了
3.也可以用一条命令同时生成私钥和证书请求文件
openssl req -new -keyout mydomain.pem -out mydomain.csr -config openssl.cnf
同样需要填写信息
3.查看证书请求内容
openssl req -in client.req -noout -text -subject
4.使用CA证书对证书请求文件签名,生成颁发的证书
openssl ca -in mydomain.csr -cert ca/cacert.pem -keyfile ca/cakey.pem -out mydomain.crt -config openssl.cnf
将私钥和证书转换成 .pfx 格式(iis等使用)
openssl pkcs12 -export -inkey server.key -in server.crt -out server.pfx
五、附配置
################################################################
# openssl example configuration file.
# This is mostly used for generation of certificate requests.
#################################################################

[default]          # The default ca section
name = root        # 自定义变量(可以放在开头也可以放在中间), 使用方式: $name , ${name}
default_ca = CA_default
name_opt = CA_default
cert_opt = CA_default

#################################################################

[ CA_default ]
dir=.                            # 自定义变量(可以放在开头也可以放在中间), 使用方式: $dir , ${dir}
                                 # 这是第一个openssl目录结构中的目录
certs=$dir                       # Where the issued certs are kept(已颁发的证书路径,即CA或自签的)
                                 # 这是第二个openssl目录结构中的目录,但非必须
crl_dir= $dir/crl                # Where the issued crl are kept(已颁发的crl存放目录)
                                 # 这是第三个openssl目录结构中的目录
database= $dir/index.txt         # database index file
#unique_subject = no             # 设置为yes则database文件中的subject列不能出现重复值
                                 # 即不能为subject相同的证书或证书请求签名
                                 # 建议设置为no,但为了保持老版本的兼容性默认是yes
new_certs_dir= $dir/new_certs    # default place for new certs(将来颁发的证书存放路径)
                                 # 这是第四个openssl目录结构中的目录
serial= $dir/serial.txt          # The current serial number(提供序列号的文件,如:创建收输入`01`)
crl= $dir/crl.pem                # The current CRL当前crl序列号)
private_key= $dir/CA/private.key # The private key(签名时需要的私钥,即CA自己的私钥)
certificate=$dir/CA/$name        # The CA certificate(CA自己的证书文件)
RANDFILE= $dir/.rand             # private random number file(提供随机数种子的文件)
x509_extensions = usr_cert       # The extentions to add to the cert(添加到证书中的扩展项)
## 以下两行是关于证书展示格式的,虽非必须项,但推荐设置。一般就如下格式不用修改
name_opt    = ca_default         # Subject Name options
cert_opt    = ca_default         # Certificate field options
## 以下是copy_extensions扩展项,需谨慎使用
# copy_extensions = copy         # 生成证书时扩展项的copy行为,可设置为none/copy/copyall
                                 # 不设置该name时默认为none
                                 # 建议简单使用时设置为none或不设置,且强烈建议不要设置为copyall
# crl_extensions    = crl_ext
default_days= 3650               # how long to certify for(默认的证书有效期)
default_crl_days= 30             # how long before next CRL(CRL的有效期)
default_md= sha256               # which message digest to use(默认摘要算法)
preserve= no                     # keep passed DN ordering(Distinguished Name顺序,一般设置为no
                                 # 设置为yes仅为了和老版本的IE兼容

# A few different ways of specifying how closely the request should
# conform to the details of the CA

policy= policy_match             # For the CA policy(证书匹配策略,此处表示引用[ policy_match ]的策略)

[ policy_match ]
countryName= match               # match 表示请求中填写的该字段信息要和CA证书中的匹配
stateOrProvinceName= optional
organizationName= optional
organizationalUnitName= optional # optional表示该字段信息可提供可不提供
commonName= supplied             # supplied表示该字段信息必须提供
emailAddress= optional

# For the `anything' policy
# At this point in time, you must list all acceptable `object'
# types
# 以下是没被引用的策略扩展,只要是没被引用的都是被忽略的
[ policy_anything ]
countryName = optional
stateOrProvinceName= optional
localityName= optional
organizationName = optional
organizationalUnitName = optional
commonName= supplied
emailAddress= optional

# 以下是添加的扩展项usr_cert的内容*/
[ usr_cert ]
basicConstraints=critical,CA:TRUE,pathlen:2         # 基本约束,CA:FALSE表示颁发的证书不能作为CA证书,即不能给其他人颁发证书
keyUsage = critical,keyCertSign,cRLSign,digitalSignature,nonRepudiation,keyEncipherment,dataEncipherment  # 指定证书的目的,也就是限制证书的用法用途
#subjectAltName=email:copy,email:my@other.address  #这个参数很重要,现在被很多地方用来签署多域名证书,但它除了DNS,还可指定email, IP,DN等
## 除了上面两个扩展项可能会修改下,其余的扩展项别管了,如下面的
nsComment  = "OpenSSL Generated Certificate"
subjectKeyIdentifier=hash
authorityKeyIdentifier=keyid,issuer

##  req相关的段
[ req ]
default_bits = 2048                             # 生成证书请求时用到的私钥的密钥长度
default_md = sha256                             # 证书请求签名时的单向加密算法
default_keyfile= privkey.pem                    # 默认新创建的私钥存放位置,
                                                # 如-new选项没指定-key时会自动创建私钥
                                                # -newkey选项也会自动创建私钥
distinguished_name  = req_distinguished_name    # 可识别的字段名(常被简称为DN)
                                                # 引用req_distinguished_name段的设置
x509_extensions = v3_ca                         # 加入到自签证书中的扩展项
#req_extensions = v3_req                        # 加入到证书请求中的扩展项
attributes  = req_attributes                    # 证书请求的属性,引用req_attributes段的设置,可以不设置它
encrypt_key = no                                # 自动生成的私钥文件要加密否?一般设置no,和-nodes选项等价
## 输入和输出私钥文件的密码,如果该私钥文件有密码,不写该设置则会提示输入
#input_password = secret
#output_password = secret
#prompt = yes | no              # 设置为no将不提示输入DN field,而是直接从配置文件中读取,需要同时设置DN默认值,否则创建证书请求时将出错
utf8 = yes
string_mask = utf8only

[ req_distinguished_name ]
## 以下项均可指定可不指定,但ca段的policy中指定为match和supplied一定要指定
## 以下选项都可以自定义,如countryName = C,commonName = CN
countryName= 国名(C)(2个字母代码)            # 国家名(C)
countryName_default = "CN"                   # 默认的国家名
countryName_min= 2                           # 填写的国家名的最小字符长度
countryName_max = 2                          # 填写的国家名的最大字符长度
stateOrProvinceName= 省/州名(S)(全名)       # 省份(S)
stateOrProvinceName_default = "SH"
localityName = 城市/地点名称(LT)              # 城市(LT)
localityName_default = "SH"
organizationName = 公司/组织名称(ON)          # 公司(ON)
organizationName_default = "Foxcall"
organizationalUnitName  = 部门/单位名称(OU)   # 部门(OU)
organizationalUnitName_default = "Foxcall"
## 以下的commonName(CN)一般必须给,如果作为CA,那么需要在ca的policy中定义CN = supplied
## CN定义的是将要申请SSL证书的域名或子域名或主机名。
## 例如要为zhonghua.com申请ssl证书则填写zhonghua.com,而不能填写www.zhonghua.com
## 要为www.zhonghua.com申请SSL则填写www.zhonghua.com
## CN必须和将要访问的网站地址一样,否则访问时就会给出警告
## 该项要填写正确,否则该请求被签名后证书中的CN与实际环境中的CN不对应,将无法提供证书服务
commonName = 域名/主机名称(CN)                # 主机名(CN)
commonName_max = 64
commonName_default = "Foxcall"
emailAddress = 电子邮件地址(E)                # Email地址,很多时候不需要该项
emailAddress_max = 40
emailAddress_default = "foxcall@foxcallcrm.com"

[ req_attributes ]   # 该段是为了某些特定软件的运行需要而设定的
                     # 现在一般都不需要提供challengepassword
                     # 所以该段几乎用不上
                     # 所以不用管这段
challengePassword = A challenge password
challengePassword_min = 4
challengePassword_max = 20
unstructuredName = An optional company name
[ v3_req ]
## Extensions to add to a certificate request
basicConstraints = critical,CA:true
keyUsage = critical,keyCertSign,cRLSign  # nonRepudiation, digitalSignature, keyEncipherment
subjectKeyIdentifier=hash
[ v3_ca ]
## Extensions for a typical CA
subjectKeyIdentifier=hash
authorityKeyIdentifier=keyid:always,issuer
basicConstraints = CA:true
keyUsage = cRLSign, keyCertSign  # 典型的CA证书的使用方法设置,由于测试使用所以注释了
                                   # 如果真的需要申请为CA, 么该设置可以如此配置
好了, 做个记录