一、安装Vue CLI
安装Vue CLI命令为npm install -g @vue/cli,若已安装旧版vue-cli则需要先卸载vue-cli,卸载命令为npm uninstall vue-cli -g 。
二、创建vue工程
我使用的是webstorm,直接新建即可,如下图

或者使用dos命令
cmd命令vue create project-name创建vue工程
 注意:新建的时候,需要等待2分钟左右

1.新建 vue.console.js,在package.json同级目录,代码如下
module.exports = {
    pages: {
        // console: {
        //     // 应用入口配置,相当于单页面应用的main.js,必需项
        //     entry: 'src/modules/console/console.js',
        //
        //     // 应用的模版,相当于单页面应用的public/index.html,可选项,省略时默认与模块名一致
        //     template: 'public/console.html',
        //
        //     // 编译后在dist目录的输出文件名,可选项,省略时默认与模块名一致
        //     filename: 'console.html',
        //
        //     // 标题,可选项,一般情况不使用,通常是在路由切换时设置title
        //     // 需要注意的是使用title属性template 中的 title 标签需要是 <title><%= htmlWebpackPlugin.options.title %></title>
        //     // title: 'console page',
        //
        //     // 包含的模块,可选项
        //     chunks: ['console']
        // },
        // 只有entry属性时,直接用字符串表示模块入口
        console: 'src/modules/console/console.js',
        client: 'src/modules/client/client.js'
        ,index:"src/main.js"
    }
}
在public文件夹下新建 client.html,代码如下
<!DOCTYPE html>
<html lang="en">
<head>
    <meta charset="UTF-8">
    <meta http-equiv="X-UA-Compatible" content="IE=edge">
    <meta name="viewport" content="width=device-width,initial-scale=1.0">
    <title><%= htmlWebpackPlugin.options.title %></title>
</head>
<body>
<div id="client"></div>
</body>
</html>
console.html如此
<!DOCTYPE html>
<html lang="en">
<head>
    <meta charset="UTF-8">
    <meta http-equiv="X-UA-Compatible" content="IE=edge">
    <meta name="viewport" content="width=device-width,initial-scale=1.0">
    <title><%= htmlWebpackPlugin.options.title %></title>
</head>
<body>
    <div id="console"></div>
</body>
</html>
新建文件夹 modules,如下图
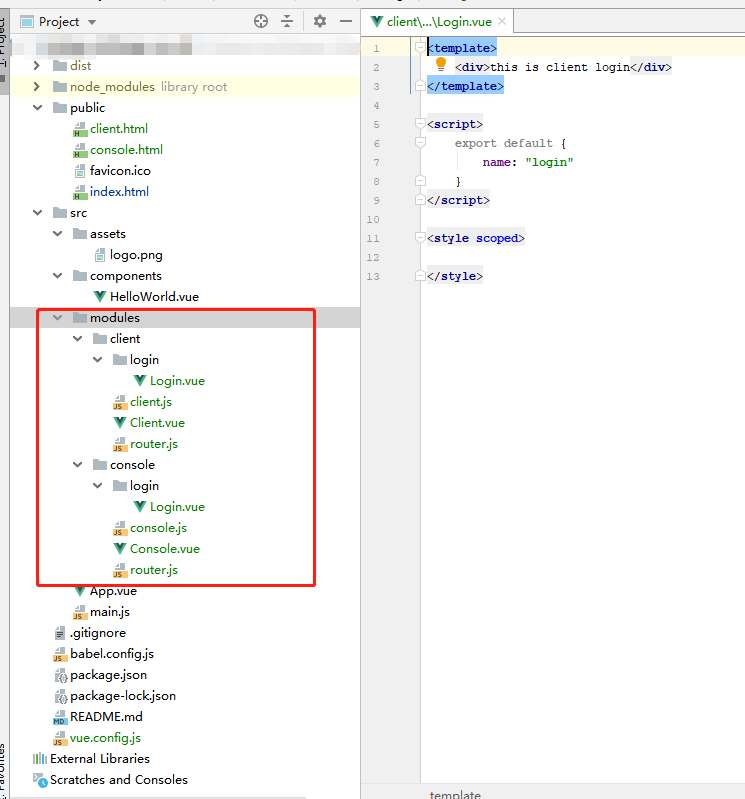
client相关代码
// Login.vue
<template>
<div>this is client login</div>
</template>

<script>
    export default {
        name: "login"
        }
</script>

<style scoped>

</style>

//client.js
import Vue from 'vue'
import Console from './Client.vue'
import router from './router'

Vue.use(require('vue-wechat-title'))

new Vue({
router,
render: h => h(Console)
}).$mount('#client')
//Client.vue
<template>
<div id="client" v-wechat-title="$route.meta.title">
<router-view></router-view>
</div>
</template>

<script>
    export default {
        name: "client"
        }
</script>

<style scoped>

</style>
//router.js
import Vue from 'vue'
import VueRouter from 'vue-router'

Vue.use(VueRouter)

const routes = [
{
path: '/', name: 'login', component: r => {
require(['./login/Login'], r)
}, meta: {title: 'client 登录'}
}
]

export default new VueRouter({
routes: routes
})
console同上
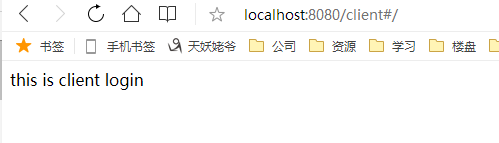
此时运行起来

结束
过程中需要路由和vue-wechat-title ,安装一下就行
资源来源于:https://www.jianshu.com/p/05c1bc5074a9