使用blend自定义symbol
需求:当小区被选中时,用动画的方式显示小区覆盖范围,用tooltip显示覆盖范围数值
说明:在arcgis 的GraphicLayer中绘制时,必须使用symbol定义外观,当外观比较复杂时需要定义symbol的ControlTemplate,如果手工添加会非常繁琐,而且做出来的效果只能通过运行程序查看,使用Blend则可以直观方便的定义ControlTemplate,所以下面我使用Blend编辑一个Controltemplate,然后copy到Symbol.Template标记下。
步骤:
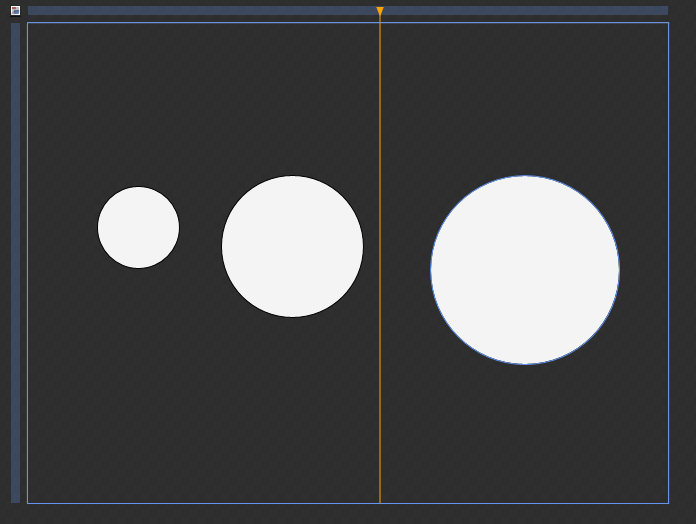
1,在blend中新建一个临时UserControl;
2,添加三个圆形,表示三个不同的覆盖范围;
需求:当小区被选中时,用动画的方式显示小区覆盖范围,用tooltip显示覆盖范围数值
说明:在arcgis 的GraphicLayer中绘制时,必须使用symbol定义外观,当外观比较复杂时需要定义symbol的ControlTemplate,如果手工添加会非常繁琐,而且做出来的效果只能通过运行程序查看,使用Blend则可以直观方便的定义ControlTemplate,所以下面我使用Blend编辑一个Controltemplate,然后copy到Symbol.Template标记下。
步骤:
1,在blend中新建一个临时UserControl;
2,添加三个圆形,表示三个不同的覆盖范围;
(注意这里所有的数值,例如高度和宽度都是静态的,如果需要动态绑定,可以使用{Binding Attribute["xxx"]}来绑定,而包含该Symbol的Graphic需要设置相应的Attributes["xxx"],
例如,<SimpleFillSymbol x:key="simapleFillSymbol">
<SimpleFillSymbol.Template>
<ControlTemplate>
<TextBlock Text="{Binding Attributes["LabelName"]}"/>
</ControlTemplate>
</SimpleFillSymbol.Template>
数据源为:
Graphic g=new Graphic(Gemerty=gemerty,Symbol=RootLayer.Resources["simapleFillSymbol"] as SimpleFillSymbol);
g.Attributes.Add("LabelName","helloworld");
graphicLayer.Graphics.Add(g);
这样就可以动态绑定ControlTemplate的TextBlock。
)
3,组合为同心圆,增加ToolTip
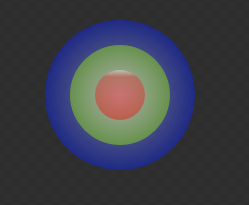
4,增加状态组VisualStateGroup,增加两个状态Selected和Unselected,设置Selected状态下,三个同心圆透明度为43%,Unselected下透明度为0,然后增加过渡动画,设置透明度的渐变动画。这些工作用Blend来做太轻松了。
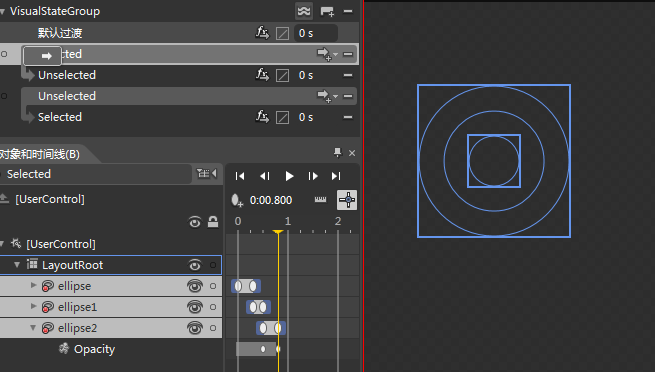
5,将控件中ControlTemplate部分拷贝至Symbol模板定义部分,或者拷贝至单独的资源文件动态加载。
<esri:MarkerSymbol x:Key="fillRangeSymbol">
<esri:MarkerSymbol.ControlTemplate>
<ControlTemplate>
<Grid x:Name="FillGrid"></ControlTemplate>
<VisualStateManager.VisualStateGroups>
<VisualStateGroup x:Name="VisualStateGroup">
<VisualStateGroup.Transitions>
<VisualTransition From="Unselected" GeneratedDuration="0" To="Selected"/>
<VisualTransition From="Selected" GeneratedDuration="0" To="Unselected"/>
</VisualStateGroup.Transitions>
<VisualState x:Name="Selected">
<Storyboard>
<DoubleAnimationUsingKeyFrames Storyboard.TargetProperty="(UIElement.Opacity)" Storyboard.TargetName="ellipse">
<EasingDoubleKeyFrame KeyTime="0" Value="0.43"/>
<EasingDoubleKeyFrame KeyTime="0:0:0.3" Value="0"/>
</DoubleAnimationUsingKeyFrames>
<DoubleAnimationUsingKeyFrames Storyboard.TargetProperty="(UIElement.Opacity)" Storyboard.TargetName="ellipse1">
<EasingDoubleKeyFrame KeyTime="0:0:0.3" Value="0.43"/>
<EasingDoubleKeyFrame KeyTime="0:0:0.5" Value="0"/>
</DoubleAnimationUsingKeyFrames>
<DoubleAnimationUsingKeyFrames Storyboard.TargetProperty="(UIElement.Opacity)" Storyboard.TargetName="ellipse2">
<EasingDoubleKeyFrame KeyTime="0:0:0.5" Value="0.43"/>
<EasingDoubleKeyFrame KeyTime="0:0:0.8" Value="0"/>
</DoubleAnimationUsingKeyFrames>
</Storyboard>
</VisualState>
<VisualState x:Name="Unselected">
<Storyboard>
<DoubleAnimationUsingKeyFrames Storyboard.TargetProperty="(UIElement.Opacity)" Storyboard.TargetName="ellipse">
<EasingDoubleKeyFrame KeyTime="0" Value="0"/>
<EasingDoubleKeyFrame KeyTime="0:0:0.7" Value="0.43"/>
</DoubleAnimationUsingKeyFrames>
<DoubleAnimationUsingKeyFrames Storyboard.TargetProperty="(UIElement.Opacity)" Storyboard.TargetName="ellipse1">
<EasingDoubleKeyFrame KeyTime="0" Value="0"/>
<EasingDoubleKeyFrame KeyTime="0:0:0.5" Value="0.43"/>
</DoubleAnimationUsingKeyFrames>
<DoubleAnimationUsingKeyFrames Storyboard.TargetProperty="(UIElement.Opacity)" Storyboard.TargetName="ellipse2">
<EasingDoubleKeyFrame KeyTime="0" Value="0"/>
<EasingDoubleKeyFrame KeyTime="0:0:0.2" Value="0.43"/>
</DoubleAnimationUsingKeyFrames>
</Storyboard>
</VisualState>
</VisualStateGroup>
</VisualStateManager.VisualStateGroups>
<Ellipse x:Name="ellipse" Margin="0" Stroke="Black" Width="150" Height="150" HorizontalAlignment="Center" VerticalAlignment="Center" Opacity="0.43" StrokeThickness="0">
<Ellipse.Fill>
<RadialGradientBrush>
<GradientStop Color="#FFF9F7F7" Offset="0"/>
<GradientStop Color="#FF0A24F9" Offset="1"/>
</RadialGradientBrush>
</Ellipse.Fill>
</Ellipse>
<Ellipse x:Name="ellipse1" HorizontalAlignment="Center" Margin="0" Stroke="Black" Width="100" Height="100" VerticalAlignment="Center" Opacity="0.43" StrokeThickness="0">
<Ellipse.Fill>
<RadialGradientBrush>
<GradientStop Color="#FFF7F3F3" Offset="0"/>
<GradientStop Color="#FF9DF706" Offset="1"/>
</RadialGradientBrush>
</Ellipse.Fill>
</Ellipse>
<Ellipse x:Name="ellipse2" HorizontalAlignment="Center" Margin="0" Stroke="Black" Width="50" VerticalAlignment="Center" Height="50" Opacity="0.43" StrokeThickness="0">
<Ellipse.Fill>
<LinearGradientBrush EndPoint="0.5,1" StartPoint="0.5,0">
<GradientStop Color="#FFF9F5F5" Offset="0"/>
<GradientStop Color="#FFF30C0C" Offset="1"/>
<GradientStop Color="#FFDC3434" Offset="0.134"/>
</LinearGradientBrush>
</Ellipse.Fill>
</Ellipse>
</Grid>
</esri:MarkerSymbol.ControlTemplate>
</esri:MarkerSymbol>