在一篇随笔中,我们已经尝试了在不依赖工具的情况下设置docker的ip,连我都想吐槽,MD单机都这么麻烦,在多机的环境中岂不是要了我的小命!
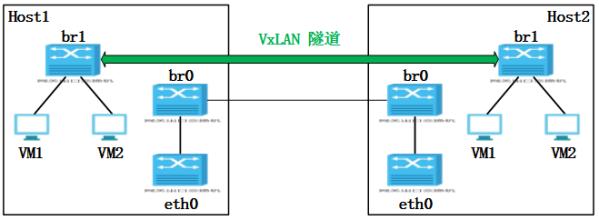
本文就是为了多机环境中各个节点的容器通信而做的,网络拓朴如下,这里用到了openvswitch工具。

openvswitch为我们建立一个扩展到三层网络的网桥,我们知道vlan是不能跨子网的,openvswitch利用了隧道技术,将二层的报文用三层的协议(udp/sdn)重新封装,从而实现二层网络在三层中进行扩展:如下图:
openvswitch是一个比较直观的解决方案,它暴露了足够多的细节给我们,生产环境中定位问题也是比较方便的。
openvswitch的安装
首先在centos7上安装openvswitch(很可惜yum源中并没有编译好的rpm,但debian是有的),我们编译的时候生成rpm而不是利用make install的方式,因为openvswitch的启动是比较麻烦的(可以读一下INSTALL.md),生成rpm然后安装rpm的方式在系统中添加了启动和停止服务,使用起来很方便。
下面是安装过程,基本是INSTALL.md的翻译,但INSTALL.md写得有点冗长,有细节问题会对我们的编译过程造成一些干扰。
1、下载openvswitch的源码,下载release版本的openvswitch源码可以减少很多麻烦。
wget http://openvswitch.org/releases/openvswitch-2.5.0.tar.gz
2、建立rpmbuild结构(这里其实只需要建立$HOME/rpmbuild/SOURCES目录即可,其它的目录可以在rpmbuild执行过程生成的)
cp openvswitch-2.5.0.tar.gz $HOME/rpmbuild/SOURCES
3、安装编译所需要的依赖包:
   yum install gcc make python-devel openssl-devel kernel-devel graphviz
       kernel-debug-devel autoconf automake rpm-build redhat-rpm-config
       libtool
4、检查内核开发kernel-devel源码的位置是否正确:
ls /lib/modules/$(uname -r) -ln

从上图可以看出,build是一个无效的称号链接,删除这个链接,重新链接到正确目录:
rm /lib/modules/$(uname -r)/build
ln -s /usr/src/kernels/3.10.0-327.13.1.el7.x86_64 /lib/modules/$(uname -r)/build
5、在任意目录下解压开源码,进入源码目录:
tar -zxvf openvswitch-2.5.0.tar.gz
cd openvswitch-2.3.2
6、执行rpmbuild生成rpm安装包:
rpmbuild -bb --without check rhel/openvswitch.spec
--without check表明不运行测试。
另外我们可以不需要编译内核模块,这样子,报文会发到用户空间由程序去处理,这样子效率会有所下降,但对内核动手毕竟是一件比较危险又麻烦的事。SO。。。
7、最后安装我生成的rpm包:
yum localinstall $HOME/rpmbuild/RPMS/openvswitch-2.5.0-1.x86_64.rpm
建立vxlan拓朴
下面利用openvswitch建立我们所需要的vxlan网络拓朴:
1、在192.168.1.102执行:
# 有错误则停止执行
set -e
# 创建一个openvswitch bridge
ovs-vsctl add-br ovs-br0
# 添加一个到192.168.1.108的接口
ovs-vsctl add-port ovs-br0 vxlan-port-to-192.168.1.108 -- set  interface vxlan-port-to-192.168.1.108 type=vxlan option:remote_ip="192.168.1.108"

# 创建一对虚拟网卡veth
ip link add vethx type veth peer name vethContainer

# sleep 3 seconds to wait for the completion of previous work.
sleep 3

# 将vethx接入到ovs-br0中
ovs-vsctl add-port ovs-br0 vethx
ifconfig vethx up

# 启动docker容器,使用--net=none策略
export containerID=$(docker run -tid --net=none ubuntu:latest /bin/bash)
export pid=$(docker inspect -f "{{.State.Pid}}" ${containerID})

echo containerID=${containerID}
echo pid=${pid}

# 如果net namespace目录没有创建则新建一个
if [ ! -d "/var/run/netns" ]; then
  mkdir -p /var/run/netns
fi

# 将docker容器使用的net namespace 打回原形
ln -s /proc/${pid}/ns/net /var/run/netns/${pid}
ip netns list

# 将vethContainer加入到容器的net namespace中
ip link set vethContainer netns ${pid}

# 配置vethContainer接口
ip netns exec ${pid} ifconfig vethContainer 192.168.100.100/24 up
ip netns exec ${pid} ifconfig -a
2、同样在192.168.1.108上执行:
# 有错误则停止执行
set -e
# 创建一个openvswitch bridge
ovs-vsctl add-br ovs-br0
# 添加一个到192.168.1.102的接口
ovs-vsctl add-port ovs-br0 vxlan-port-to-192.168.1.102 -- set  interface vxlan-port-to-192.168.1.102 type=vxlan option:remote_ip="192.168.1.102"

# 创建一对虚拟网卡veth
ip link add vethx type veth peer name vethContainer

# sleep 3 seconds to wait for the completion of previous work.
sleep 3

# 将vethx接入到ovs-br0中
ovs-vsctl add-port ovs-br0 vethx
ifconfig vethx up

# 启动docker容器,使用--net=none策略
export containerID=$(docker run -tid --net=none ubuntu:latest /bin/bash)
export pid=$(docker inspect -f "{{.State.Pid}}" ${containerID})

echo containerID=${containerID}
echo pid=${pid}

# 如果net namespace目录没有创建则新建一个
if [ ! -d "/var/run/netns" ]; then
  mkdir -p /var/run/netns
fi

# 将docker容器使用的net namespace 打回原形
ln -s /proc/${pid}/ns/net /var/run/netns/${pid}
ip netns list

# 将vethContainer加入到容器的net namespace中
ip link set vethContainer netns ${pid}

# 配置vethContainer接口
ip netns exec ${pid} ifconfig vethContainer 192.168.100.101/24 up
ip netns exec ${pid} ifconfig -a
测试:
192.168.1.102上的容器:

192.168.1.108上的容器:
