How to Set Up a NFS Server on Debian 10 Buster
- Nick Congleton
- Debian
- 24 May 2019
There are plenty of reasons why you'd want to share files across computers on your network, and Debian makes a perfect file server, whether you're running it from a workstation, dedicated server, or even a Raspberry Pi. Since NFS functionality comes from the kernel, everything is fairly simple to set up and well integrated.
In this tutorial you will learn:- How to Install the NFS Packages
- How to Configure Your Shares
- How to Connect to a Share

Software Requirements and Conventions Used
| Category | Requirements, Conventions or Software Version Used |
|---|---|
| System | Debian 10 Buster |
| Software | NFS Server |
| Other | Privileged access to your Linux system as root or via the sudo command. |
| Conventions | # - requires given linux commands to be executed with root privileges either directly as a root user or by use of sudo command$ - requires given linux commands to be executed as a regular non-privileged user |
Install the NFS Packages

NFS is super simple to install on Debian. It's connected to the kernel, and it's a common package. You can install everything you need from the main repositories.
$ sudo apt install nfs-kernel-server
Subscribe to Linux Career NEWSLETTER and receive latest Linux news, jobs, career advice and tutorials.
Configure Your Shares
Start by creating a directory that you want to share or choosing an existing one. Make sure that the directory that you choose doesn't have root-only permissions.
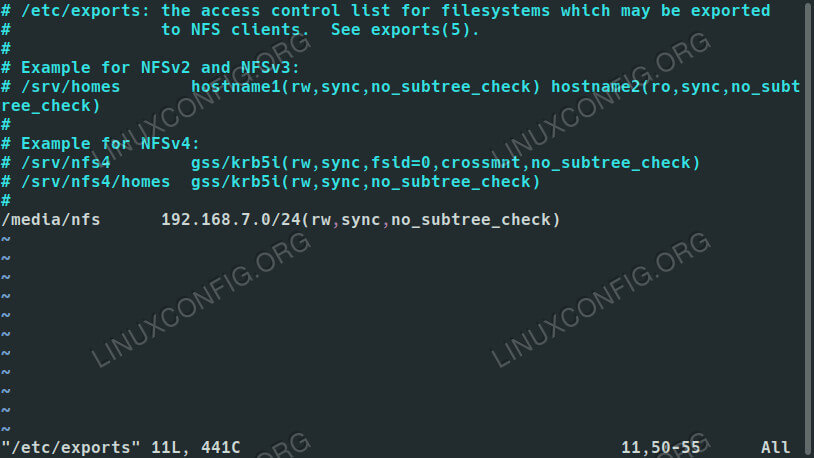
Next, open up /etc/exports with your favorite text editor. This is the file that you'll use to set up your shares. Here, you can configure which directories you're sharing and who can access them. You can also set specific permissions for the shares to further limit access.
In the file, each share gets its own line. That line begins with the location of the share on the server machine. Across from that, you can list the hostname of an accepted client, if is available in the server's hosts file, or an IP or range of IPs. Directly behind the IP address, place the rules for the share in a set of parenthesis. Altogether, it should look something like this:
/media/nfs 192.168.1.0/24(rw,sync,no_subtree_check)
You can include as many shares as you like, provided each has its own line. You can also include more than one hostname or IP in each line and assign them different permissions. For example:
/media/nfs 192.168.1.112(rw,sync,no_subtree_check) 192.168.1.121(ro,sync,no_subtree_check)
In that instance, each of those machines could view and read from the share, but only the computer at 192.168.1.112 could write to it.
There are plenty more options that you can choose from to configure how the server handles you share for each guest. Here is a complete breakdown of what's available:
- ro: specifies that the directory may only be mounted as read only
- rw: grants both read and write permissions on the directory
- no_root_squash: is an extremely dangerous option that allows remote “root” users the same privilege as the “root” user of the host machine
- subtree_check: specifies that, in the case of a directory is exported instead of an entire filesystem, the host should verify the location of files and directories on the host filesystem
- no_subtree_check: specifies that the host should not check the location of the files being accessed withing the host filesystem
- sync: this just ensures that the host keeps any changes uploaded to the shared directory in sync
- async: ignores synchronization checks in favor of increased speed
Once you have everything set up the way you want, save and exit the file. Then, restart the server to load your new exports configuration.
$ sudo systemctl restart nfs-kernel-server
Connect to a Share
Your share is now accessible from the client machines that you configured in your exports. Assuming that your clients are Ubuntu or Debian based, you can install the required package to connect with:
$ sudo apt install nfs-common

With that, you'll be able to mount the NFS shares. So, to try it out, pick a directory to mount to, and run the mount command as root privileges to mount the networked share.
$ sudo mount -t nfs4 192.168.1.110:/media/nfs /media/share
Provided the mount succeeded, you'll be able to access your shared files in the directory where you mounted them.
For a more permanent solution, you can add the share to your client's /etc/fstab file. The overall syntax looks a lot like the command that you just used to mount your share. Start with the location of the share on your network. Follow that with where the share is to be mounted. The filesystem type here is nfs4. The options are up to you, but using the defaults and allowing user access are pretty common for non-sensitive shares. The end result should look a bit like the example below.
192.168.1.110:/media/nfs /media/share nfs4 defaults,user,exec 0 0
If you aren't certain if the share will always be available on the client, add noauto to the list of options to prevent your system from trying to mount it automatically.
192.168.1.110:/media/nfs /media/share nfs4 defaults,user,exec,noauto 0 0
Try mounting it on the client using /etc/fstab.
$ sudo mount -a
Your share should be mounted exactly where you specified.
Conclusion
Your Debian server is now ready to start serving files, and you shouldn't have any trouble setting up the rest of your client machines. Remember that NFS doesn't have much in the way of security, so you're going to need other methods to restrict access to your files, should you choose to share anything more sensitive.