1.tf.train.batch(image, batch_size=batch_size, num_threads=1) # 获取一个batch的数据
参数说明:image表示输入图片,batch_size表示一个batch的大小,num_threads表示使用几个线程进行执行
import tensorflow as tf
import numpy as np
def generate_data():

    num = 25
    label = np.asarray(range(0, num))
    image = np.random.random([num, 1, 1, 1])

    return label, image

def get_batch_data():

    labels, images = generate_data()
    images = tf.cast(images, 'float32')
    labels = tf.cast(labels, 'int32')
    input_queue = tf.train.slice_input_producer([images, labels], shuffle=False)
    image_batch, label_batch = tf.train.batch(input_queue, batch_size=10, num_threads=1, capacity=64)

    return image_batch, label_batch

image_batch, label_batch = get_batch_data()
with tf.Session() as sess:
    coord = tf.train.Coordinator()
    threads = tf.train.start_queue_runners(sess=sess, coord=coord)
    i = 0
    for i in range(10):
        image_batch_v, label_batch_v = sess.run([image_batch, label_batch])
        print(image_batch_v, label_batch_v)

    coord.request_stop()
    coord.join(threads)
    sess.close()
实例说明
2.tf.image.resize_image_with_crop_or_pad(image, IMAGE_SIZE, IMAGE_SIZE) # 表示对图片进行压缩,即变化维度, 相当于tf.resize(操作)
参数说明:image表示输入图片,IMAGE_SIZE表示变化后的维度
3.tf.train.per_image_standardization(image) 对图片进行标准化操作
参数说明:image表示输入的图片
4.tf.train.string_input_producer(filenames) # 将字符串放入到队列中
参数说明:filename表示输入的字符串集合
5. tf.TFRecordReader() # 构建tfr读取器,使用.read() 对文件进行读取
6. tf.parse_single_example(serialized_exmaple, features={}) 解析example数据字符串
7.tf.train.start_queue_runner(coord=coord, sess=sess) 用来启动线程,进行多线程操作
参数说明:coord表示线程协调器,sess执行函数支持多线程
8.tf.train.Coordinator() 用于建立线程协调器, coord.join(threads) 将多线程放入到线程协调器中
数据说明:使用的数据是Tfrecord数据集,一共3670个数据,每次迭代选取16张图片,输出的结果类别数是5
文中的代码主要是分为两个部分:
第一部分构造flower_input, 读取batch_image, batch_label
第二部分:构造image_tensor_input和label_tensor_input, 输入到构造的flower_inference模型中进行训练,输出结果为softmax概率值,构造loss和train_op,sess.run进行模型的训练操作
第一部分:
第一步:构造flower_input函数,输入为if_random, if_train
第二步:根据是否训练,使用[os.path.join(path_data + ''%i) for i in range(0, 2)] 来获得文件的路径filenames
第三步:使用tf.train.string_input_producer(filenames) , # 输出字符变成一个输入队列中
第四步:将filename_queue输入到read_and_decode(filename_queue) 输出image_object实例化对象,包含image, label, filename等属性
第一步:使用tf.TFRecordReader() 构造reader的读写器
第二步:使用_, serialized_example = reader.read(filenames) 获得存储好的example
第三步:使用tf.parse_single_example(features={}) 获得属性值
第四步:实例化_image_object(), 用于储存image,label, filename,width和height
第五步:使用image_raw = tf.image.decode_jpeg(feature[image/encoded]) # 对图片进行解码操作
第六步:使用tf.image.resize_image_with_crop_or_pad(image_raw) 对图像进行维度的压缩变换
第七步:将其他属性label,filename, height,width,使用image_object.label = features['image/labels'] 进行添加, 返回image_object
第五步:使用image_object.image 获得image, 使用tf.train.per_image_standardization对image进行标准化操作
第六步:使用image_object.label获得label属性
第七步:使用image_object.filename获得filename属性
第八步:判断是否是随机的batch,如果是随机的使用tf.train.shuffle_batch,如果不是随机的batch,使用tf.train.batch([image, label, filename]) 获得随机的batch,返回image_batch, label_batch, filename_batch
第二部分:第一部分,获得了一个batch的数据, 第二部分,建立网络模型
第一步:使用tf.placeholder()构建image_tensor_input, 同时对image_batch_out 进行维度的变化,确认其维度为[BATCH_SIZE, 224, 224, 3]
第二步:使用tf.placeholder()构建label_tensor_input,同时构造label_offset = -tf.ones([batch_size]) ,然后使用tf.add(label_batch_out, label_offset) 将标签值从1变为0。
第三步:构造flower_inference(image_tensor_input)获得logits_batch_out, 对logists_batch 进行维度变化,确认其维度为[BATCH_SIZE, 5]
flower_inference是用于构造卷积的模型,网络的结构是卷积层5层,全连接层4层,输出层为[BATCH_SIZE, 5], 结果使用tf.nn.softmax()
第四步: 使用tf.nn.softmax_entropy_logits(logits=logits_out, labels=tf.one_hots(label_tensor_input, depth=5)) 构造loss损失函数
第五步:使用tf.train.GradientDescentOptimizer().minimize(loss) 构造train_op,降低损失值
第六步:使用with tf.Session() as sess 构造sess执行函数
第七步:使用sess.run, 进行变量的初始化操作
第八步:使用tf.train.Coordinator() 构造coord通道,使用tf.train.start_queue_runners(coord=coord, sess=sess) 构造threads多线程
第九步:进行循环,使用sess.run([image_batch, label_batch]) 获得实际的image_batch 和 label_batch
第十步:使用sess.run([train_op, logits_out, loss]) 进行训练操作
第十一步:coord.request_stop() 将coord进行关闭
第十二步:coord.join(threads) 将多线程添加到通道数,sess.close() 关闭sess
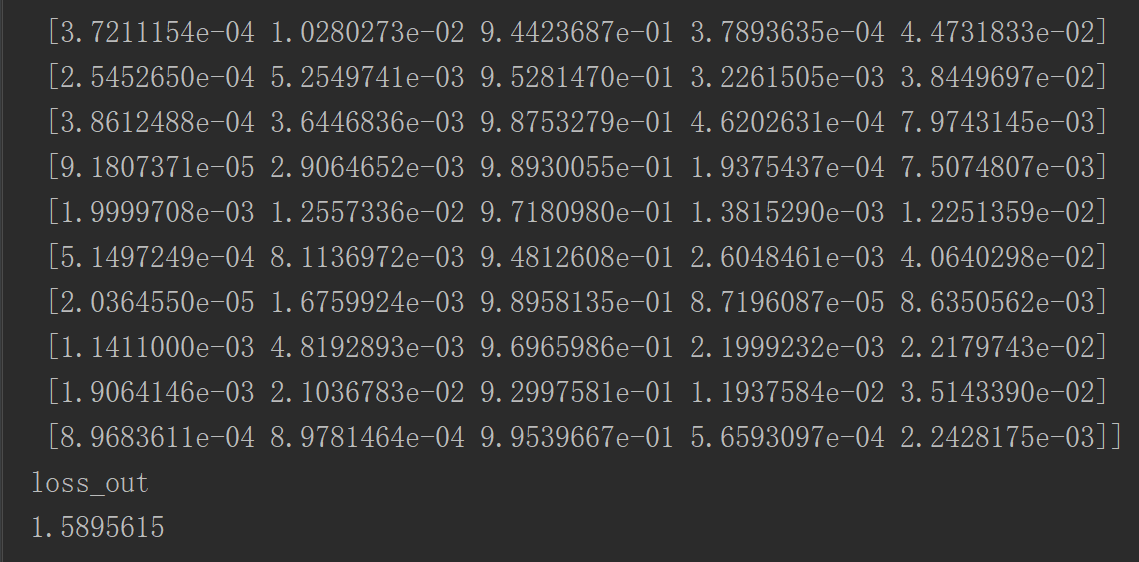
import tensorflow as tf
import numpy as np
import os

data_path = './data/'
TRAINING_SET_SIZE = 3670
BATCH_SIZE = 16
IMAGE_SIZE = 224

def create_Weight(shape):

    return tf.Variable(tf.truncated_normal(shape=shape, stddev=0.05))

def creat_biases(shape):

    return tf.Variable(tf.constant(0.1, shape=shape))

def conv2d(x, w):

    return tf.nn.conv2d(x, w, strides=[1, 1, 1, 1], padding='SAME')

def maxpool(x):

    return tf.nn.max_pool(x, ksize=[1, 2, 2, 1], strides=[1, 2, 2, 1], padding='SAME')

def flower_inference(image_tensor_input):

    # 确认输入的图片的维度为[batchsize, 224, 224, 5]
    x_image = tf.reshape(image_tensor_input, [BATCH_SIZE, IMAGE_SIZE, IMAGE_SIZE, 3])
    # 创建第一层卷积的w
    w_conv1 = create_Weight([5, 5, 3, 32])
    # 第一层卷积的b
    b_conv1 = creat_biases([32])
    # 进行卷积和激活操作
    h_conv1 = tf.nn.relu(conv2d(x_image, w_conv1) + b_conv1)
    # 进行池化操作
    h_pool1 = maxpool(h_conv1)
    # 第二层卷积的w
    w_conv2 = create_Weight([5, 5, 32, 64])
    # 第二层卷积的b
    b_conv2 = creat_biases([64])
    # 卷积和激活操作
    h_conv2 = tf.nn.relu(conv2d(h_pool1, w_conv2) + b_conv2)
    # 池化操作
    h_pool2 = maxpool(h_conv2)
    # 第三层卷积的w
    w_conv3 = create_Weight([5, 5, 64, 128])
    # 第三层卷积的b
    b_conv3 = creat_biases([128])
    # 卷积和激活操作
    h_conv3 = tf.nn.relu(conv2d(h_pool2, w_conv3) + b_conv3)
    # 池化操作
    h_pool3 = maxpool(h_conv3)
    # 第四层卷积的w
    w_conv4 = create_Weight([5, 5, 128, 256])
    # 第四层卷积的b
    b_conv4 = creat_biases([256])
    # 进行卷积和激活操作
    h_conv4 = tf.nn.relu(conv2d(h_pool3, w_conv4) + b_conv4)
    # 进行池化操作
    h_pool4 = maxpool(h_conv4)
    # 第五层卷积的w
    w_conv5 = create_Weight([5, 5, 256, 256])
    # 第五层卷积的b
    b_conv5 = creat_biases([256])
    # 进行卷积和激活操作
    h_conv5 = tf.nn.relu(conv2d(h_pool4, w_conv5) + b_conv5)
    # 池化操作
    h_pool5 = maxpool(h_conv5)
    # 将卷积后的结果进行维度的变换,以便后续进行全连接操作
    fcIn = tf.reshape(h_pool5, [-1, 7*7*256])
    # 第一层全连接的w
    w_fc1 = create_Weight([7*7*256, 2048])
    # 第一层全连接的b
    b_fc1 = creat_biases([2048])
    # 点乘和激活操作
    h_fc1 = tf.nn.relu(tf.matmul(fcIn, w_fc1) + b_fc1)
    # dropout操作
    h_fc1_dropout = tf.nn.dropout(h_fc1, 1.0)
    # 第二层全连接的w
    w_fc2 = create_Weight([2048, 256])
    # 第二层全连接的b
    b_fc2 = creat_biases([256])
    # 点乘和激活操作
    h_fc2 = tf.nn.relu(tf.matmul(h_fc1_dropout, w_fc2) + b_fc2)
    # 第三层全连接层
    w_fc3 = create_Weight([256, 64])
    b_fc3 = creat_biases([64])
    h_fc3 = tf.nn.relu(tf.matmul(h_fc2, w_fc3) +b_fc3)
    # 第四层全连接输出层
    w_fc4 = create_Weight([64, 5])
    b_fc4 = creat_biases([5])
    # 对输出的结果使用softmax获得概率值
    y_prob = tf.nn.softmax(tf.matmul(h_fc3, w_fc4) + b_fc4)

    return y_prob


class _image_object:
    # 构造实例化属性
    def __init__(self):
        # 存放图片,高度,宽度,名字和标签属性
        self.image = tf.Variable([], dtype=tf.string)
        self.height = tf.Variable([], dtype=tf.int64)
        self.width = tf.Variable([], dtype=tf.int64)
        self.filename = tf.Variable([], dtype=tf.string)
        self.label = tf.Variable([], dtype=tf.int32)

def read_and_decode(filename_queue):
    # 构造TFR的读写器
    reader = tf.TFRecordReader()
    # 使用reader.read(filename_queue)读出存入的exmaple数据
    _, serialized_exmaple = reader.read(filename_queue)
    # 使用tf.parse_single_example, 获得数据中属性对应的数据
    features = tf.parse_single_example(serialized_exmaple, features={
        'image/encoded':tf.FixedLenFeature([], tf.string),
        'image/height': tf.FixedLenFeature([], tf.int64),
        'image/width': tf.FixedLenFeature([], tf.int64),
        'image/filename': tf.FixedLenFeature([], tf.string),
        'image/class/label': tf.FixedLenFeature([], tf.int64)
    })
    # 获得编码的图片数据
    image_decode = features['image/encoded']
    # 使用tf.image.decode_jpeg 对图片进行解码操作
    image_raw = tf.image.decode_jpeg(image_decode, channels=3)
    # 实例化函数,用于进行数据集合的存储
    image_object = _image_object()
    # 使用tf.image.resize_image_with_crop_or_pad进行维度的变换和压缩,并存储到image.object
    image_object.image = tf.image.resize_image_with_crop_or_pad(image_raw,IMAGE_SIZE, IMAGE_SIZE)
    # 将label属性存储到image_object.label中
    image_object.label = features['image/class/label']
    # 将filename属性存储到image_object.filename中
    image_object.filename = features['image/filename']
    # 将height属性存储到image_object.height中
    image_object.height = features['image/height']
    # 将width属性存储到image_object.width中
    image_object.width = features['image/width']
    # 返回数据集合image_object
    return image_object

# 第一步:创建flower_input,用于进行数据的创建,输入为是否训练和是否获得随机的batch值
def flower_input(if_train=True, if_random=True):
    # 第二步:如果是进行训练,获得训练集的文件地址
    if if_train:
        filenames = [os.path.join(data_path, 'train-0000%d-of-00002.tfrecord'%i) for i in range(0, 2)]
    else:
        filenames = [os.path.join(data_path, 'eval-0000%d-of-00002.tfrecord'%i) for i in range(0, 2)]
    # 判断文件是否存在,如果不存在返回错误提醒
    for f in filenames:
        if not tf.gfile.Exists(f):
            raise ValueError('the file is not exits', f)
    # 第三步:使用tf.train.string_input_producer()将数据输入到队列中
    filename_queue = tf.train.string_input_producer(filenames)
    # 第四步:构造函数获得数据集合
    image_object = read_and_decode(filename_queue)
    # 使用tf.image.per_image_standardization对图片进行标准化
    image = tf.image.per_image_standardization(image_object.image)
    # 获得图片的标签
    label = image_object.label
    # 获得图片的文件名
    filename = image_object.filename
    # 如果是随机获得标签,使用tf.train.shuffle_batch
    if if_random:
        min_fraction_of_example_in_queue = 0.4
        min_queue_examples = int(min_fraction_of_example_in_queue * TRAINING_SET_SIZE)
        num_preprocess_threads = 1
        image_batch, label_batch, filename_batch = tf.train.shuffle_batch(
            [image, label, filename],
            batch_size = BATCH_SIZE,
            num_threads = num_preprocess_threads,
            capacity = min_queue_examples + 3 * BATCH_SIZE,
            min_after_dequeue = min_queue_examples
        )
        # 返回batch的image,label,filename
        return image_batch, label_batch, filename_batch
    else:
        # 如果不是随机获得数据,使用tf.train.batch
        image_batch, label_batch, filename_batch = tf.train.batch(
            [image, label, filename],
            batch_size = BATCH_SIZE,
            num_threads = 1
        )
        #返回batch的image,label,filename
        return image_batch, label_batch, filename_batch


def flower_trian():
    # 第一部分:使用tf.train.batch获得一个batch的数据
    image_batch_out, label_batch_out, filename_batch = flower_input(if_train=True, if_random=False)
    # 第二部分:构造模型,进行模型的训练,使用sess.run()获得上述的实际数据
    # 第一步:使用tf.placeholder初始化输入图像,并对image_batch_out确认维度
    image_tensor_input = tf.placeholder(tf.float32, [BATCH_SIZE, 224, 224, 3])
    image_batch = tf.reshape(image_batch_out, [BATCH_SIZE, IMAGE_SIZE, IMAGE_SIZE, 3])
    # 第二步:使用tf.placeholder初始化标签值,并构造-1的[batch_size]大小,与标签进行加和,使得标签值变成从0开始
    label_tensor_input = tf.placeholder(tf.int64, [BATCH_SIZE])
    label_offset = -tf.ones([BATCH_SIZE], dtype=tf.int64, name='label_offset')
    label_batch = tf.add(label_batch_out, label_offset)
    # 第三步:构造模型,带入image_tensor_input获得5个类别的概率值,维度为[BATCHSIZE, 5]
    logits_batch_out = flower_inference(image_tensor_input)
    logits_batch = tf.reshape(logits_batch_out, [BATCH_SIZE, 5])
    # 第四步:使用tf.nn.sotfmax_cross(logist=logits_batch, labels=tf.one_hot() 进行对标签进行one_hot编码
    loss = tf.reduce_mean(tf.nn.softmax_cross_entropy_with_logits(labels=tf.one_hot(label_tensor_input, depth=5), logits=logits_batch))
    # 第五步:使用tf.train.Gradient降低损失值loss
    train_op = tf.train.GradientDescentOptimizer(0.0001).minimize(loss)

    saver = tf.train.Saver()
    # 第六步:使用tf.Session() 构造sess执行函数
    with tf.Session() as sess:
        # 第七步:对参数进行初始化操作
        sess.run(tf.global_variables_initializer())
        # 第八步:使用tf.train.Coordinator构造通道数
        coord = tf.train.Coordinator()
        # 第九步:使用tf.train.start_queue_runners构造sess的多线程threads
        threads = tf.train.start_queue_runners(coord=coord, sess=sess)

        for i in range(TRAINING_SET_SIZE * 10):
            # 第十步:使用sess.run获得实际的batch的label,image
            image_batch_v, label_batch_v, filename_batch_v = sess.run([image_batch, label_batch, filename_batch])
            # 第十一步:进行实际的train_op, loss, logits的执行
            _, infer_out, loss_out = sess.run([train_op, logits_batch, loss], feed_dict={image_tensor_input:image_batch_v, label_tensor_input:label_batch_v})
            # 打印结果
            if (i % 10 == 0):
                print('infer_out')
                print(infer_out)
                print('loss_out')
                print(loss_out)
        # 第十一步:关闭线程
        coord.request_stop()
        # 第十二步:将线程进行添加,和关闭sess
        coord.join(threads)
        sess.close()


flower_trian()