WebService是一个SOA(面向服务的编程)的架构,它是不依赖于语言,不依赖于平台,可以实现不同的语言间的相互调用,通过Internet进行基于Http协议的网络应用间的交互。 其实WebService并不是什么神秘的东西,它就是一个可以远程调用的类,或者说是组件,把你本地的功能开放出去共别人调用。具体的说,Web Service可以让你的网站使用其他网站的资源,比如在网页上显示天气、地图、twitter上的最新动态等等。
一、为什么用WebService
比如你的项目需要查询某银行账户余额。你能直接查吗,肯定不行,因为数据库是银行的,他不可能给你权限。你想访问他的数据库获取数据,这就需要用到WebService。通过调用银行暴露的接口来得到你想要的数据。
1. 适用场景
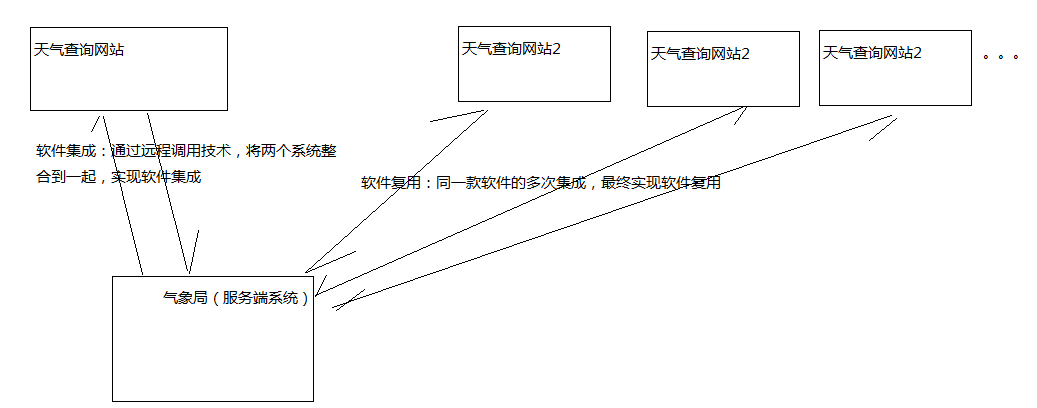
软件的集成和复用,如气象局(服务端系统)、天气查询网站等。
- 发布一个服务(对内/对外),不考虑客户端类型,不考虑性能,建议WebService
- 服务端已经确定使用webservice,客户端不能选择,必须使用WebService
软件集成即通过远程调用技术,将两个系统整合到一起,从而实现软件集成。
软件复用即同一个款软件的多次集成,最终实现复用。

2. 不适用场景
- 考虑性能时不建议使用WebService:采用xml格式封装数据,所以在传输过程中,要传输额外的标签,随着soap协议的不断完善,标签越来越大,导致webservice的性能下降。
- 同构程序下不建议使用webservice,比如java 用RMI,不需要翻译成XML的数据。
二、WebService的原理
在Web Service的体系架构中有三个角色:服务提供者(Service Provider),也叫服务生产者;服务请求者(Service Requester),也叫服务消费者;服务注册中心(Service Register),也叫服务代理,服务提供者在这里发布服务,服务请求者在这里查找服务,获取服务的绑定信息。

角色间主要有三个操作:
- 发布(Publish),服务提供者把服务按照规范格式发布到服务注册中心;
- 查找(Find),服务请求者根据服务注册中心提供的规范接口发出查找请求,获取绑定服务所需的相关信息。
- 绑定(Bind),服务请求者根据服务绑定信息对自己的系统进行配置,从而可以调用服务提供者提供的服务。
Web Service的实现是通过SOAP在Web上提供的软件服务,使用WSDL文件进行说明,并通过UDDI进行注册。
相关概念:
- XML:(Extensible Markup Language)扩展型可标记语言。面向短期的临时数据处理、面向万维网络,是SOAP的基础。
- SOAP:(Simple Object Access Protocol)简单对象存取协议。是XML Web Service 的通信协议。当用户通过UDDI找到你的WSDL描述文档后,他通过可以SOAP调用你建立的Web服务中的一个或多个操作。SOAP是XML文档形式的调用方法的规范,它可以支持不同的底层接口,像HTTP(S)或者SMTP。
- WSDL:(Web Services Description Language) WSDL 文件是一个 XML 文档,用于说明一组 SOAP 消息以及如何交换这些消息。大多数情况下由软件自动生成和使用。
- UDDI (Universal Description, Discovery, and Integration) 是一个主要针对Web服务供应商和使用者的新项目。在用户能够调用Web服务之前,必须确定这个服务内包含哪些商务方法,找到被调用的接口定义,还要在服务端来编制软件,UDDI是一种根据描述文档来引导系统查找相应服务的机制。UDDI利用SOAP消息机制(标准的XML/HTTP)来发布,编辑,浏览以及查找注册信息。它采用XML格式来封装各种不同类型的数据,并且发送到注册中心或者由注册中心来返回需要的数据。
三、Axis2与CXF的区别
目前java开发WebService的框架主要包括Axis2和CXF,如果你需要多语言的支持,你应该选择Axis2。如果你需要把你的实现侧重java并希望和Spring集成,CXF就是更好的选择,特别是把你的WebService嵌入其他的程序中。

四、SpringBoot使用CXF集成WebService
1. 服务端构建
(1) 引入依赖
<!-- 核心启动器 -->
<dependency>
    <groupId>org.springframework.boot</groupId>
    <artifactId>spring-boot-starter</artifactId>
</dependency>

<!-- web启动器 -->
<dependency>
    <groupId>org.springframework.boot</groupId>
    <artifactId>spring-boot-starter-web</artifactId>
</dependency>

<!-- webService-->
<dependency>
    <groupId>org.springframework.boot</groupId>
    <artifactId>spring-boot-starter-web-services</artifactId>
</dependency>

<!-- CXF webservice -->
<dependency>
    <groupId>org.apache.cxf</groupId>
    <artifactId>cxf-spring-boot-starter-jaxws</artifactId>
    <version>3.2.1</version>
</dependency>
<dependency>
    <groupId>org.apache.cxf</groupId>
    <artifactId>cxf-rt-transports-http</artifactId>
    <version>3.2.1</version>
</dependency>
<!-- CXF webservice -->
(2) 接口
@WebService(name = "ServerServiceDemo", targetNamespace = "http://server.webservice.example.com")
public interface ServerServiceDemo {
    @WebMethod
    String emrService(@WebParam String data);

}
(3) 接口实现类
/**
 * WebService涉及到的有这些 "四解三类 ", 即四个注解,三个类
 * @WebMethod
 * @WebService
 * @WebResult
 * @WebParam
 * SpringBus
 * Endpoint
 * EndpointImpl
 *
 * 一般我们都会写一个接口,然后再写一个实现接口的实现类,但是这不是强制性的
 * @WebService 注解表明是一个webservice服务。
 *      name:对外发布的服务名, 对应于<wsdl:portType name="ServerServiceDemo"></wsdl:portType>
 *      targetNamespace:命名空间,一般是接口的包名倒序, 实现类与接口类的这个配置一定要一致这种错误
 *              Exception in thread "main" org.apache.cxf.common.i18n.UncheckedException: No operation was found with the name xxxx
 *              对应于targetNamespace="http://server.webservice.example.com"
 *      endpointInterface:服务接口全路径(如果是没有接口,直接写实现类的,该属性不用配置), 指定做SEI(Service EndPoint Interface)服务端点接口
 *      serviceName:对应于<wsdl:service name="ServerServiceDemoImplService"></wsdl:service>
 *      portName:对应于<wsdl:port binding="tns:ServerServiceDemoImplServiceSoapBinding" name="ServerServiceDemoPort"></wsdl:port>
 *
 * @WebMethod 表示暴露的服务方法, 这里有接口ServerServiceDemo存在,在接口方法已加上@WebMethod, 所以在实现类中不用再加上,否则就要加上
 *      operationName: 接口的方法名
 *      action: 没发现又什么用处
 *      exclude: 默认是false, 用于阻止将某一继承方法公开为web服务
 *
 * @WebResult 表示方法的返回值
 *      name:返回值的名称
 *      partName:
 *      targetNamespace:
 *      header: 默认是false, 是否将参数放到头信息中,用于保护参数,默认在body中
 *
 * @WebParam
 *       name:接口的参数
 *       partName:
 *       targetNamespace:
 *       header: 默认是false, 是否将参数放到头信息中,用于保护参数,默认在body中
 *       model:WebParam.Mode.IN/OUT/INOUT
 */
@Component
@WebService(name = "ServerServiceDemo", targetNamespace = "http://server.webservice.example.com",
        endpointInterface = "com.example.webservice.service.ServerServiceDemo")
public class ServerServiceDemoImpl implements ServerServiceDemo{

    @Override
    public String emrService(@WebParam String data) {
        if(null == data || "".equals(data.trim())){
            return "传入的参数为空";
        }
        return "调用成功";
    }
}
(4) 接口发布类
/**
 * 注意:
 * org.apache.cxf.Bus
 * org.apache.cxf.bus.spring.SpringBus
 * org.apache.cxf.jaxws.EndpointImpl
 * javax.xml.ws.Endpoint
 */
@Configuration
public class WebServiceConfig {

    @Autowired
    private ServerServiceDemo serverServiceDemo;

    /**
     * Apache CXF 核心架构是以BUS为核心,整合其他组件。
     * Bus是CXF的主干, 为共享资源提供一个可配置的场所,作用类似于Spring的ApplicationContext,这些共享资源包括
     * WSDl管理器、绑定工厂等。通过对BUS进行扩展,可以方便地容纳自己的资源,或者替换现有的资源。默认Bus实现基于Spring架构,
     * 通过依赖注入,在运行时将组件串联起来。BusFactory负责Bus的创建。默认的BusFactory是SpringBusFactory,对应于默认
     * 的Bus实现。在构造过程中,SpringBusFactory会搜索META-INF/cxf(包含在 CXF 的jar中)下的所有bean配置文件。
     * 根据这些配置文件构建一个ApplicationContext。开发者也可以提供自己的配置文件来定制Bus。
     */
    @Bean(name = Bus.DEFAULT_BUS_ID)
    public SpringBus springBus() {
        return new SpringBus();
    }

    /**
     * 此方法作用是改变项目中服务名的前缀名,此处127.0.0.1或者localhost不能访问时,请使用ipconfig查看本机ip来访问
     * 此方法被注释后, 即不改变前缀名(默认是services), wsdl访问地址为 http://127.0.0.1:8080/services/ws/api?wsdl
     * 去掉注释后wsdl访问地址为:http://127.0.0.1:8080/soap/ws/api?wsdl
     * http://127.0.0.1:8080/soap/列出服务列表 或 http://127.0.0.1:8080/soap/ws/api?wsdl 查看实际的服务
     * 新建Servlet记得需要在启动类添加注解:@ServletComponentScan
     *
     * 如果启动时出现错误:not loaded because DispatcherServlet Registration found non dispatcher servlet dispatcherServlet
     * 可能是springboot与cfx版本不兼容。
     * 同时在spring boot2.0.6之后的版本与xcf集成,不需要在定义以下方法,直接在application.properties配置文件中添加:
     * cxf.path=/service(默认是services)
     */
    //@Bean
    //public ServletRegistrationBean dispatcherServlet() {
    //    return new ServletRegistrationBean(new CXFServlet(), "/soap/*");
    //}

    @Bean
    public Endpoint endpoint() {
        EndpointImpl endpoint = new EndpointImpl(springBus(), serverServiceDemo);
        endpoint.publish("/ws/api");
        return endpoint;
    }
}
(5) 启动项目
访问地址:http://localhost:8080/services/ 列出在services下的所有服务列表

http://localhost:8080/services/ws/api?wsdl 查看访问具体的服务信息。

标签的重要信息说明可以参考:https://blog.csdn.net/xxssyyyyssxx/article/details/50292787
3. 客户端构建
创建一个新的项目。
(1) 引入依赖
<!-- 核心启动器 -->
<dependency>
    <groupId>org.springframework.boot</groupId>
    <artifactId>spring-boot-starter</artifactId>
</dependency>
<!-- webService-->
<dependency>
    <groupId>org.springframework.boot</groupId>
    <artifactId>spring-boot-starter-web-services</artifactId>
</dependency>

<!-- CXF webservice -->
<dependency>
    <groupId>org.apache.cxf</groupId>
    <artifactId>cxf-spring-boot-starter-jaxws</artifactId>
    <version>3.2.1</version>
</dependency>
<dependency>
    <groupId>org.apache.cxf</groupId>
    <artifactId>cxf-rt-transports-http</artifactId>
    <version>3.2.1</version>
</dependency>
<!-- CXF webservice -->

<!-- 如果使用代理类工厂的方式, 因需要知道服务端发布的接口名,所以这里是需要引入服务端的接口模块。
    服务端一般需要将所有对外接口抽取到单独的一个模块,再再pom.xml进行引入 -->
(2) 调用代码
/**
 * 1.代理类工厂的方式,需要拿到对方的接口地址, 同时需要引入接口
 */
//    public static void invokeService_1(){
//        // 接口地址
//        String address = "http://localhost:8080/services/ws/api?wsdl";
//        // 代理工厂
//        JaxWsProxyFactoryBean jaxWsProxyFactoryBean = new JaxWsProxyFactoryBean();
//        // 设置代理地址
//        jaxWsProxyFactoryBean.setAddress(address);
//        // 设置接口类型
//        jaxWsProxyFactoryBean.setServiceClass(ServerServiceDemo.class);
//        // 创建一个代理接口实现
//        ServerServiceDemo us = (ServerServiceDemo) jaxWsProxyFactoryBean.create();
//        // 数据准备
//        String data = "hello world";
//        // 调用代理接口的方法调用并返回结果
//        String result = us.emrService(data);
//        System.out.println("返回结果:" + result);
//    }

/**
 * 2. 动态调用
 */
public static void invokeService_2(){
    // 创建动态客户端
    JaxWsDynamicClientFactory dcf = JaxWsDynamicClientFactory.newInstance();
    Client client = dcf.createClient("http://localhost:8080/services/ws/api?wsdl");
    // 需要密码的情况需要加上用户名和密码
    // client.getOutInterceptors().add(new ClientLoginInterceptor(USER_NAME, PASS_WORD));
    Object[] objects = new Object[0];
    try {
        // invoke("方法名",参数1,参数2,参数3....);
        //这里注意如果是复杂参数的话,要保证复杂参数可以序列化
        objects = client.invoke("emrService", "hello world");
        System.out.println("返回数据:" + objects[0]);
    } catch (java.lang.Exception e) {
        e.printStackTrace();
    }
}
参考:
https://blog.csdn.net/sujin_/article/details/83865124